Table of Contents
What You Can Do After This Guide
Open the Revenue Automations dashboard → enable a script → open "View workflow" to edit content/audience → (optional) connect a sending channel → perform the trigger action in the CRM screen for the script to run → view execution logs → disable/re-enable.
Preparation
| # | Condition | Why It's Needed |
|---|---|---|
| 1 | Log in to a workspace you have write permissions for. | To enable scripts and create trigger data. |
| 2 | (Optional) A connected sending channel (Messaging → Channels) + parameters (email account, segment ID). | To ensure the email/SMS/ad sending step runs completely. Without it, the script will still run, but the sending step will report an expected error. |
Step 1 — Open the Revenue Automations Dashboard
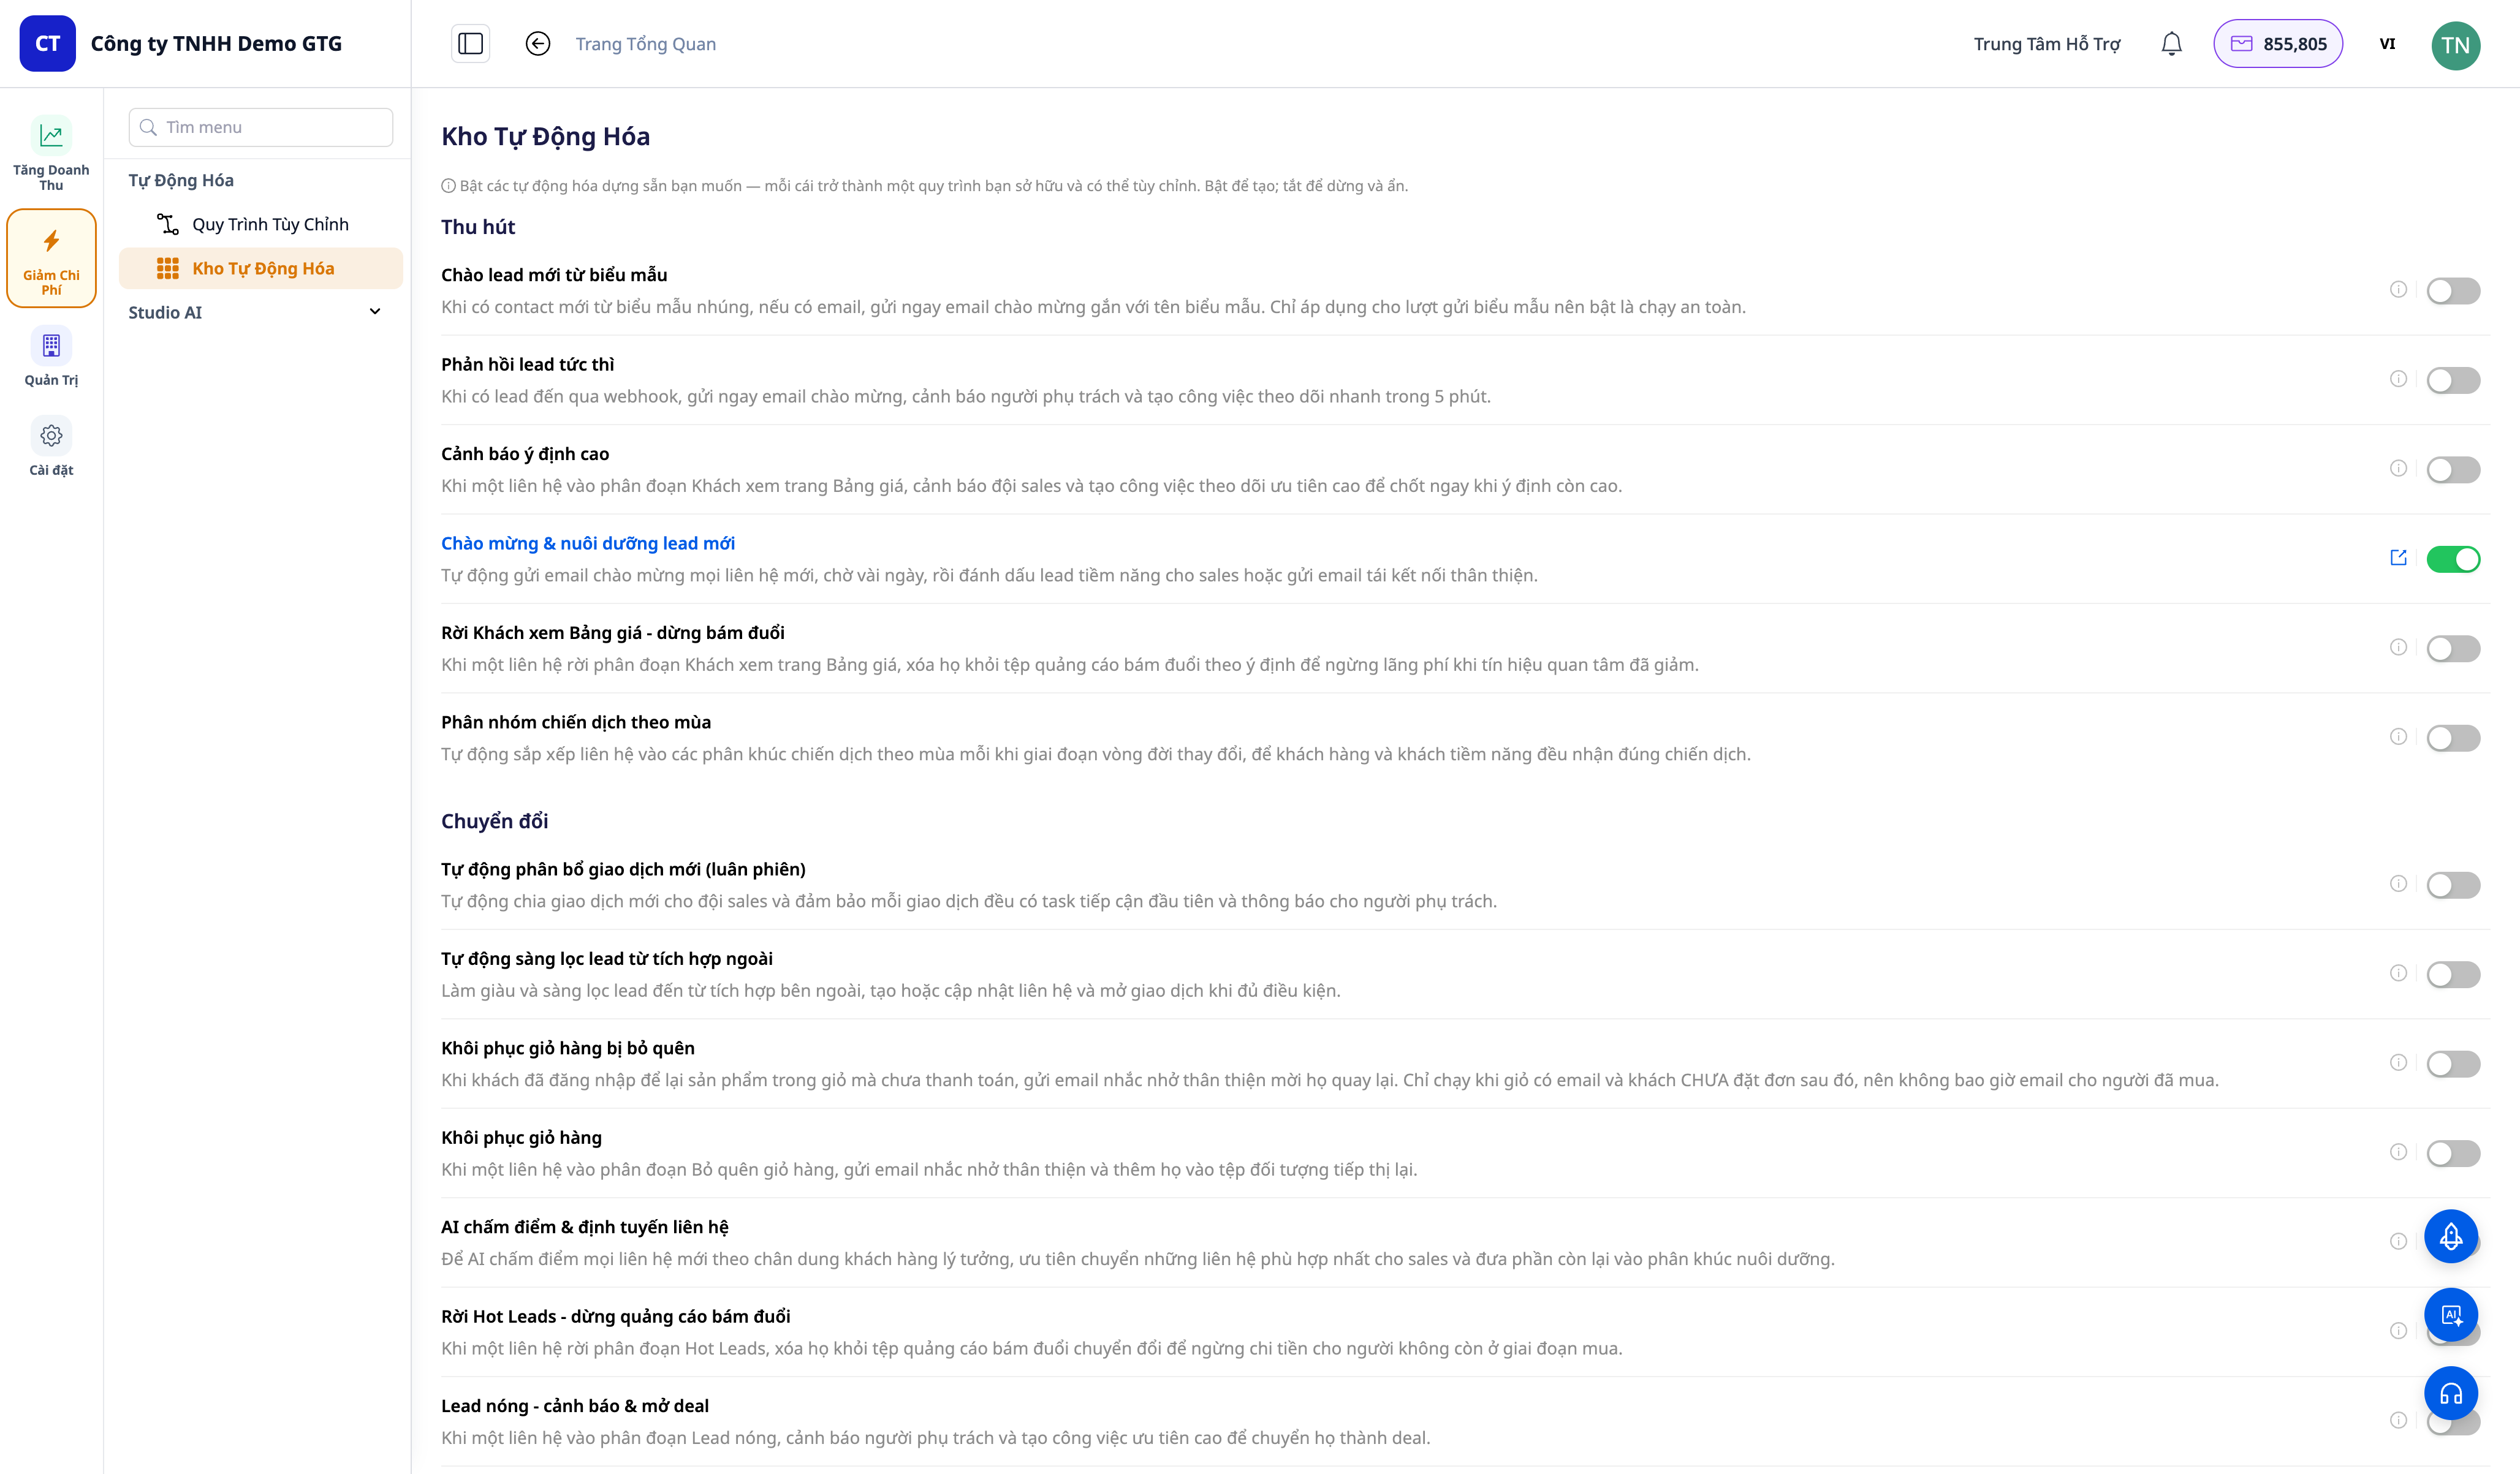
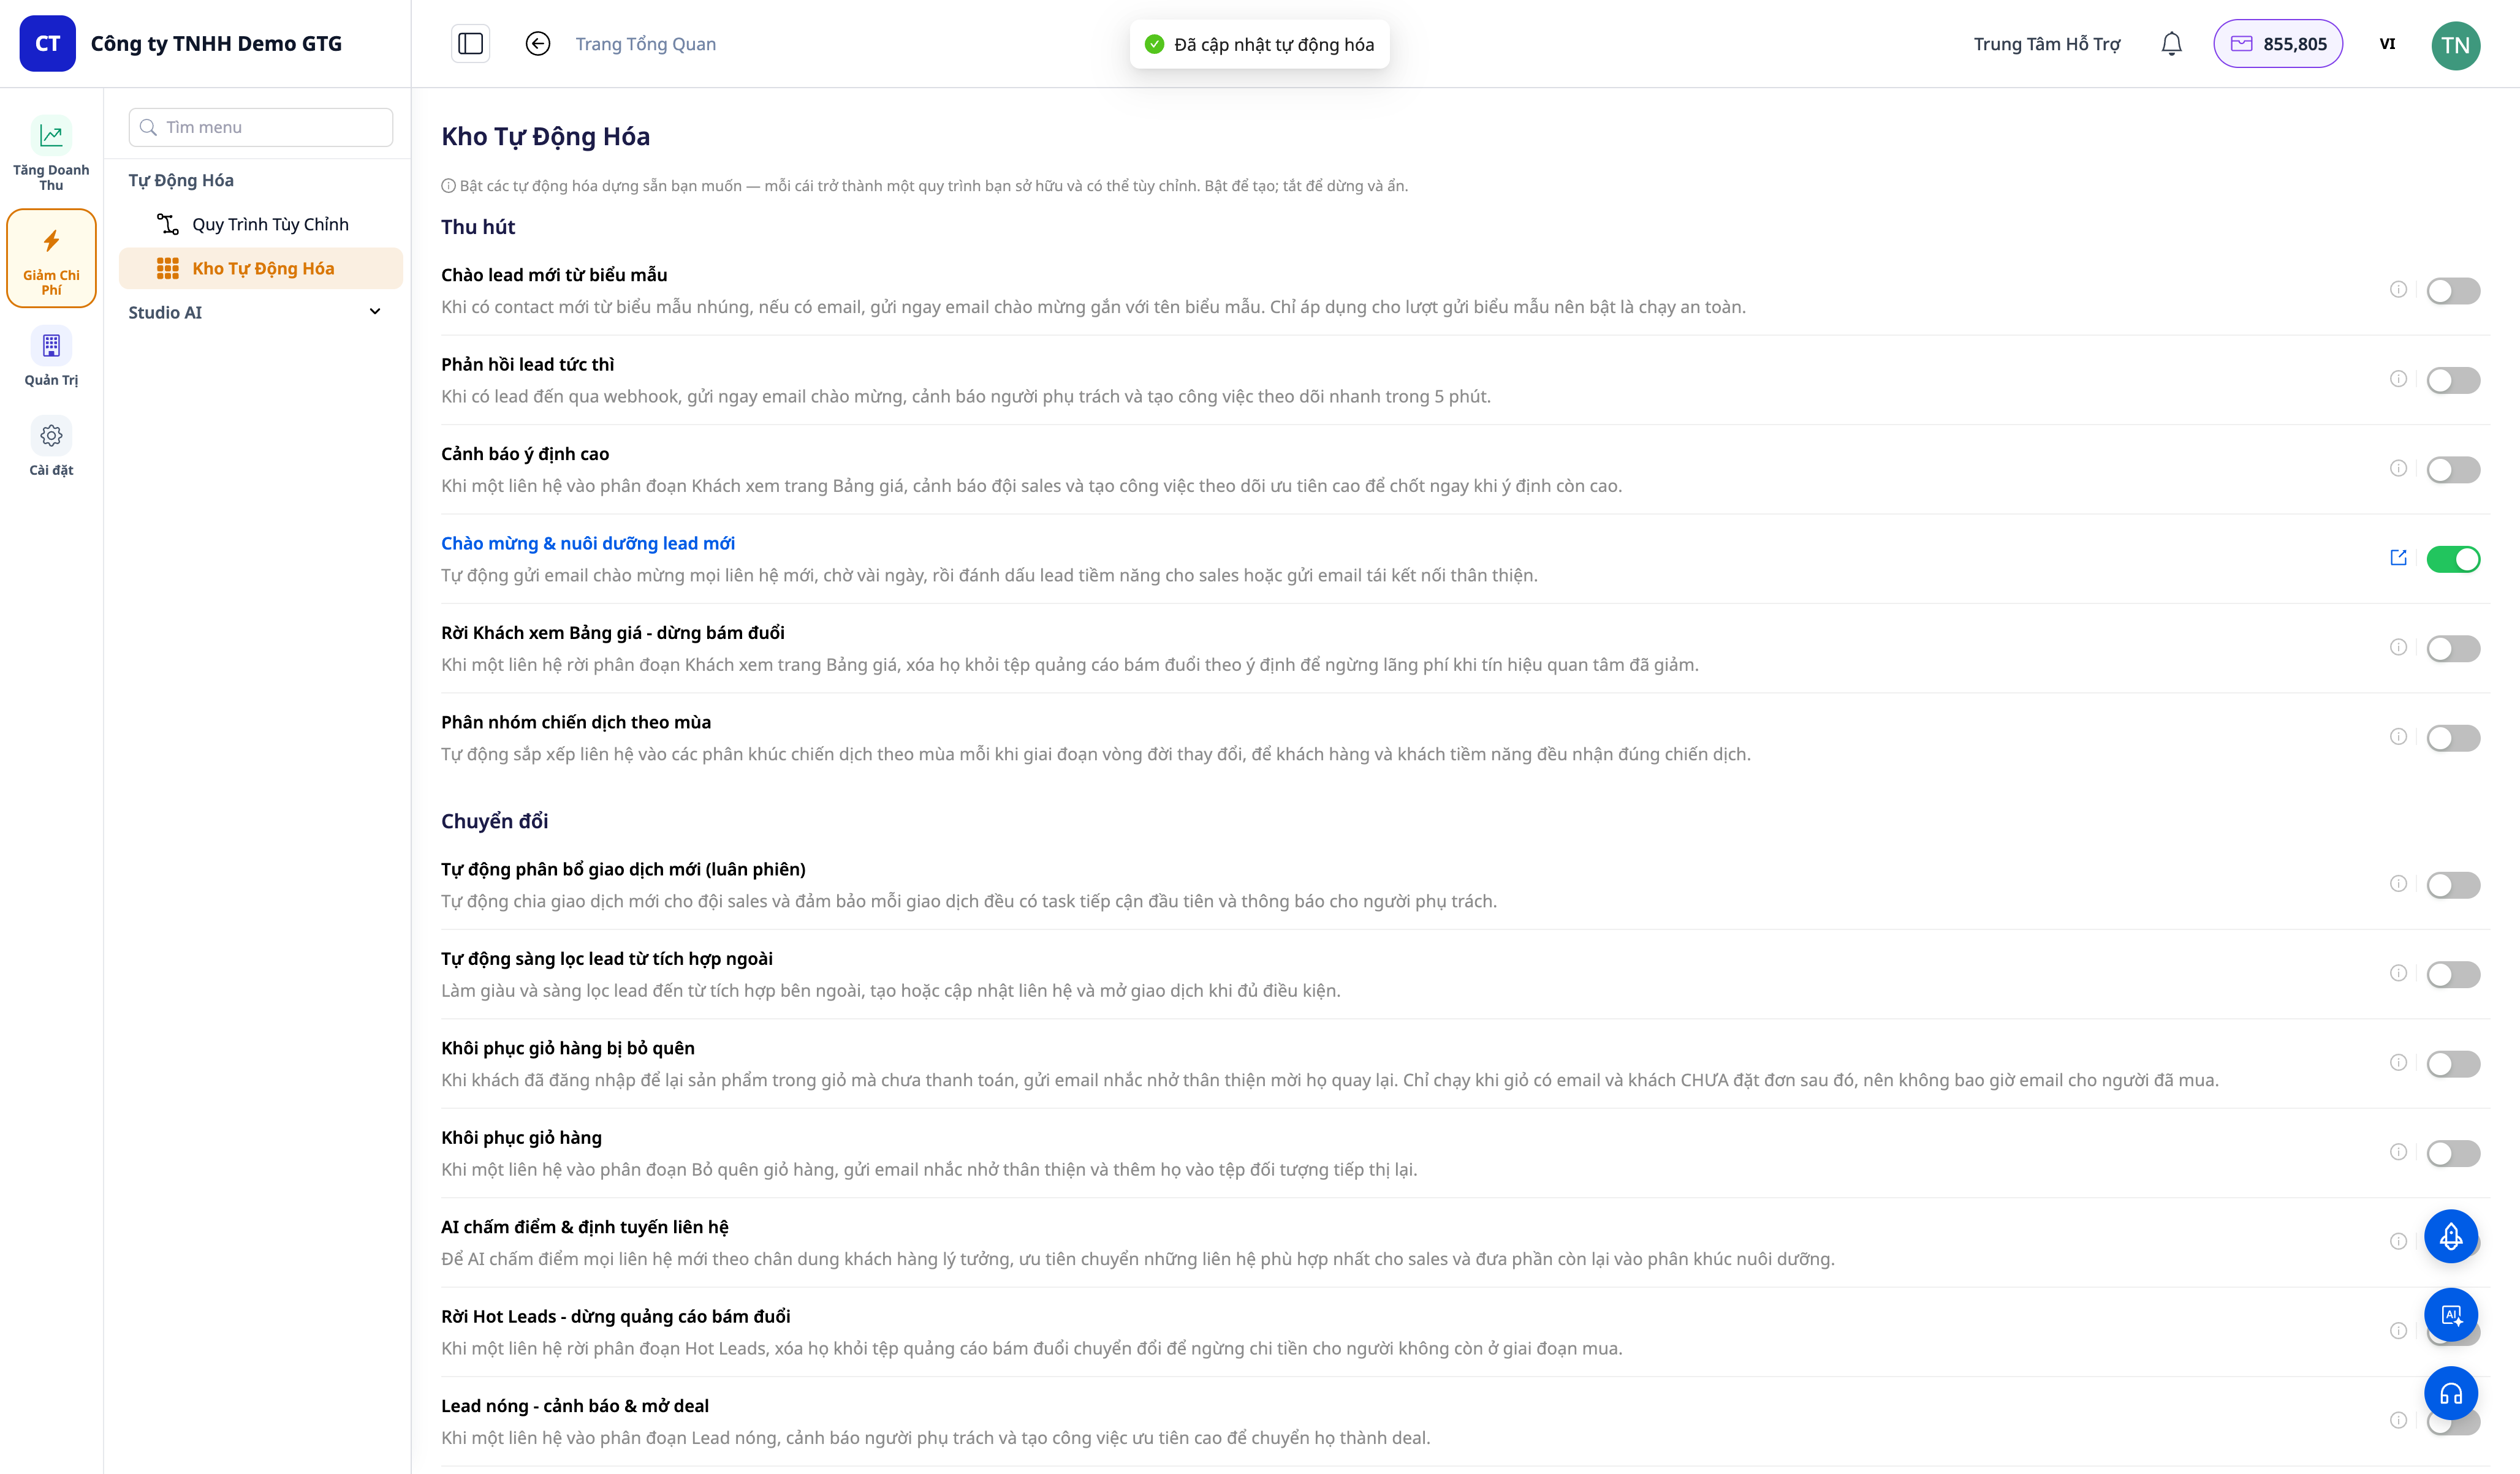
- On the left navigation bar, open Increase Revenue → Automation → Automation Catalog.
✅ Expected Result: A list of scripts grouped by funnel stage (Acquire · Convert · Close · Retain · Expand · Win-back). Each row: an understandable name + description + on/off toggle — over 30 scripts, grouped by funnel.
Step 2 — Enable a Script
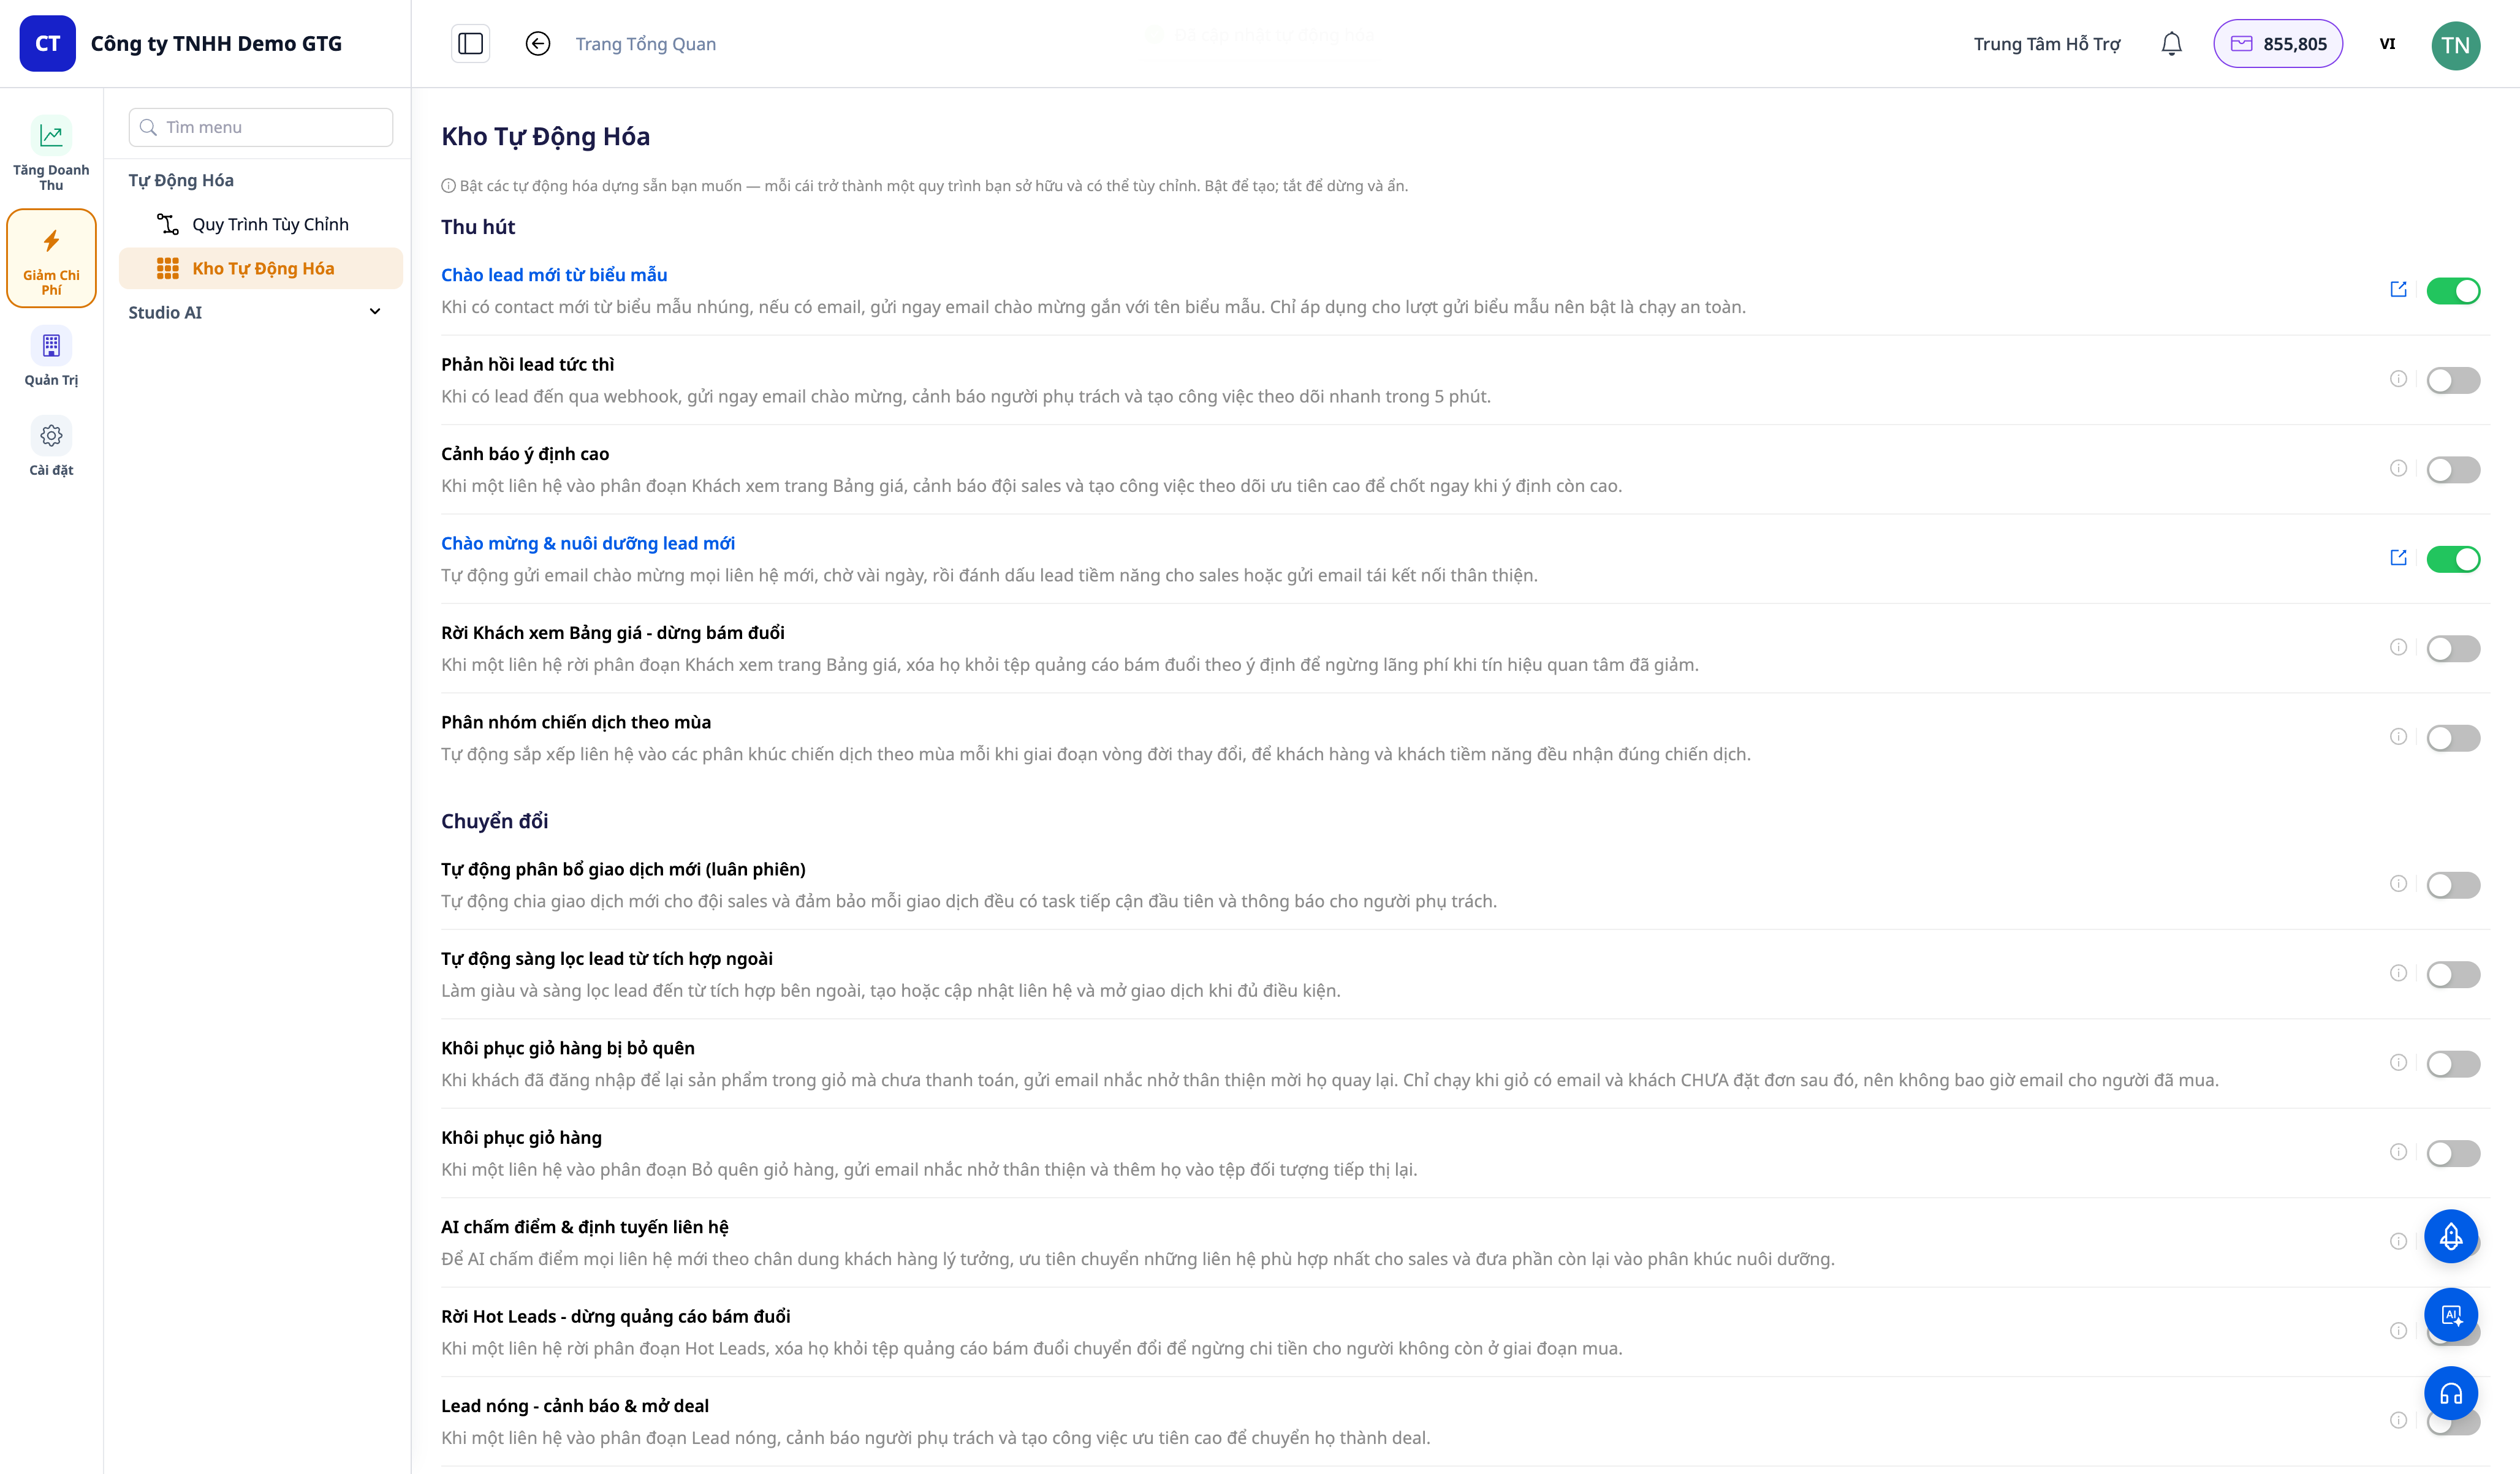
- Toggle on a script (e.g., "Deal won → customer onboarding" or "Abandoned cart recovery").
✅ Expected Result: The toggle switches on; a success toast appears; a "View workflow" (↗) link appears on that row. The script is now an Active workflow that you own (visible in Automation → Workflows).
Step 3 — Open "View workflow" and Edit Content
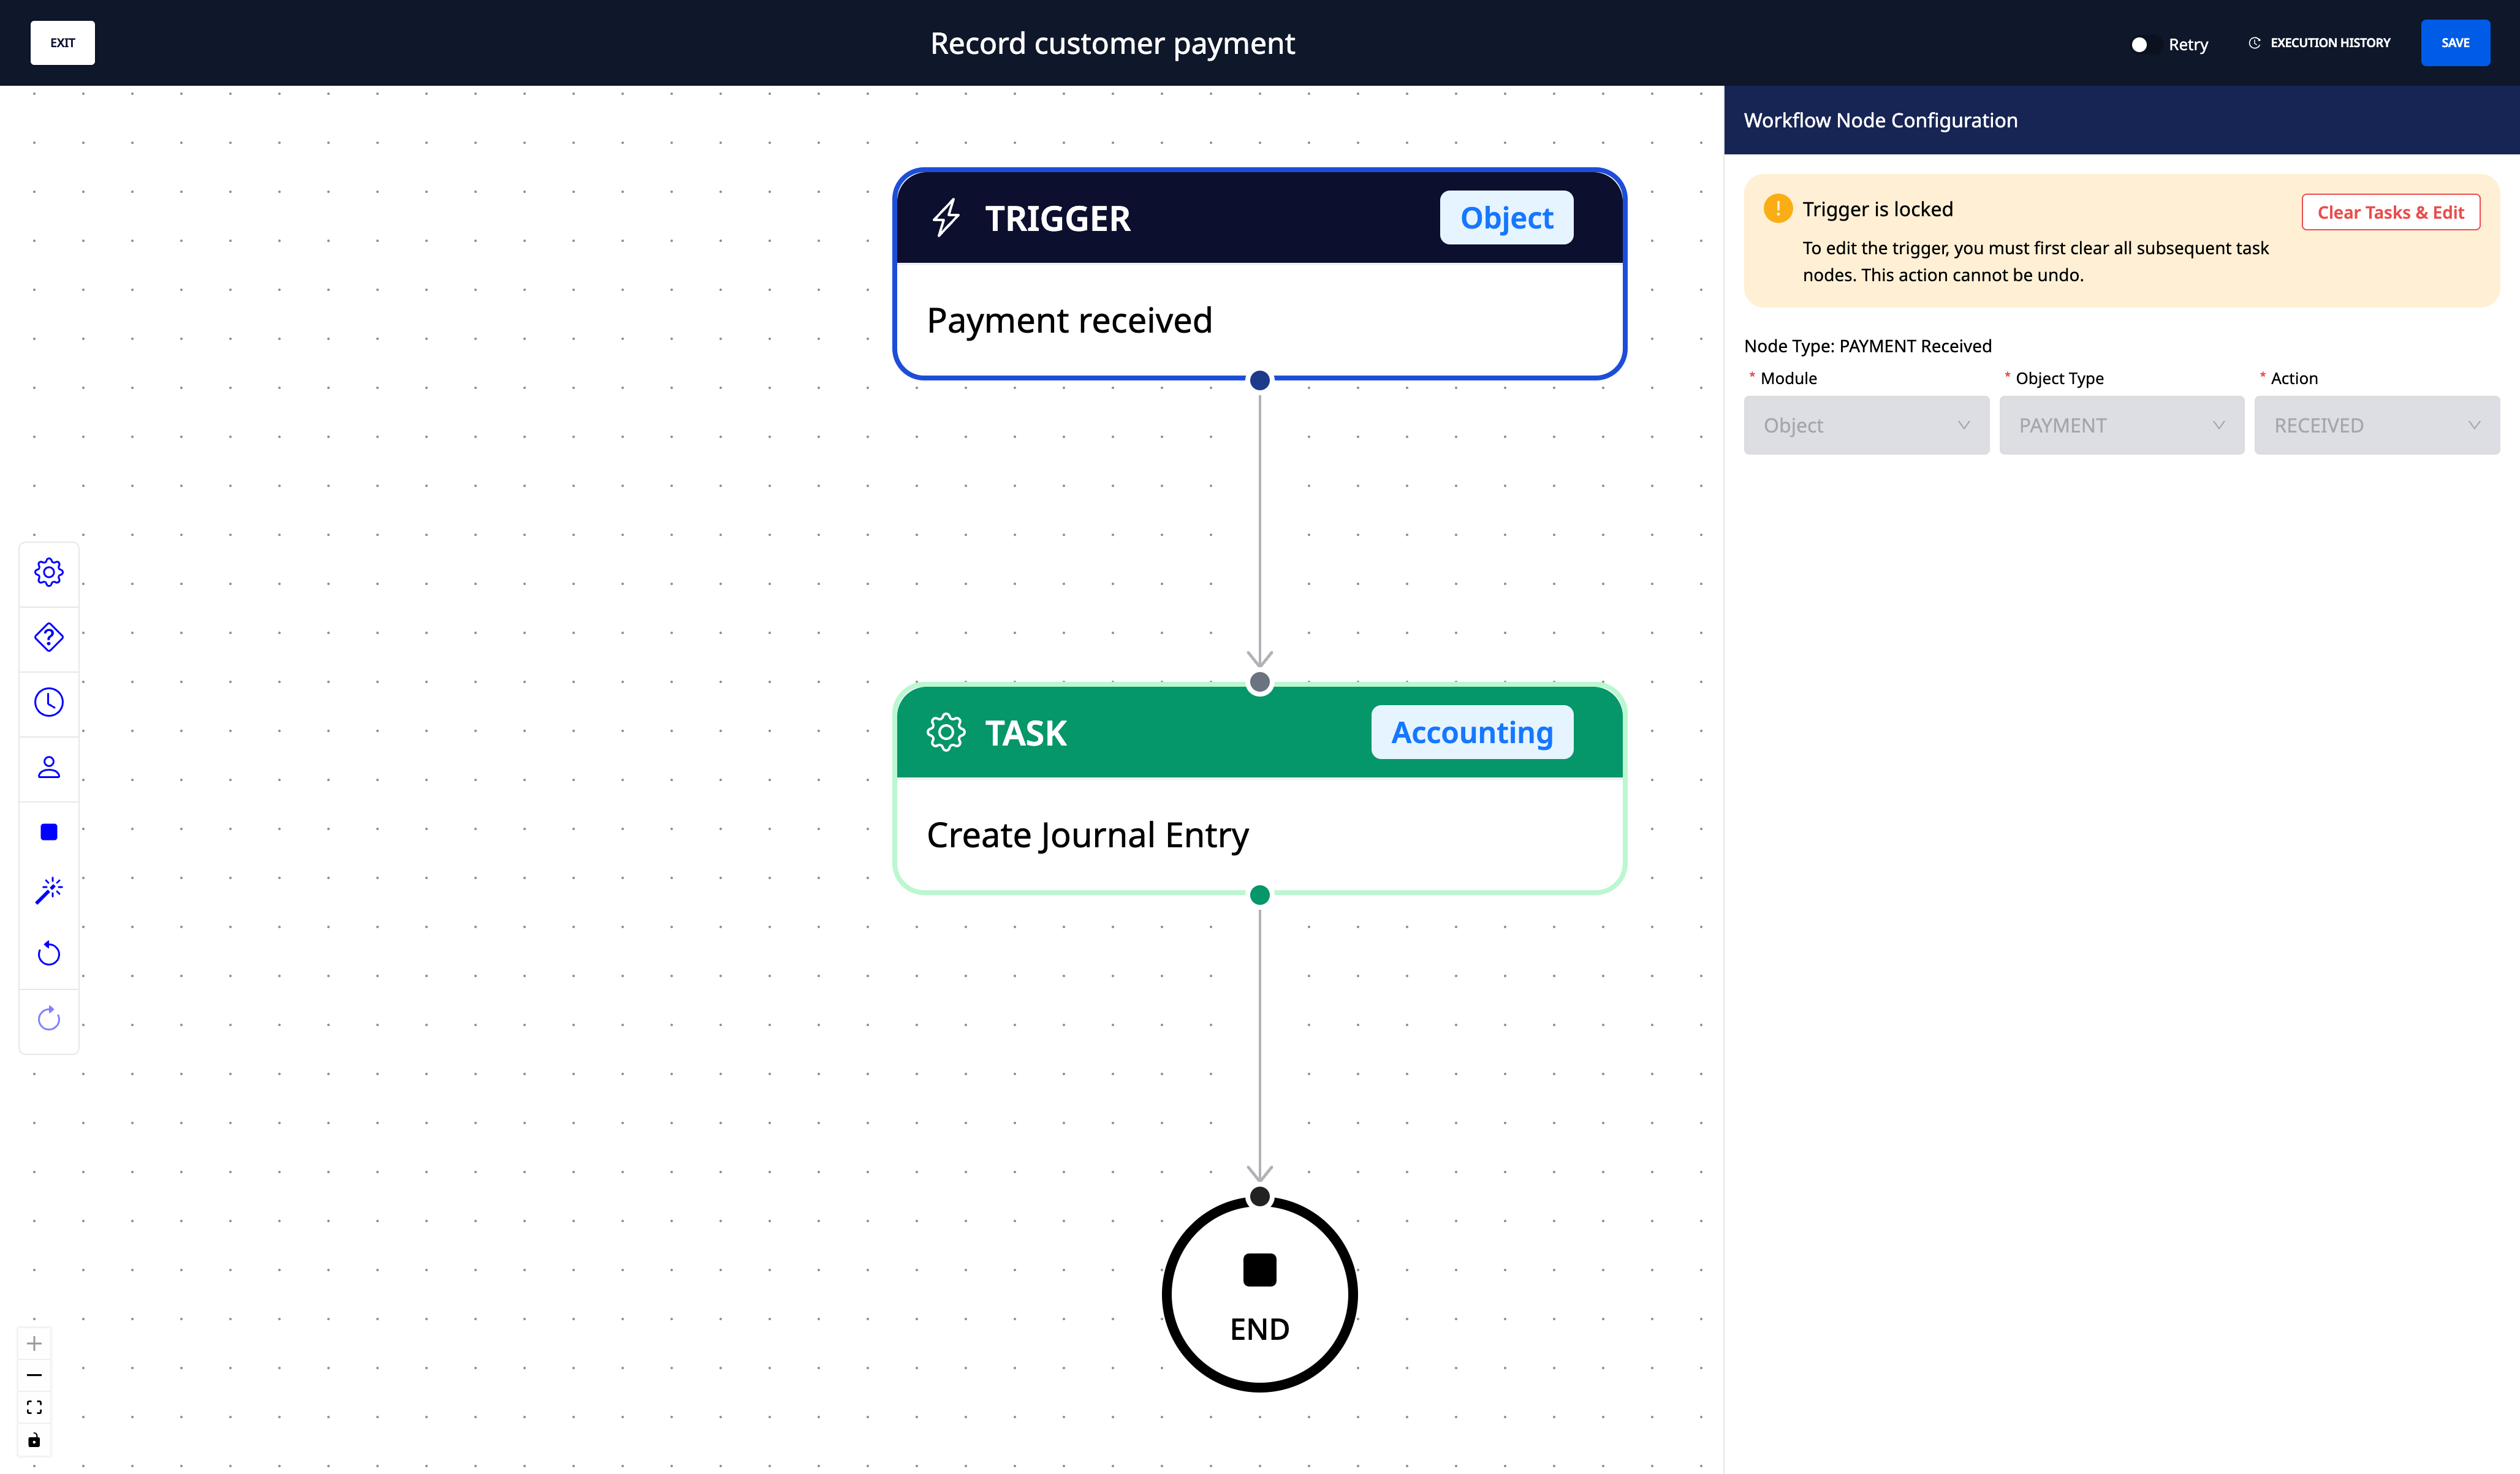
- Click "View workflow" on the script row you just enabled.
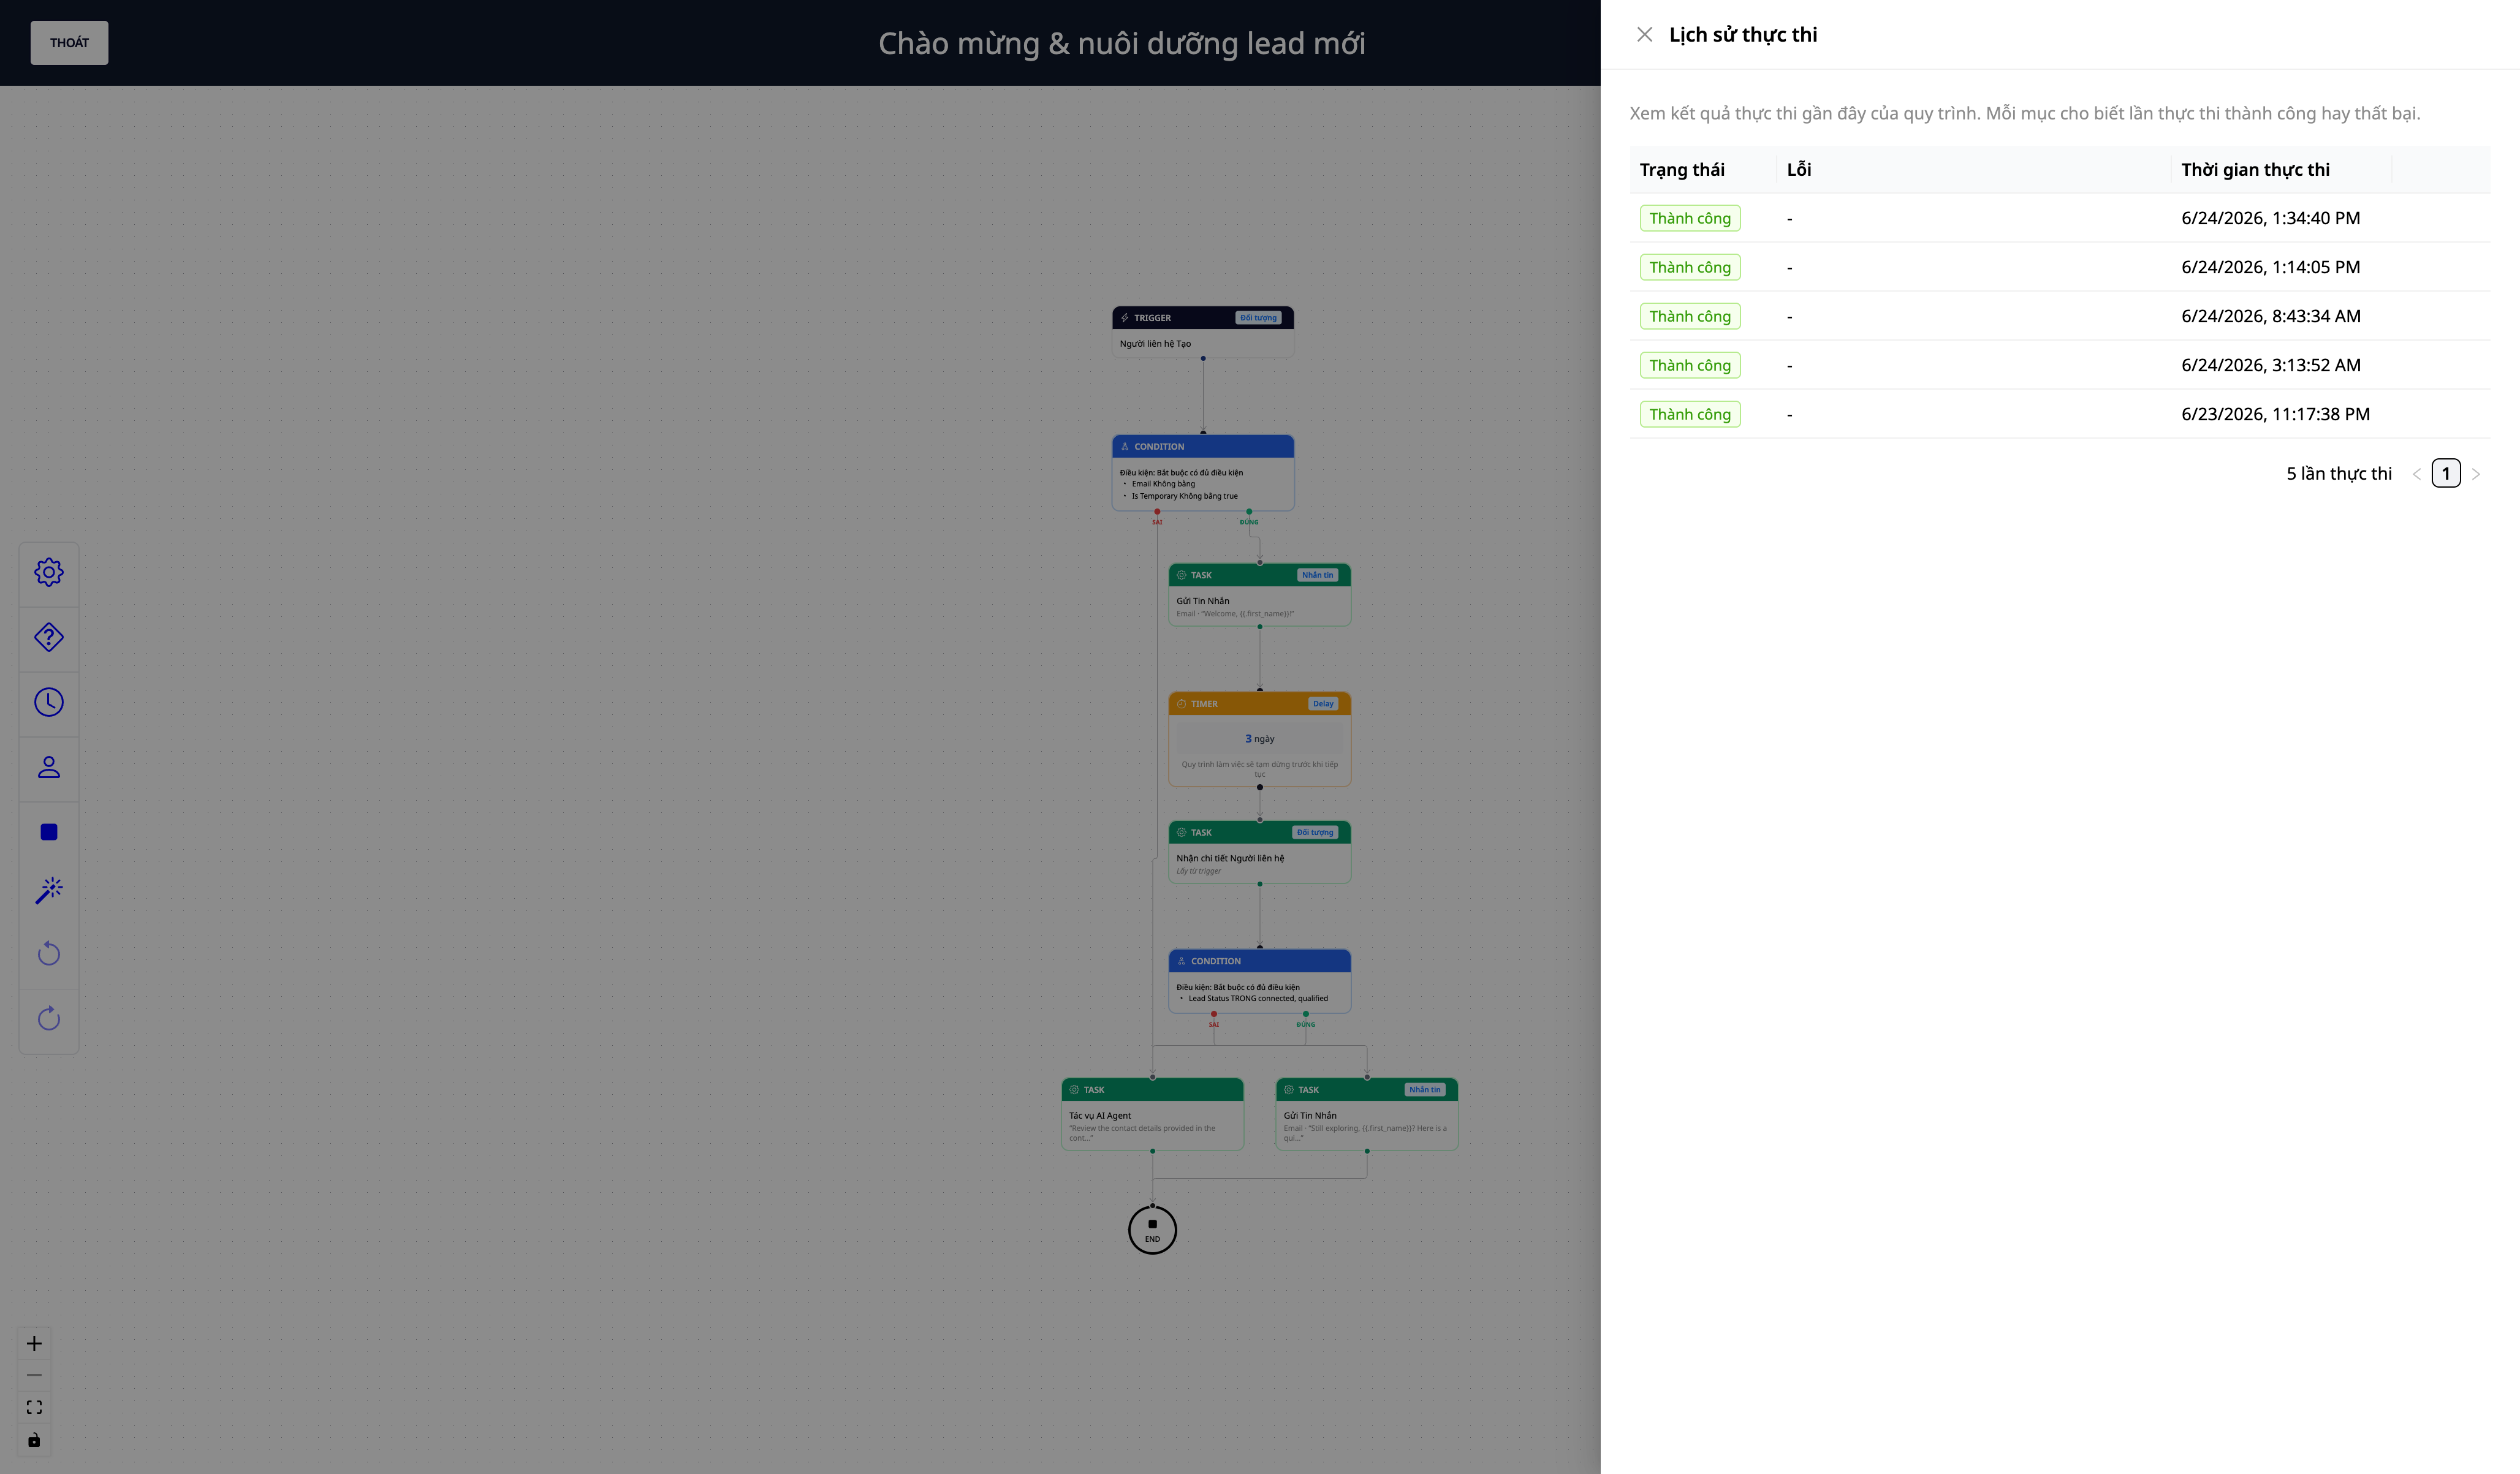
- In the editor, view the diagram (Trigger → steps → End). Edit the email content, delays, audience segment IDs, thresholds in the node parameters → Save.
✅ Expected Result: The correct workflow editor for the script opens; parameters can be edited and saved.
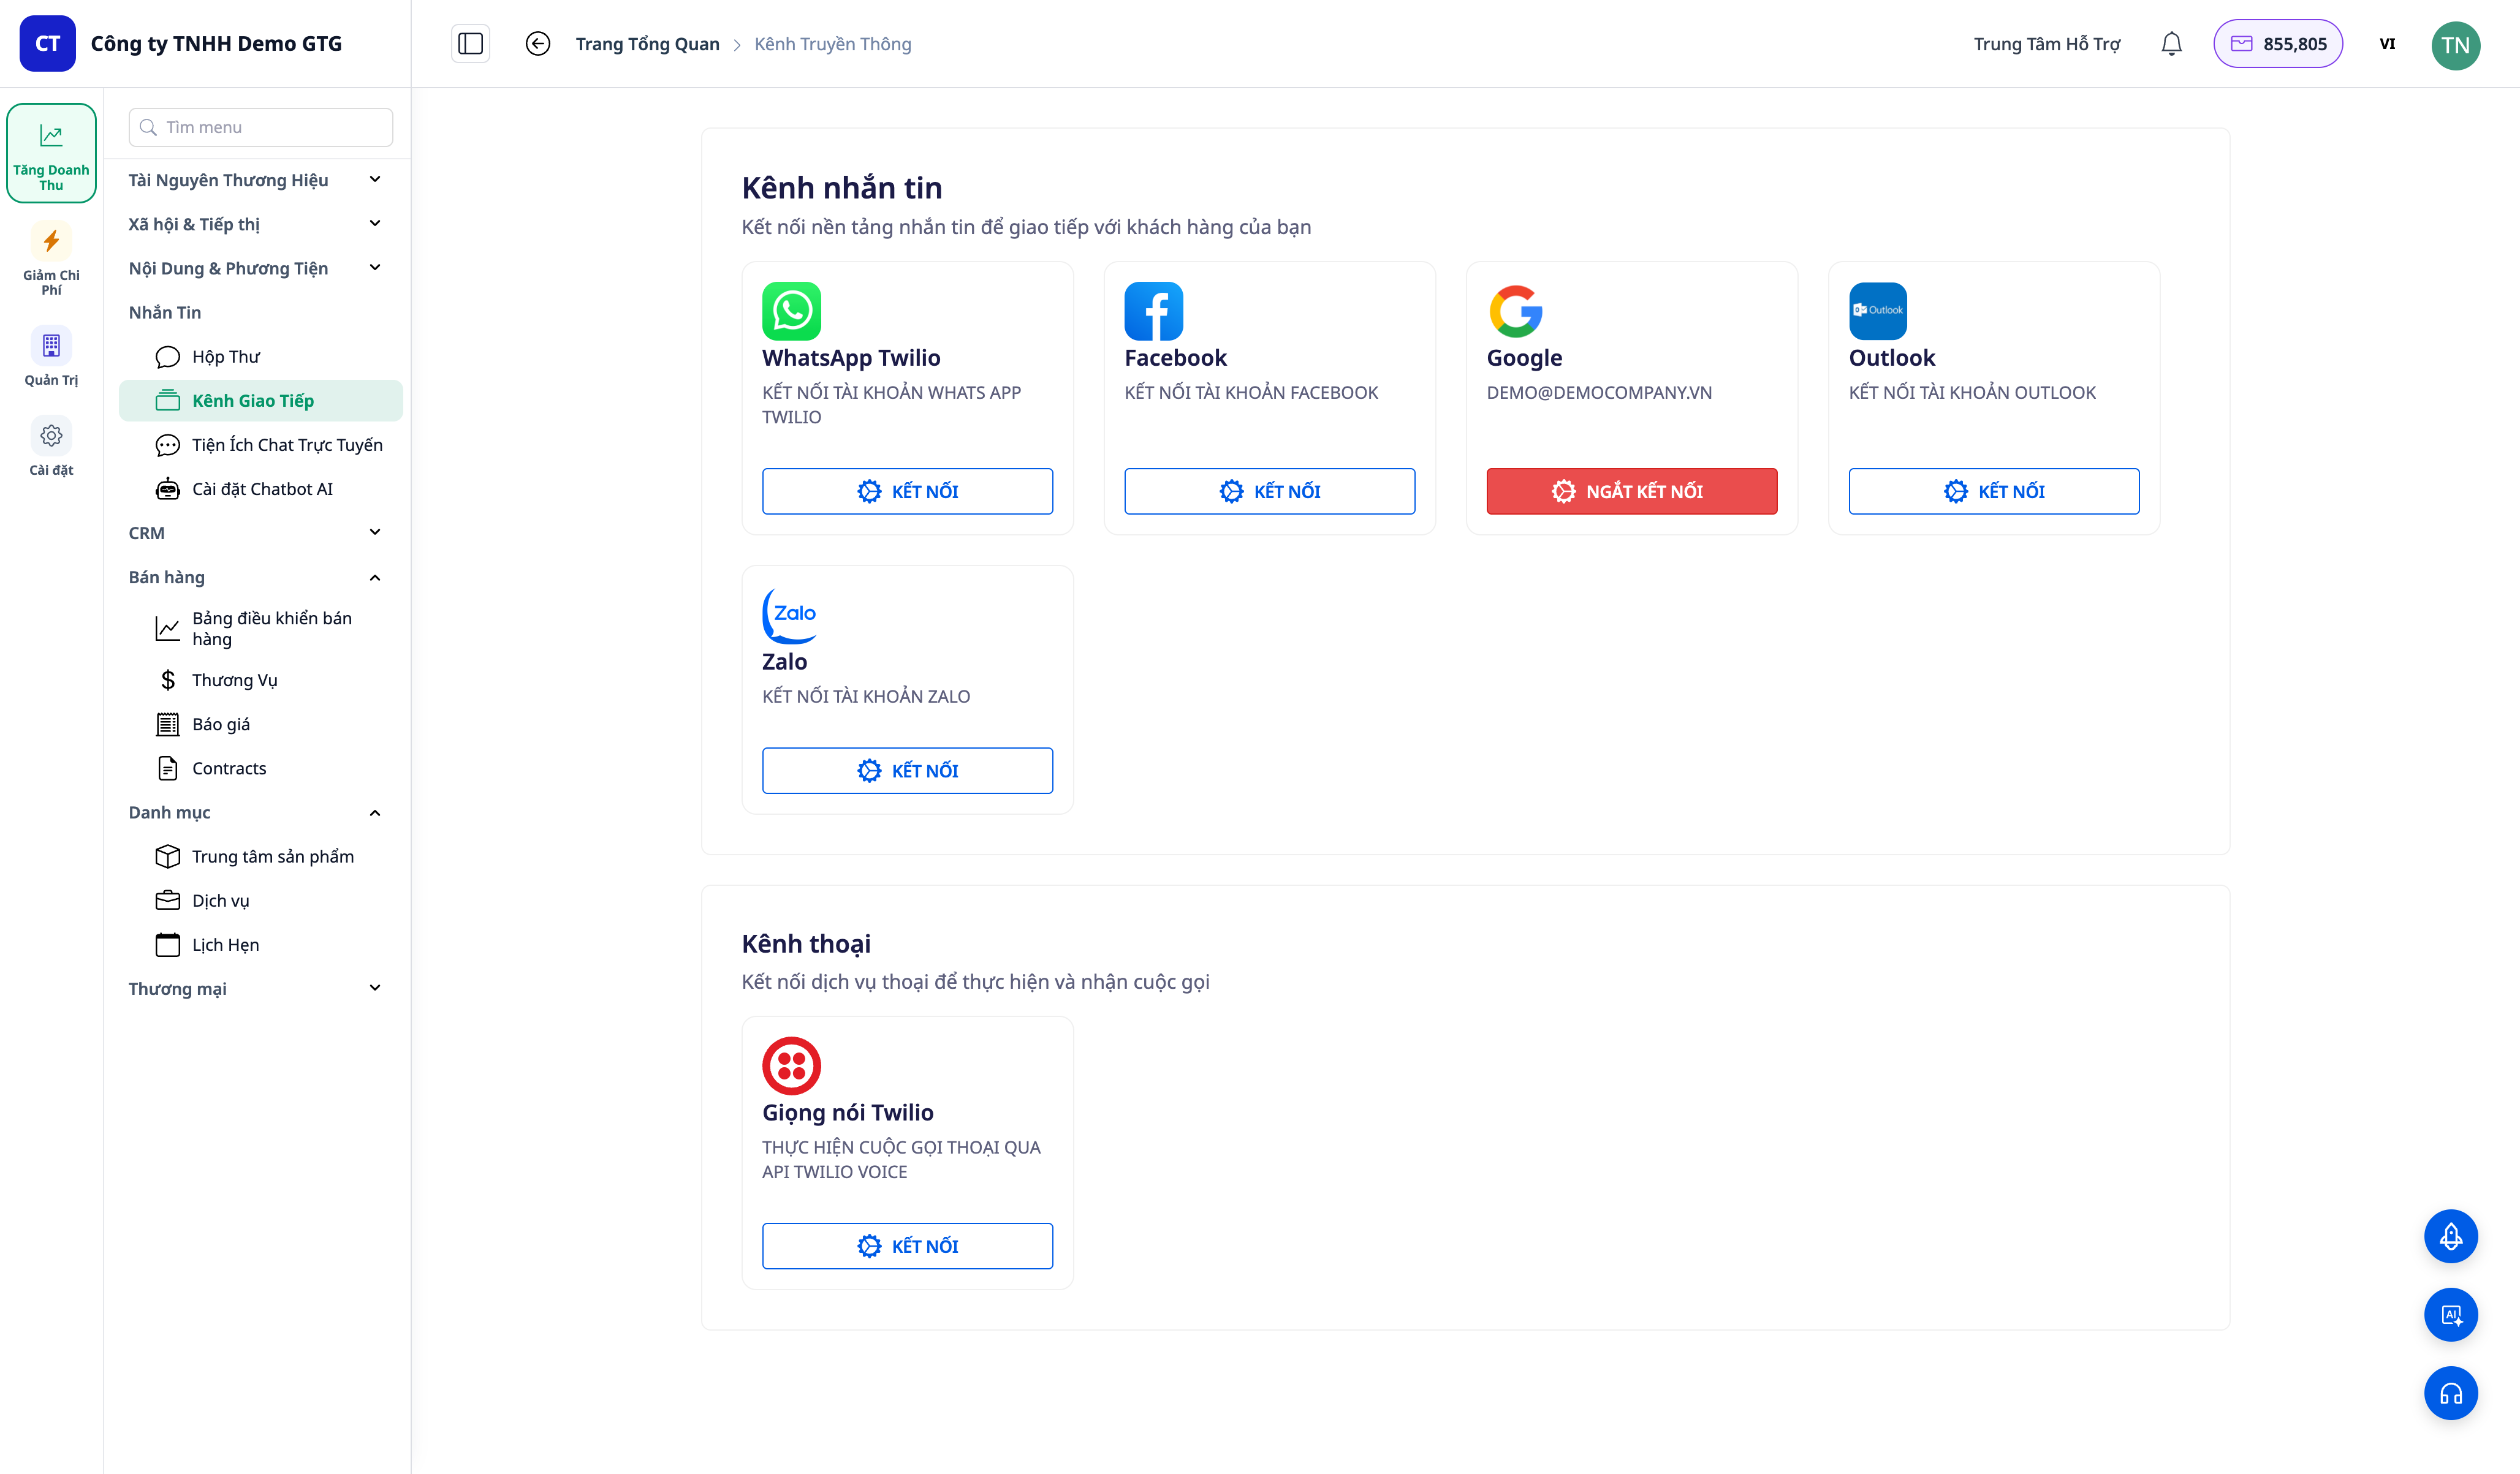
Step 4 — (Optional) Connect Sending Channel
- Open Messaging → Channels and connect an email/SMS account; return to the editor and fill in any remaining parameters (email account, segment/audience ID).
✅ Expected Result: After connecting and filling in parameters, the Send Message / Add to Ad Audience step will run completely (instead of reporting an expected error when not configured).
Step 5 — Trigger the Action in the Corresponding CRM Screen
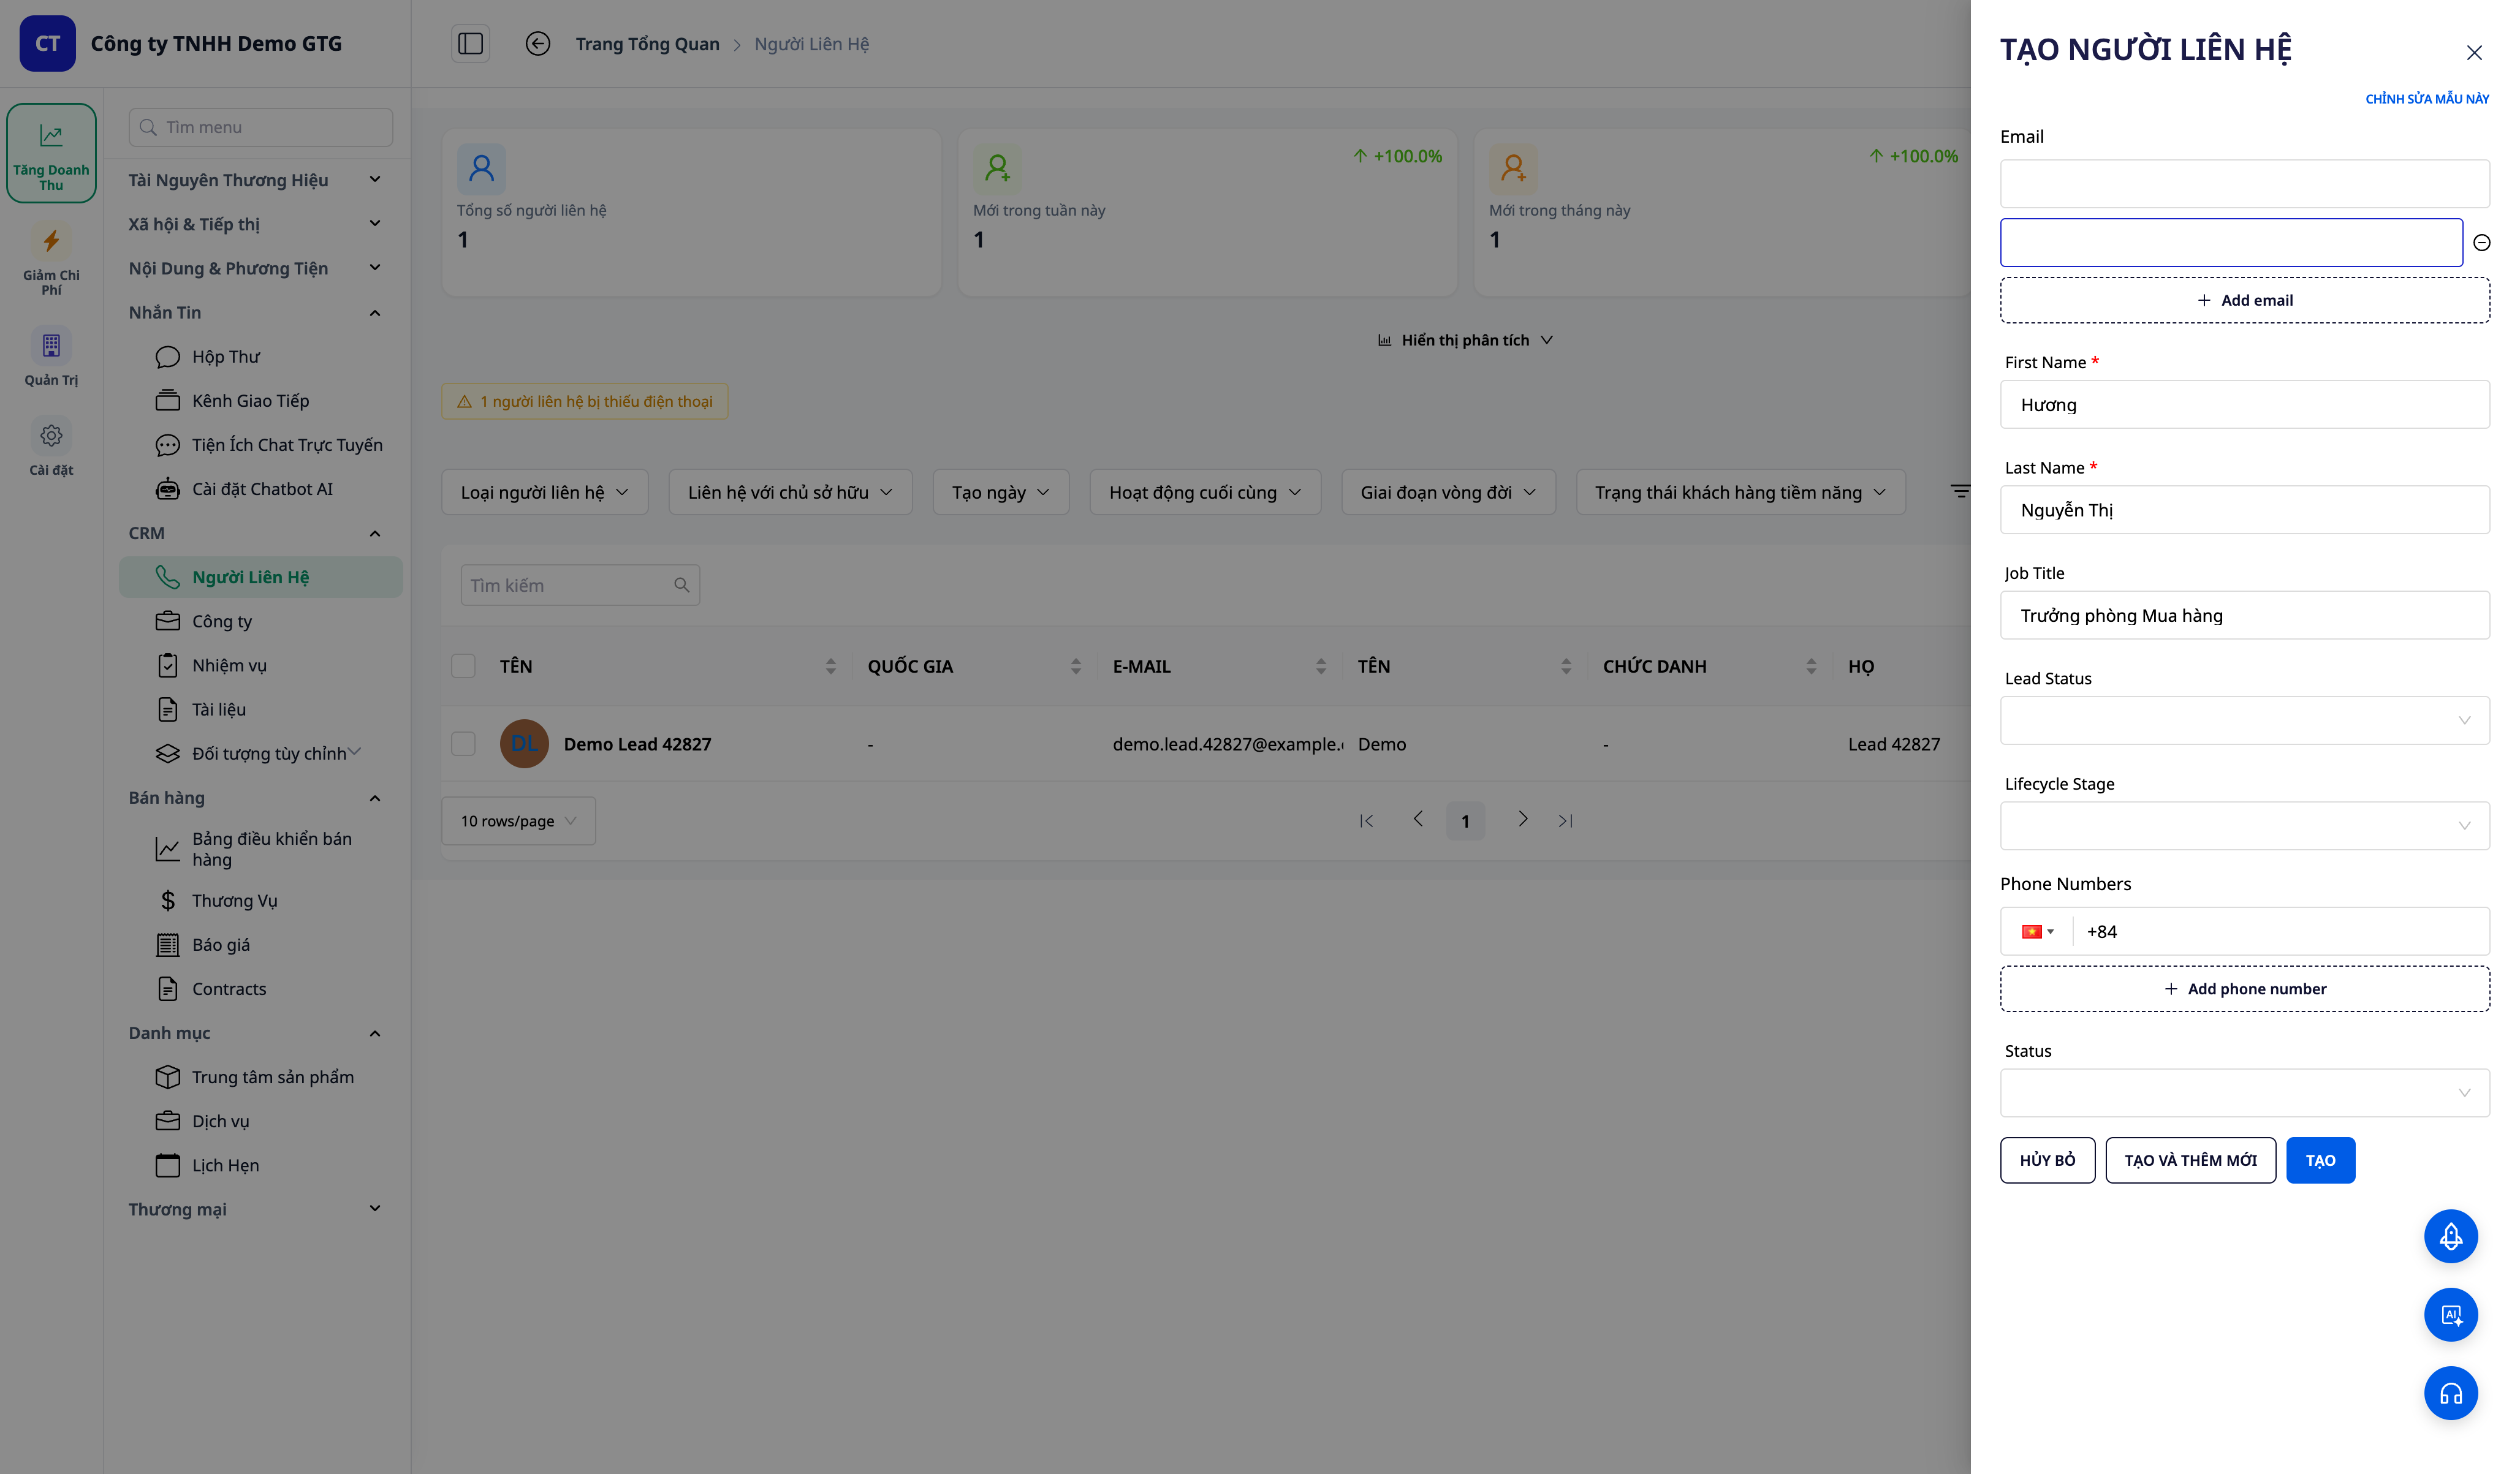
- Navigate to the CRM screen that matches the script and perform the trigger action. For example:
- Welcome & nurture new leads: CRM → Contacts → create a new contact (with name + email).
- Deal won → onboarding: CRM → Deals → move a deal to Won.
- Order delivered → review & NPS: CRM → Products & Orders → mark an order as Delivered.
- Schedule appointment: confirm & remind: CRM → Appointments → Confirm an appointment.
✅ Expected Result: The script's workflow fires immediately when the event occurs.
Step 6 — View Execution Logs
- Open Automation → Workflows → open that workflow → execution logs.
✅ Expected Result: View the recent run: each step executed in order; the sending step succeeded if the channel was connected (or reported "configuration required" if not — as expected).
Step 7 — Disable and Re-enable (Preserve Configuration)
- Return to the Revenue Automations dashboard, toggle the script off.
- Toggle it back on.
✅ Expected Result: When turned off: the toggle is off, the "View workflow" link disappears, and in Workflows it is hidden (disabled but retained, not deleted). When turned back on: it becomes active immediately, no need to rebuild — your configuration is preserved.
Quick Reference Table of Expected Results
| Action | What You'll See |
|---|---|
| Open Dashboard (Step 1) | List of scripts grouped by funnel + toggle for each row |
| Enable (Step 2) | Toast + "View workflow" link; becomes an active workflow you own |
| View Workflow (Step 3) | Editor opens; edit content/delay/audience + Save |
| Connect Channel (Step 4) | Sending step runs completely after parameters are filled |
| Trigger Action (Step 5) | Workflow fires when the CRM event occurs |
| Execution Logs (Step 6) | See the run + status of each step |
| Disable/Re-enable (Step 7) | Off = hidden + retained; Re-enable = runs immediately, no rebuild needed |
Notes
- Sending Step Configuration Required: If a channel is not connected or parameters are not filled (email account, segment ID), the script will still fire and run, but the sending step will report an error — these are customer-specific parameters to fill, not a product defect. Sending messages consumes credits — the workspace must have sufficient credits for the sending step to complete.
- External Lead Webhook: The "auto-confirm external lead" script requires configuring the webhook event name in the trigger (Settings → Integrations).
- Some scripts require appropriate actual data (e.g., round-robin needs staff to assign to) — refer to the description of each script.
Maybe You Should Read These
Guide
ACCOUNTING & INVOICE
Grow. Thrive. Go.
Accounting & E-Invoice User Guide
Guide
LINKEDIN ADS
Grow. Thrive. Go.
LinkedIn Ads User Guide - GTG CRM

Guide
AI BIZ EMAIL
Grow. Thrive. Go.
AI Biz Email: Create and Send Professional Marketing Emails
Guide
AI PRODUCT CREATION
Grow. Thrive. Go.
AI-Powered Product Creation Guide
Guide
FORM BUILDER
Grow. Thrive. Go.
Customer Information Collection Form Builder Guide

Guide
ARTICLE INTEGRATION
Grow. Thrive. Go.
Guide to Integrating GTG CRM Articles with Your Website
Guide
AI SECTION CREATION
Grow. Thrive. Go.
Guide to Creating Website Sections with AI

Guide
AI EMAIL CAMPAIGN
Grow. Thrive. Go.
AI Email Campaign Guide

Guide
AI WEBSITE CREATION
Grow. Thrive. Go.
AI Full Website Creation Guide

Guide
AI ARTICLE GENERATION
Grow. Thrive. Go.
AI-Generated Article Guide

Guide
OMNI-CHANNEL ORDER MANAGEMENT
Grow. Thrive. Go.
Omni-channel Order Management — Shopee + Lazada + TikTok Shop

Guide
AUTOMATIC ORDER CREATION
Grow. Thrive. Go.