Table of Contents
What You Can Do After This Guide
Enable Payroll module → add employees → create and sign employment contracts → run monthly payroll → finalize payroll → view automatic journal entries in the ledger → send payslips to employees.
Preparation
| # | Condition | Why it's Needed |
|---|---|---|
| 1 | Log in to GTG CRM, with permissions HRM_MANAGE_SETTINGS + HRM_MANAGE_EMPLOYEE ( "HR Manager" group). | To enable the feature, add employees, and run payroll. |
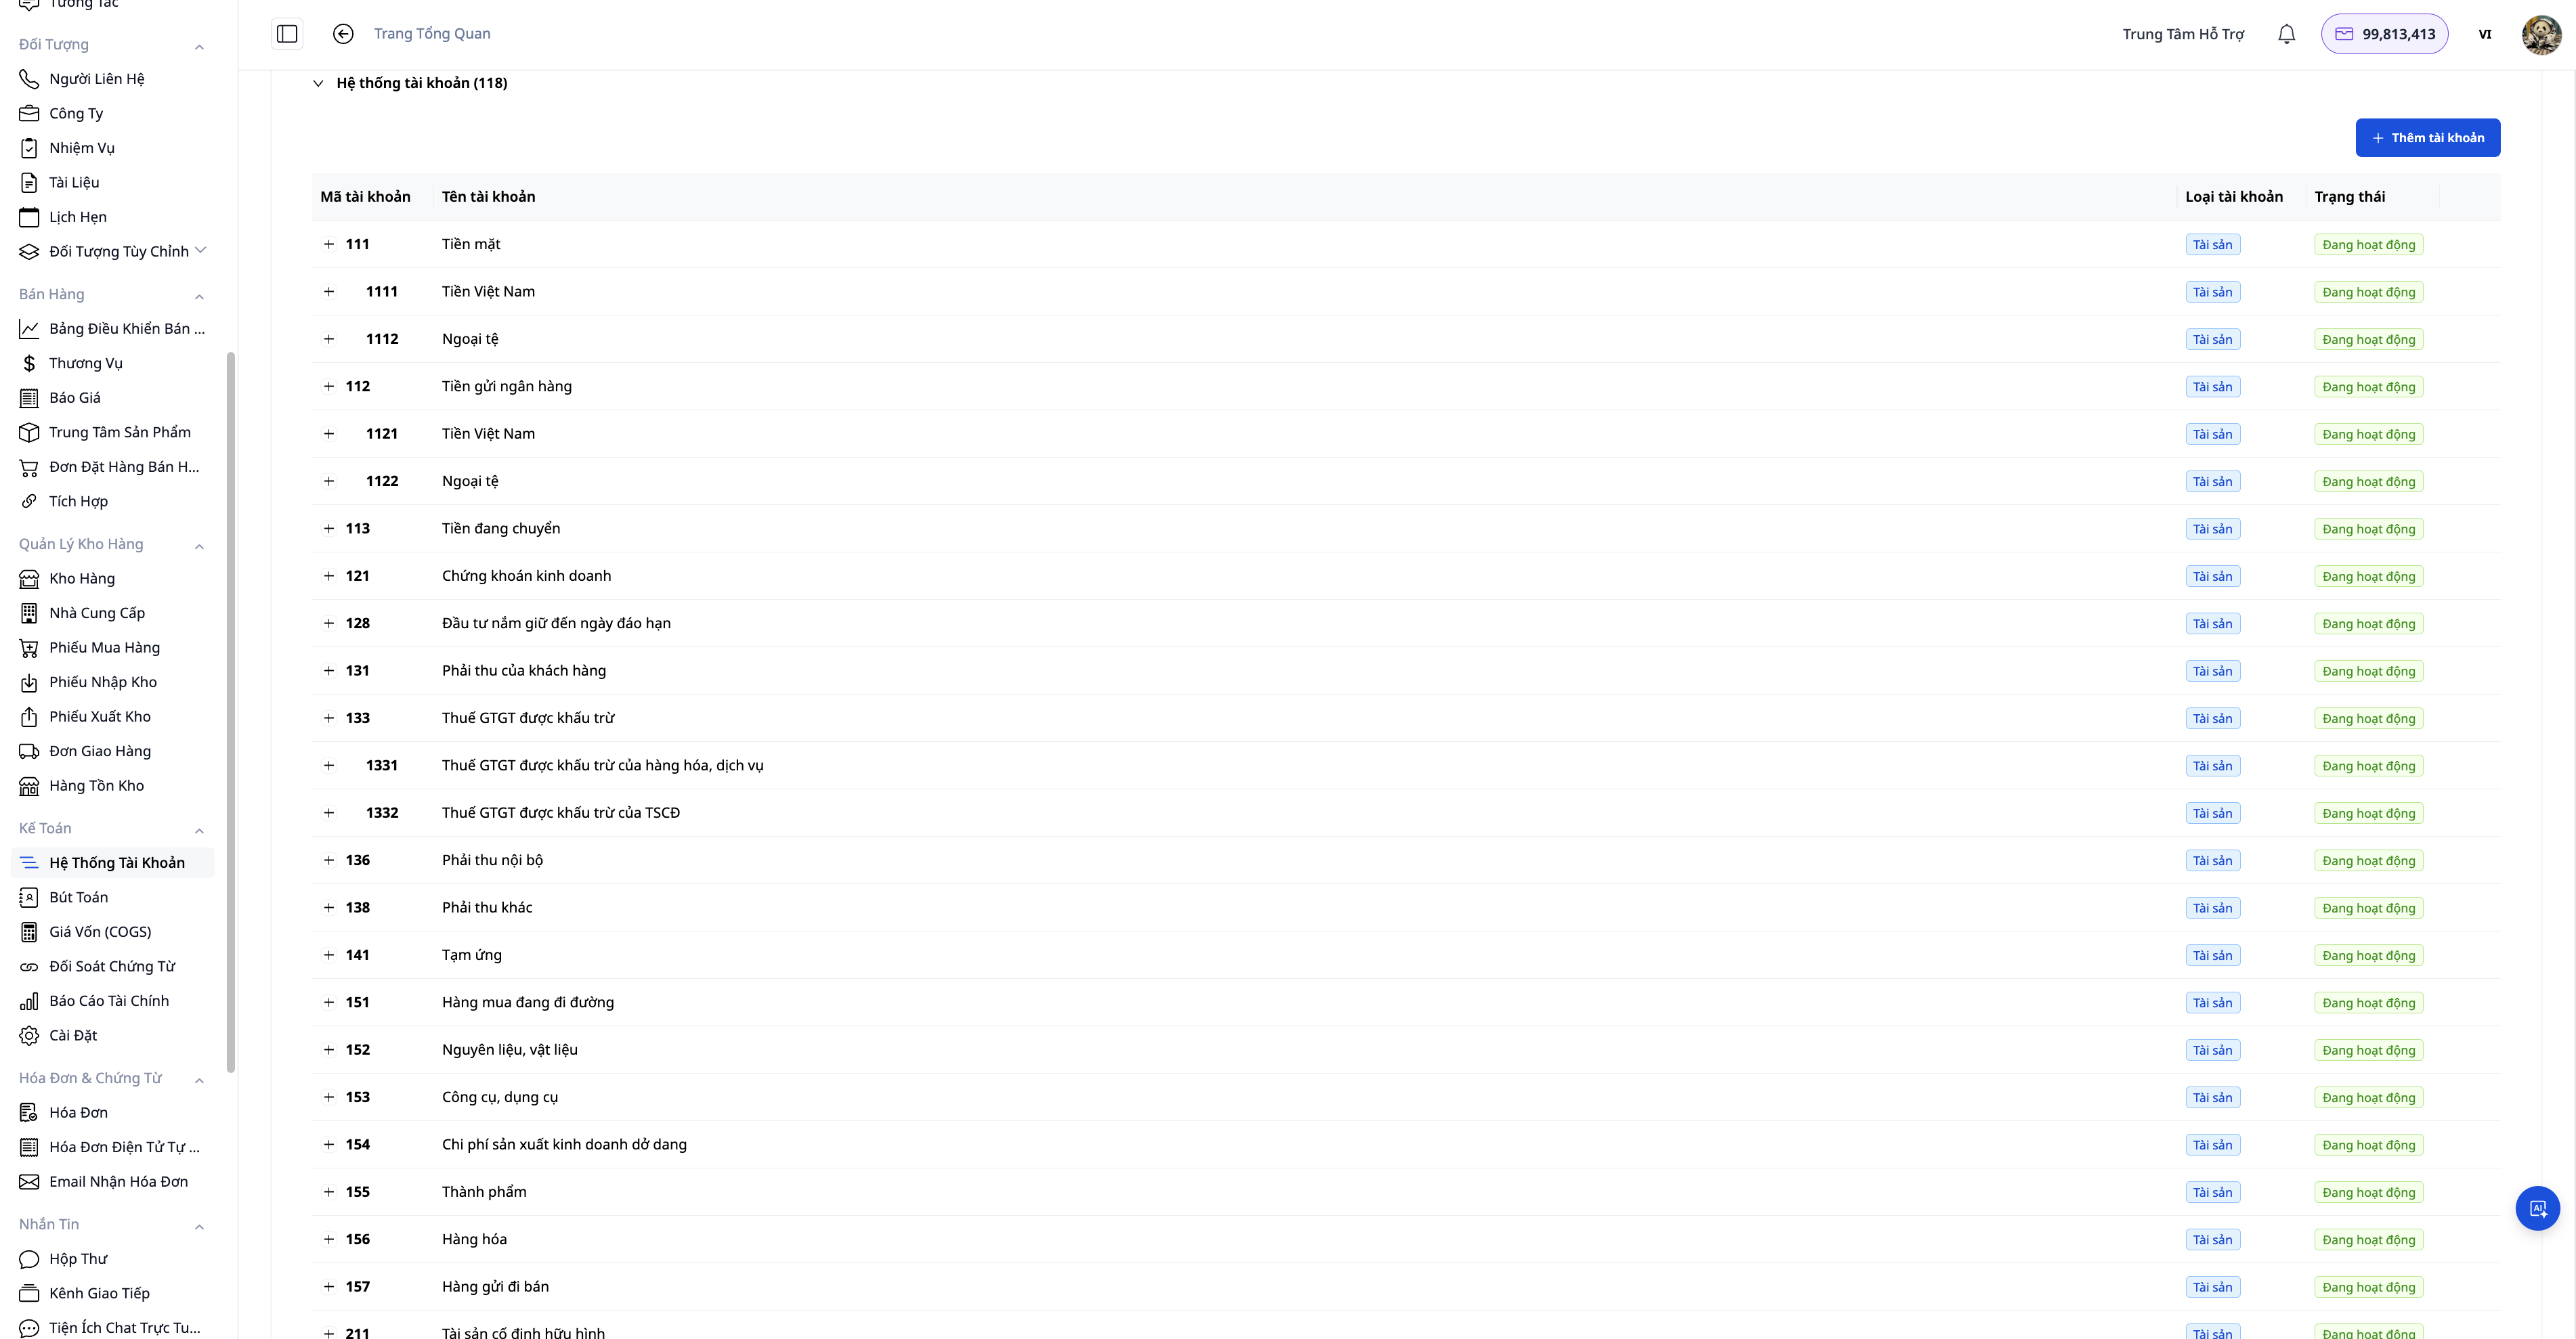
| 2 | Chart of Accounts has been set up for the workspace. | For payroll journal entries to have corresponding accounts. |
| 3 | (Optional) An email inbox connected in HR Settings. | Only needed when sending payslips via email. |
| 4 | Workspace has credits. | To generate contracts using AI, which consumes credits. |
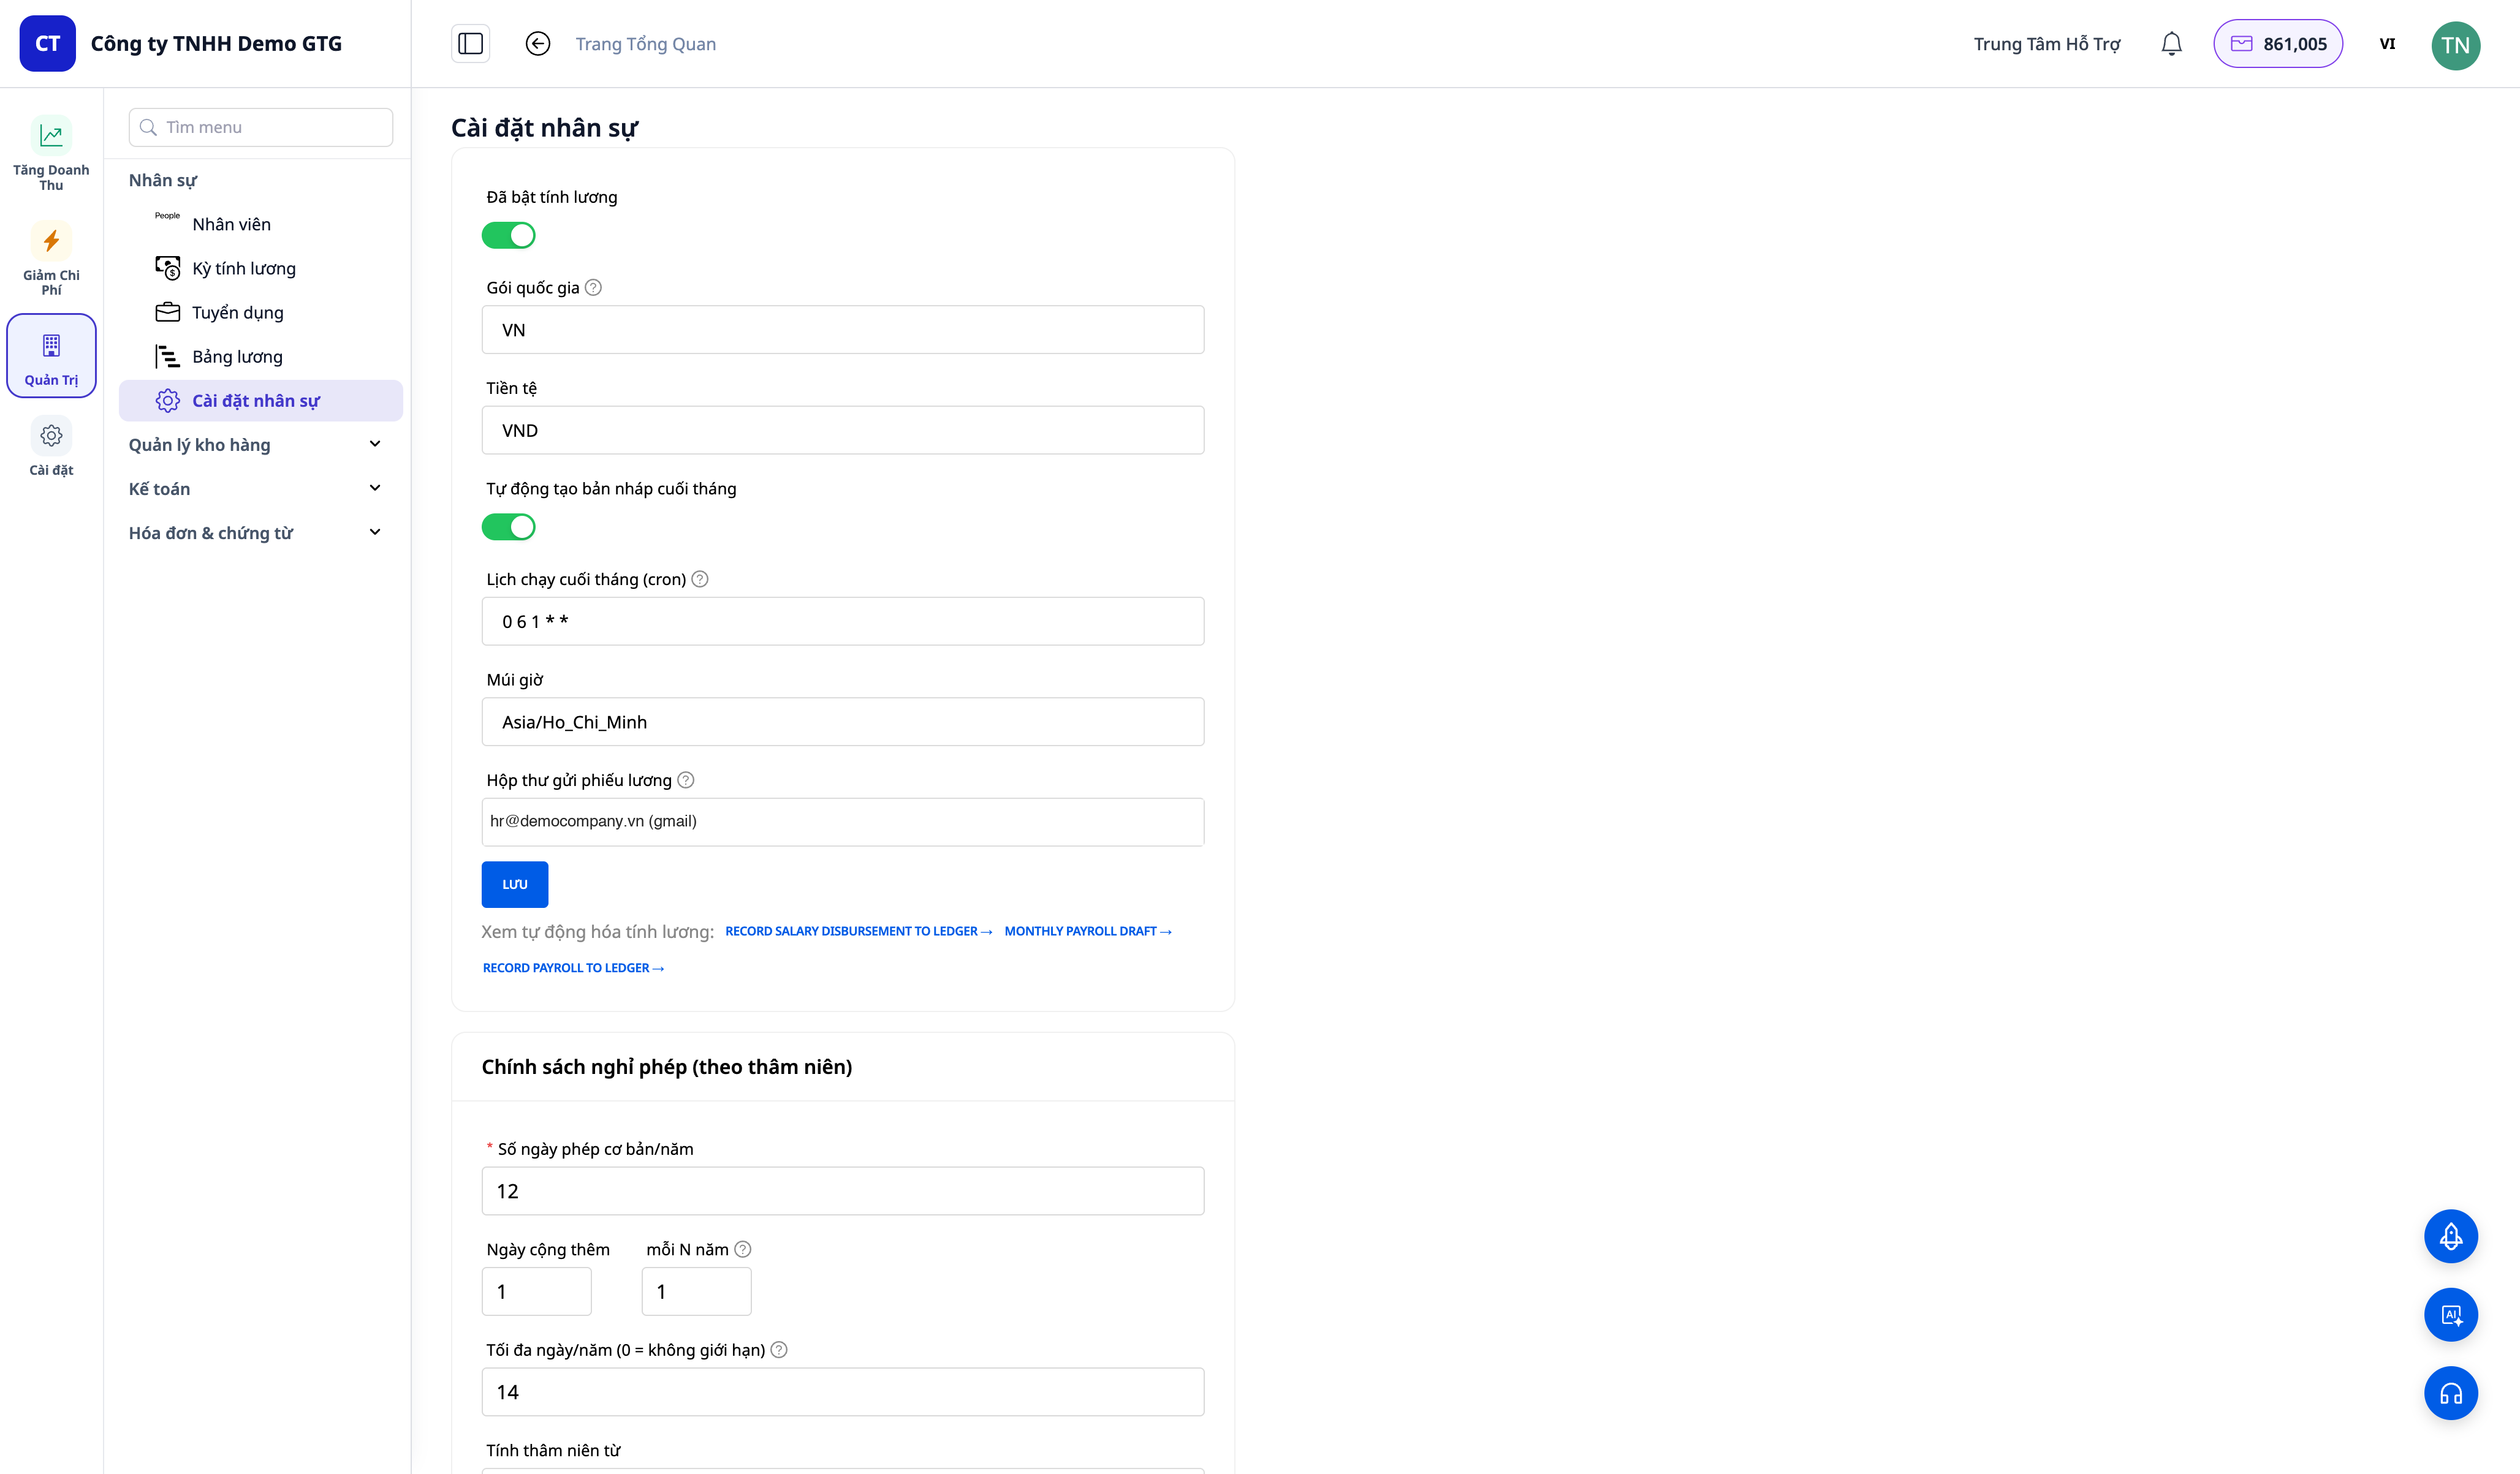
Step 1 — Enable Payroll Feature
- On the left navigation bar, open HR → HR Settings.
- Turn on the Payroll toggle.
- Select the country dataset — defaults to Vietnam (VN) (with Social Insurance/Health Insurance/Unemployment Insurance + Personal Income Tax tables already included).
- Set the end-of-month payroll run schedule (cron) and timezone, then Save.
✅ Expected Result: A successful save notification. The system automatically provisions payroll workflows — one for drafting the end-of-month payroll and another for posting entries upon payroll finalization. You will see "View workflow" links for both.
Step 2 — Add Employee
- Open HR → Employees → click + Add Employee.
- Fill in: Full Name, Job Title, Department, Country; Salary section: Base Salary + allowances; (optional) ID Card/Passport, bank account.
- Click Save.
✅ Expected Result: The employee appears in the list with an employee code (EMP-xxxx). If your account does not have payroll view permissions, the salary column will be hidden (this is a sensitive permission that works correctly).
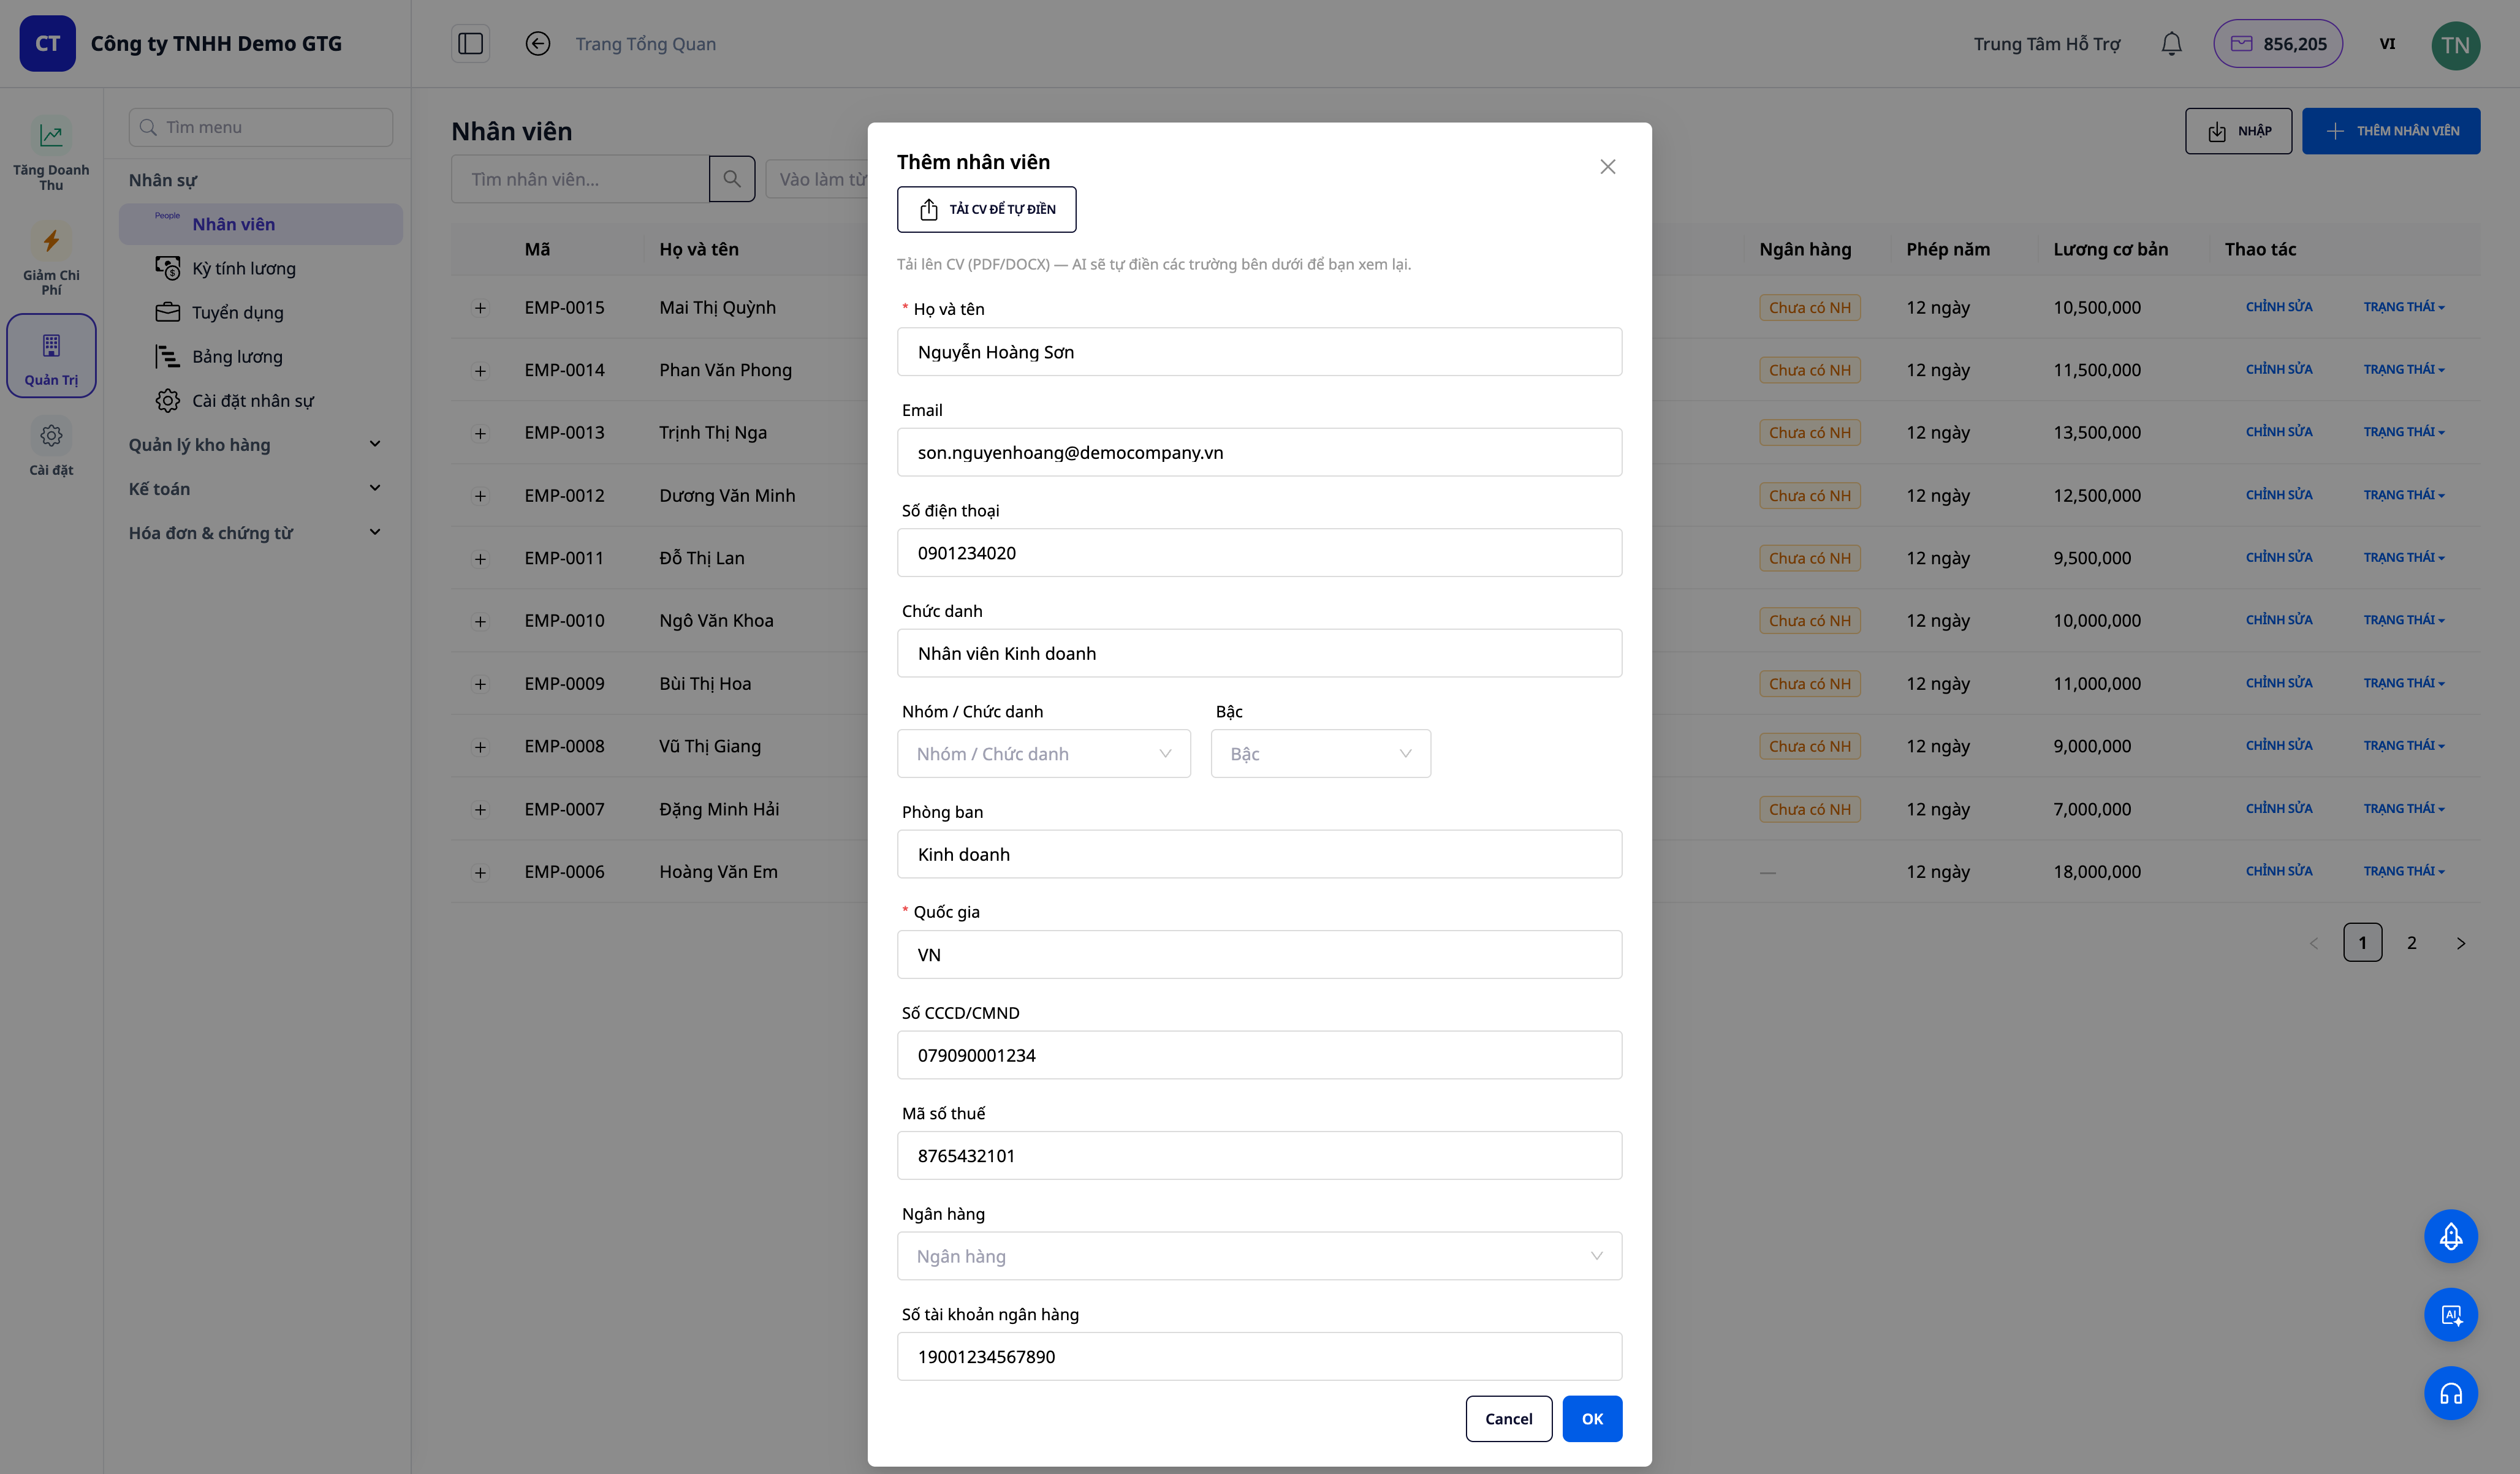
💡 Tip: Have a list on Excel? Use Bulk Import (CSV) from the employee list to add multiple people at once.
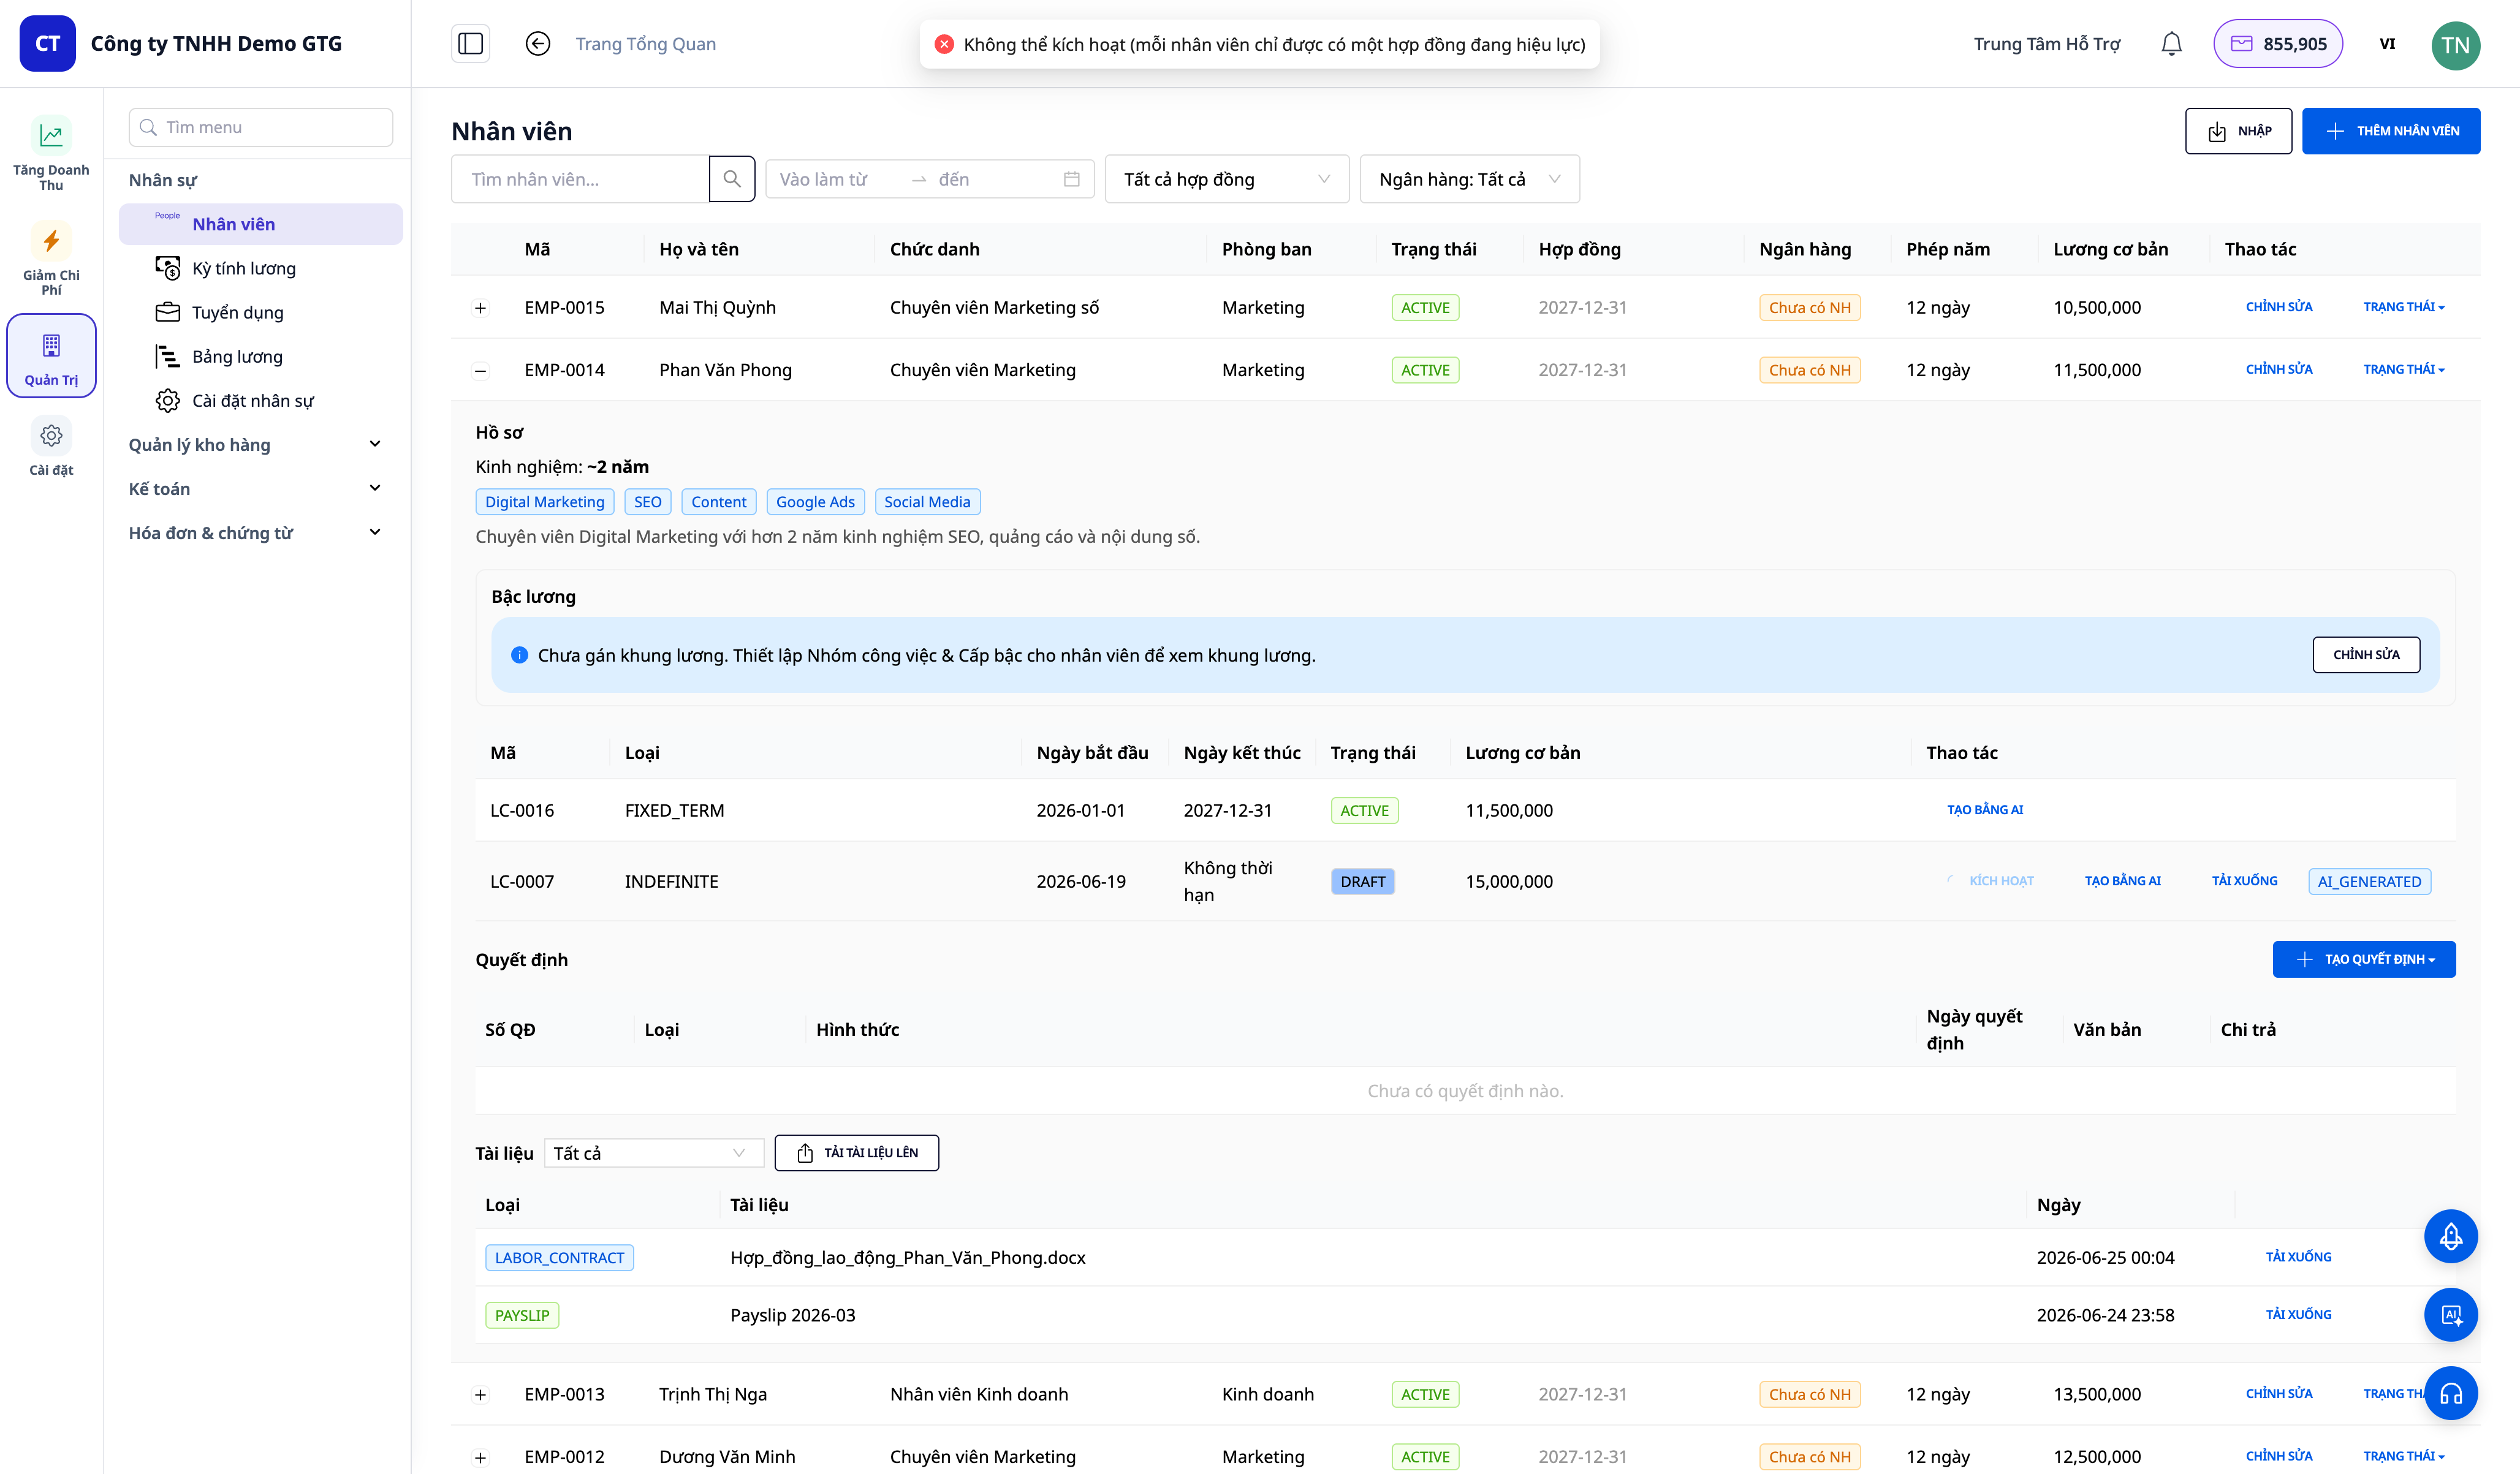
Step 3 — Create Employment Contract and Generate with AI
- From the Employee list, click the (+) icon at the beginning of the employee's row to open the Employee 360 profile. Scroll to the Labor Contracts section — the table of contracts (LC-xxxx code, type, date, status, base salary). Click to create a new contract (or edit an existing draft).
- Select contract type, duration, base salary, allowances → Save.
- Click GENERATE WITH AI directly on the contract row to generate the employment contract text.
ℹ️ Employment Contracts, Salary bands, Decisions, and Documents (including CVs) are all located within the expanded Employee 360 row, not as separate tabs.
✅ Expected Result: After a few seconds, an employment contract document (DOCX/PDF) is generated, with your company's branding inserted; a Download button appears. (Alternatively, you can upload a signed contract.)
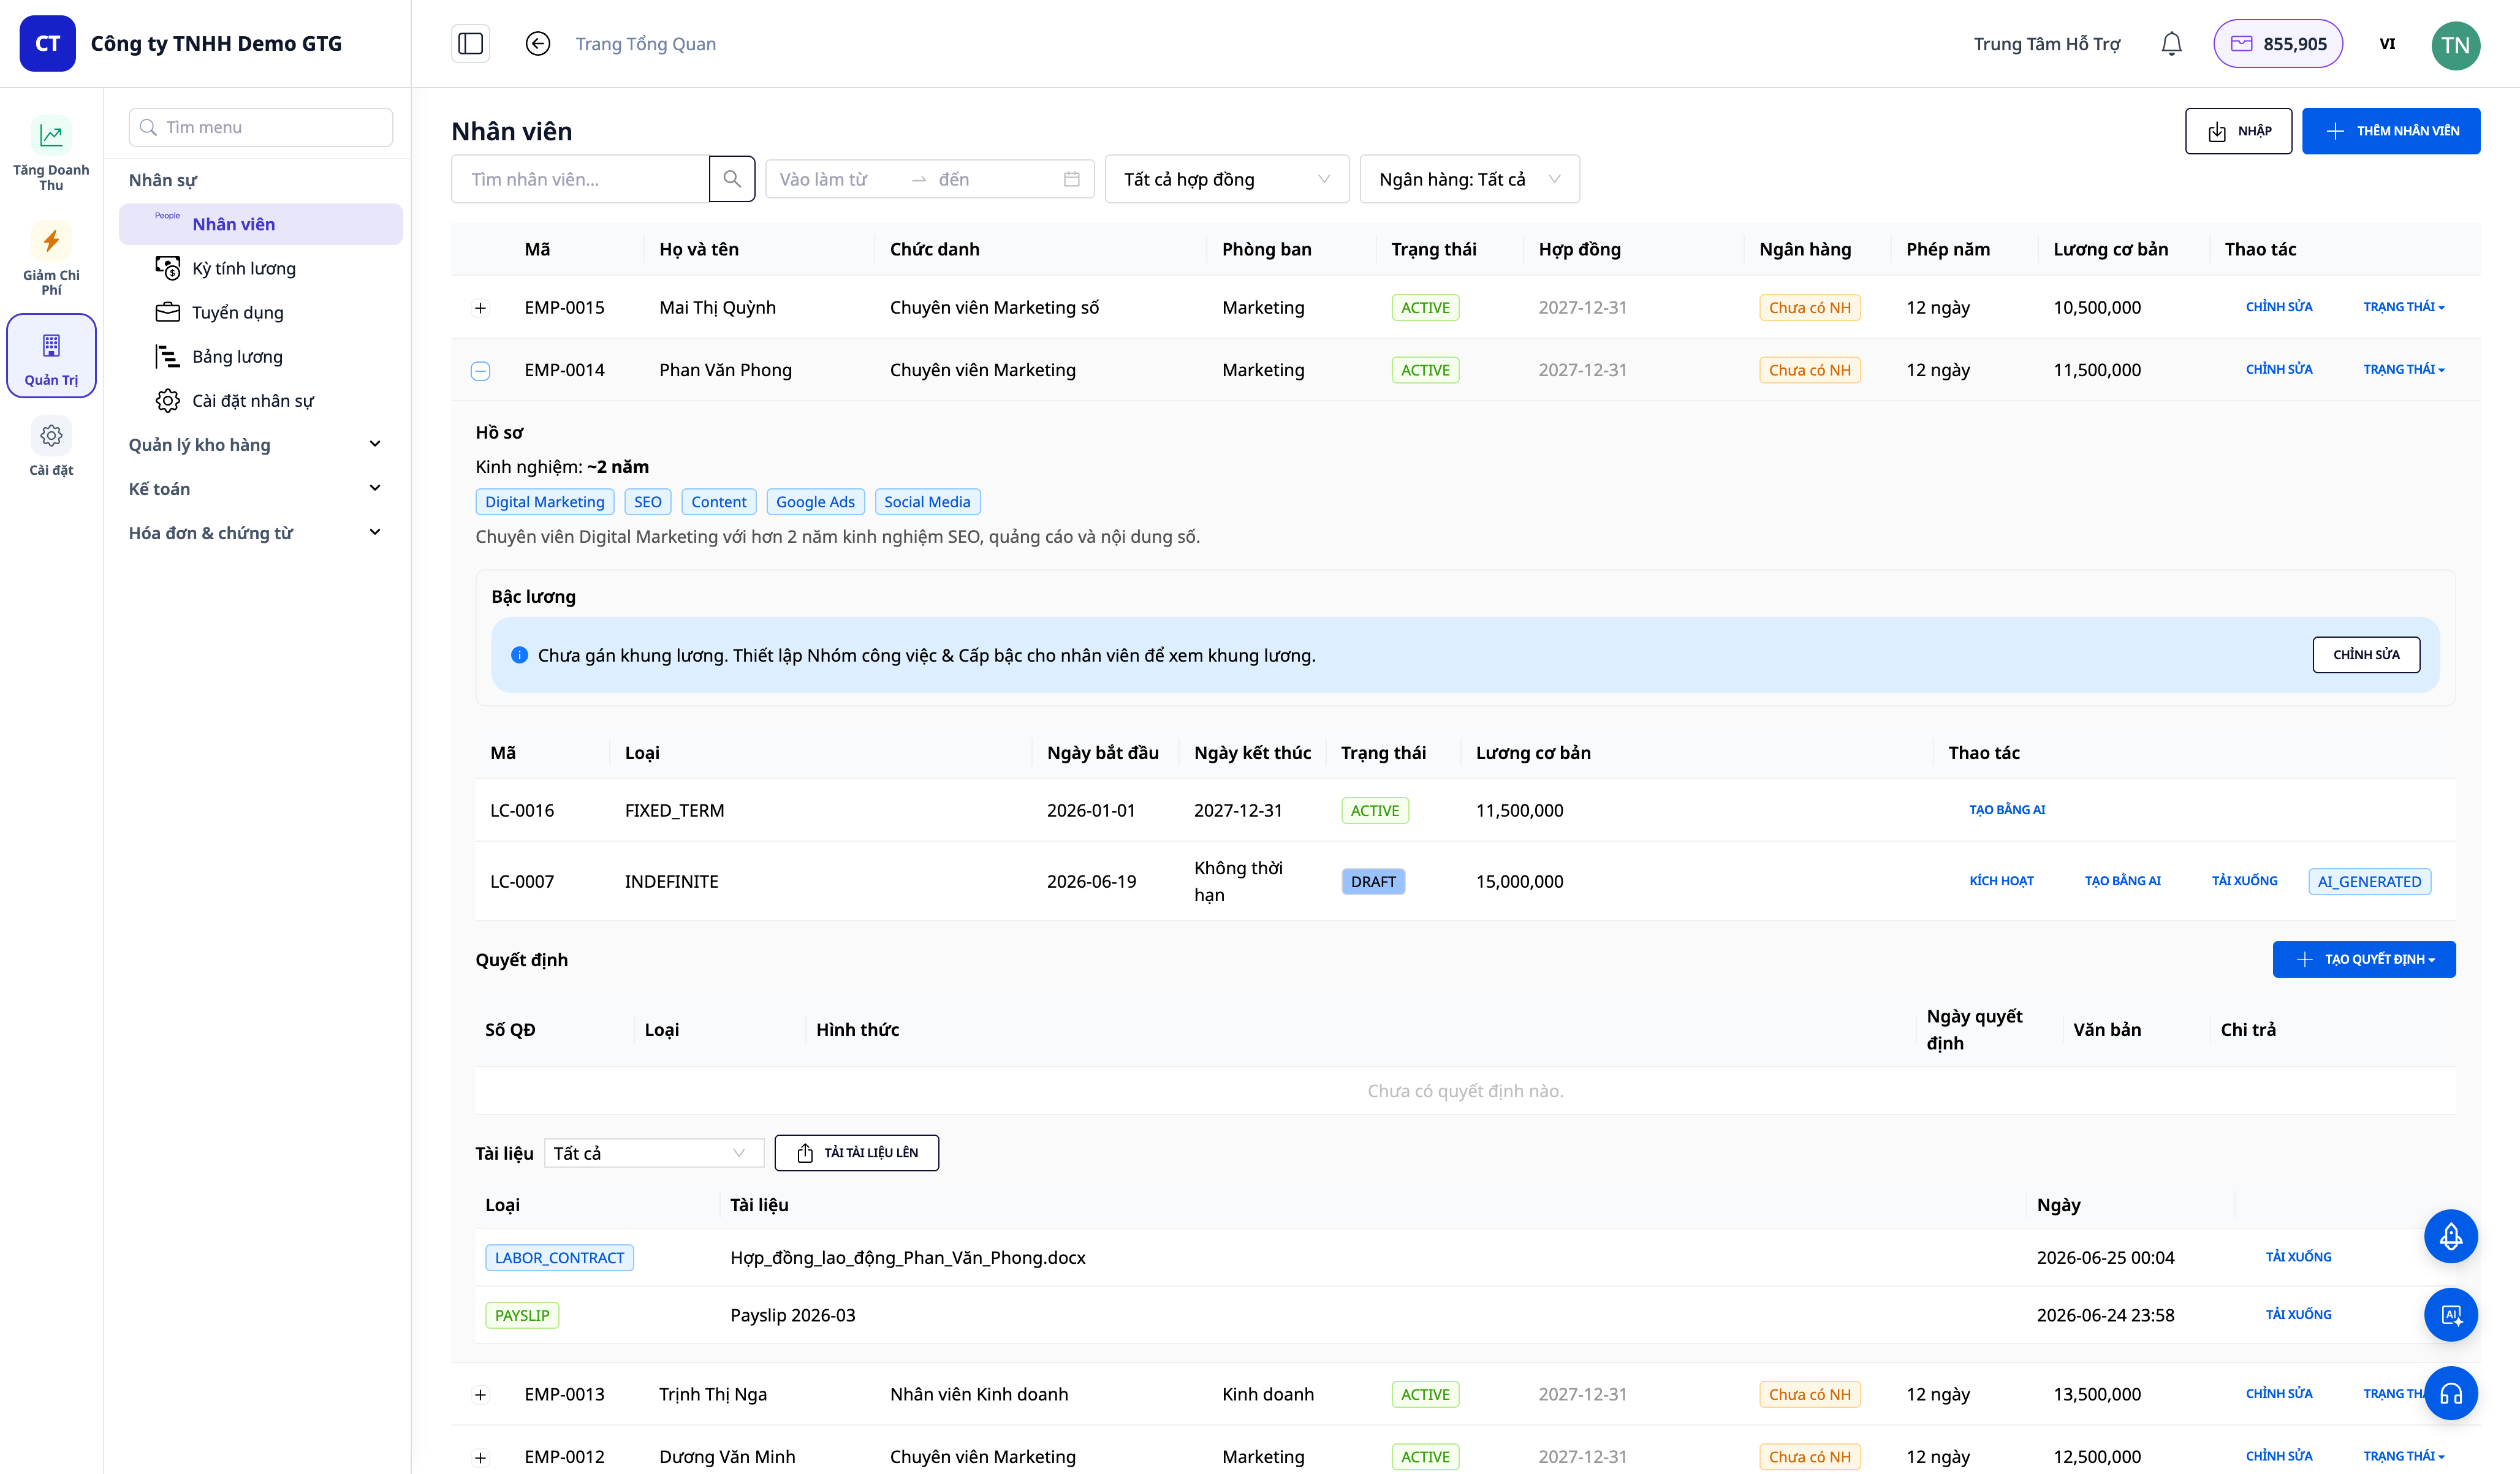
Step 4 — Activate Contract
- On the newly created contract, click Activate.
✅ Expected Result: The contract status changes to ACTIVE. Each employee can only have one active contract — attempting to activate a second contract will result in an error message.
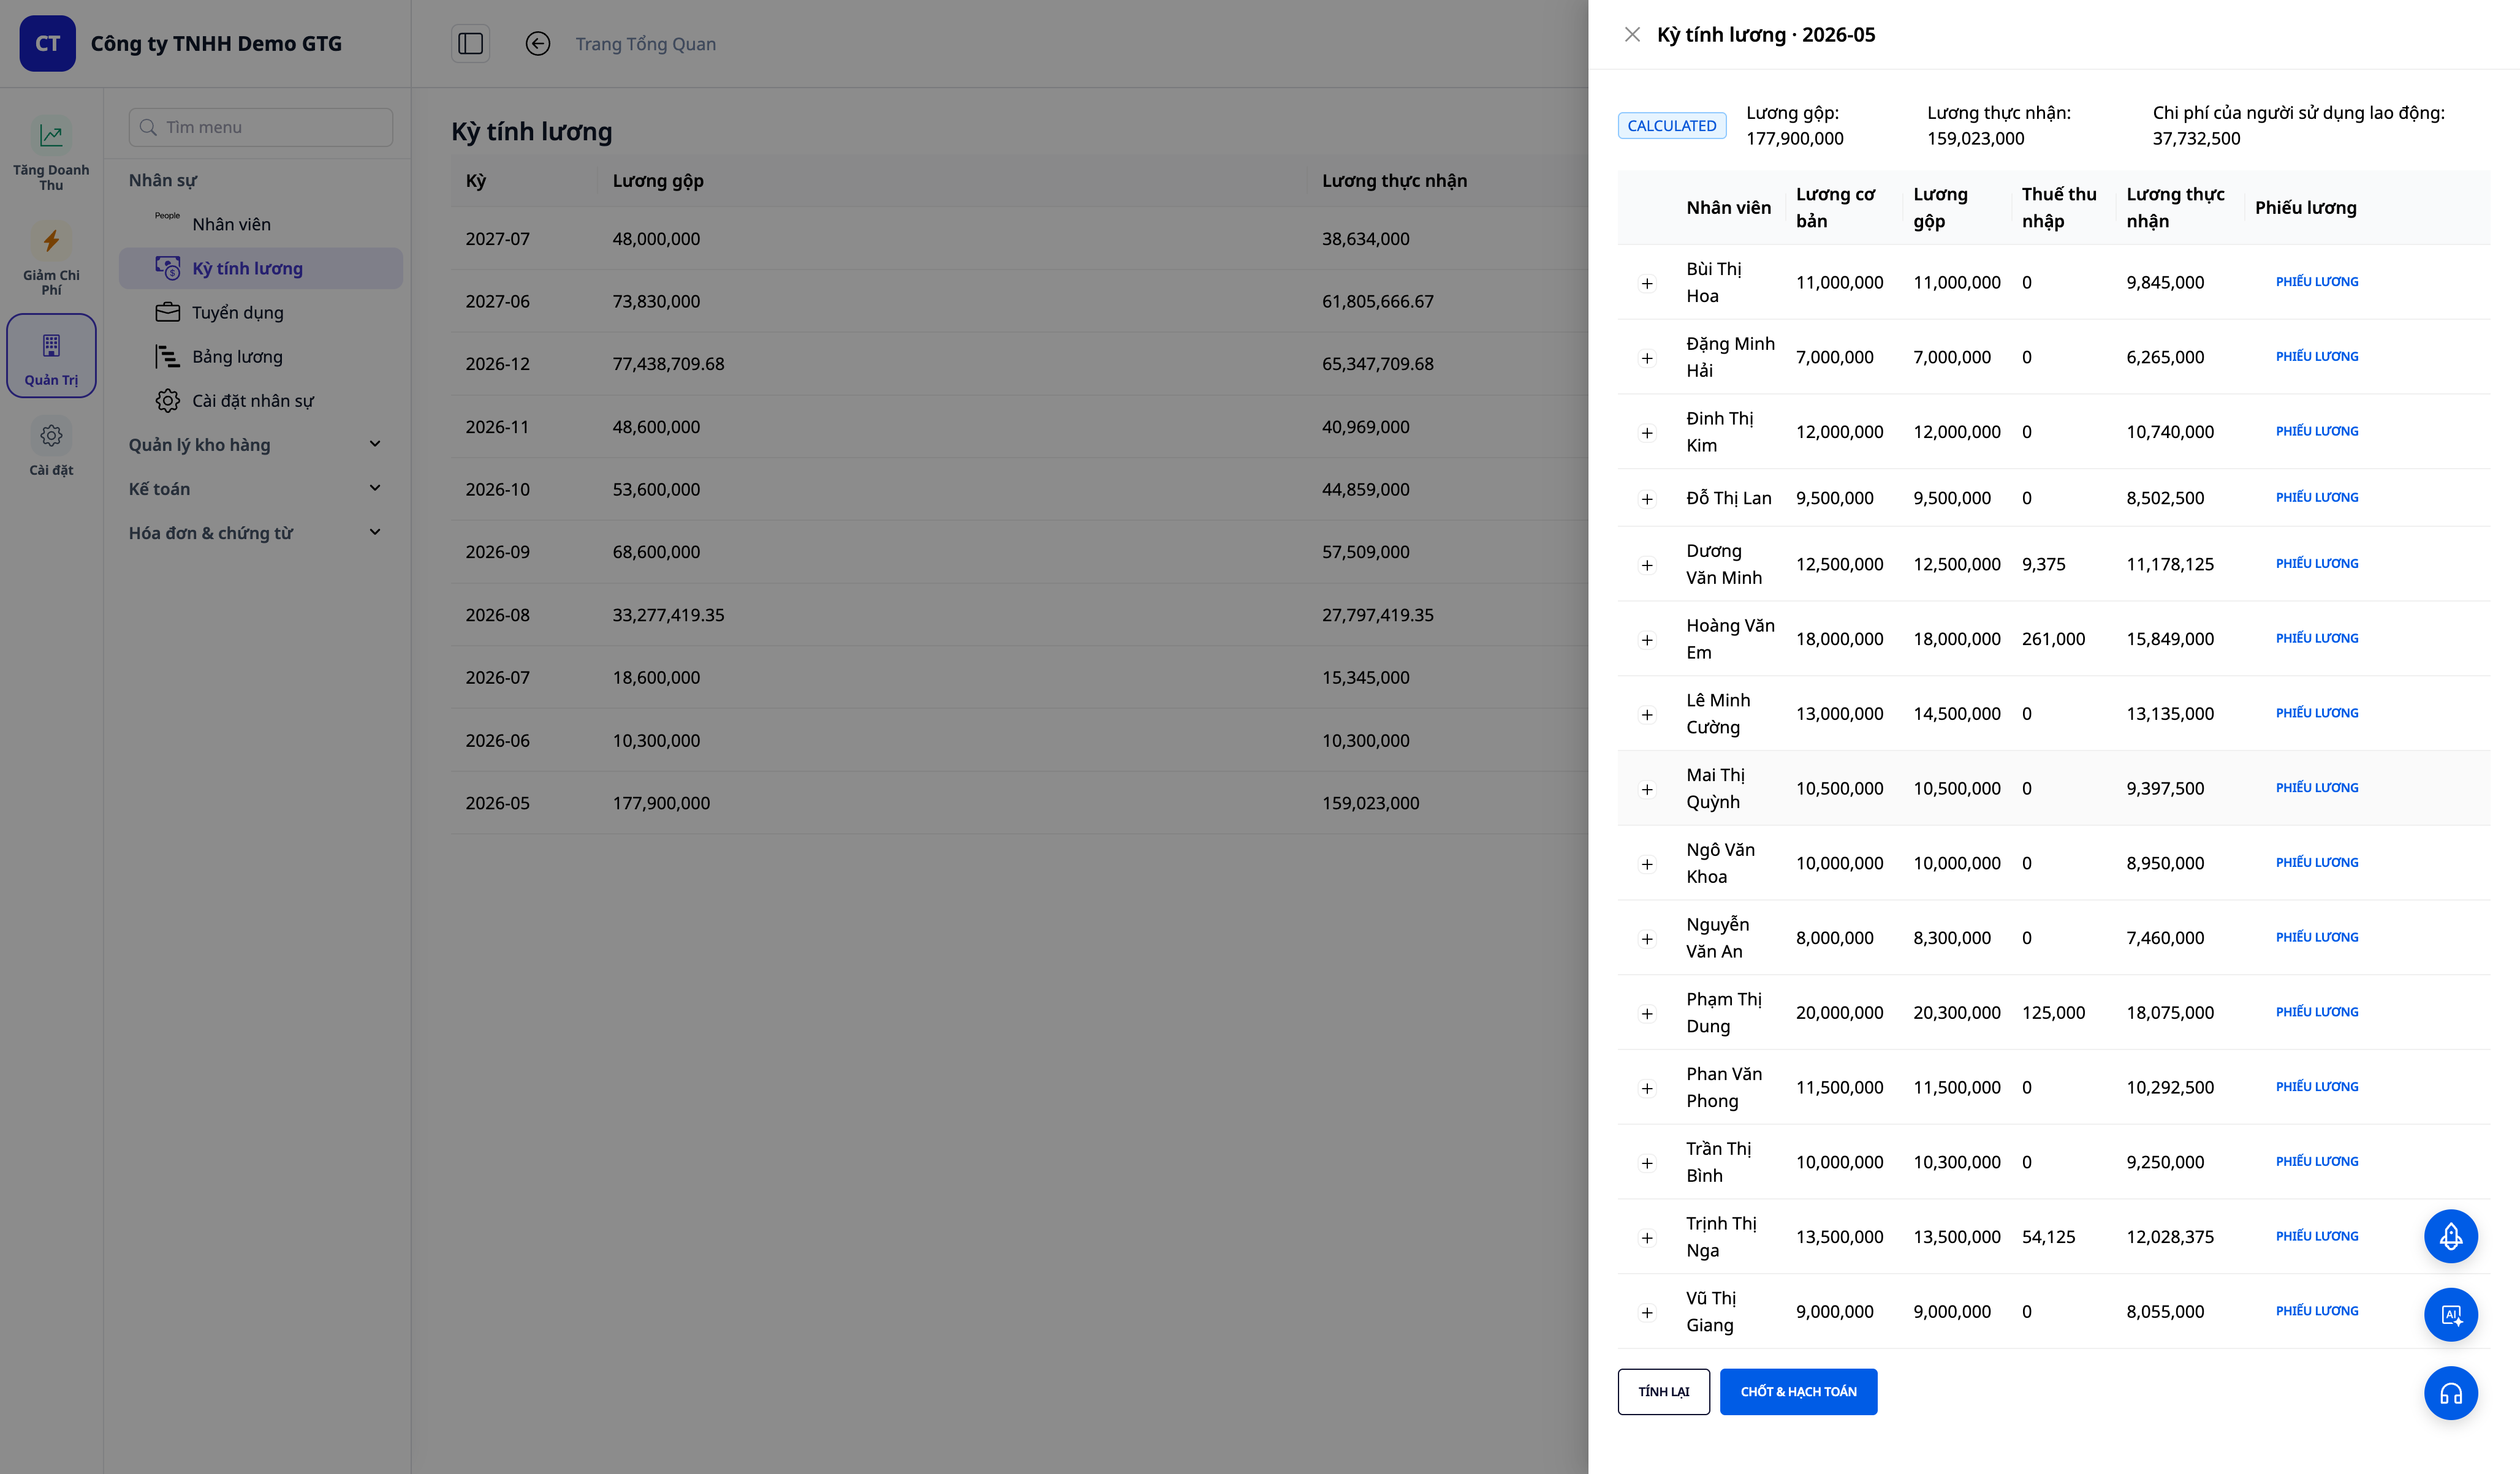
Step 5 — Create Monthly Payroll
- Open HR → Payroll Runs → + Create Payroll (or wait for the system to auto-create a draft at the end of the month).
- Select the payroll period (month/year) → Create.
- Click Calculate.
✅ Expected Result: The system calculates for each employee: Gross Salary → Social Insurance/Health Insurance/Unemployment Insurance → Personal Income Tax → Net Salary. The payroll is in CALCULATED status.
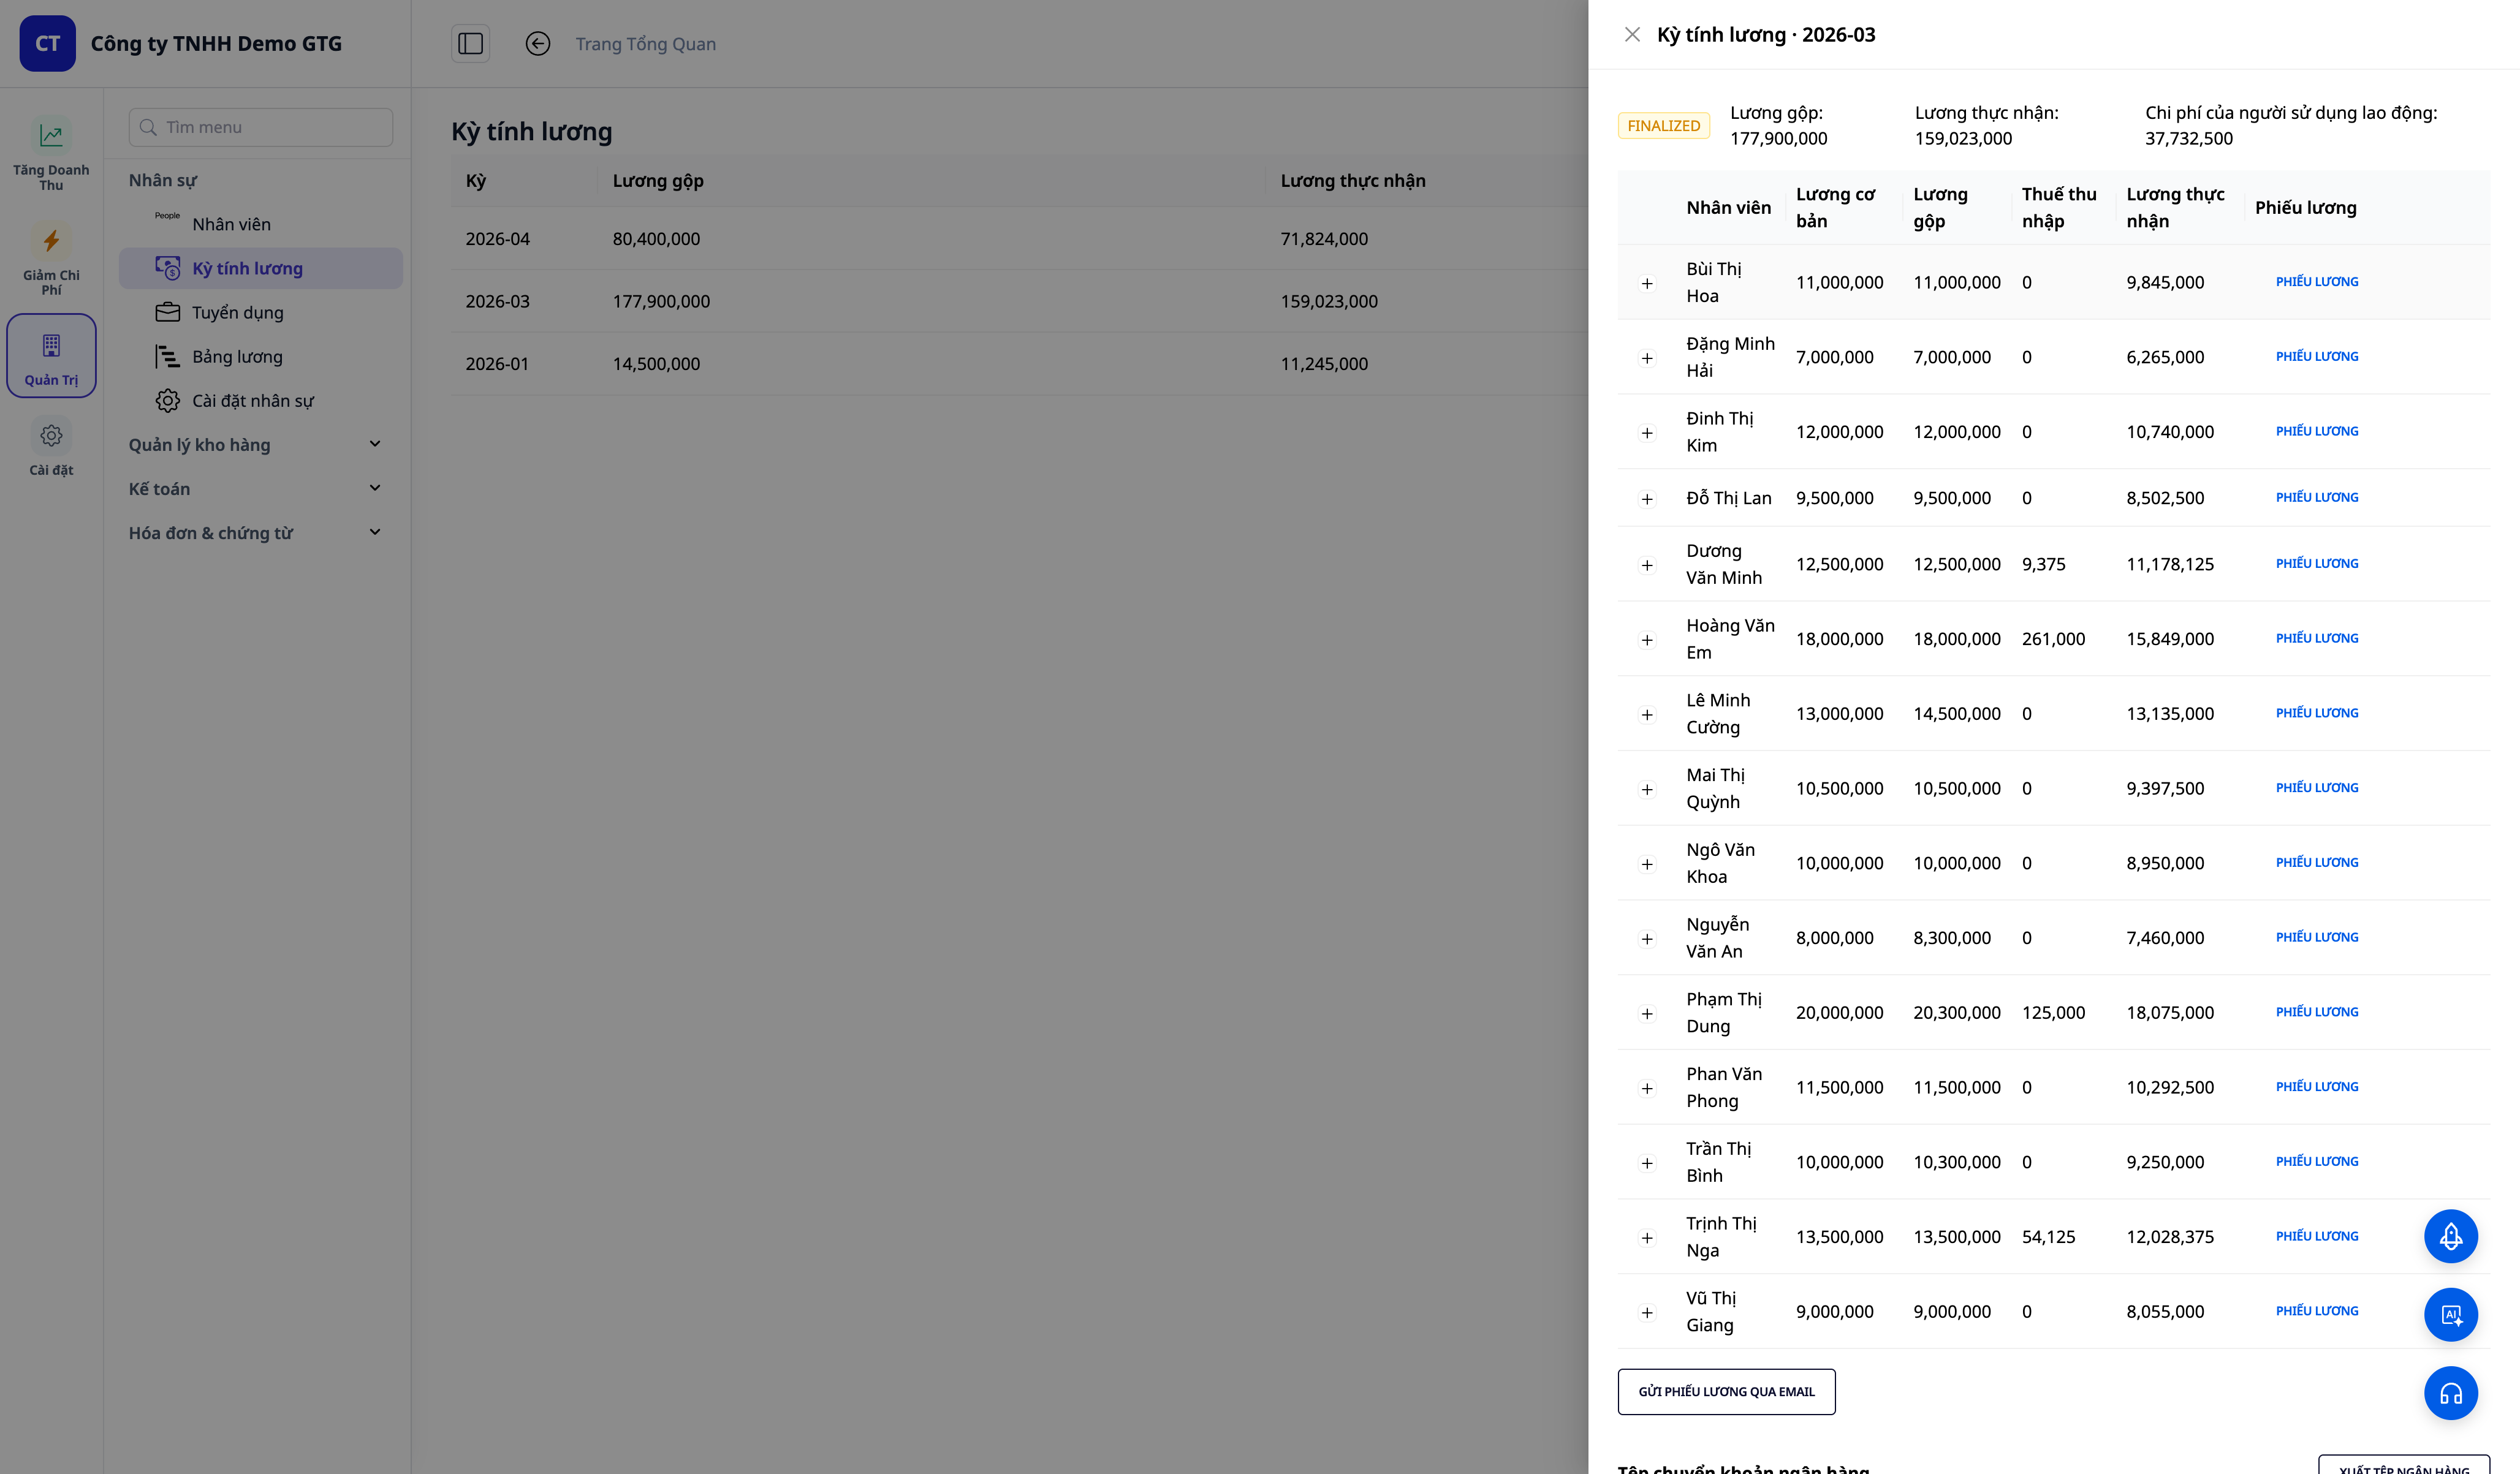
Step 6 — Review and Finalize Payroll
- Open the payroll run details, review gross/deductions/net pay for each person.
- Make one-time adjustments if needed (bonuses, leave...).
- Click Finalize.
✅ Expected Result: The status changes to FINALIZED. The system automatically triggers the accounting workflow to post the payroll expense journal entry.
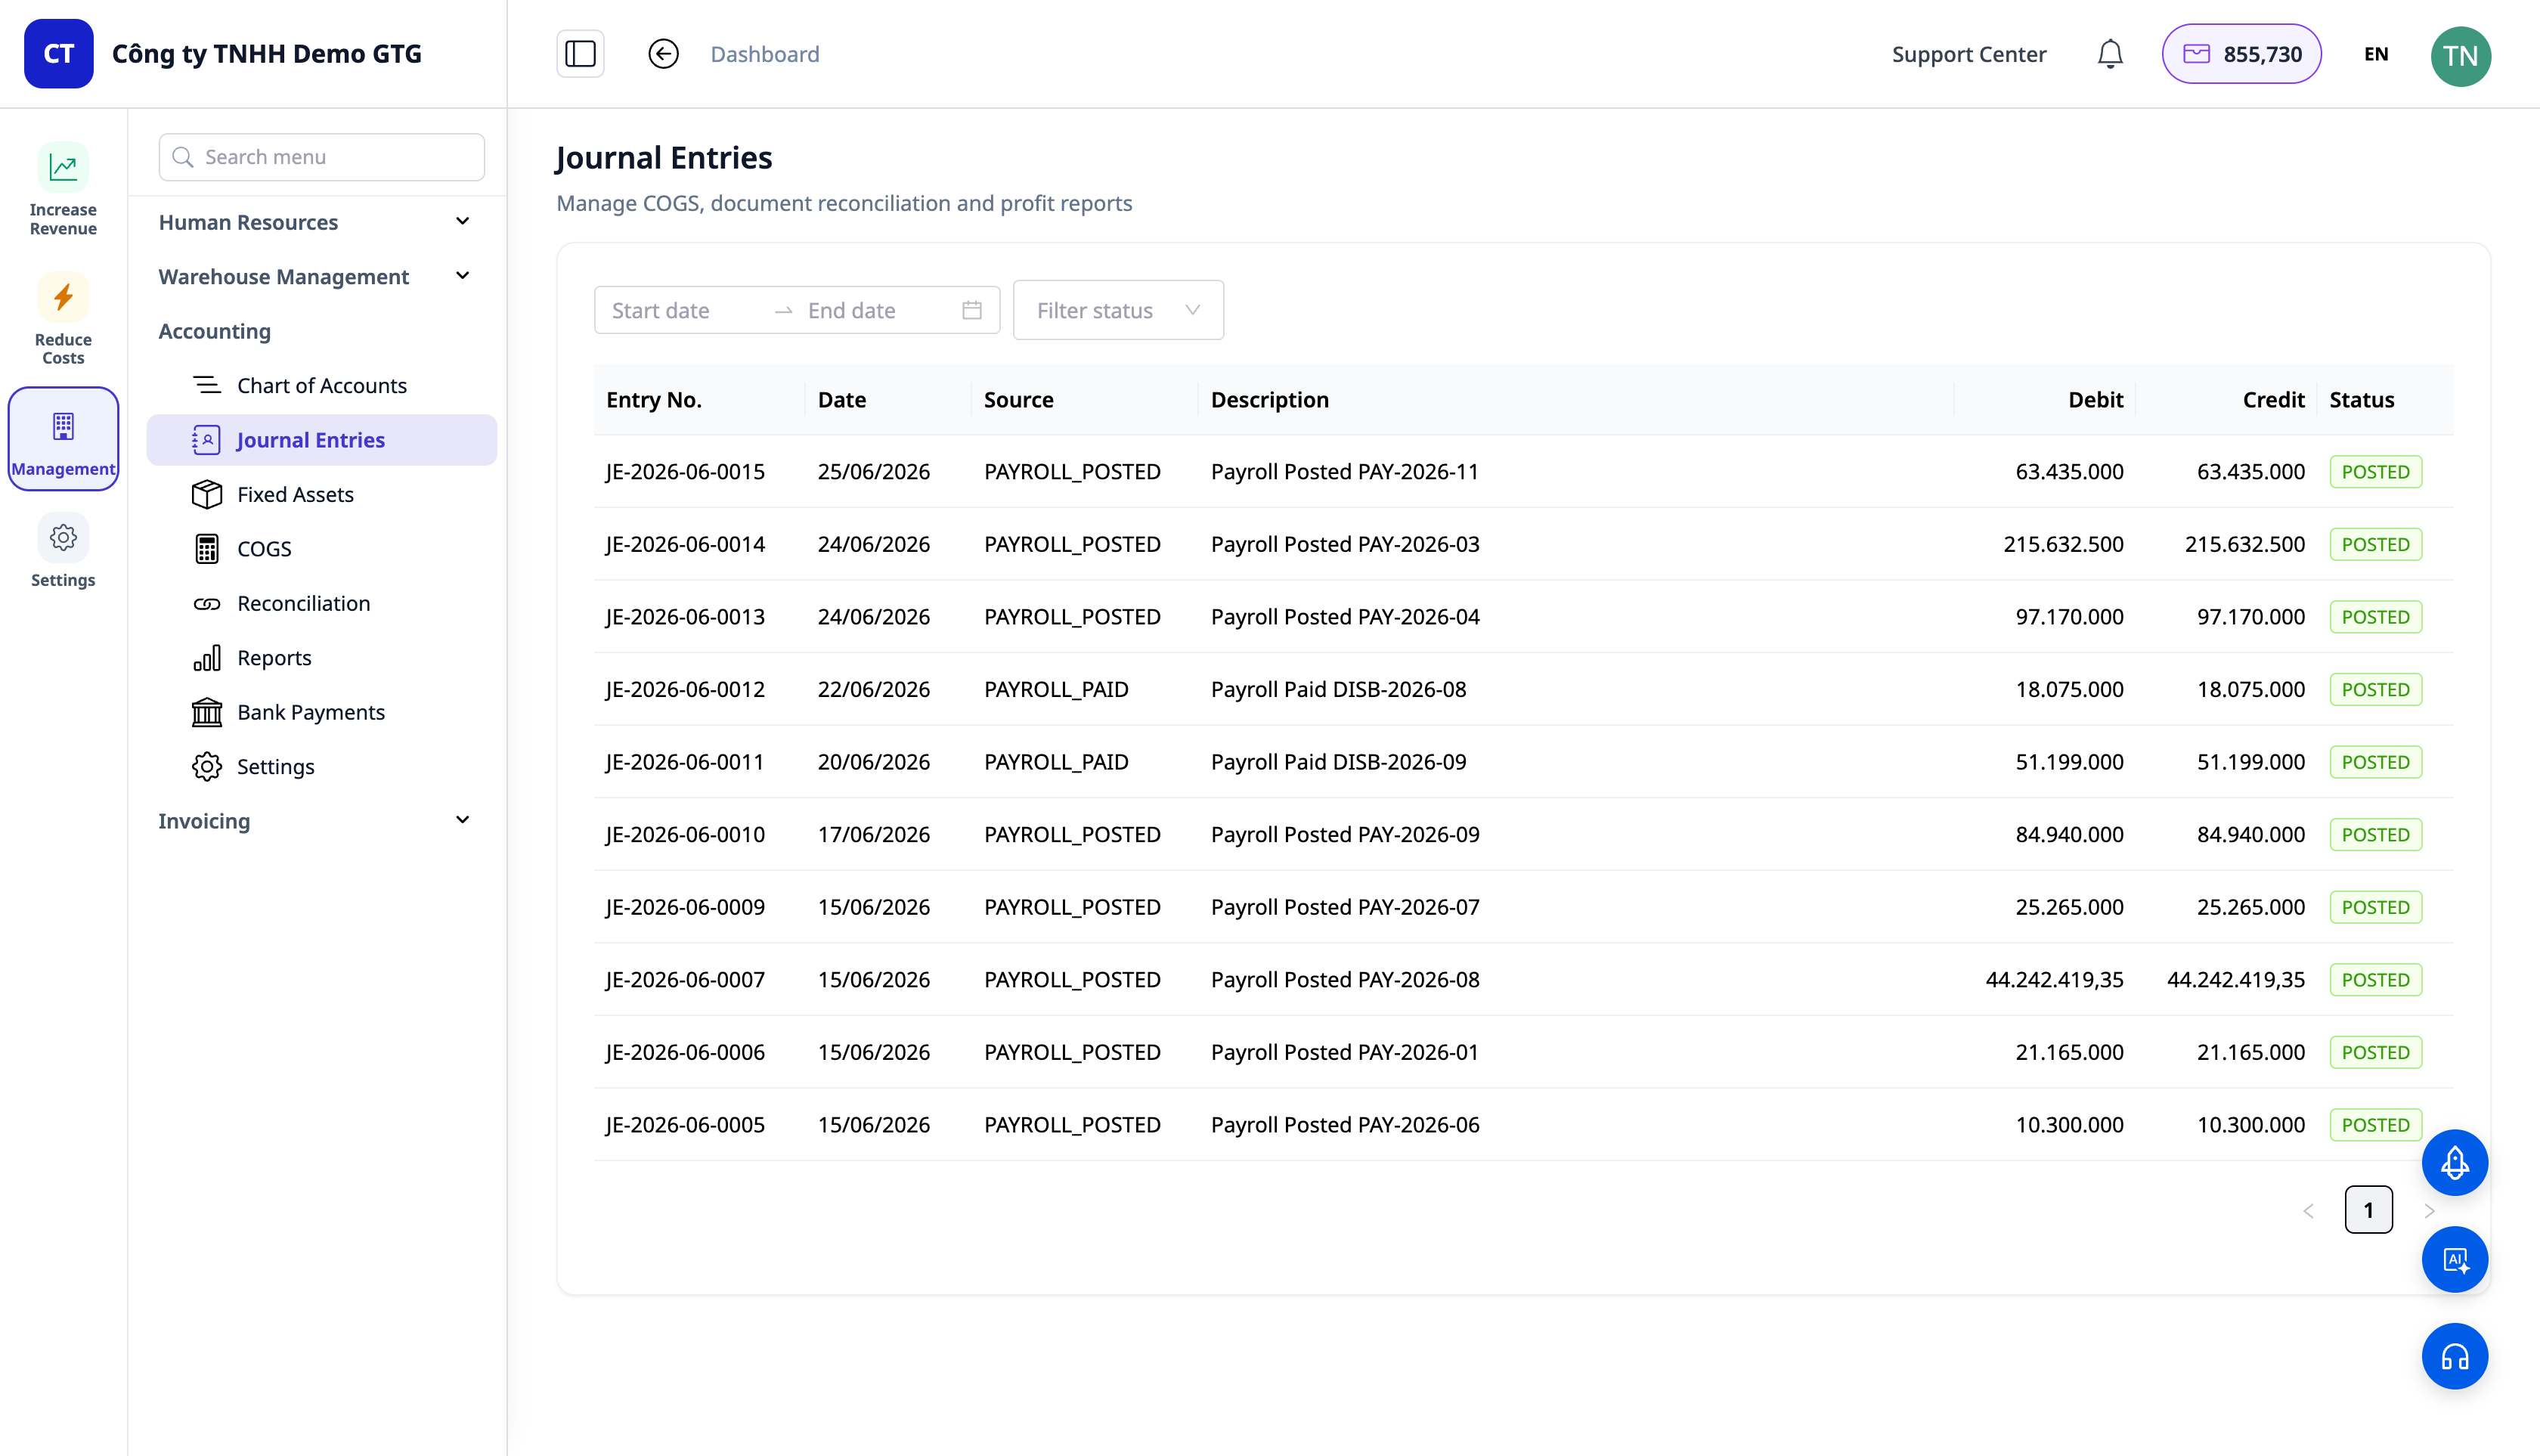
Step 7 — View Automatic Payroll Journal Entries in Ledger
- Open Management → Accounting → Journal Entries. Find the payroll expense entry for the finalized period, click the row to view details. (Or view the workflow run log for the payroll workflow.)
✅ Expected Result: A balanced journal entry is automatically created: Debit Salary Expense (642) / Credit Salaries Payable (334) + Social Insurance contributions (3383/3384/3386). Personal Income Tax withheld is accounted for separately when PIT is generated for that payroll period. The payroll run changes to POSTED and is linked to that journal entry.
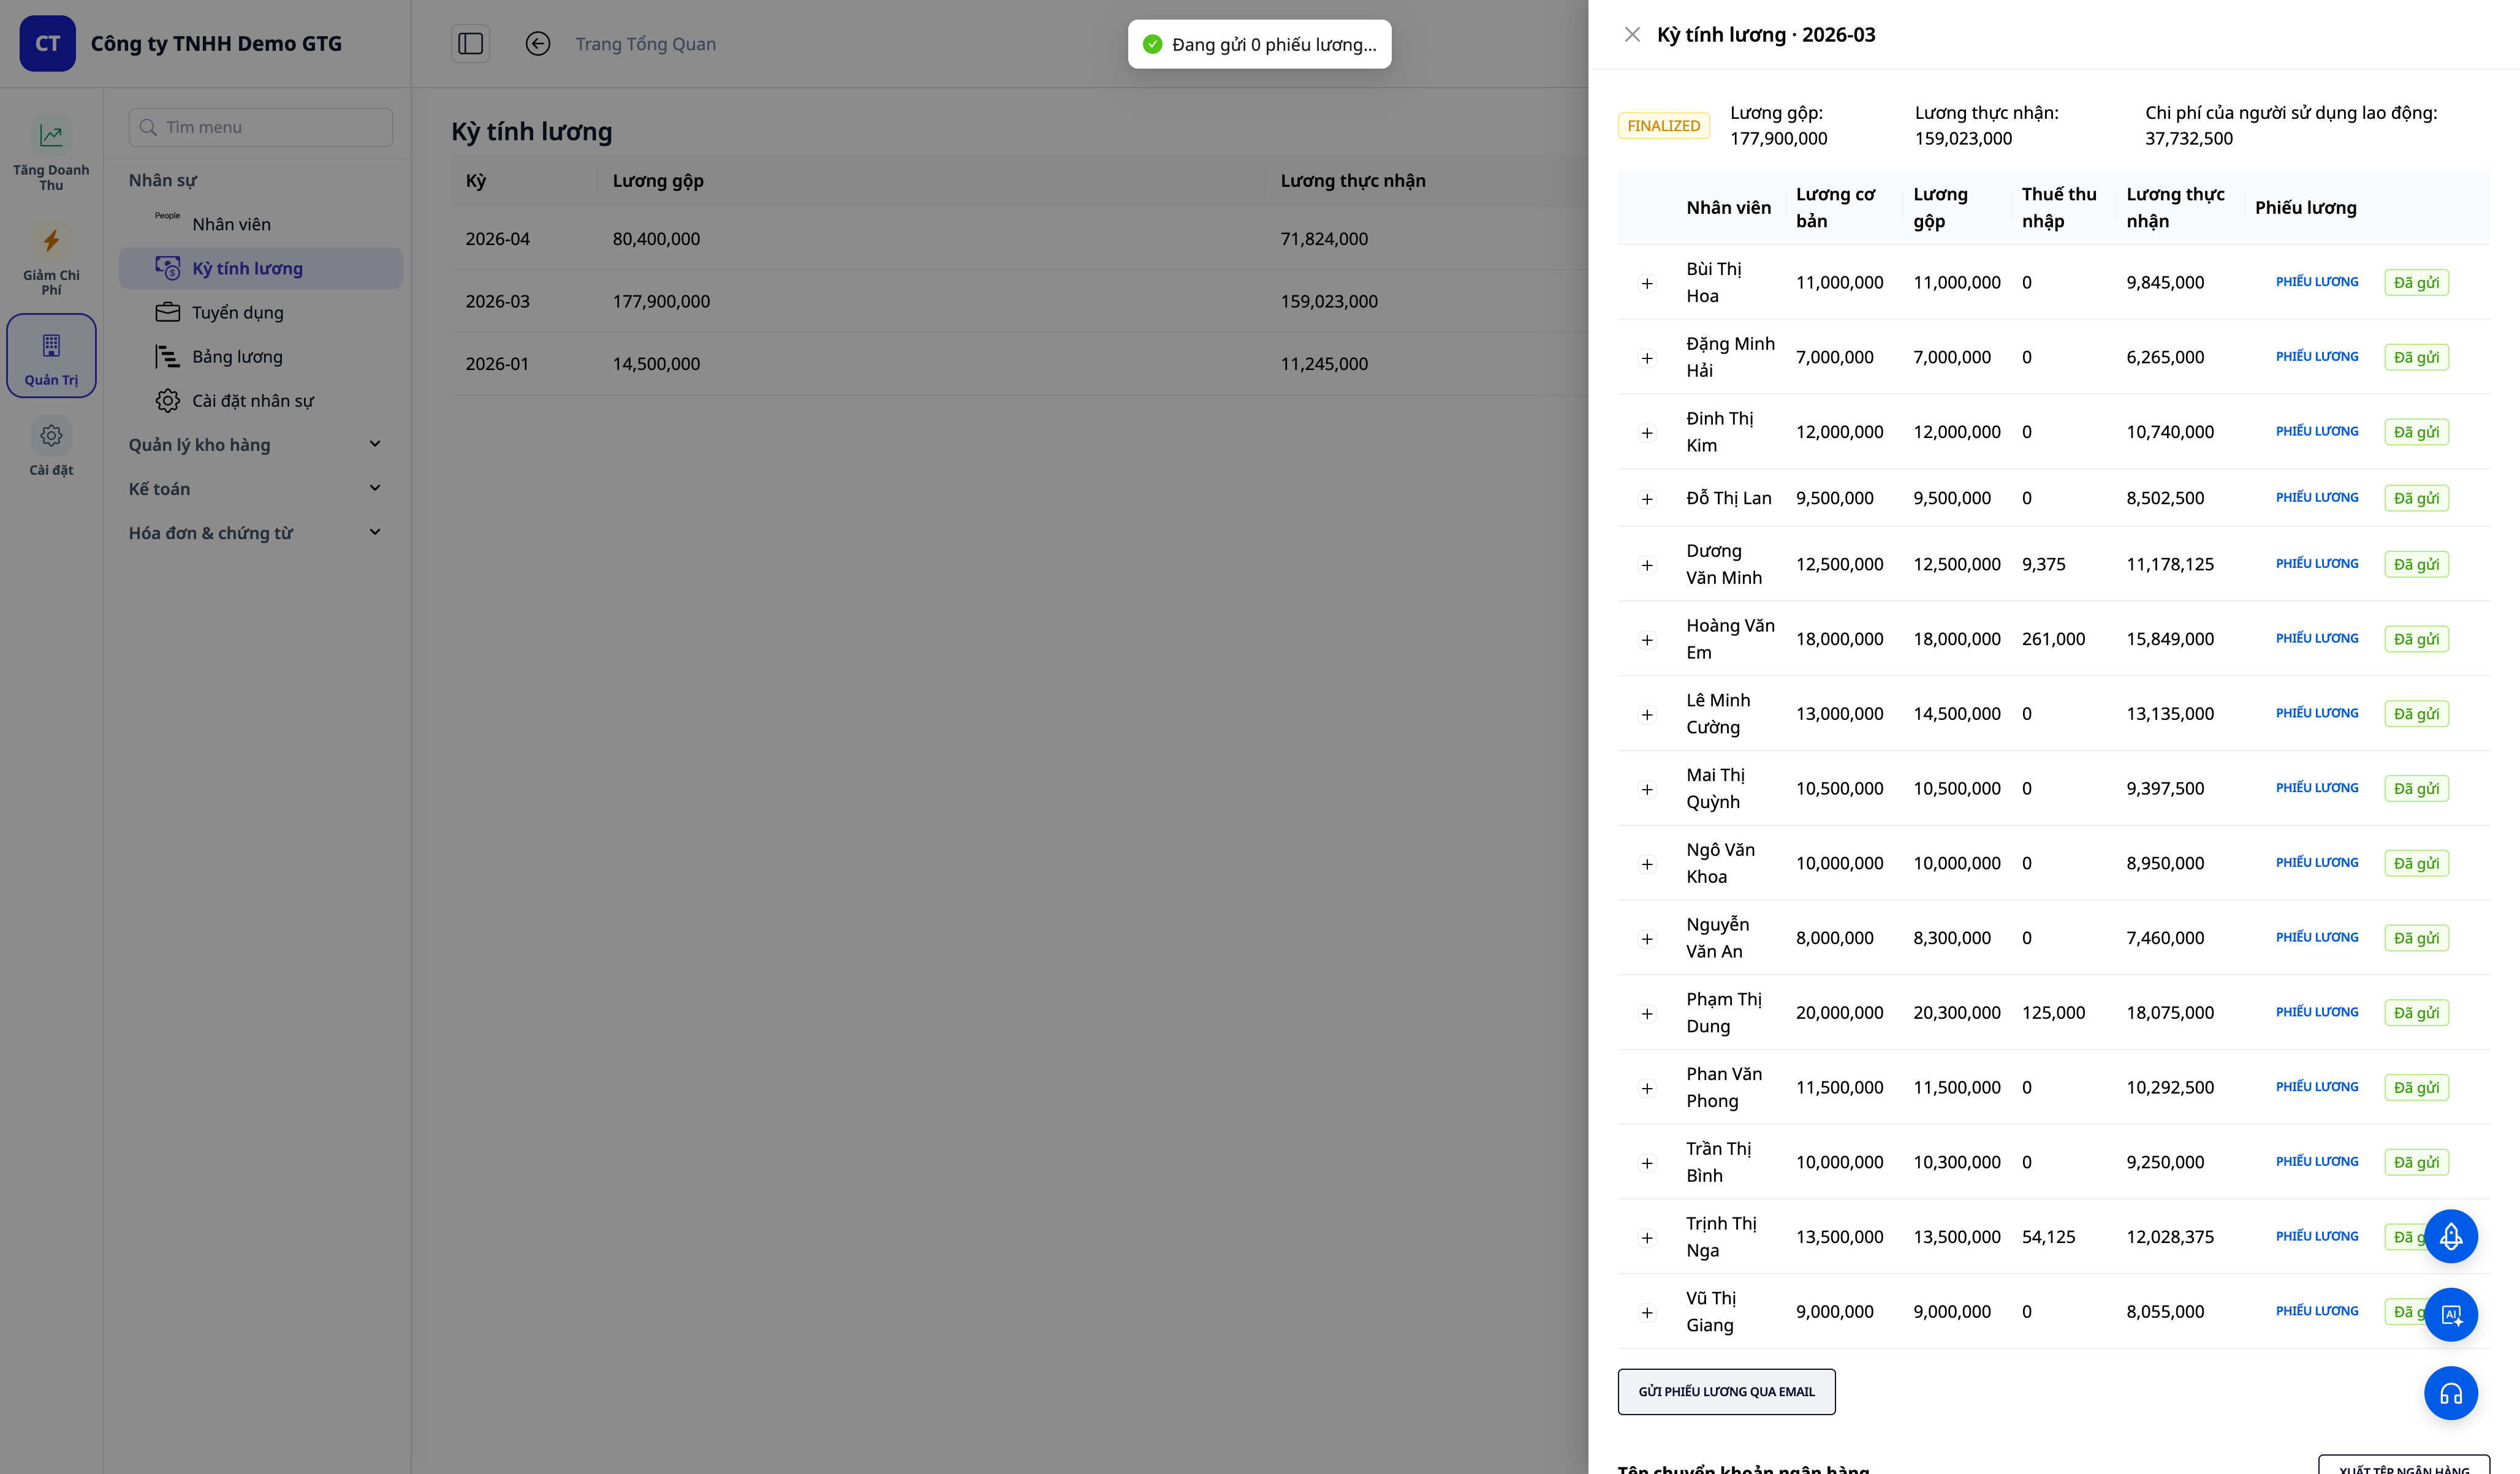
Step 8 — Send Payslips to Employees
- (Requires a connected inbox in HR Settings.) On the finalized payroll run, select Send payslips.
✅ Expected Result: Each employee receives a payslip email sent from your company's address (not a generic one), detailing their gross/deductions/net pay.
Quick Reference: Expected Results
| Action | What You Will See |
|---|---|
| Enable Payroll (Step 1) | Successful save + 2 payroll workflows created + "View workflow" links |
| Add Employee (Step 2) | EMP-xxxx in list; salary column hidden if lacking view permission |
| Generate with AI (Step 3) | DOCX/PDF Contract text + Download button |
| Activate Contract (Step 4) | ACTIVE status; blocks second contract |
| Calculate Payroll (Step 5) | Gross → SI → PIT → Net for each person; CALCULATED |
| Finalize Payroll (Step 6) | FINALIZED; triggers accounting event |
| View Ledger (Step 7) | Automatic balanced entry; POSTED payroll |
| Send Payslips (Step 8) | Payslip email from company inbox |
Notes
- Payroll Permissions: If you use an "HR Viewer" account, salary/bank/tax fields will be hidden — this is by design to protect sensitive data.
- Sending Payslips requires a connected inbox; if not connected, the system will provide connection instructions (a one-time setup).
- Bank Disbursement is an extended feature planned for the roadmap — currently, the journal entry stops at Salaries Payable (334).
Maybe You Should Read These
Guide
ACCOUNTING & INVOICE
Grow. Thrive. Go.
Accounting & E-Invoice User Guide
Guide
LINKEDIN ADS
Grow. Thrive. Go.
LinkedIn Ads User Guide - GTG CRM

Guide
AI BIZ EMAIL
Grow. Thrive. Go.
AI Biz Email: Create and Send Professional Marketing Emails

Guide
AI PRODUCT CREATION
Grow. Thrive. Go.
AI-Powered Product Creation Guide
Guide
FORM BUILDER
Grow. Thrive. Go.
Customer Information Collection Form Builder Guide

Guide
ARTICLE INTEGRATION
Grow. Thrive. Go.
Guide to Integrating GTG CRM Articles with Your Website

Guide
AI SECTION CREATION
Grow. Thrive. Go.
Guide to Creating Website Sections with AI

Guide
AI EMAIL CAMPAIGN
Grow. Thrive. Go.
AI Email Campaign Guide

Guide
AI WEBSITE CREATION
Grow. Thrive. Go.
AI Full Website Creation Guide

Guide
AI ARTICLE GENERATION
Grow. Thrive. Go.
AI-Generated Article Guide

Guide
OMNI-CHANNEL ORDER MANAGEMENT
Grow. Thrive. Go.
Omni-channel Order Management — Shopee + Lazada + TikTok Shop

Guide
AUTOMATIC ORDER CREATION
Grow. Thrive. Go.