What you will be able to do after this tutorial
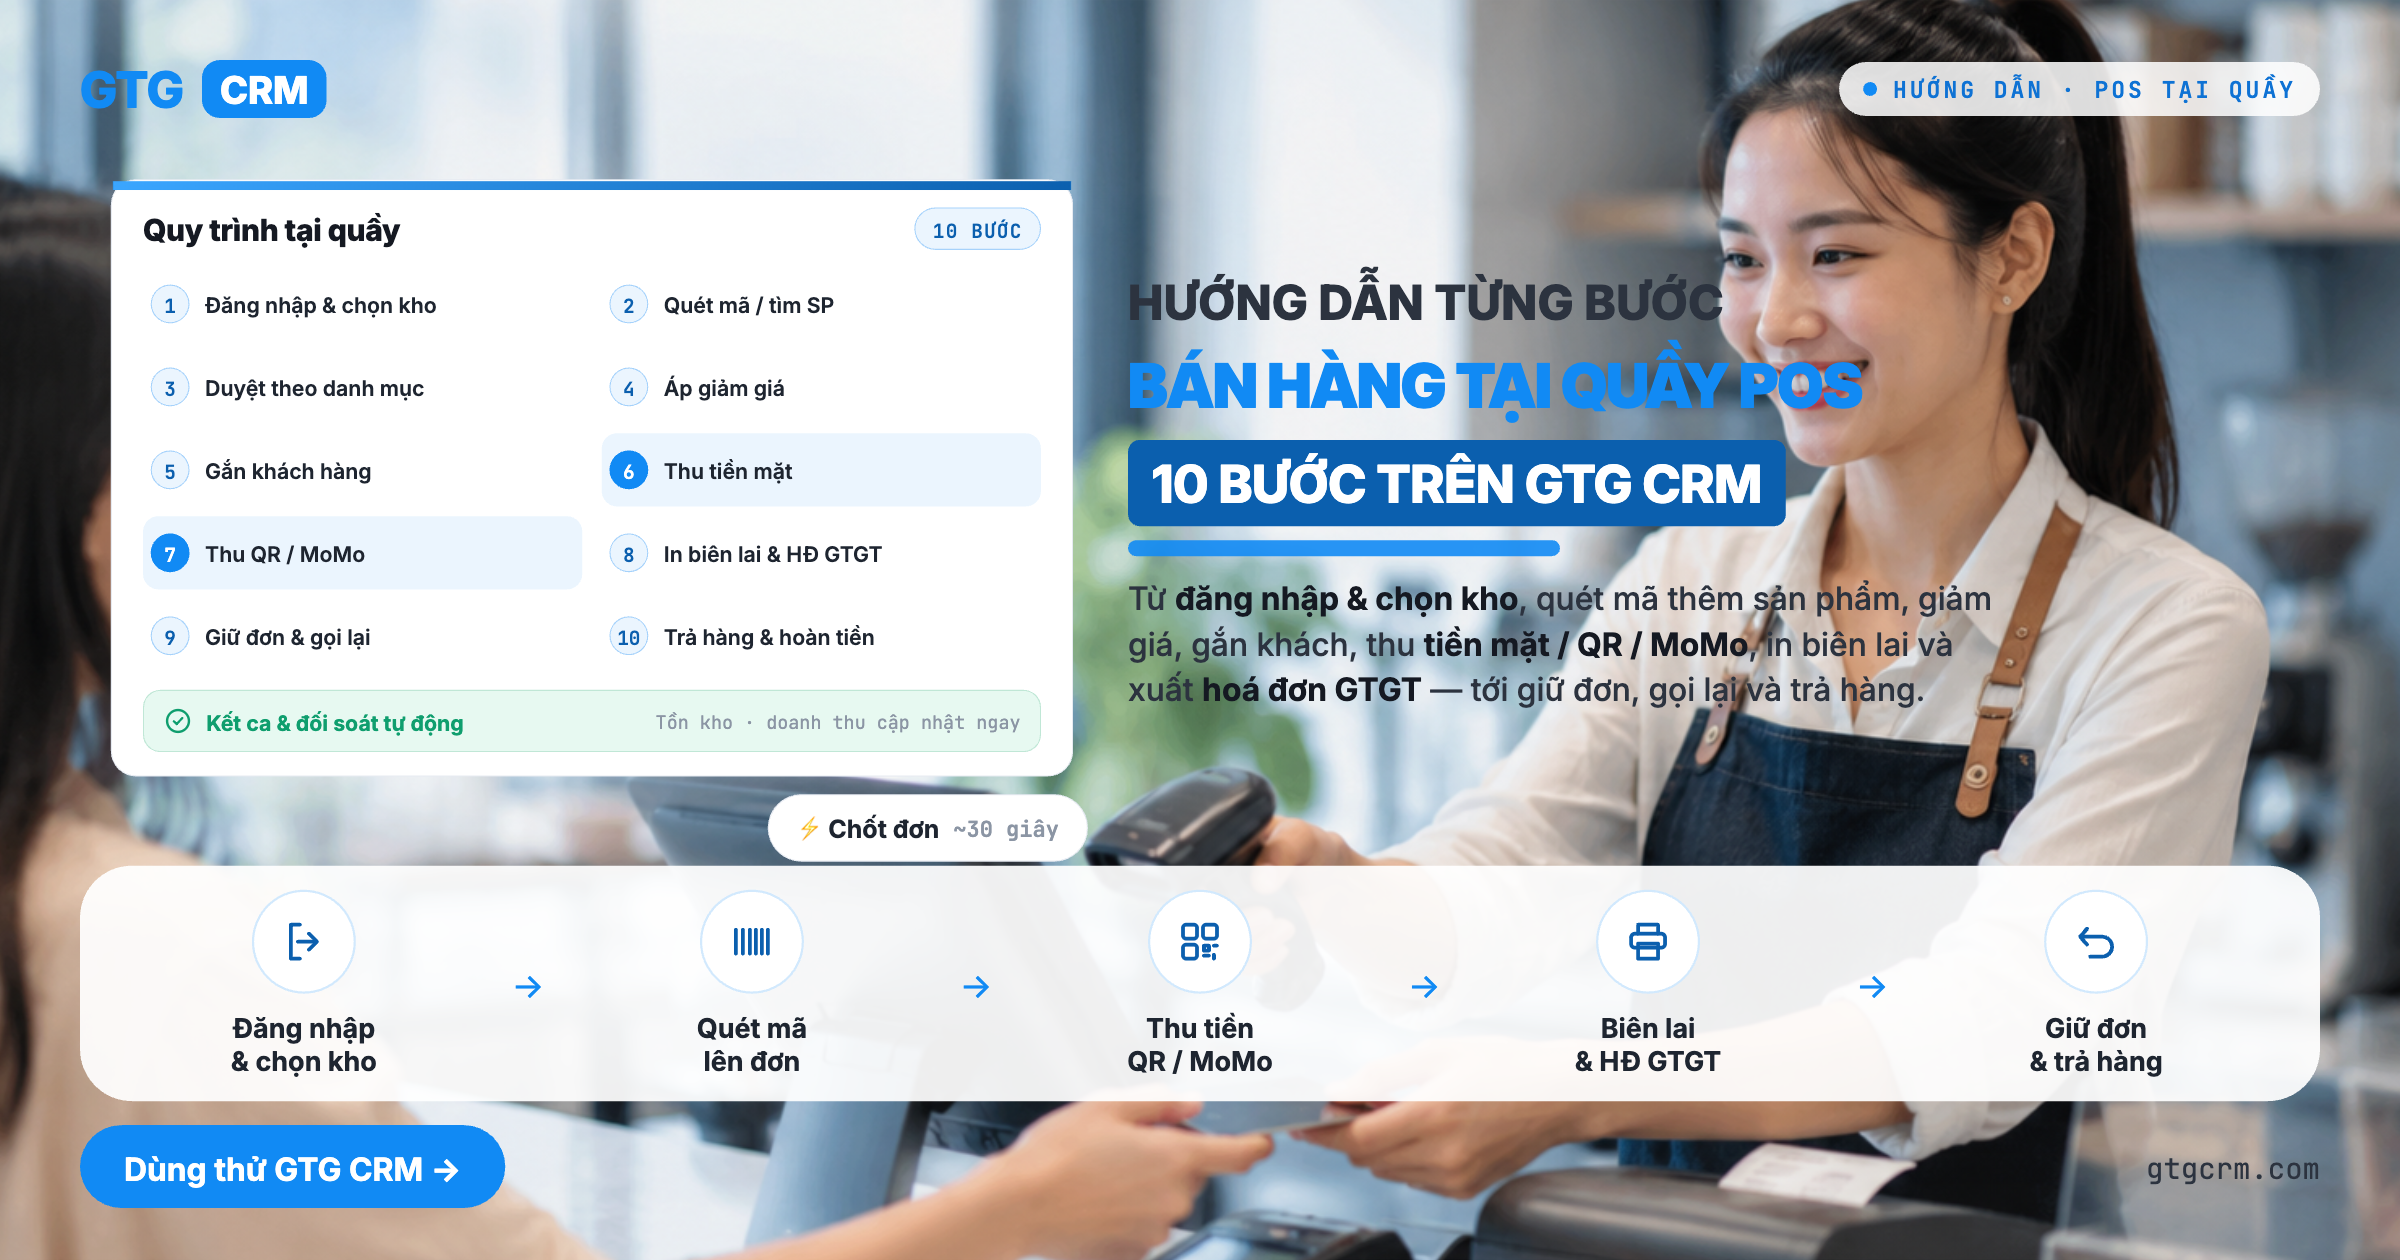
Log in to the cashier screen and select the store warehouse → add products to the cart (scan code / browse / search) → apply discounts and attach customers if needed → receive **cash** or **QR/MoMo** → print receipts and (optionally) let customers self-collect VAT invoices → **hold order/recall** when needed → and **return items, refund** correctly according to records. Conclusion: you can run a full sales shift at the counter, and all orders will be synchronized with inventory + customers with the online sales system.
Don't grasp the overview yet? Preview the article POS Sales to understand what POS can do.
Preparation
1. GTG CRM account with Create POS sale permission. — Without this permission, you cannot complete orders at the counter.
2. The store's warehouse is already in the system, and products have prices, barcodes (if scanning), and inventory in that warehouse. — POS deducts inventory from the store warehouse; scanning requires a barcode on the product.
3. (If receiving QR/e-wallet) MoMo/VNPay is enabled and configured in the online store's payment section. — POS uses shared payment configurations; only enabled methods will appear.
4. (If returning items) Account has return permission (higher than a regular cashier). — Returns are a money reversal transaction requiring separate permission; without it, the Returns section will be hidden.
5. (Optional) 58mm/80mm thermal printer connected to the counter machine. — To print receipts and automatically open the cash drawer.
Step 1 — Log in to POS and select store warehouse
Open your browser at pos.gtgcrm.com on your counter machine, and log in with your GTG CRM account.
If you have multiple workspaces/stores, select the correct store for sales.
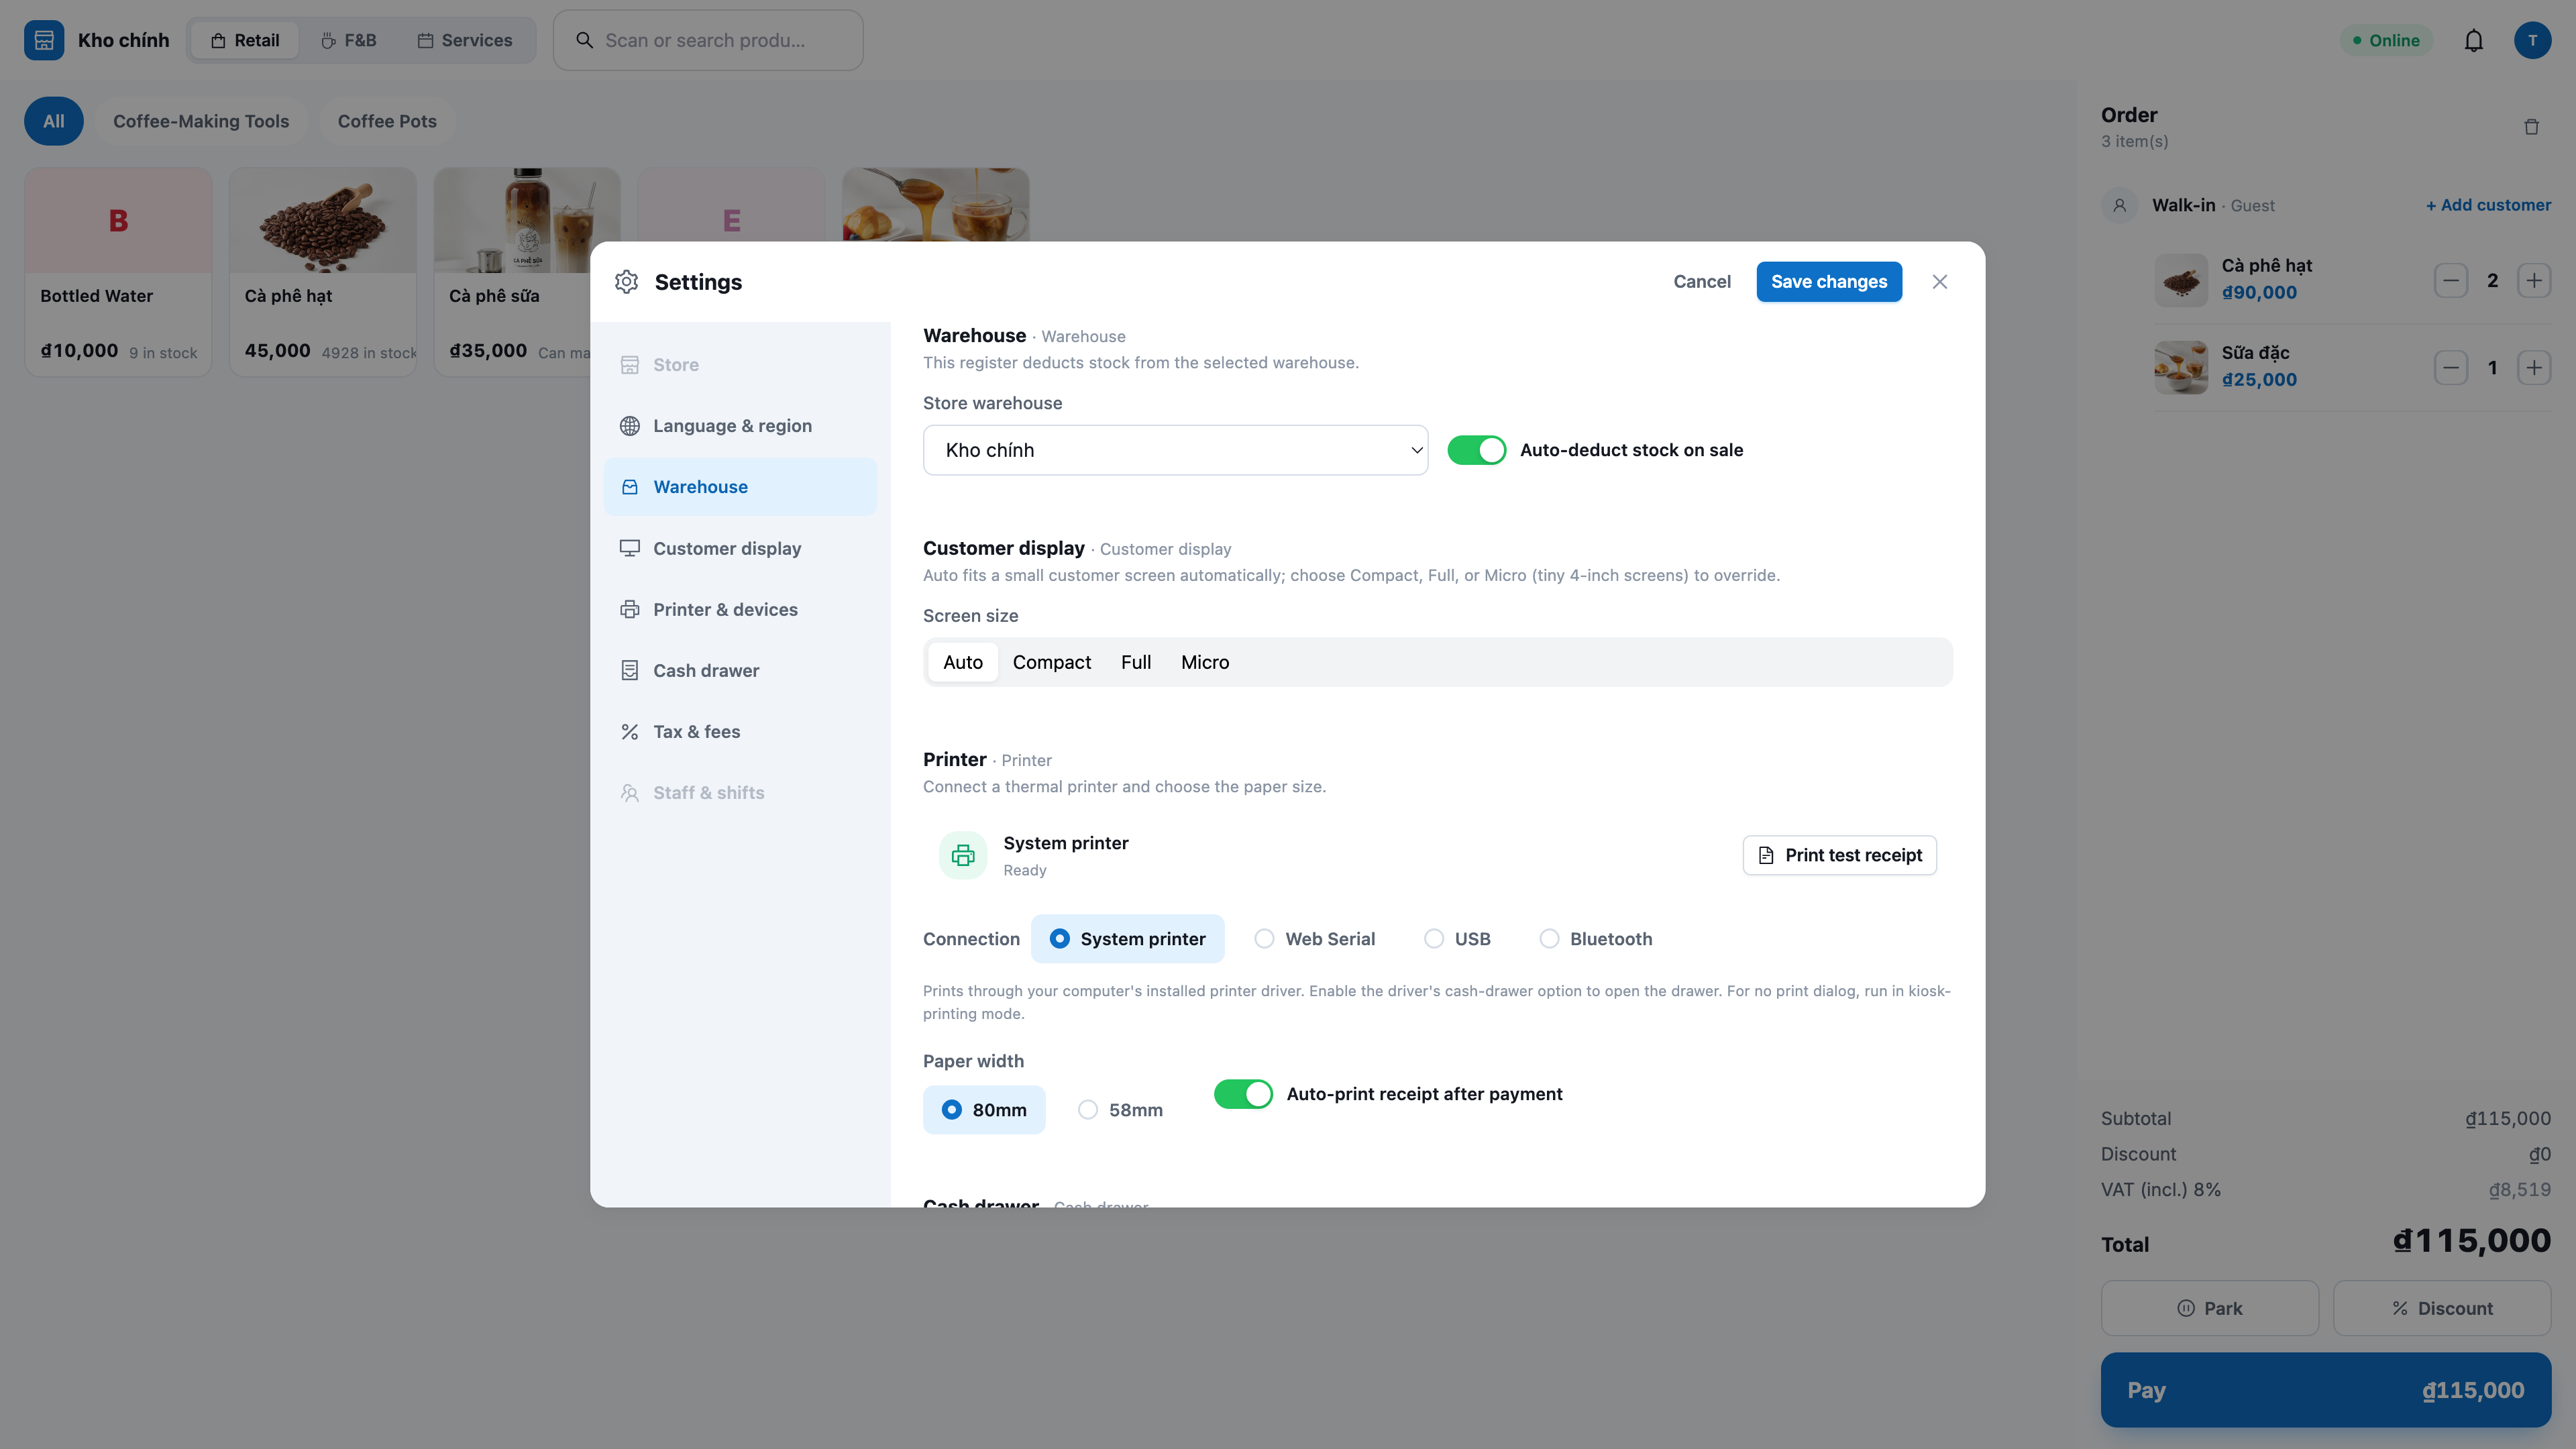
First-time use: go to Settings → select the store warehouse.
✅ Expected result: The POS screen appears (without the CRM interface), the top bar displays the store warehouse name and cashier name. The product grid is ready in the middle of the screen.
Step 2 — Add products to cart (scan code / browse / search)
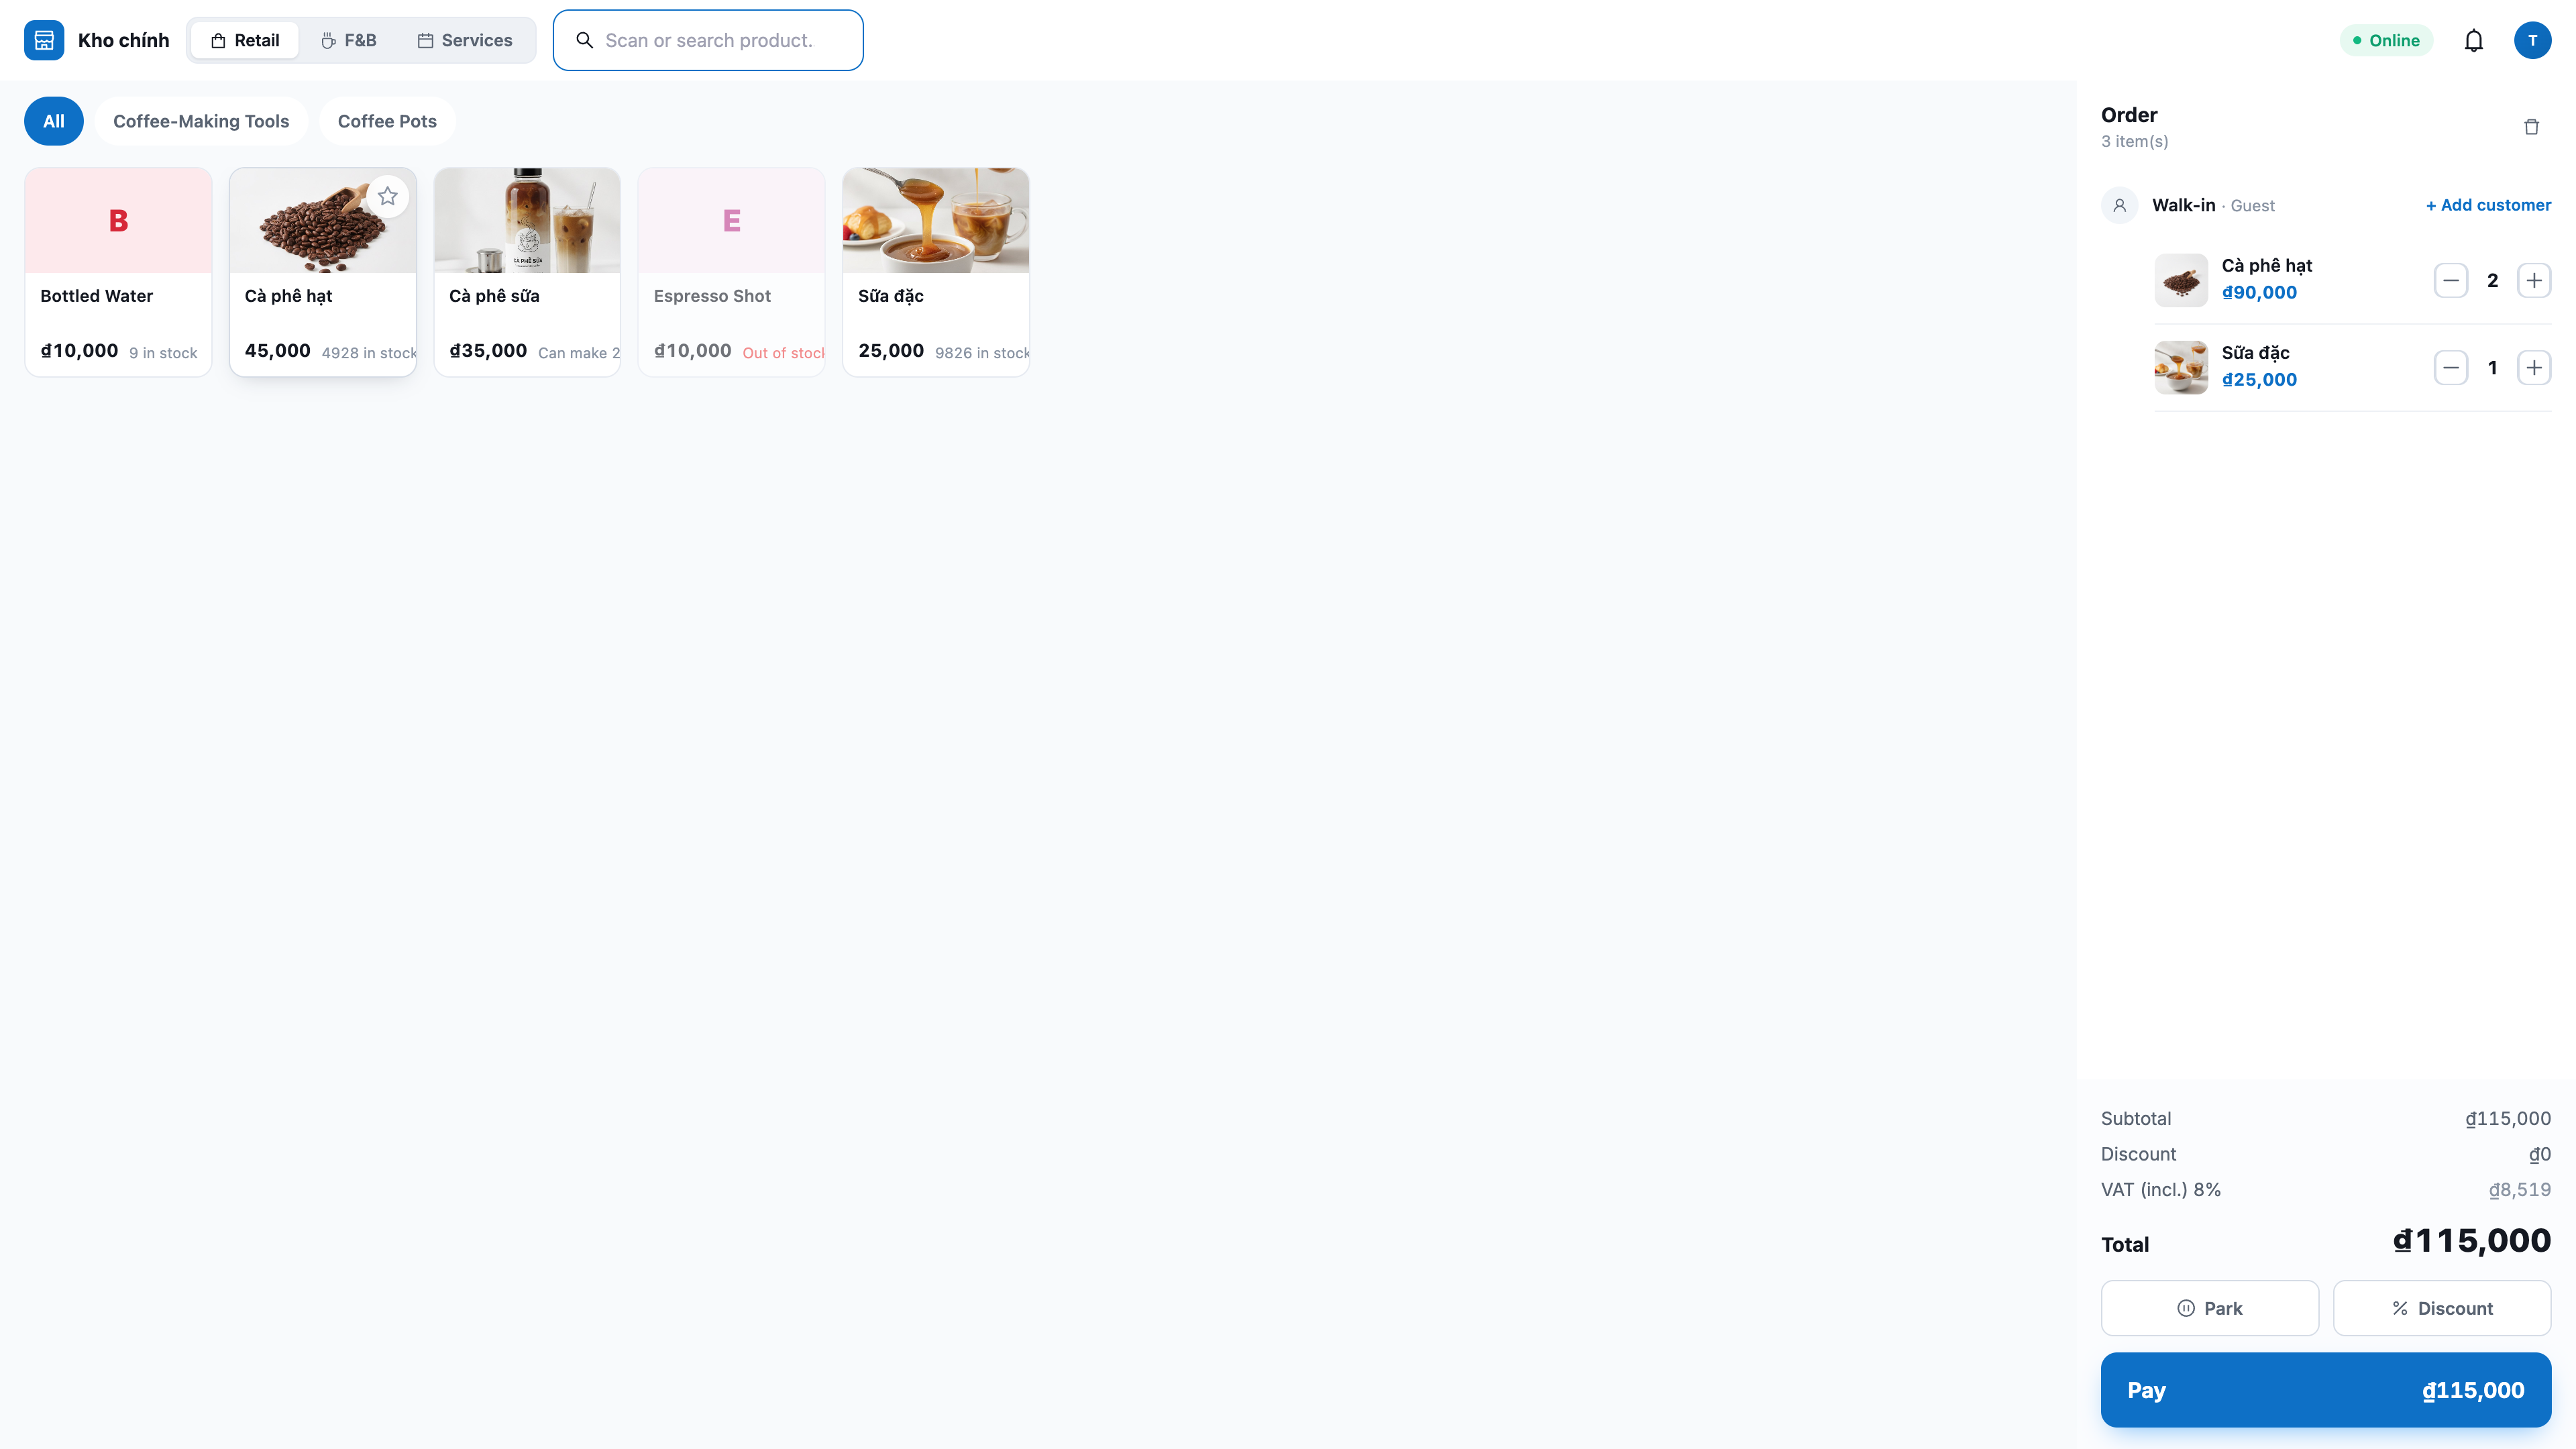
Scan barcode using a USB scanner (place the cursor in the scan field then scan), or type the code and press Enter.
Or browse the product grid: tap on product cards to add; tap on category tabs to filter by group; scroll down to load more.
Or search: type the product name/code into the search bar, tap the result to add.
Adjust quantity in the cart: press + / −, or tap directly on the quantity number to type a number (e.g., 12); delete a line with the trash can icon 🗑.
✅ Expected result: Products appear in the cart with the correct price; the Total updates instantly with each addition/edit/deletion. Out-of-stock products are dimmed and cannot be added.
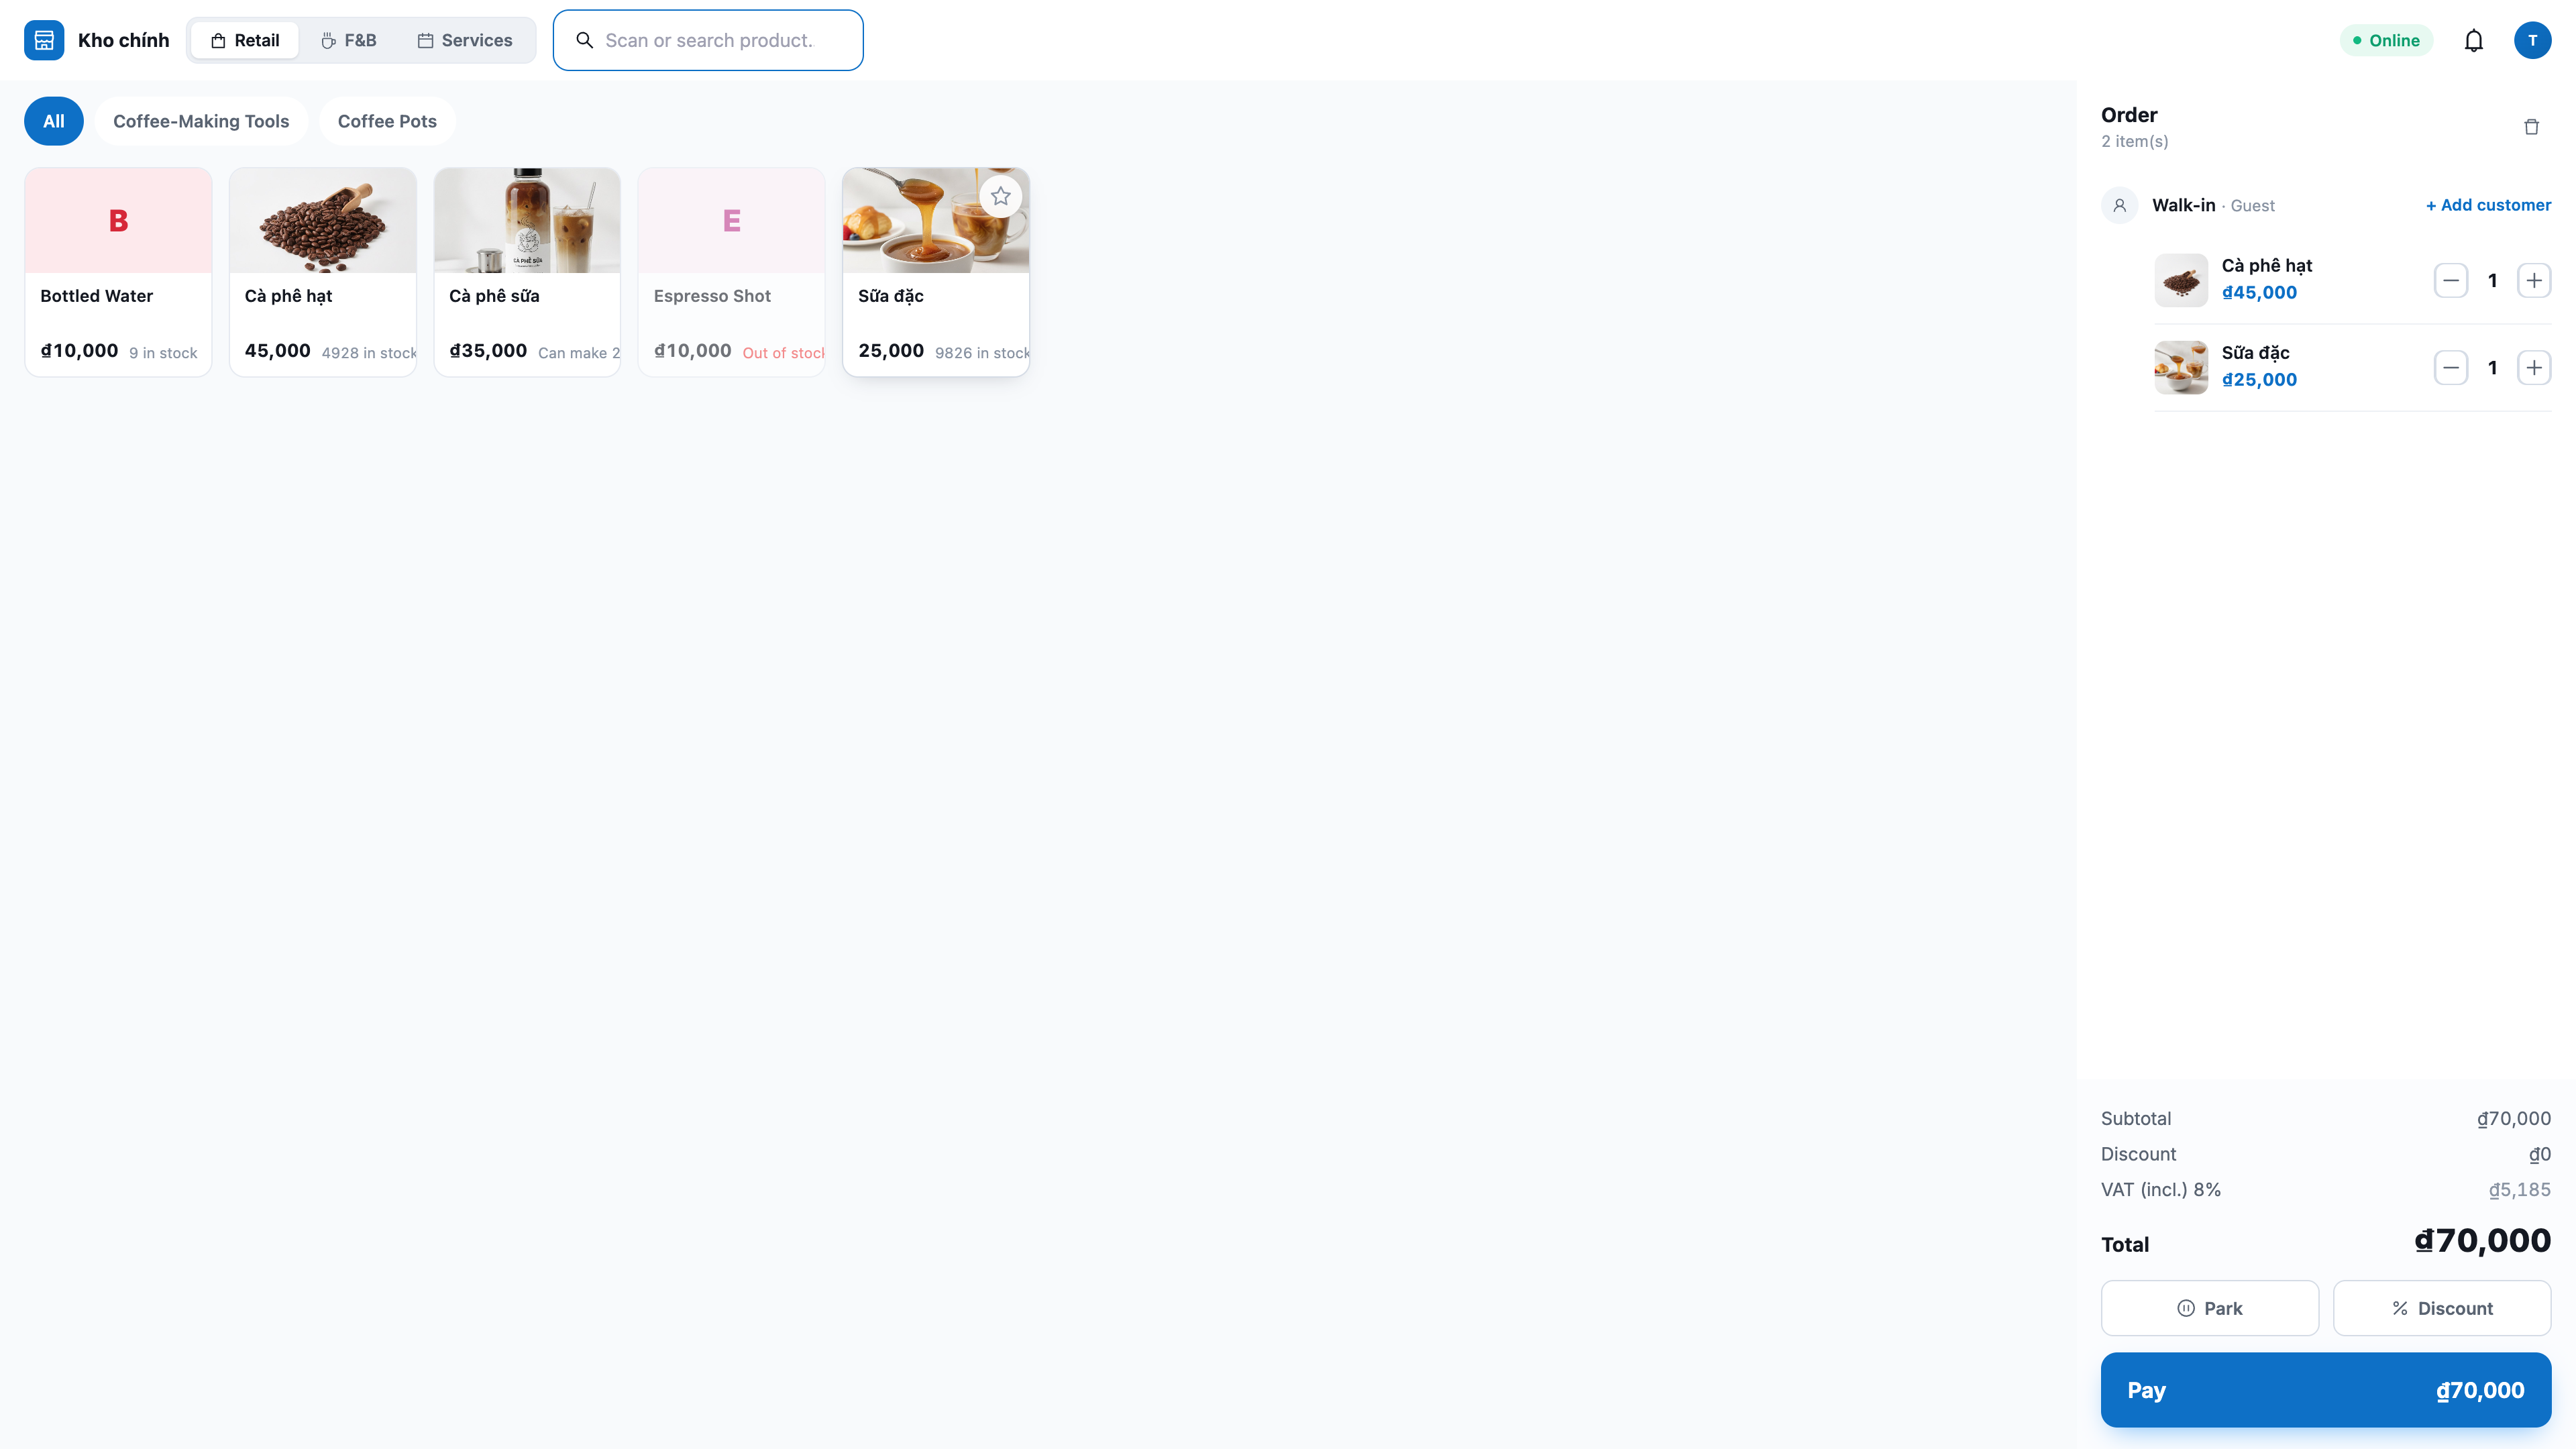
💡 Tip: The counter can still sell normally without a scanner — just tap products in the grid or search by name.
Step 3 — (Optional) Apply discounts
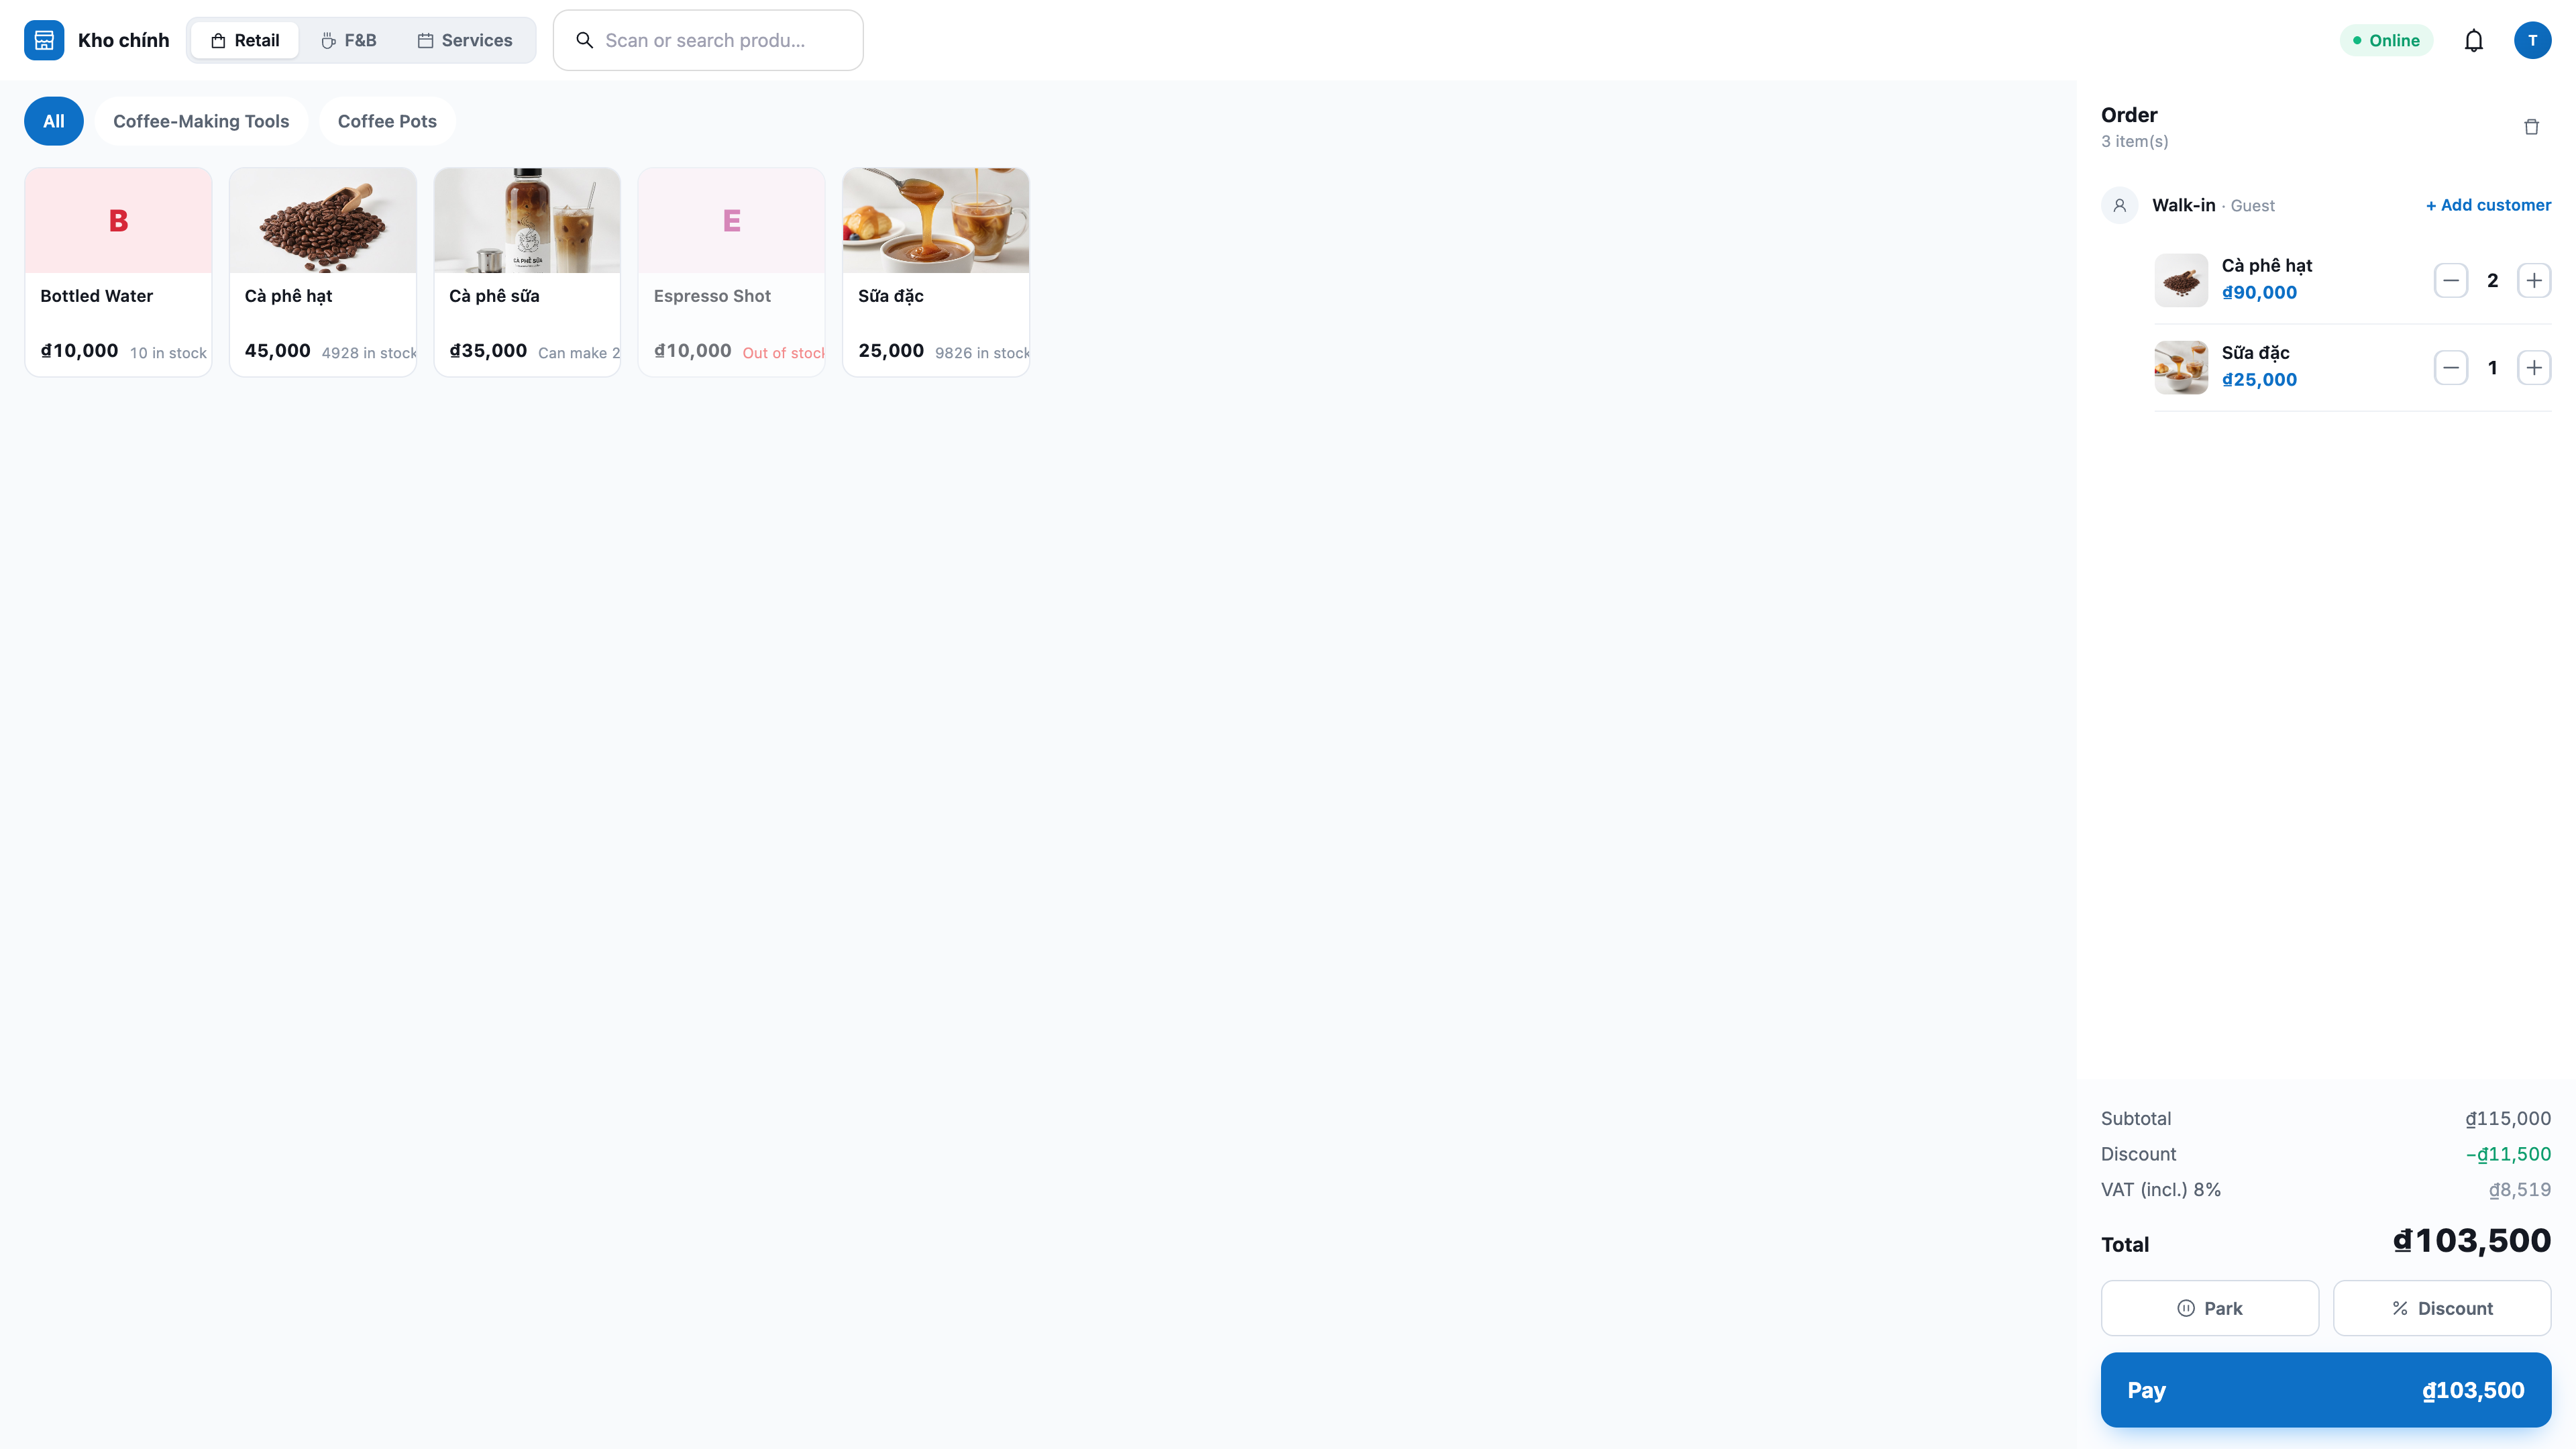
Discount a single line item: tap the discount button on the product line, select by amount or percentage (%).
Discount the entire order: open the order discount field, enter the amount or percentage.
✅ Expected result: The cart clearly shows three lines: Subtotal / Discount / Total; the total is recalculated by the server. If you enter a discount greater than the subtotal, the system will reject it, and the total will never be negative.
Step 4 — (Optional) Attach customer by phone number
In the customer field, type the customer's phone number.
✅ Expected result: If the number is already in the CRM, the contact name will now appear instead of "Walk-in" and the order will be linked to that customer. If no number is entered, the order will be for a walk-in customer — sales will proceed as normal.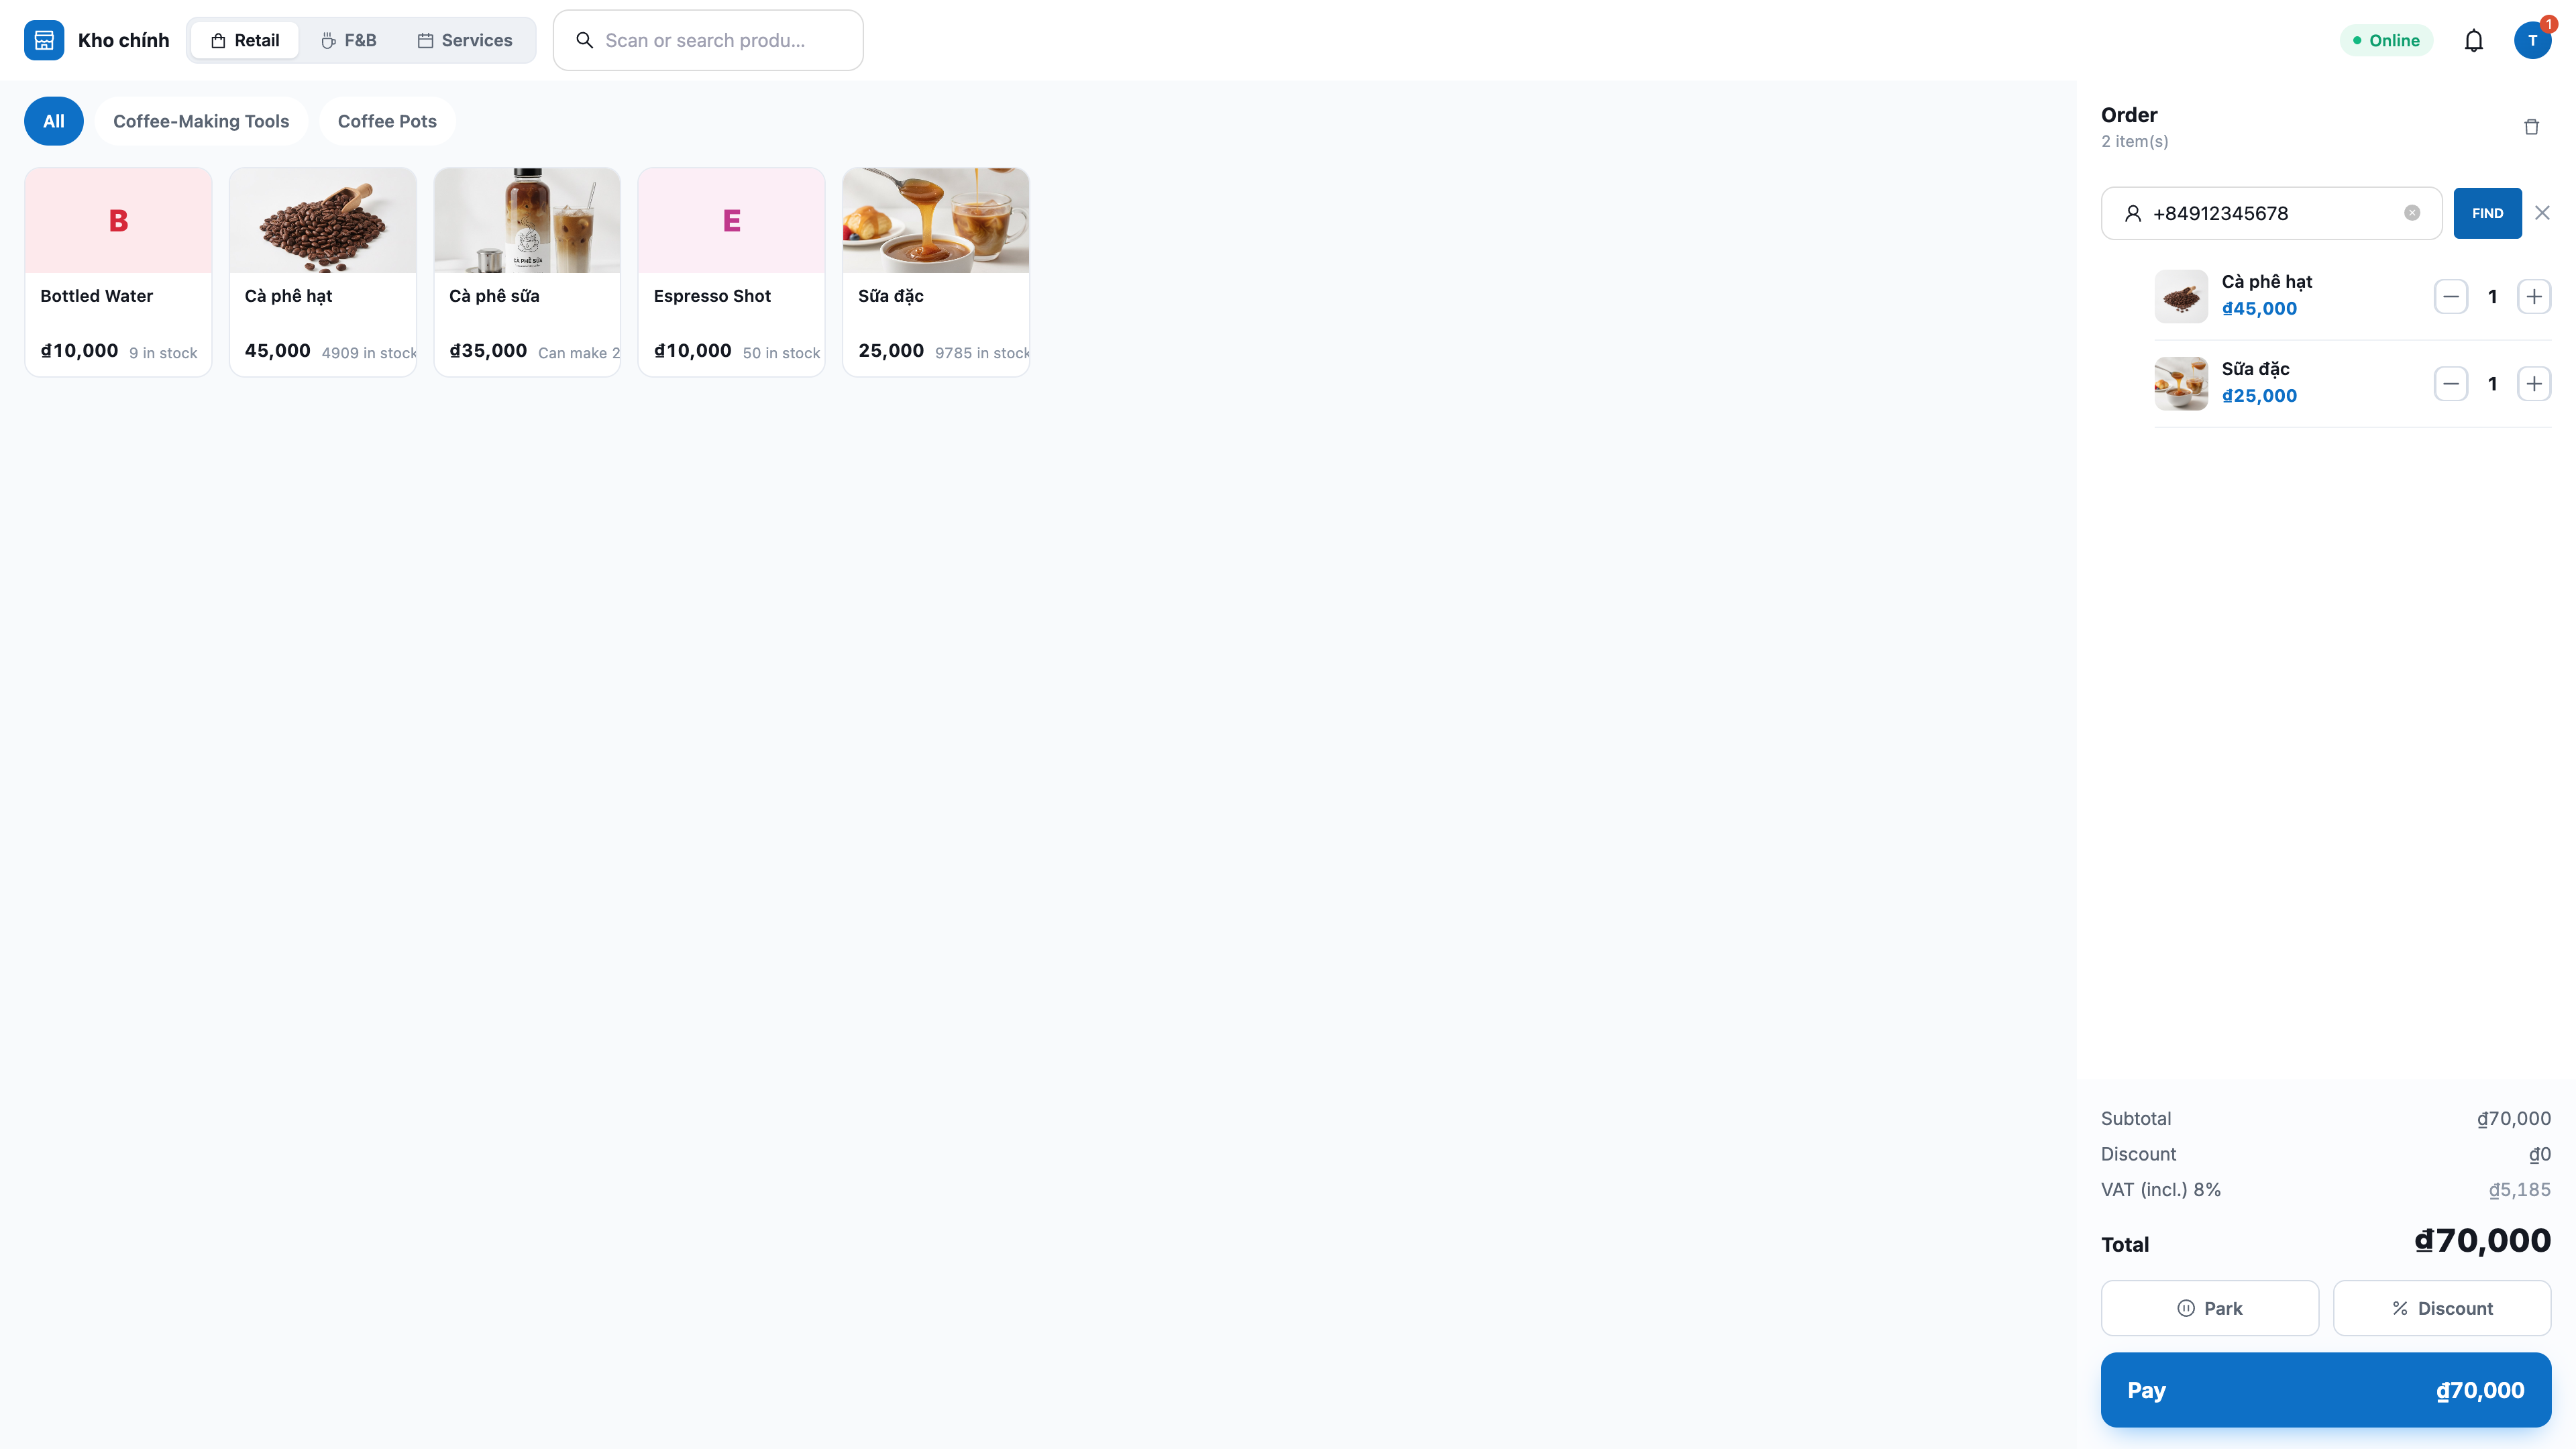
Step 5 — Cash Payment
Click Pay → select Cash.
Enter the amount the customer paid using the numeric keypad, or tap the quick denomination buttons (10K–500K), or Exact.
Click Confirm.
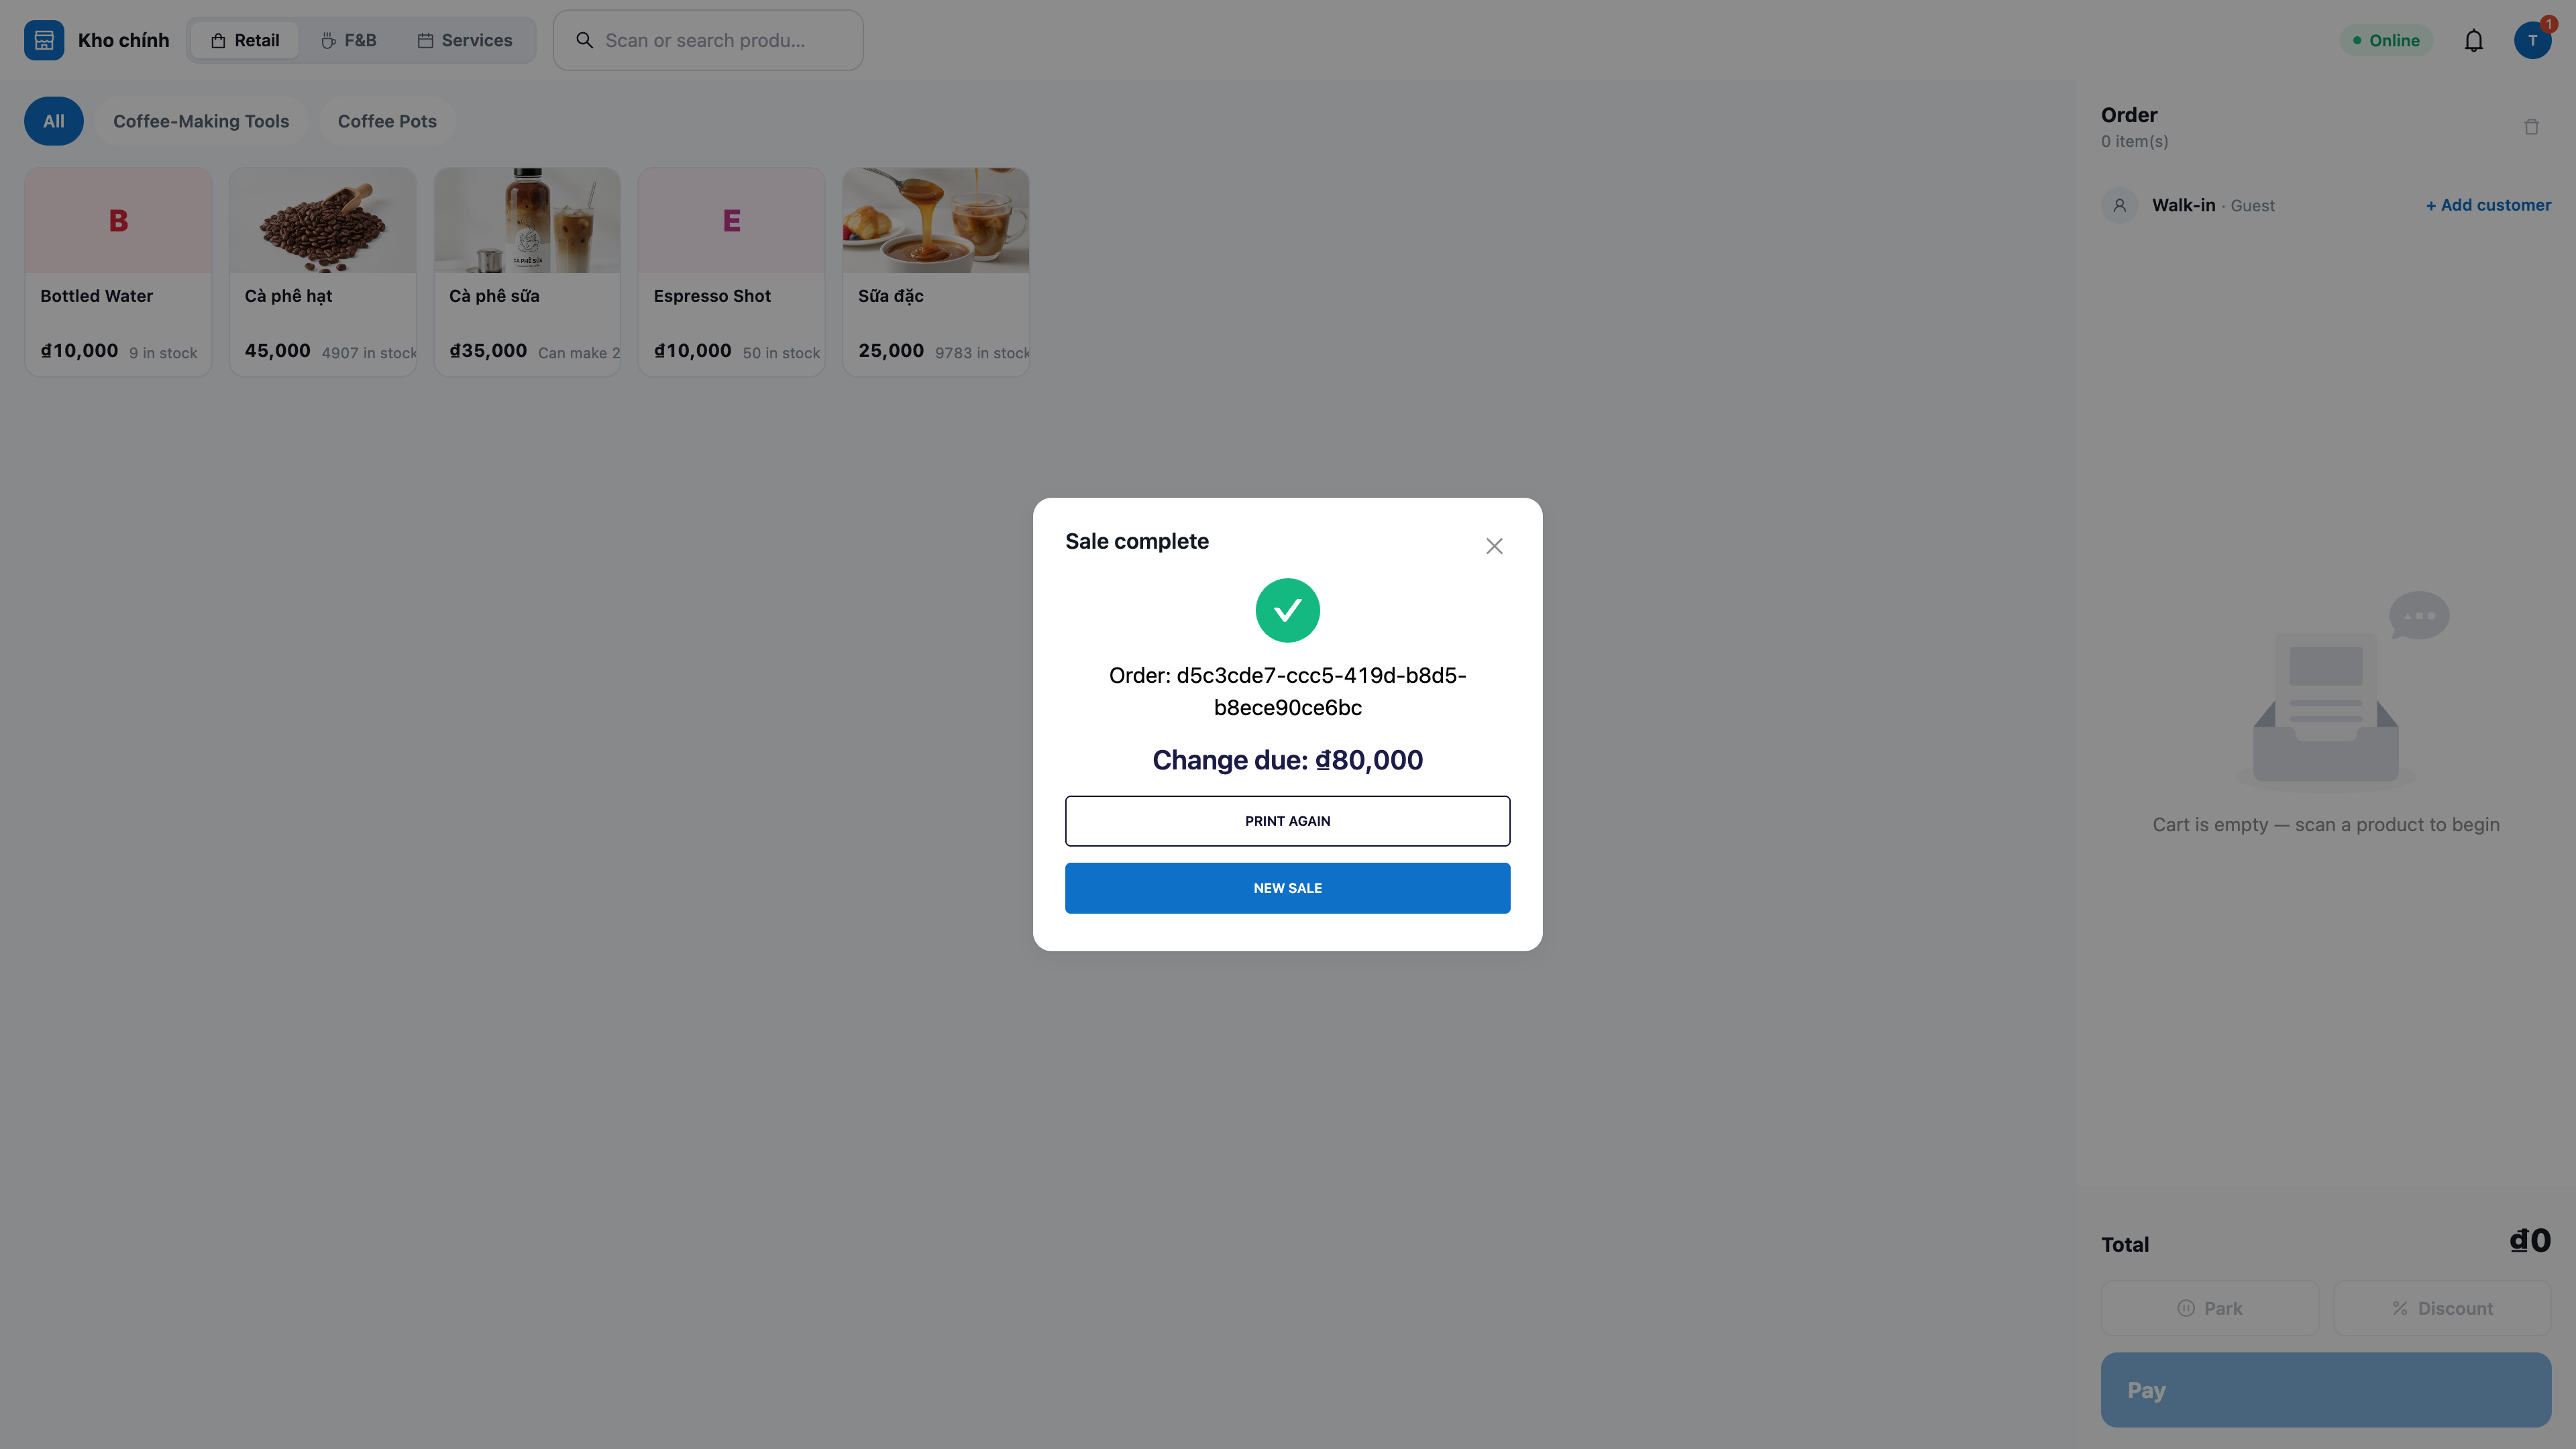
✅ Expected result: The screen will show Total / Tendered / Change; after confirmation, the order is created (source POS), immediately deducted from inventory, the shopping cart becomes empty, and the cursor returns to the scan field for the next customer.
ℹ️ If the sale exceeds available stock, the system will block it and indicate which product is missing — no deduction will be made from inventory for any part.
Step 6 — Bank QR / MoMo Wallet Payment
Click Pay → select MoMo or VNPay (only appears if you have enabled/configured it).
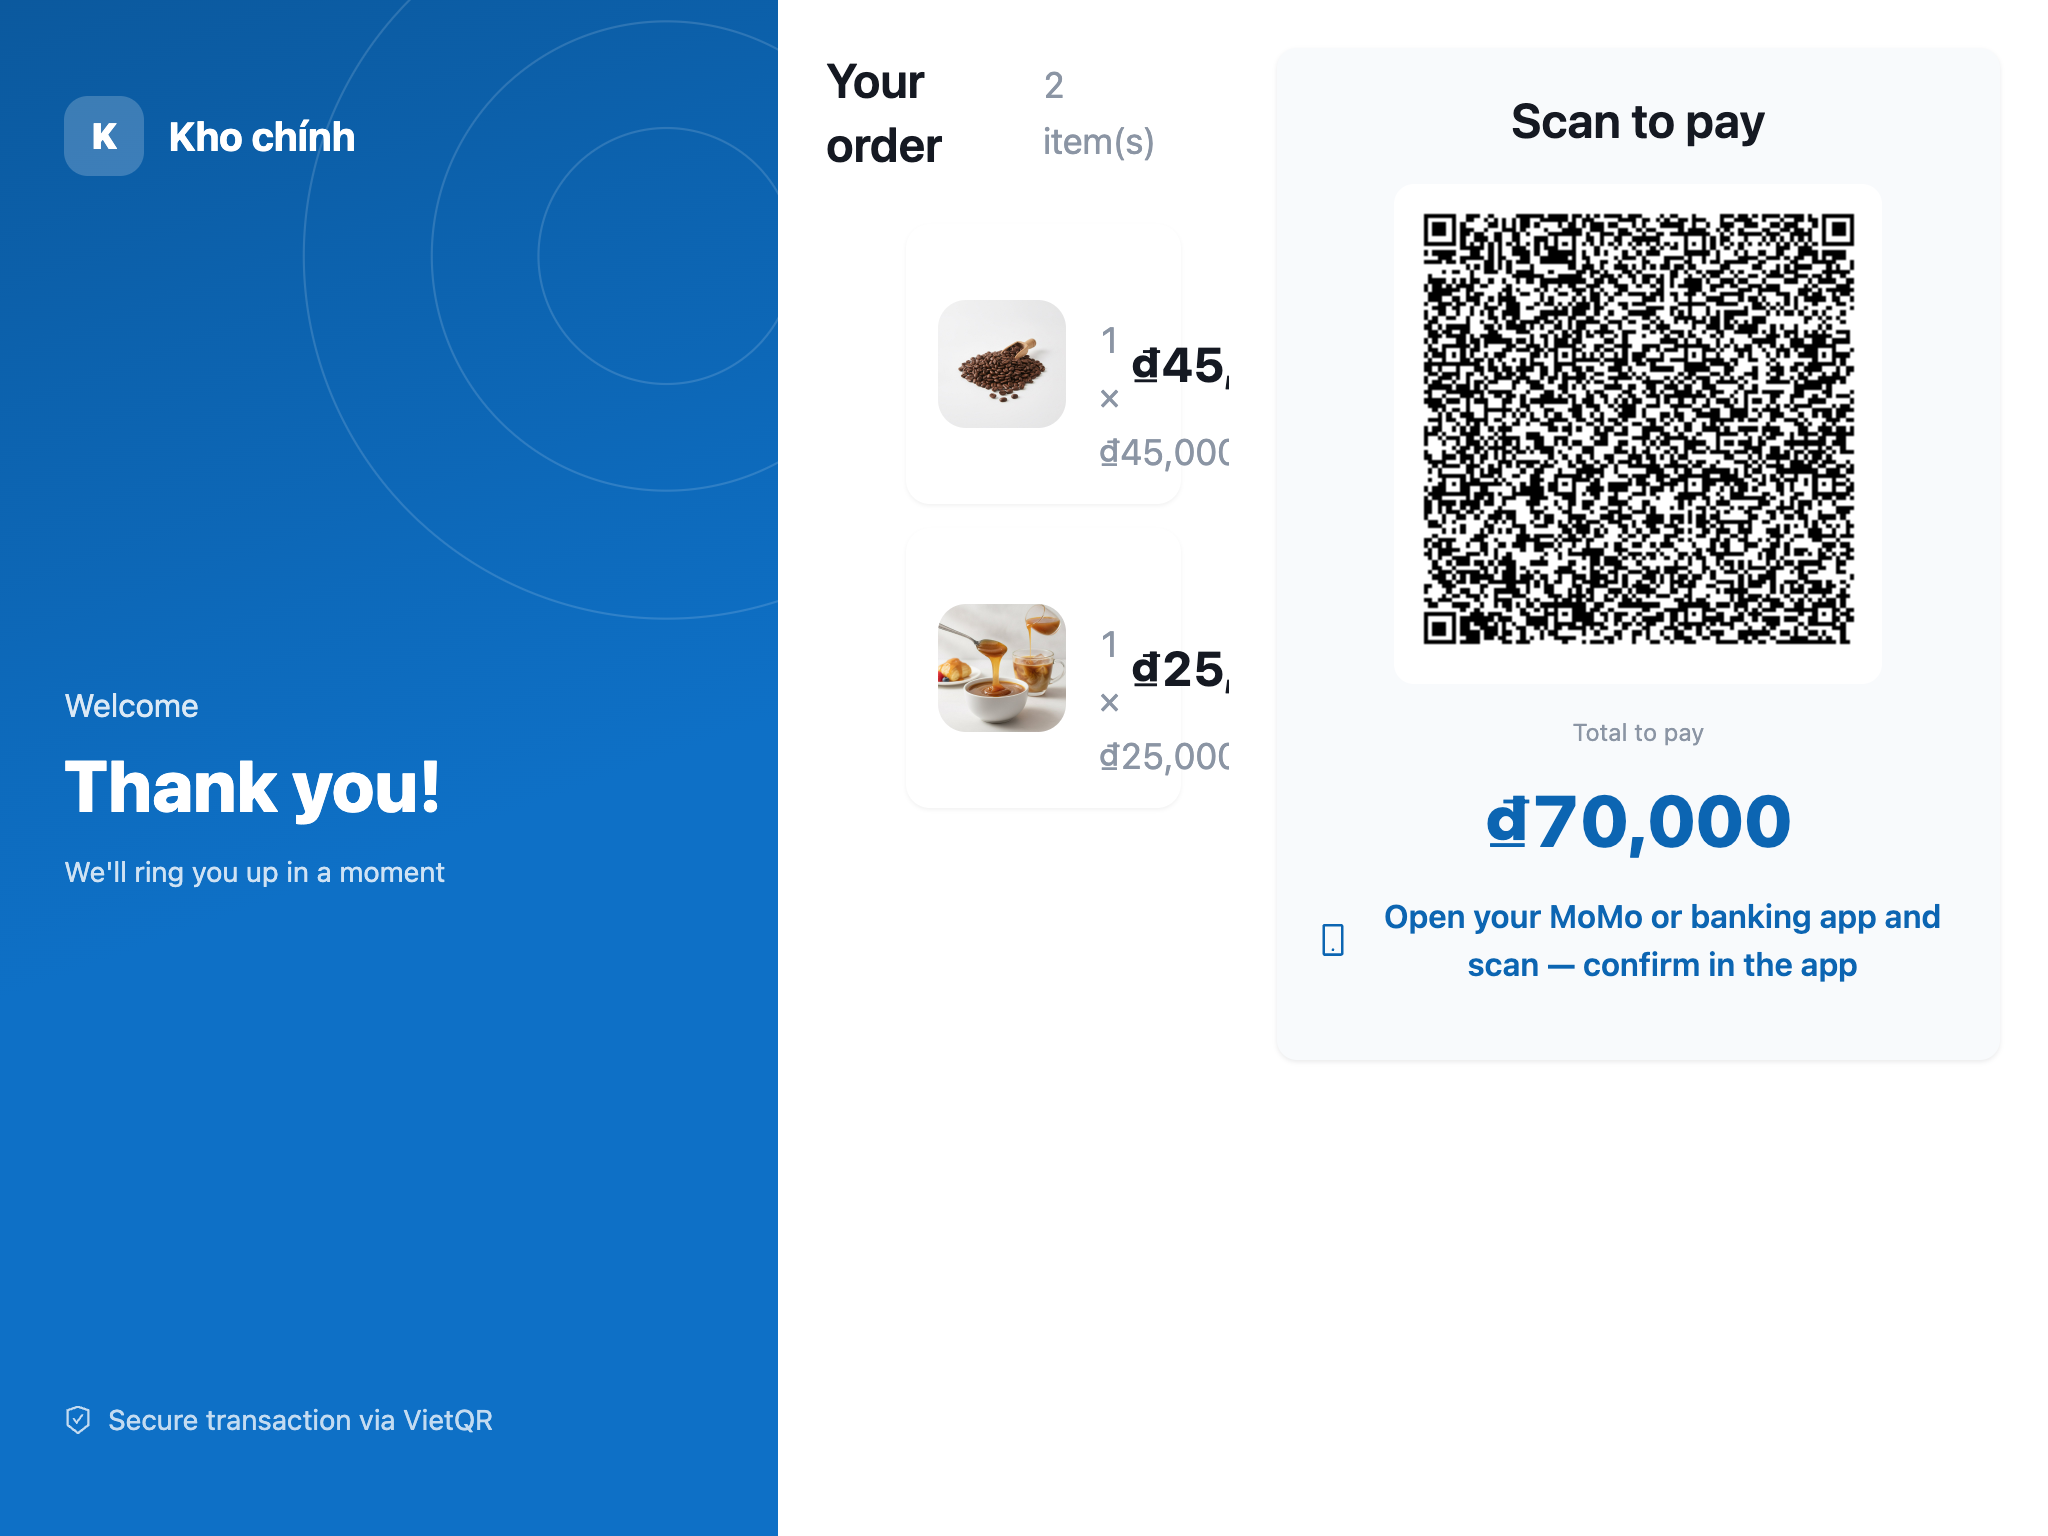
Click to display the payment QR code — the QR code will appear on the secondary screen facing the customer.
The customer scans to pay: MoMo scans using the MoMo app (do not use the phone's camera); VNPay opens the VNPay QR page.
✅ Expected result: When the payment is received, the order will automatically complete, inventory will be deducted, and a receipt will be printed; a "payment received" notification will appear in the bell 🔔 on the POS bar. If the payment initiation fails, the shopping cart will remain as is for another attempt.
Step 7 — Print Receipt and (Optional) Open Cash Drawer
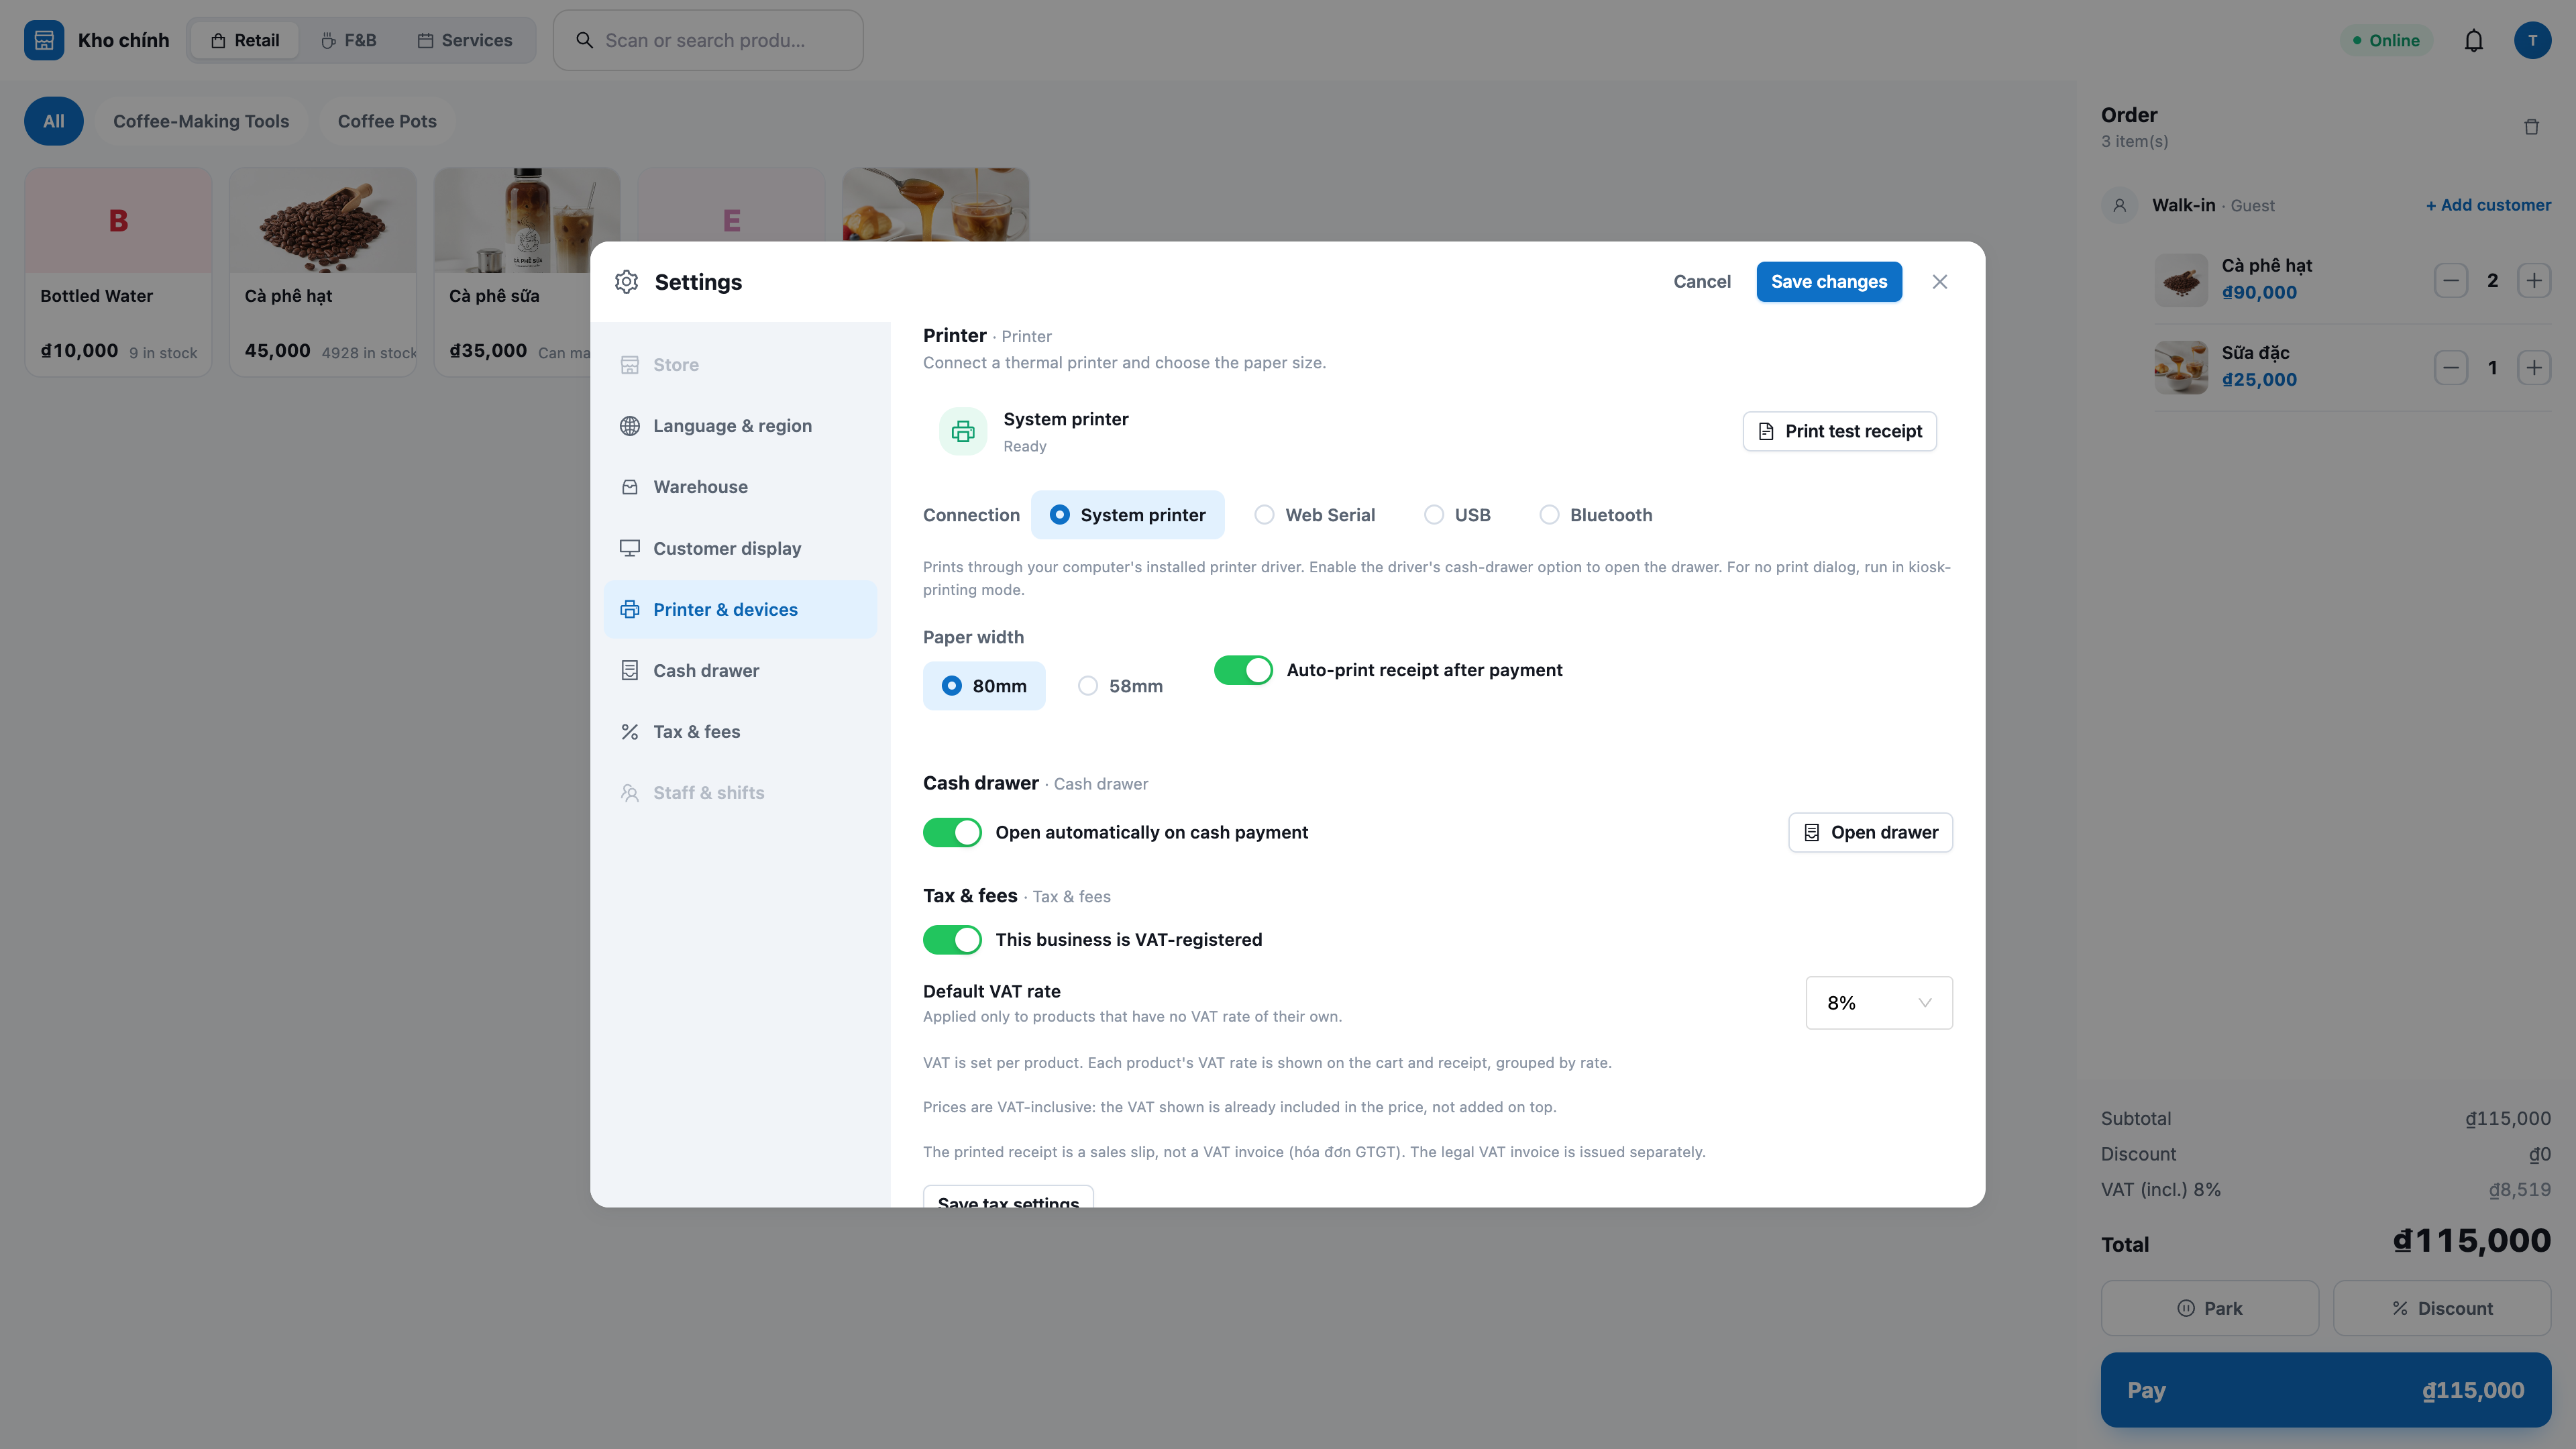
For the first time at each counter: go to Settings → Printer, select the appropriate Connection (System printer / WebUSB / Web Serial), choose the paper size 58mm/80mm, enable/disable open cash drawer on cash sales, and then Print test receipt.
From then on, each completed order will automatically print a receipt (and open the cash drawer for cash sales if enabled).
Need to reprint? Click Print again on the screen where the sale was just made, or open Recent sales and reprint any order.
✅ Expected result: The receipt prints correctly in Vietnamese (with diacritics), includes complete store information, item list, total amount, and change; reprints will be marked as RE-PRINT. If the printer malfunctions, the order will still be completed — only a small notification with a retry button will appear.
Step 8 — VAT Invoice: View Tax and Allow Customer to Retrieve E-invoice
View tax included in price: the shopping cart and receipt clearly separate the VAT portion included in the price, for each tax rate of the product (e.g., 8%, 10%) — the total amount remains unchanged.
New products without VAT: for businesses that declare VAT, a newly created product for which the store owner has not selected VAT cannot be sold. When collecting payment, the screen will display "Tax rate not set for .... Please ask the manager to set it in Products and try again, or remove this item to continue." If you remove the item from the order, the remaining items can still be sold. Previously existing products can still be sold as before.
Enable/disable VAT declaration: if the store does not declare VAT, disable it in Settings — the POS will not display or record tax.
Customers Self-Issue Electronic Invoices: the receipt has a QR code; customers scan it with their phone, enter company name, tax identification number (TIN), address, email, and the electronic invoice is then issued through your connected invoice provider and sent to the customer's email.
If an invoice is rejected, customers can correct and resubmit it themselves — no need to call the store. If a customer mistypes a digit in the tax ID, or the company information doesn't match tax authority data, the system won't be "silent" as before. When customers rescan the QR code on the invoice, they will immediately see the reason why the invoice couldn't be issued (e.g., "Cannot issue: invalid buyer tax identification number"), along with the form pre-filled with the previous information. Customers just need to correct the incorrect part and click Resubmit — the invoice will be automatically reissued, without needing to contact staff or return to the store.
If the store has not enabled automatic invoice issuance for this order. In cases where the store has not connected or enabled the automatic electronic invoice issuance feature, customers scanning the QR code will see a clear message "Not available" — "The store has not enabled automatic invoice issuance for this order. You can try again later, or contact the store." — instead of a promise of an invoice "being issued" that never arrives. Customers can try again after the store enables the feature, or contact the store directly for assistance.
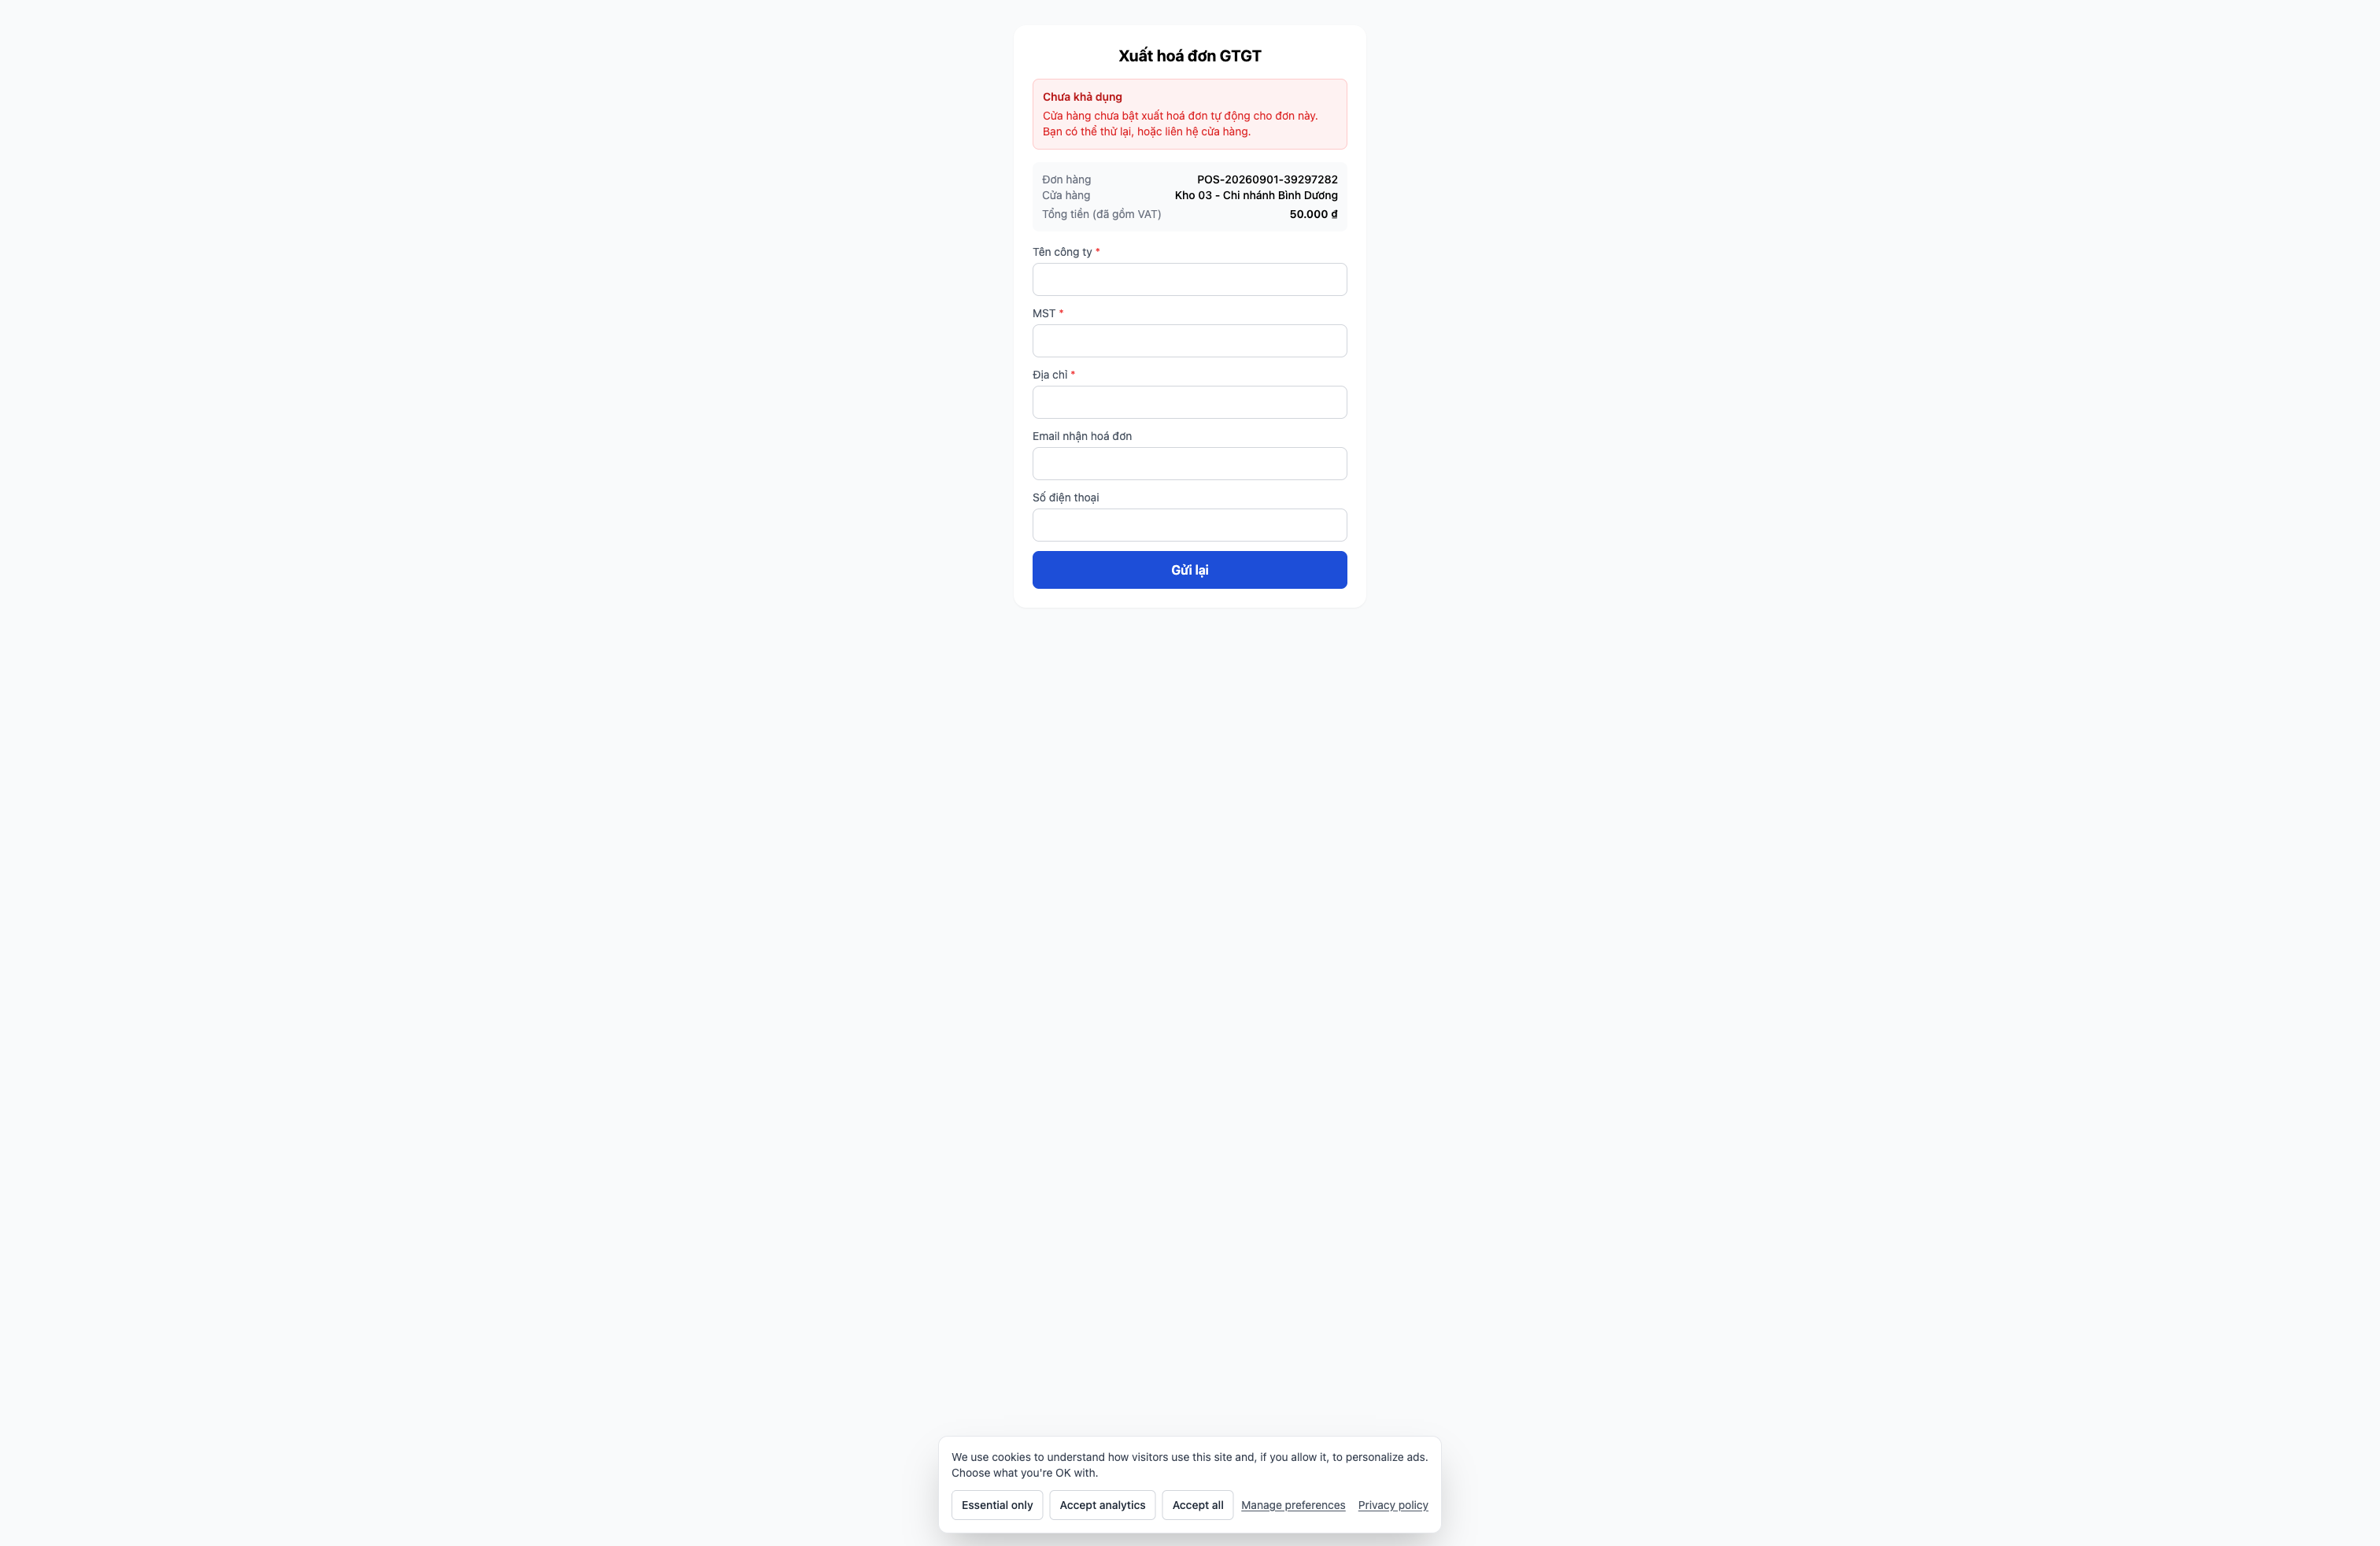
The screen customers see when the store has not enabled automatic invoice issuance for this order — customers can click "Resubmit" to try again once the store has enabled it, or contact the store.
✅ Expected Result: The cart/receipt correctly displays VAT for each tier; the receipt has a QR code for customers to enter their information to issue an invoice; after customers submit, they see a confirmation screen "invoice is being issued and will be sent via email".
If an invoice encounters an error or the store has not enabled automatic issuance, customers will always see the clear reason and can self-correct and resubmit directly on their phone — avoiding situations like "submitted information but never received the invoice, and no idea why".
ℹ️ To issue electronic invoices, you must have connected an invoice provider for the store. If not connected, the receipt will clearly state that this is not a valid VAT invoice.
Step 9 — Park and Recall
Customer hesitates/forgot their wallet? Click Park to save the current shopping cart.
Serve the next customer normally.
Open the list of parked orders, click Recall to restore the old cart.
✅ Expected Result: After parking, the cart becomes empty and a parked order item appears (item count + total + time). When recalling, the cart is restored with the exact items, quantities, discounts, and assigned customer; the parked order remains even after reloading the page.
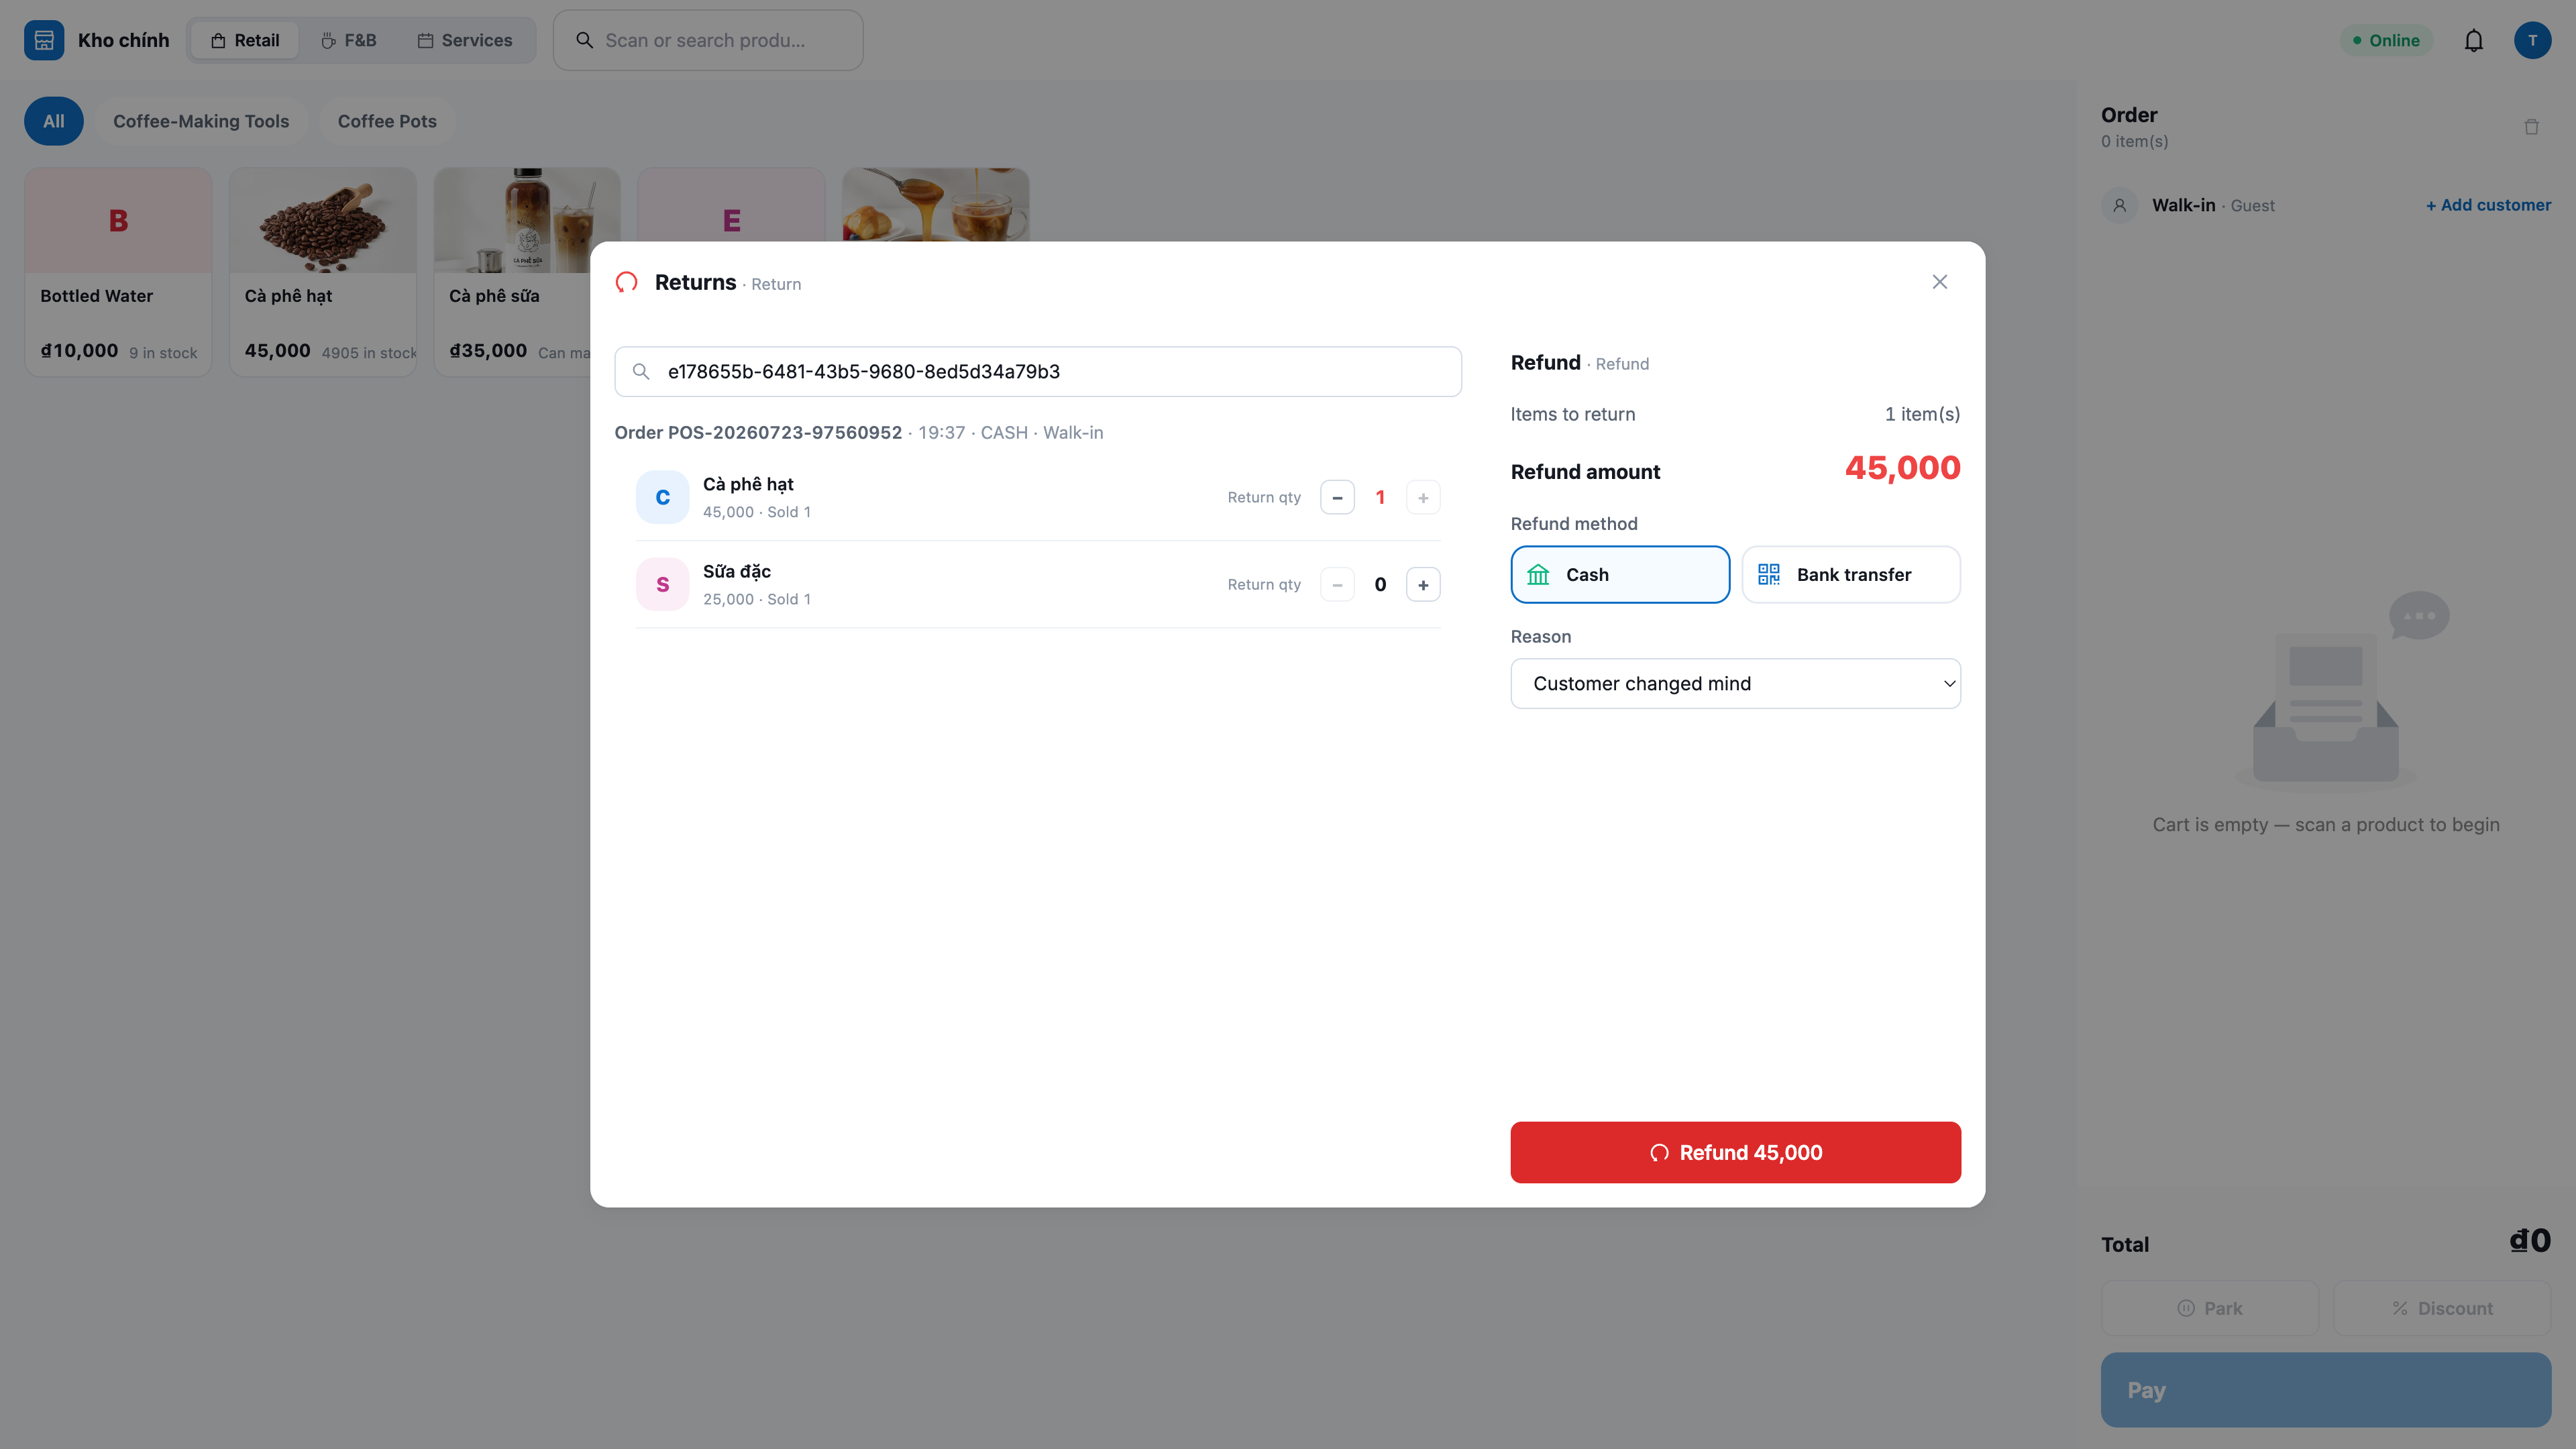
Step 10 — Returns and Refunds
Open the ⋯ menu on the POS bar → Returns (only appears if you have return permissions).
Select the order to return from the recent list (or enter the order ID) → Load.
Enter the quantity to return for the item line, specify the reason, and click Issue refund.
✅ Expected Result: A message "Refund issued: " appears; returned items are added back to inventory (usable); the order status changes to partially_returned/returned; a reversal entry is recorded to balance the books. If the returned quantity exceeds the sold quantity, the system rejects it.
Step 11 — Verify POS Orders and 360° Activity Feed in CRM
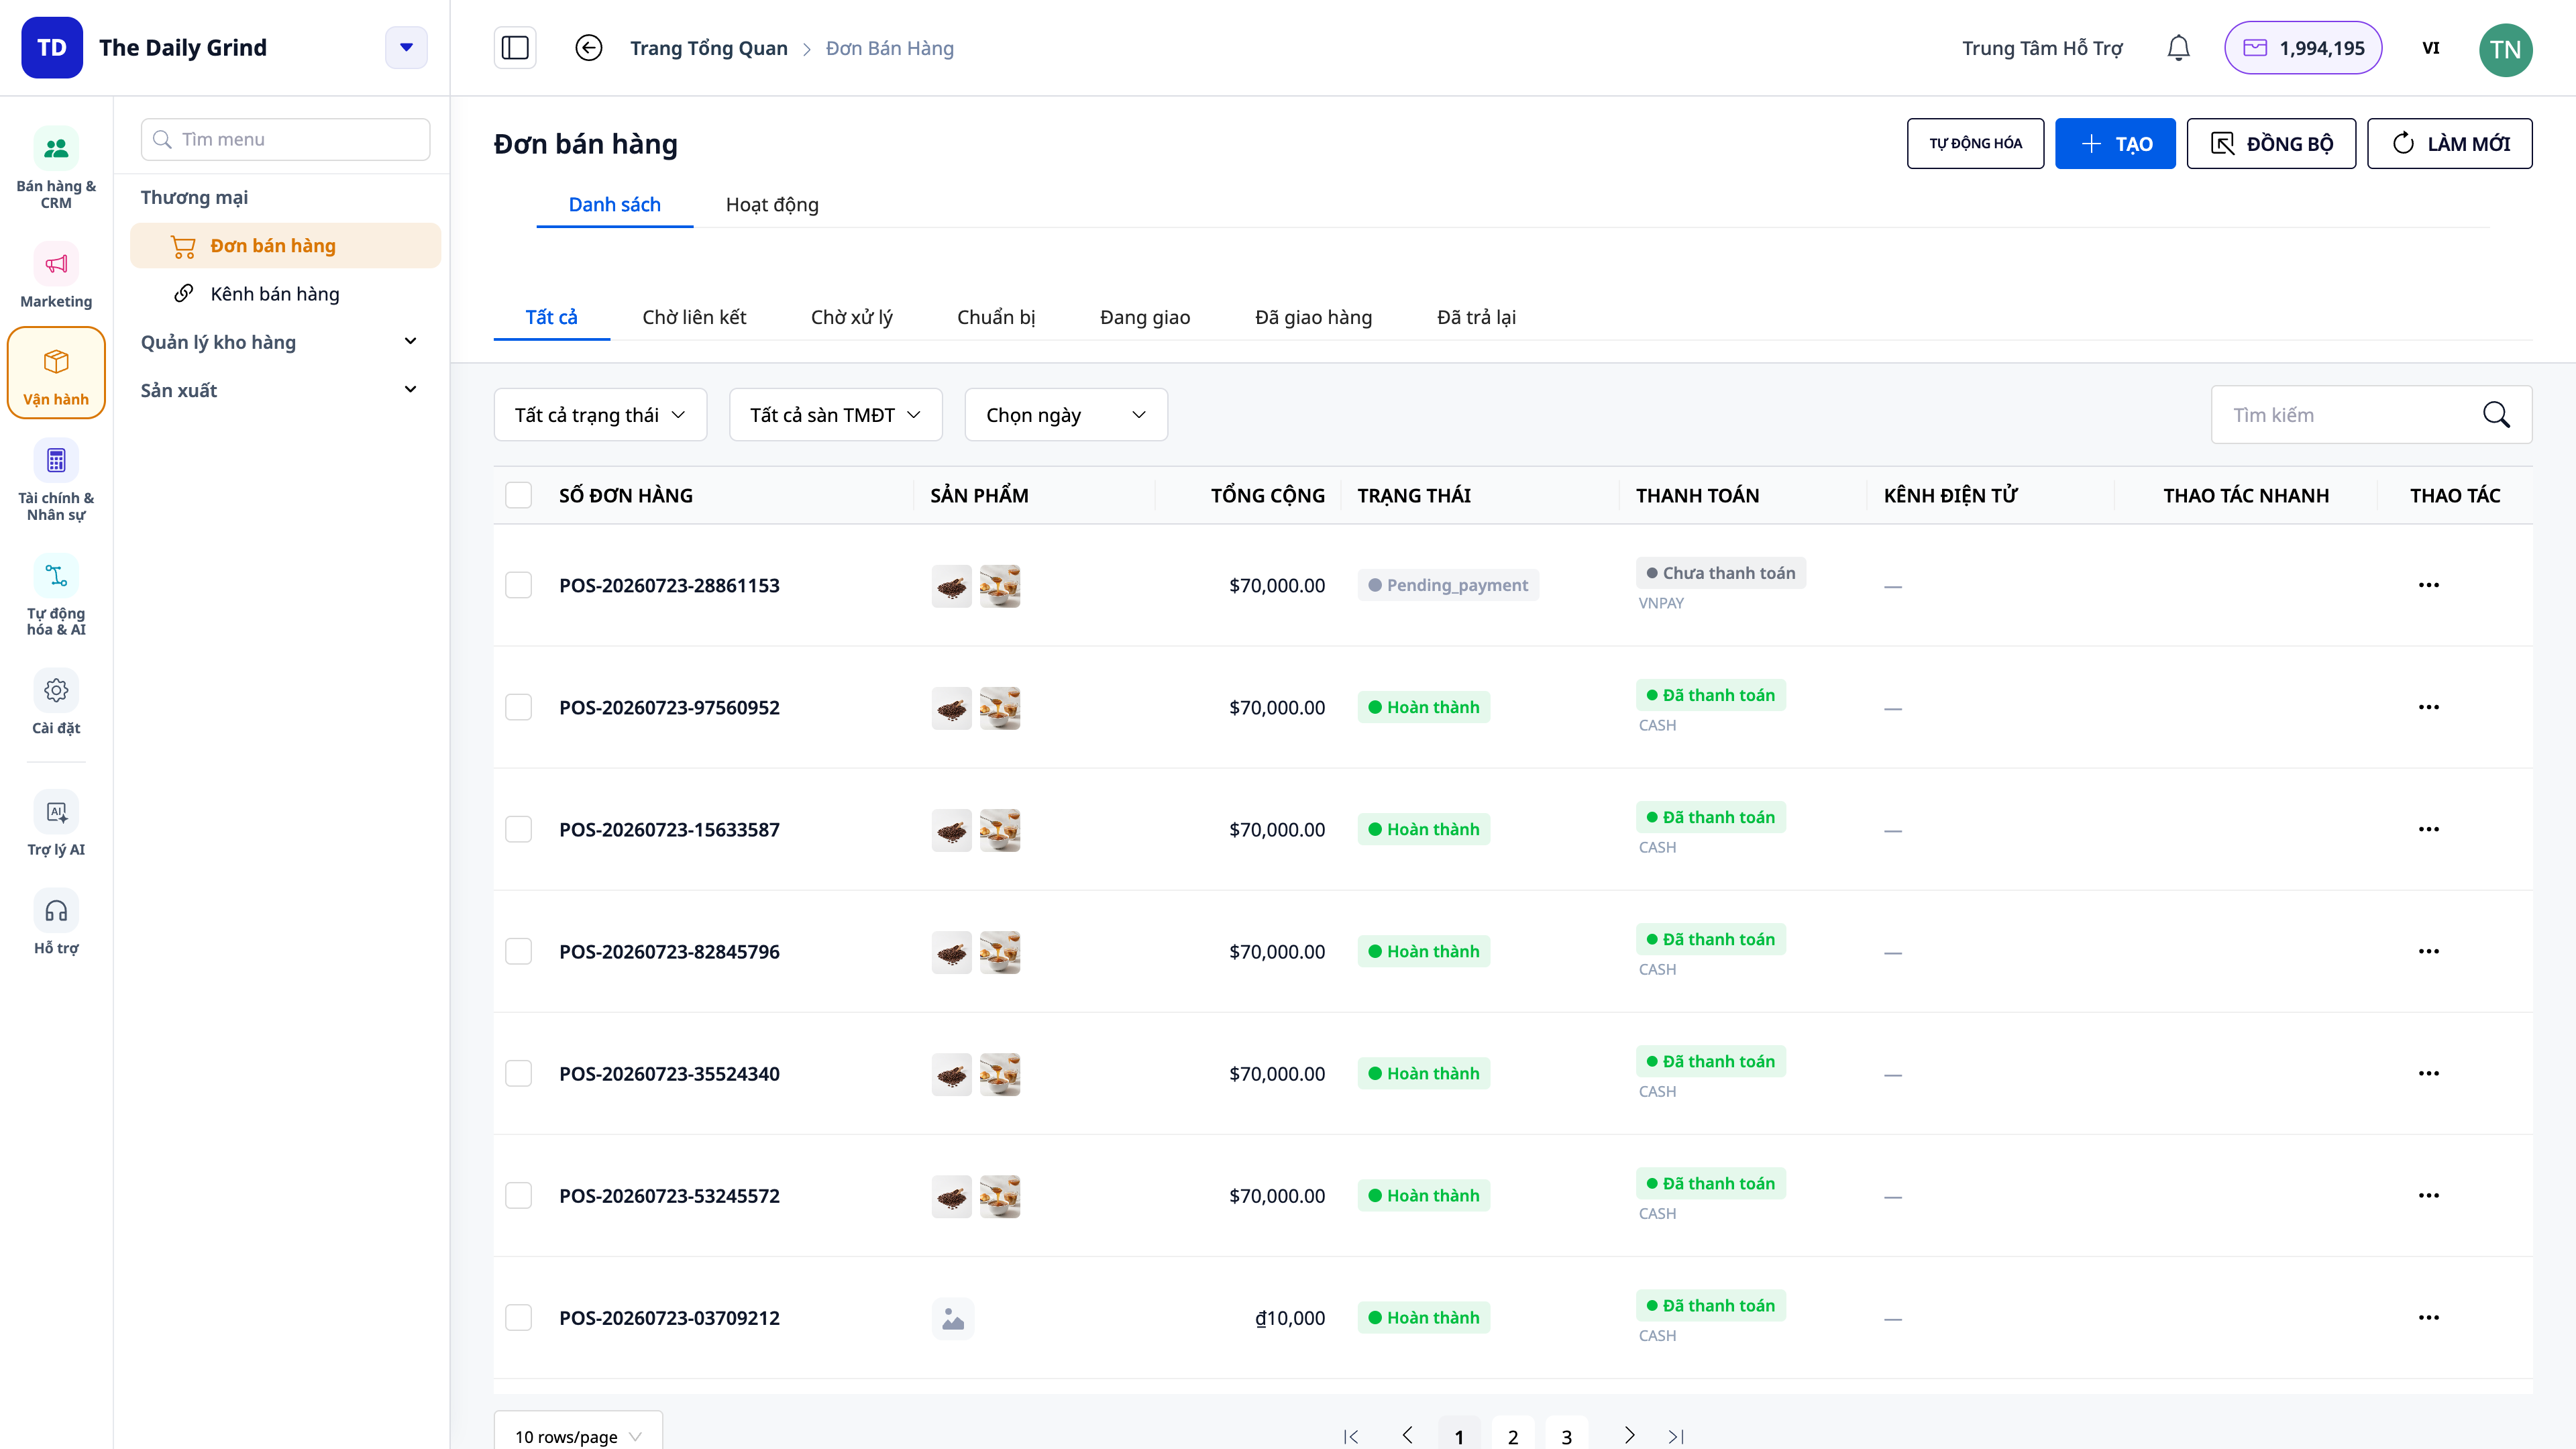
Open CRM (app.gtgcrm.com) → Orders: find the order just sold, source POS.
If a customer was linked: open that contact → Activity tab.
Open the Orders → Activities menu to view the feed of all counter sales.
✅ Expected Result: The order appears with source POS, correct total amount, no delivery address; if a customer was linked, a "POS sale" activity appears on the customer's timeline; all counter sales appear in the Order menu's Activities feed (filterable by salesperson/date).
Quick Reference for Expected Results
POS Login + Warehouse Selection — POS screen displays warehouse name + cashier name, product grid is ready
Scan Barcode / Tap Product — Product added to cart with correct price; total updates instantly
Tap Quantity — Numeric keypad to directly enter quantity
Apply Discount — Displays Subtotal / Discount / Total; server recalculates; cannot exceed provisional total
Link Customer by Phone Number — Displays contact name instead of "Walk-in"
Cash Payment + Confirm — Displays change due; order (source POS) created, stock deducted, cart cleared
QR / MoMo Payment — Customer scans to pay; order automatically completes; "payment received" notification
Overselling Inventory — Blocked, specifies the missing product, stock not deducted
Print Receipt / Reprint — Vietnamese receipt is clear; reprint is marked RE-PRINT
View VAT — Clearly separates the included tax amount at each rate
Park → Recall — Cart saved and restored correctly (even after page reload)
Issue Refund — Refund issued + item returned to stock + reversed transaction; prevents refund exceeding sales amount
Verify in CRM — POS source order + 360° activity on customer and Order feed
Notes
Requires Create POS sale permission to complete an order; requires separate return permission to use the Returns section — if missing, contact your workspace administrator and log in again to receive the new permissions.
POS deducts stock from the store warehouse selected in Settings; each counter remembers its own configuration for printer / paper size / cash drawer.
QR MoMo must be scanned with the MoMo app, not the phone camera; only payment gateways you have enabled and configured will appear at the counter.
Issuing e-invoices to customers requires you to have connected an invoice provider; when not connected, the receipt will clearly state that it is not a valid VAT invoice.
The current POS interface may display English labels (Pay, Confirm, Settings, Returns, Recent sales…) — this guide includes their Vietnamese meanings for your reference.
Inventory entry and stocktaking for the store is done on the shared Warehouse screen — see the Warehouse & Inventory guide.