How to Use Facebook Ads on GTG CRM
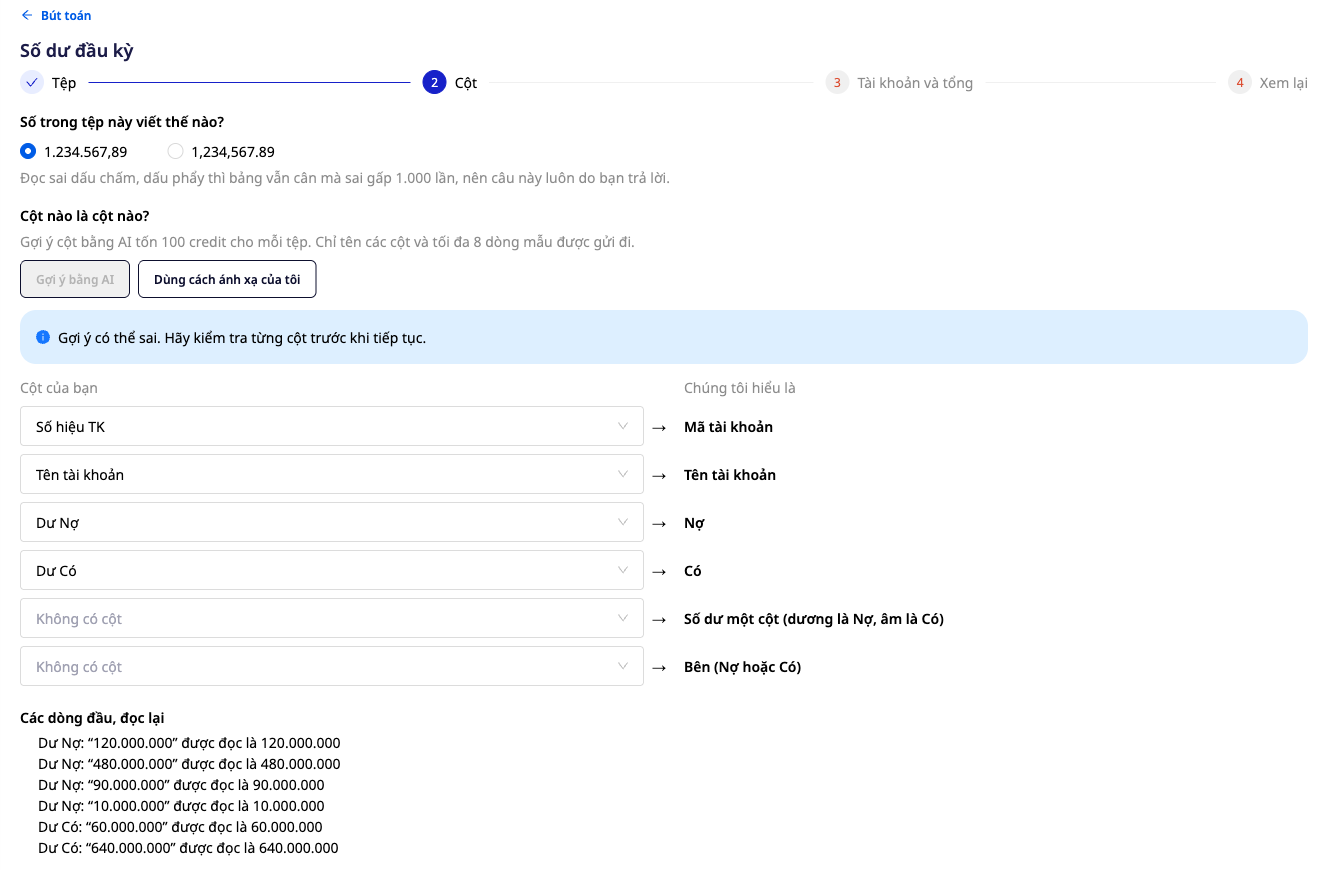
1. Connect your Facebook Ads account.
Step 1: Access account settings
On the GTG CRM main interface, select Campaigns and then click Account Settings to connect your ad account.
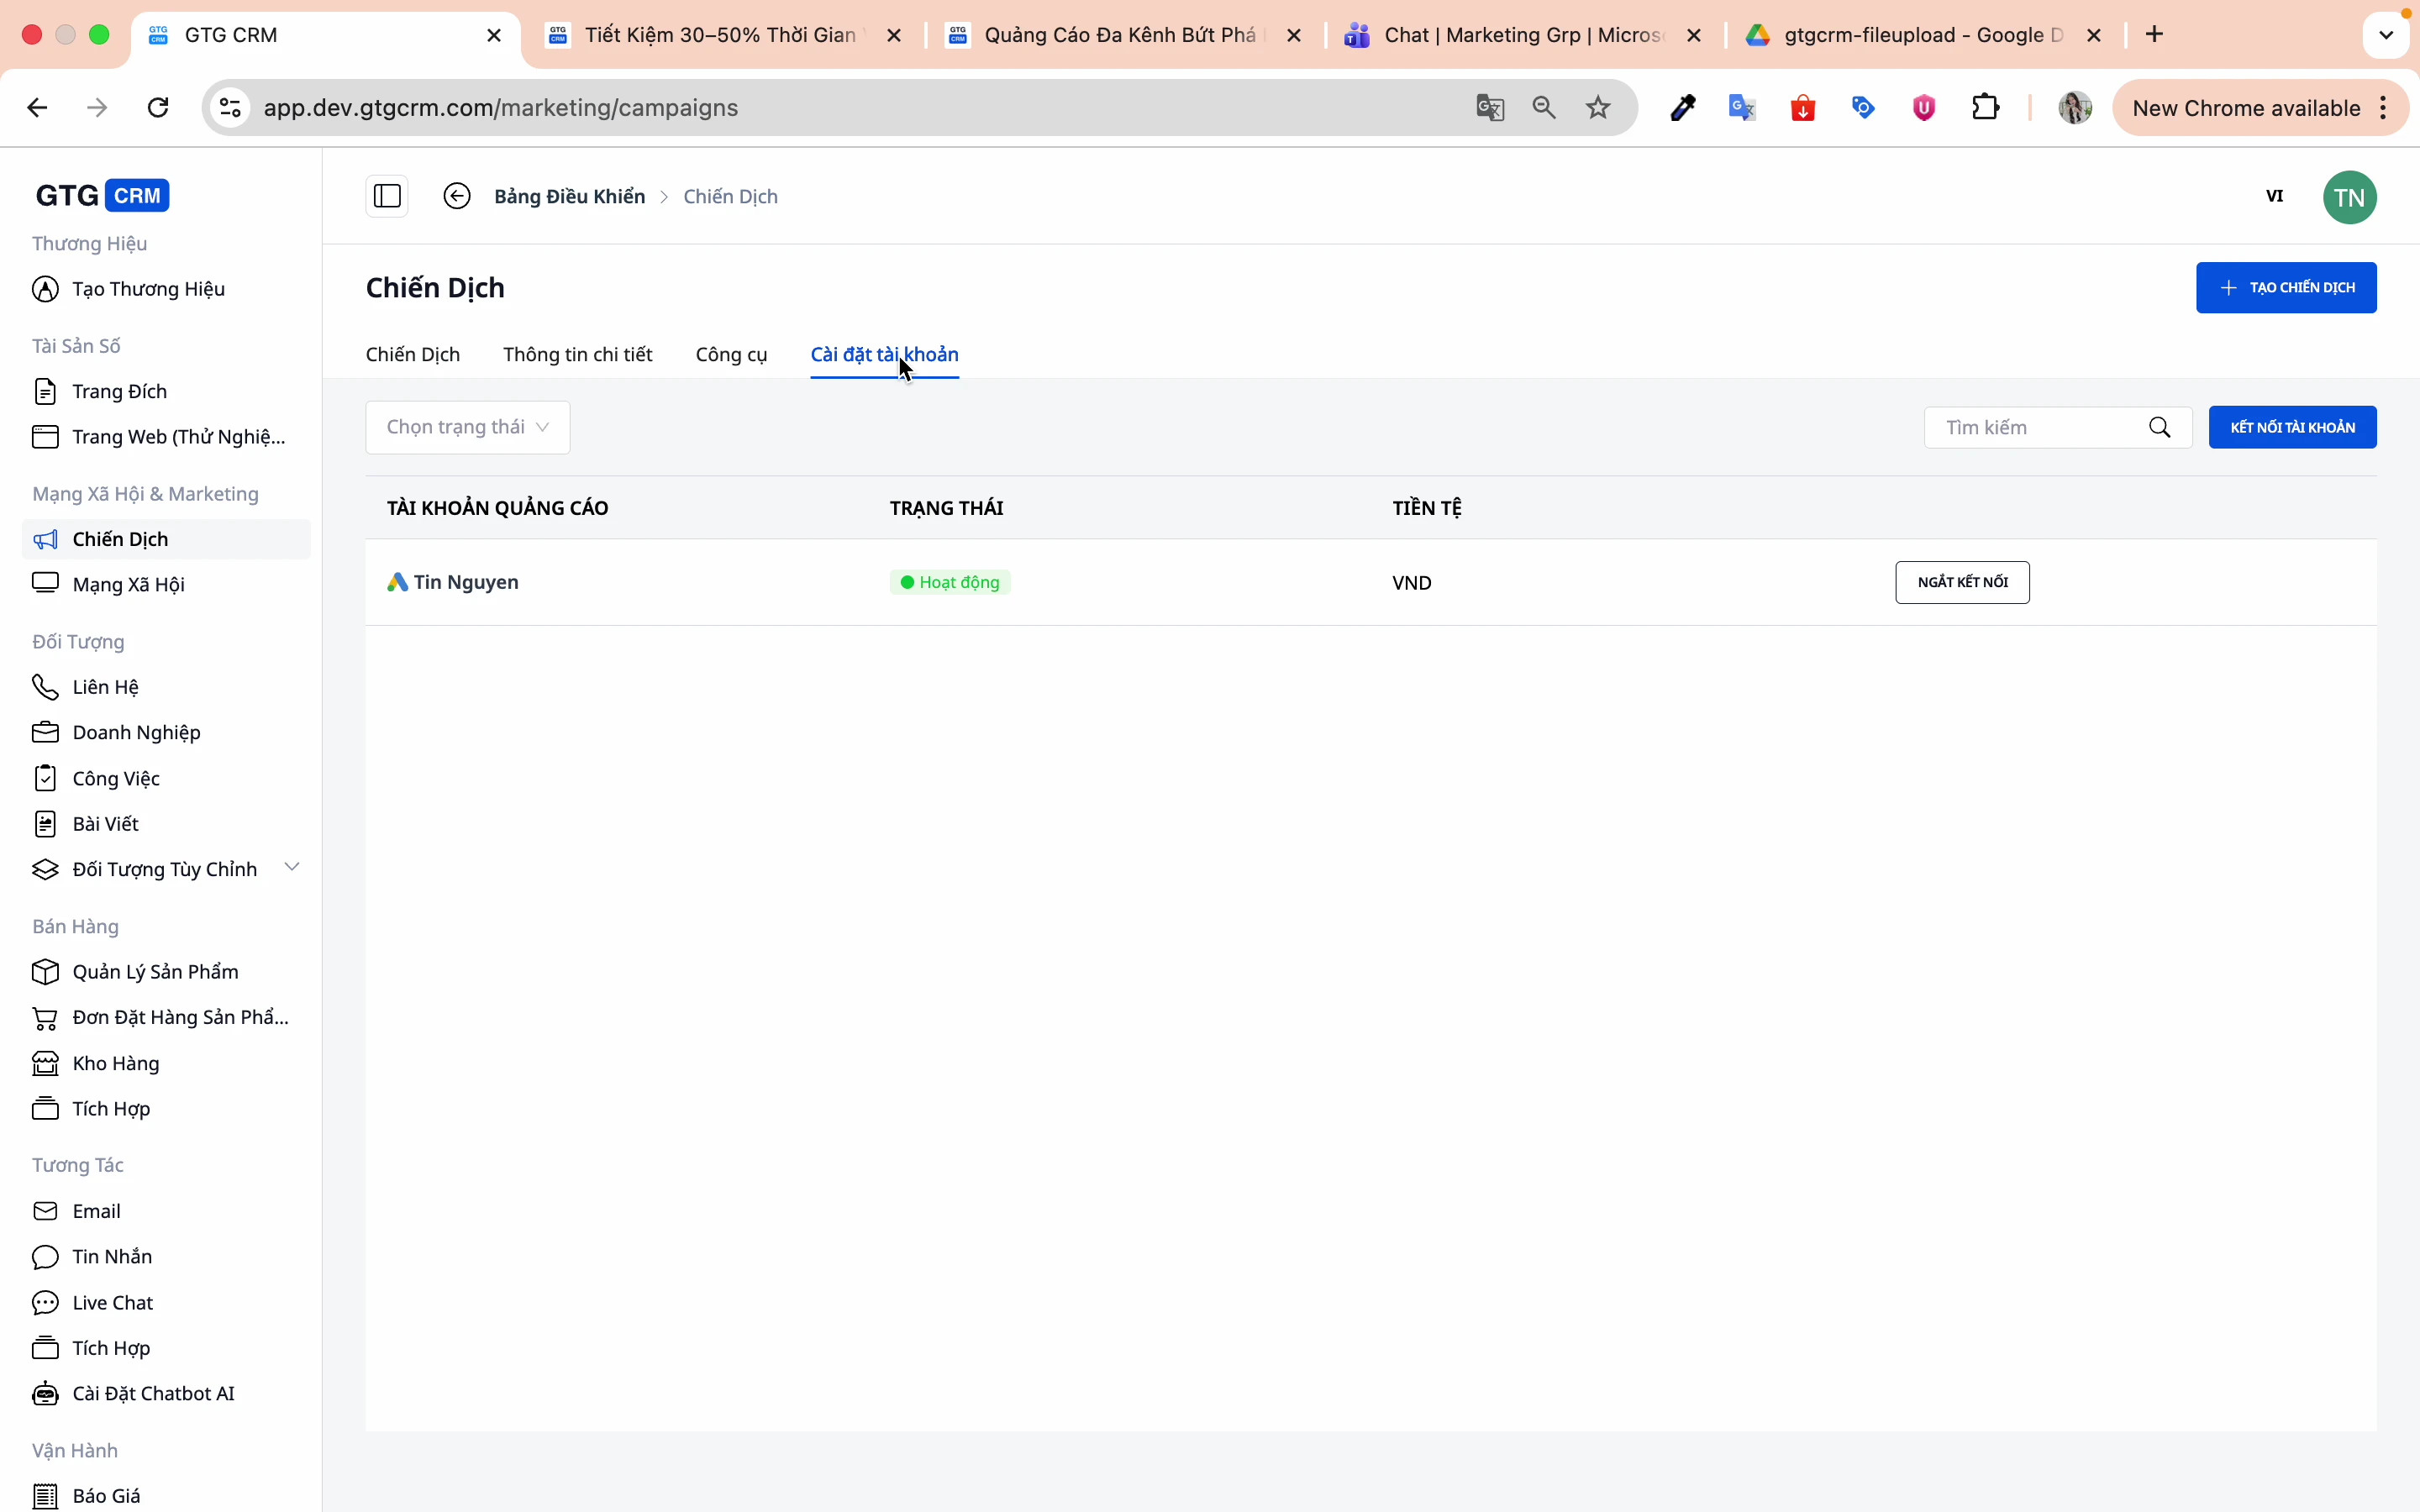
Step 2: Click to connect account
Click the Connect Account button.
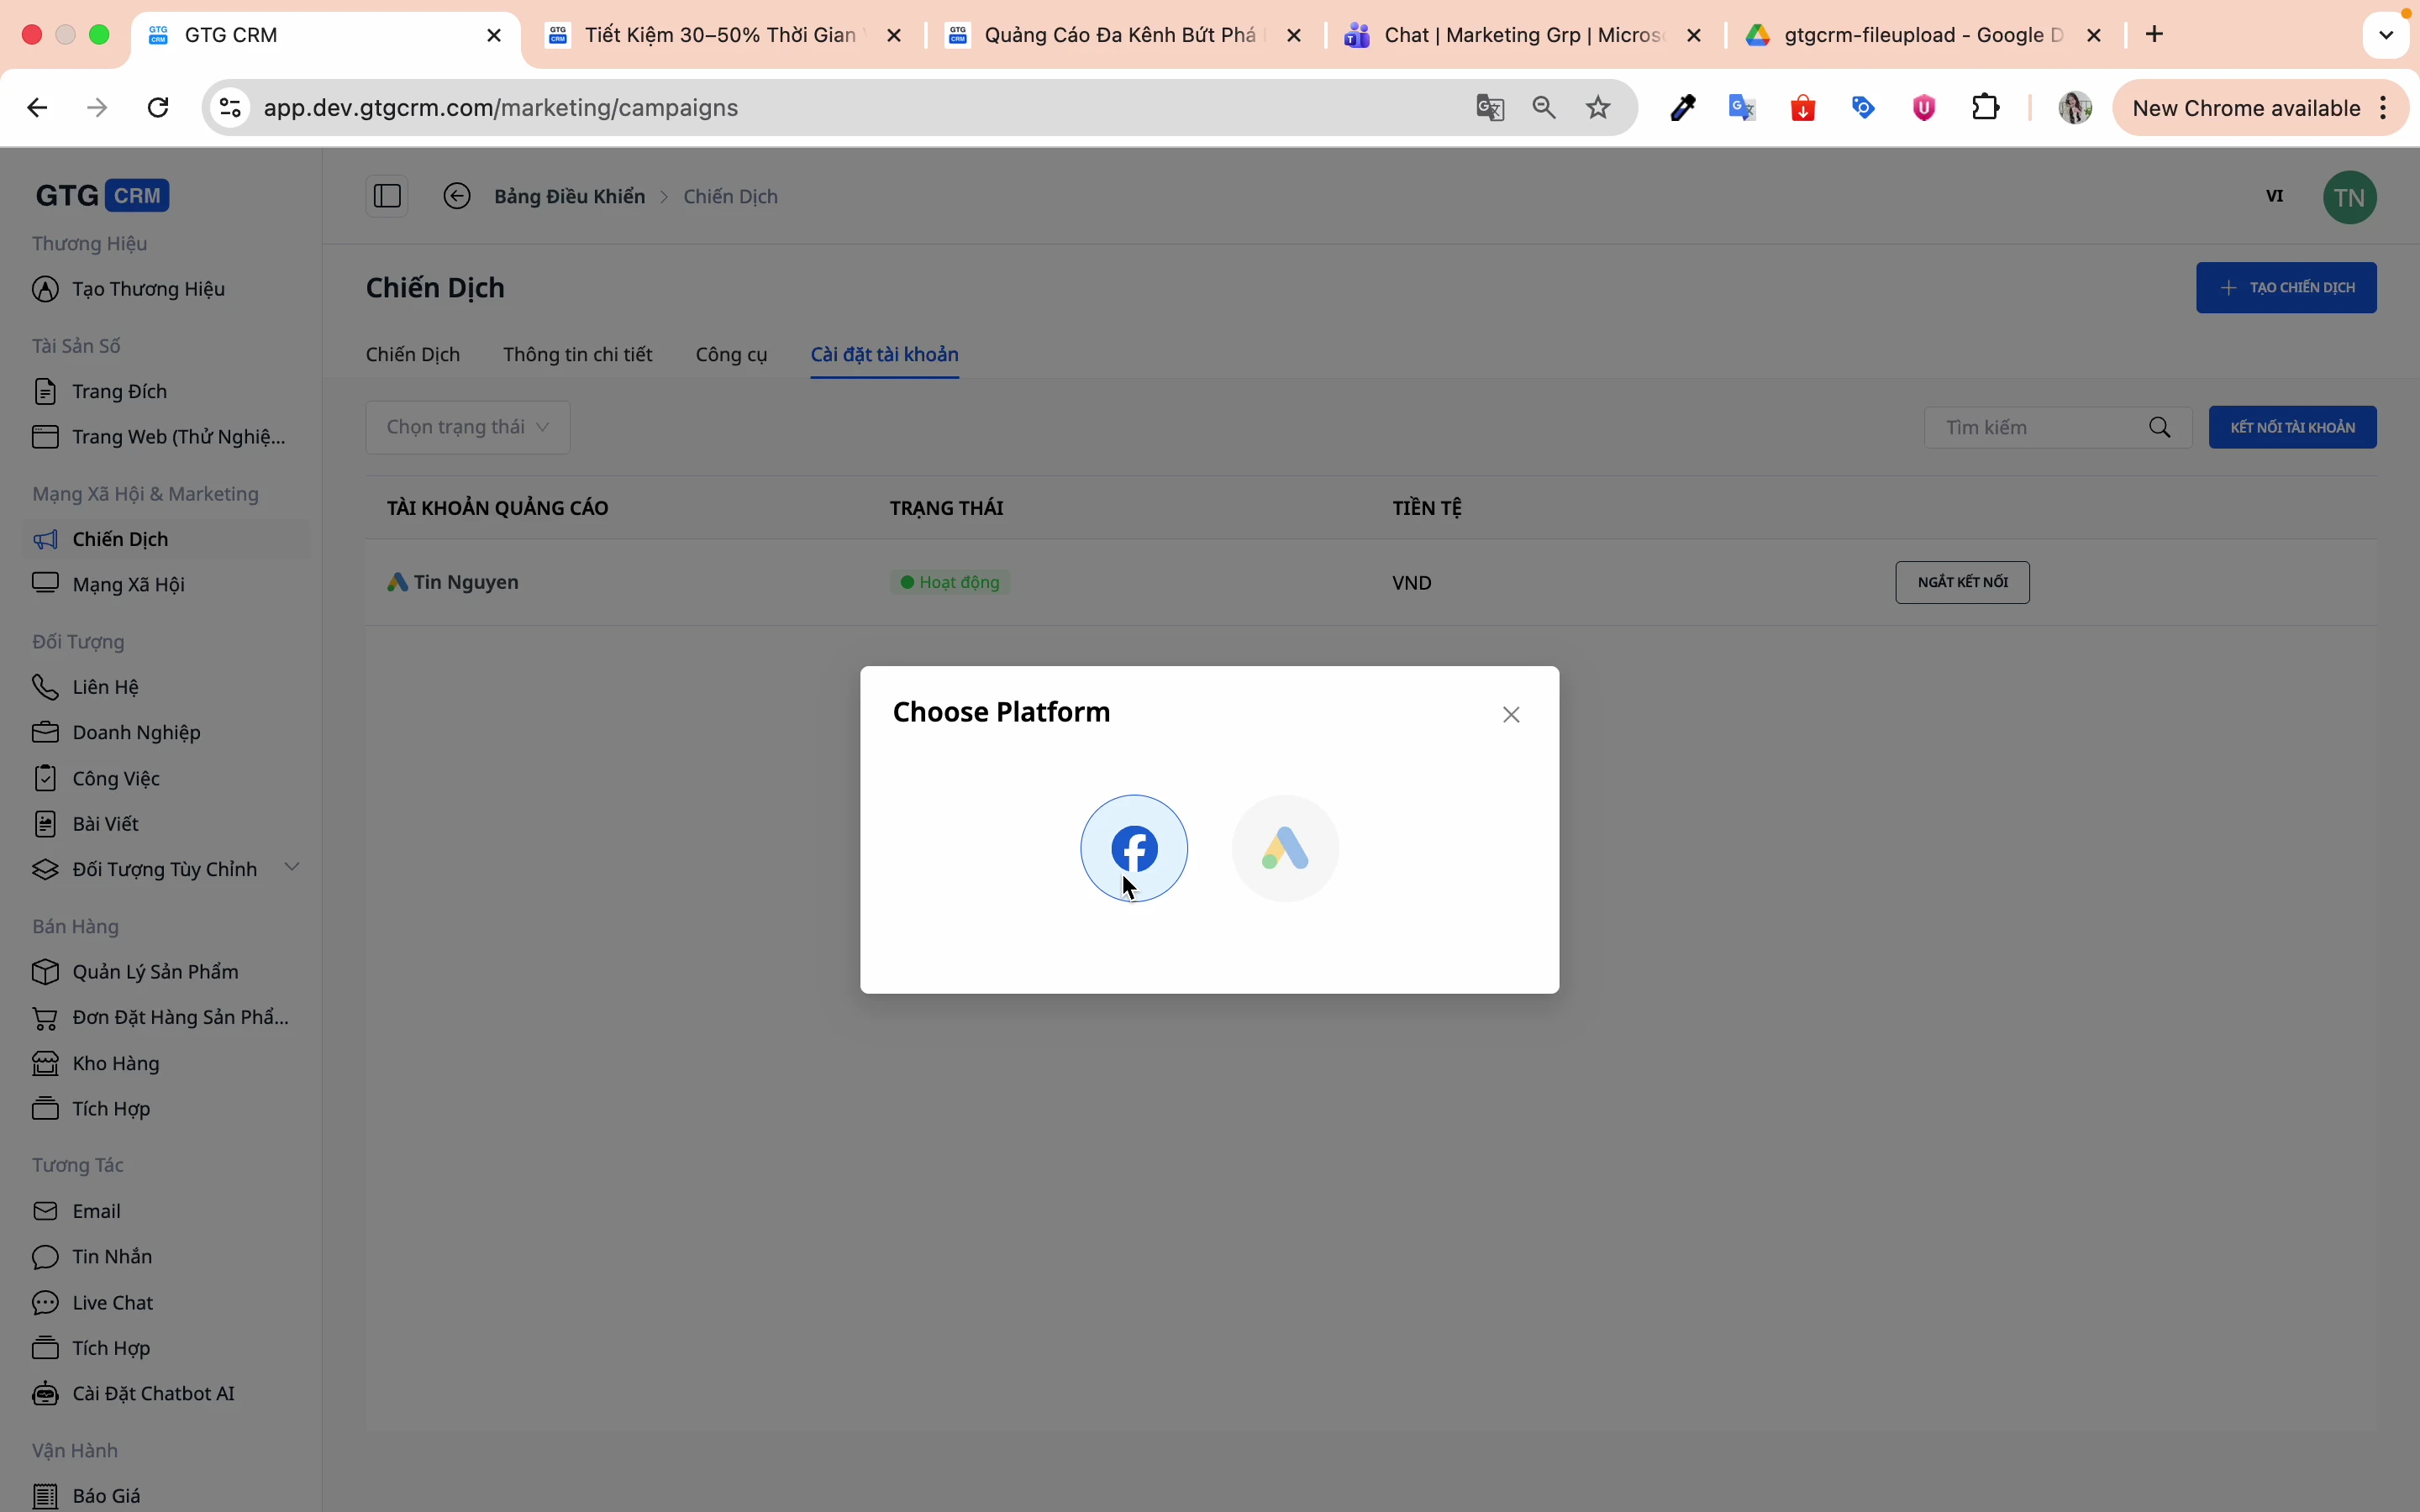
Step 3: Choose the Facebook platform
Choose Facebook as the platform to connect.
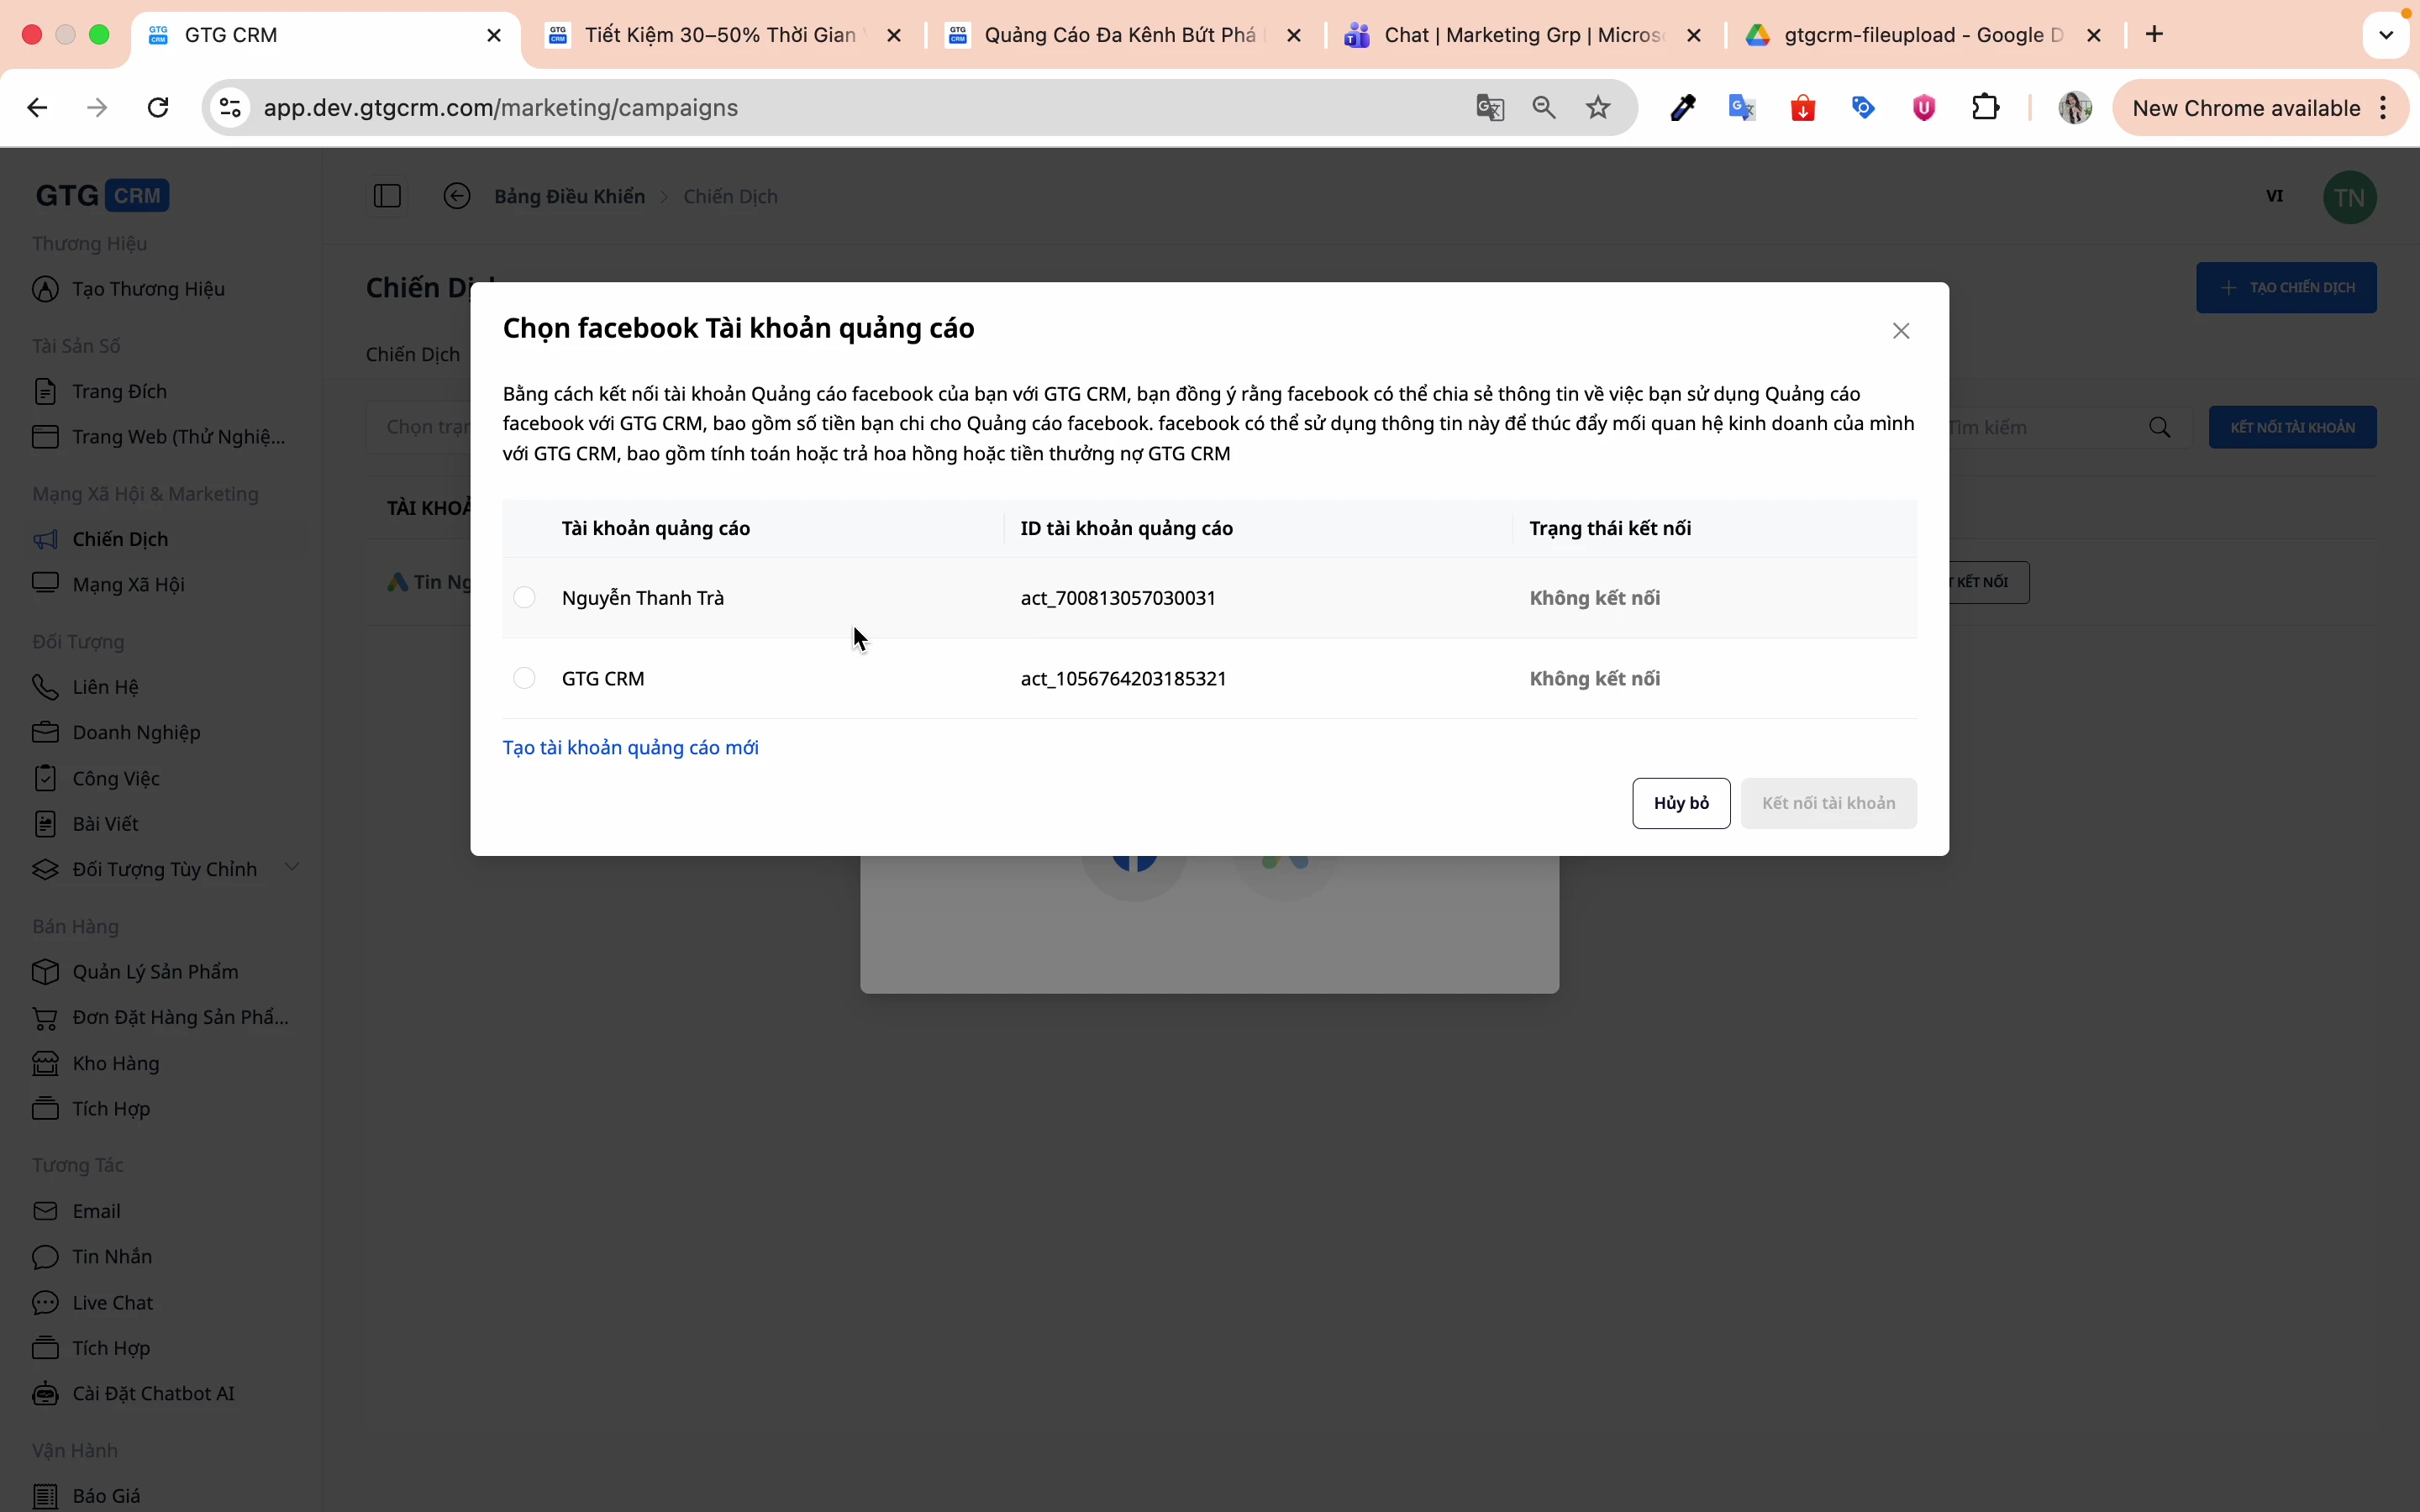
Step 4: Choose an advertising account
The system will display a list of the advertising accounts you are managing:
1. Select the advertising account you want to connect.
2. Click Connect account
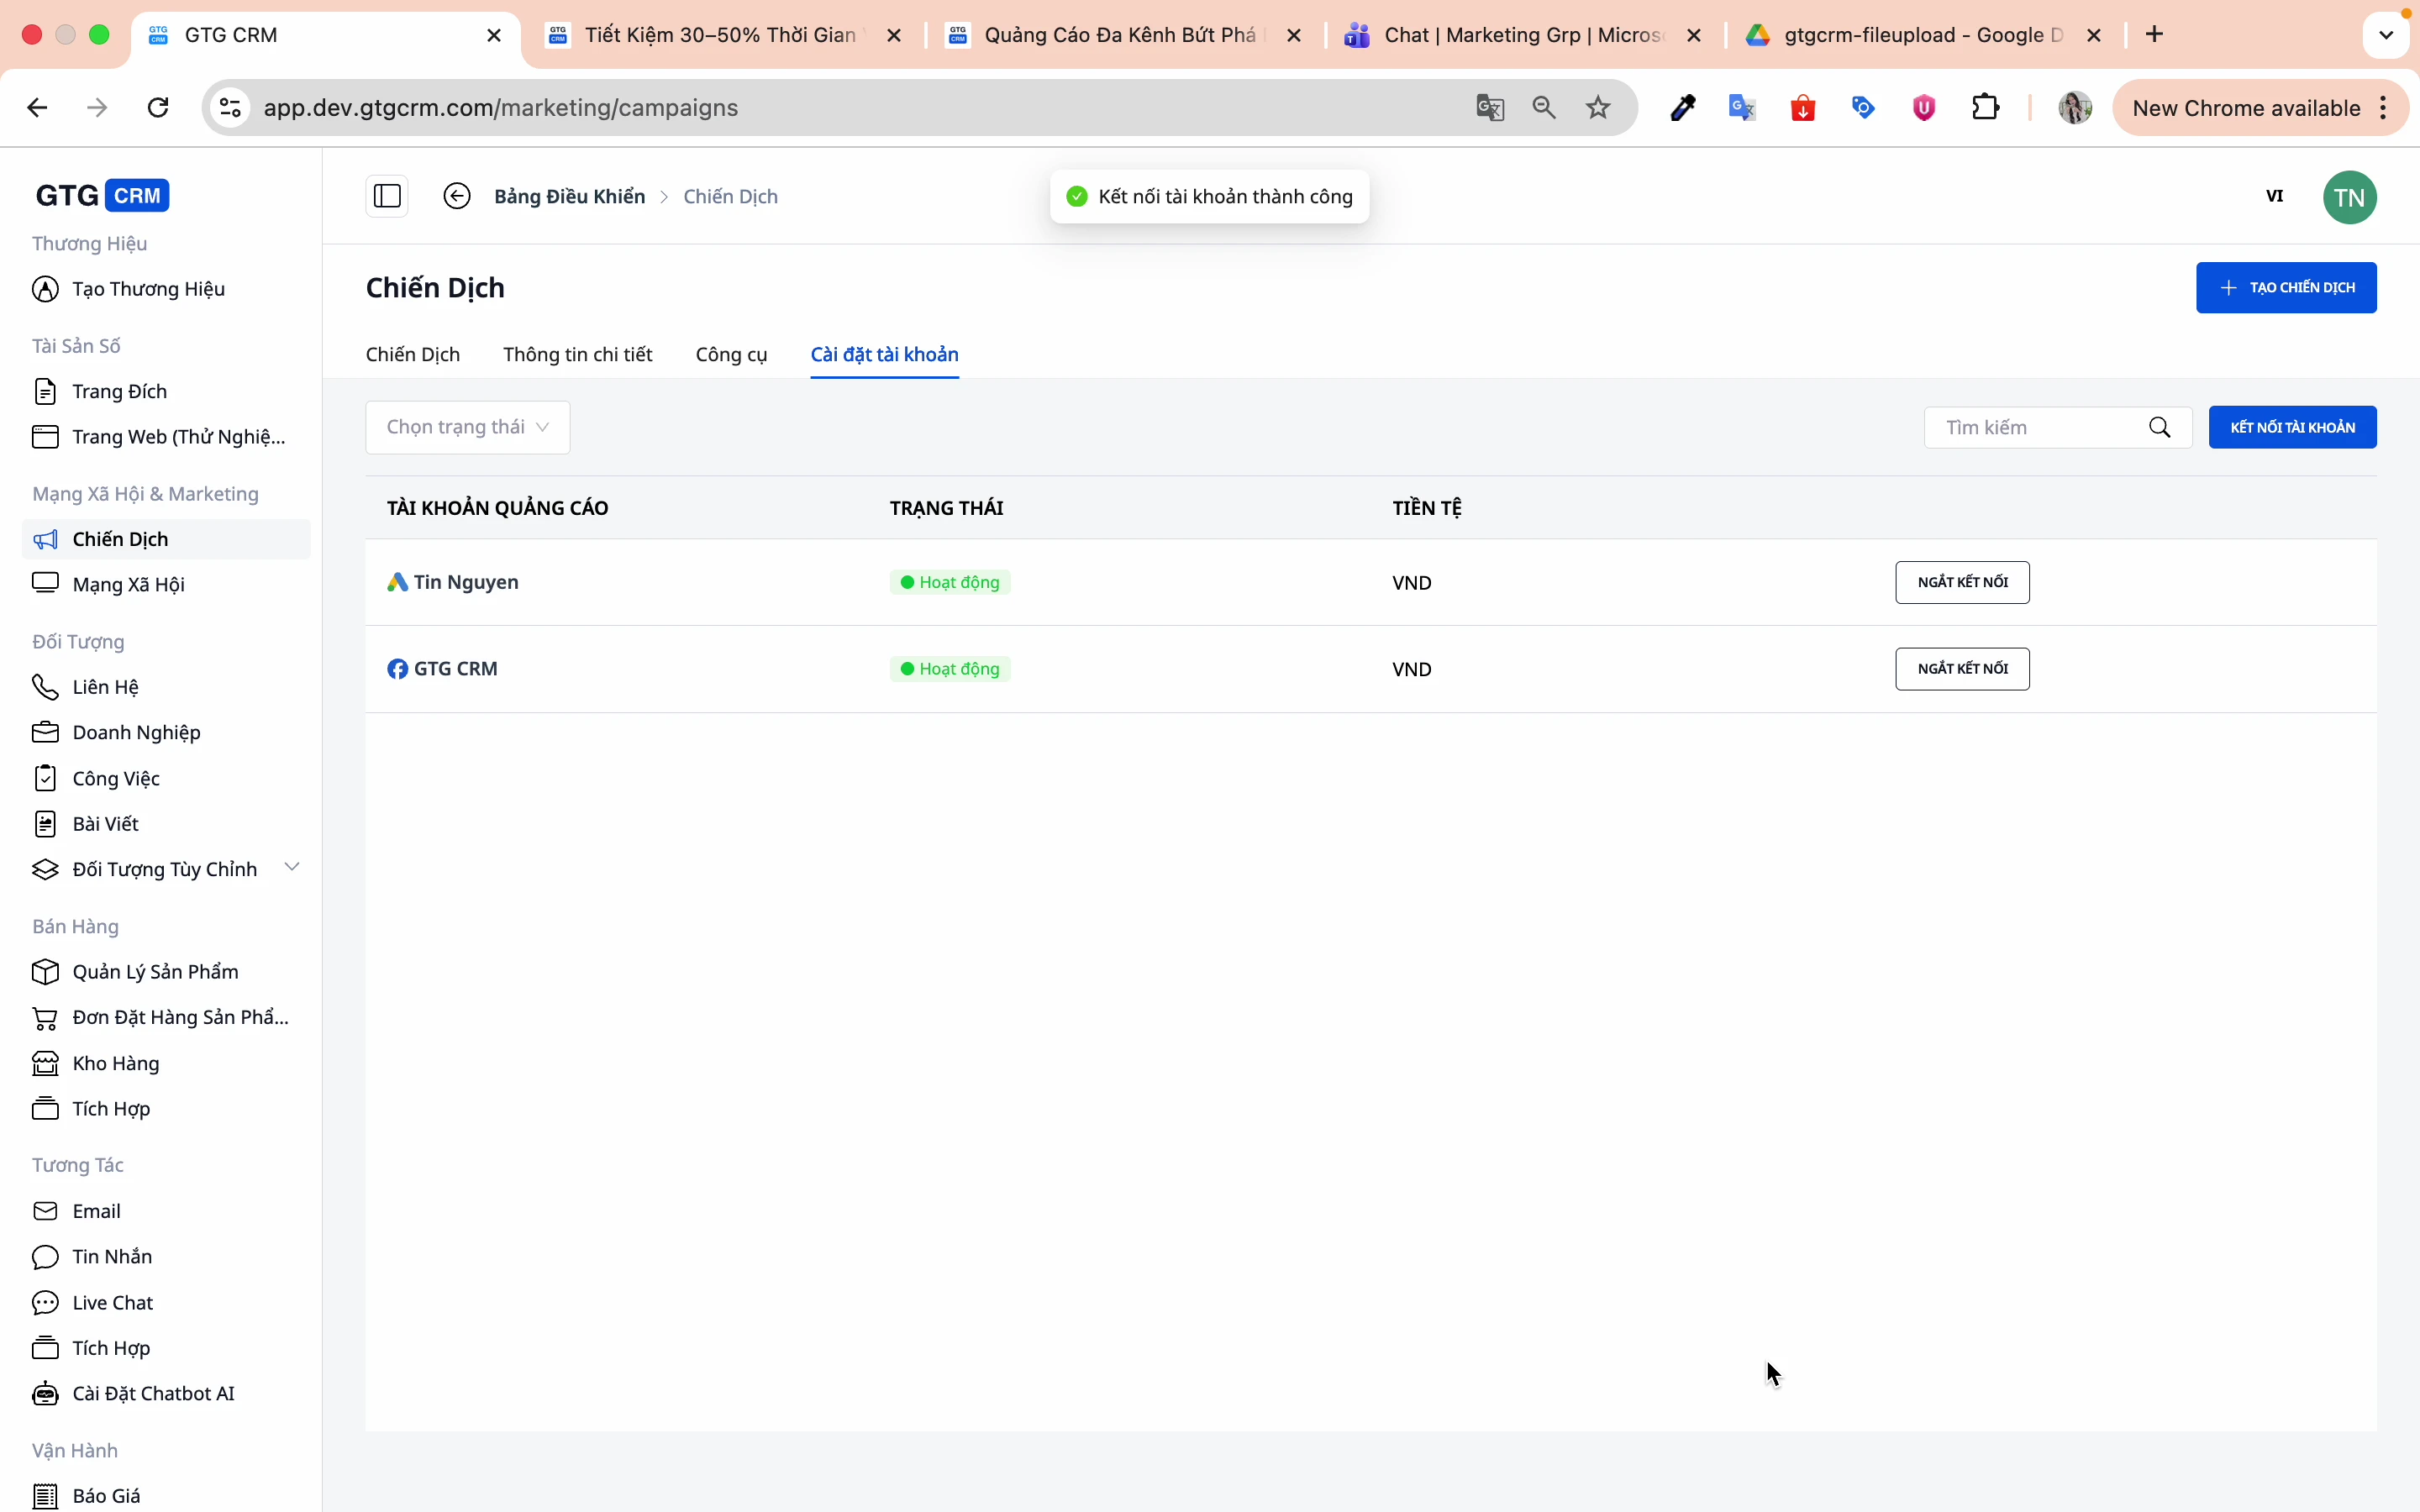
Step 5: Confirm successful connection
When you see the success message, your account has been connected.
2. Create a New Campaign
Step 1: Click "Create campaign"
From the home screen, tap the Create Campaign button.
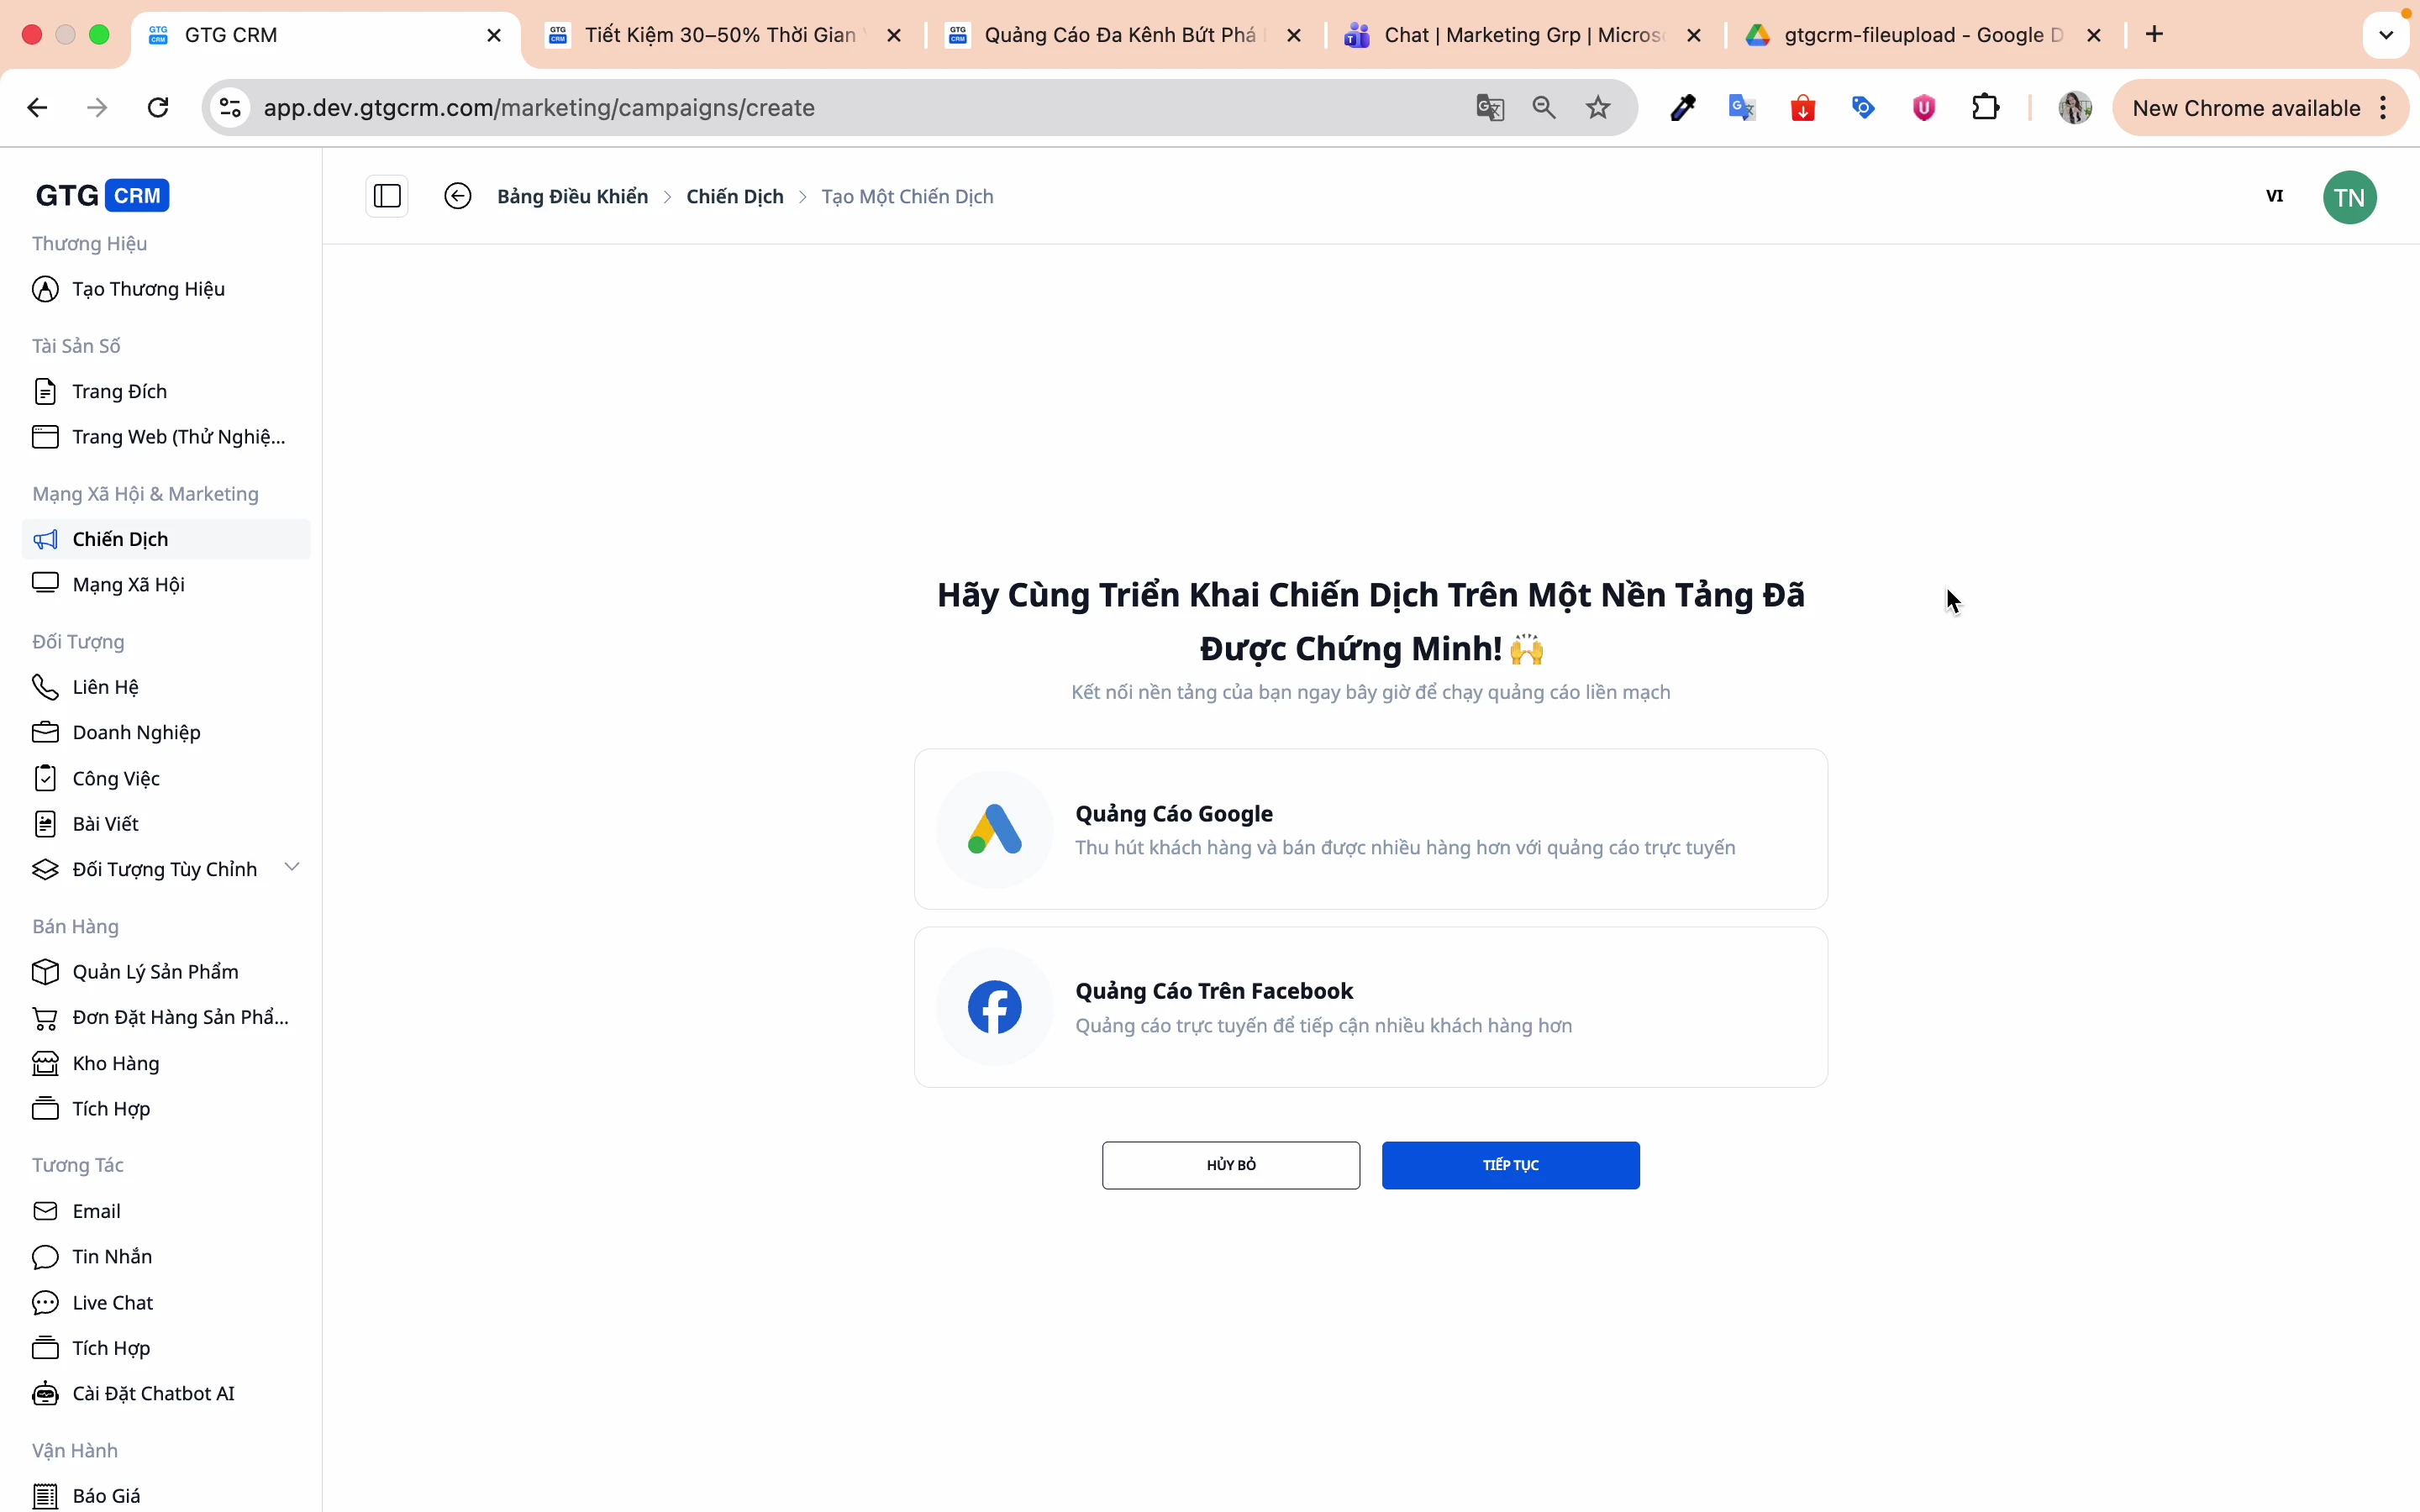
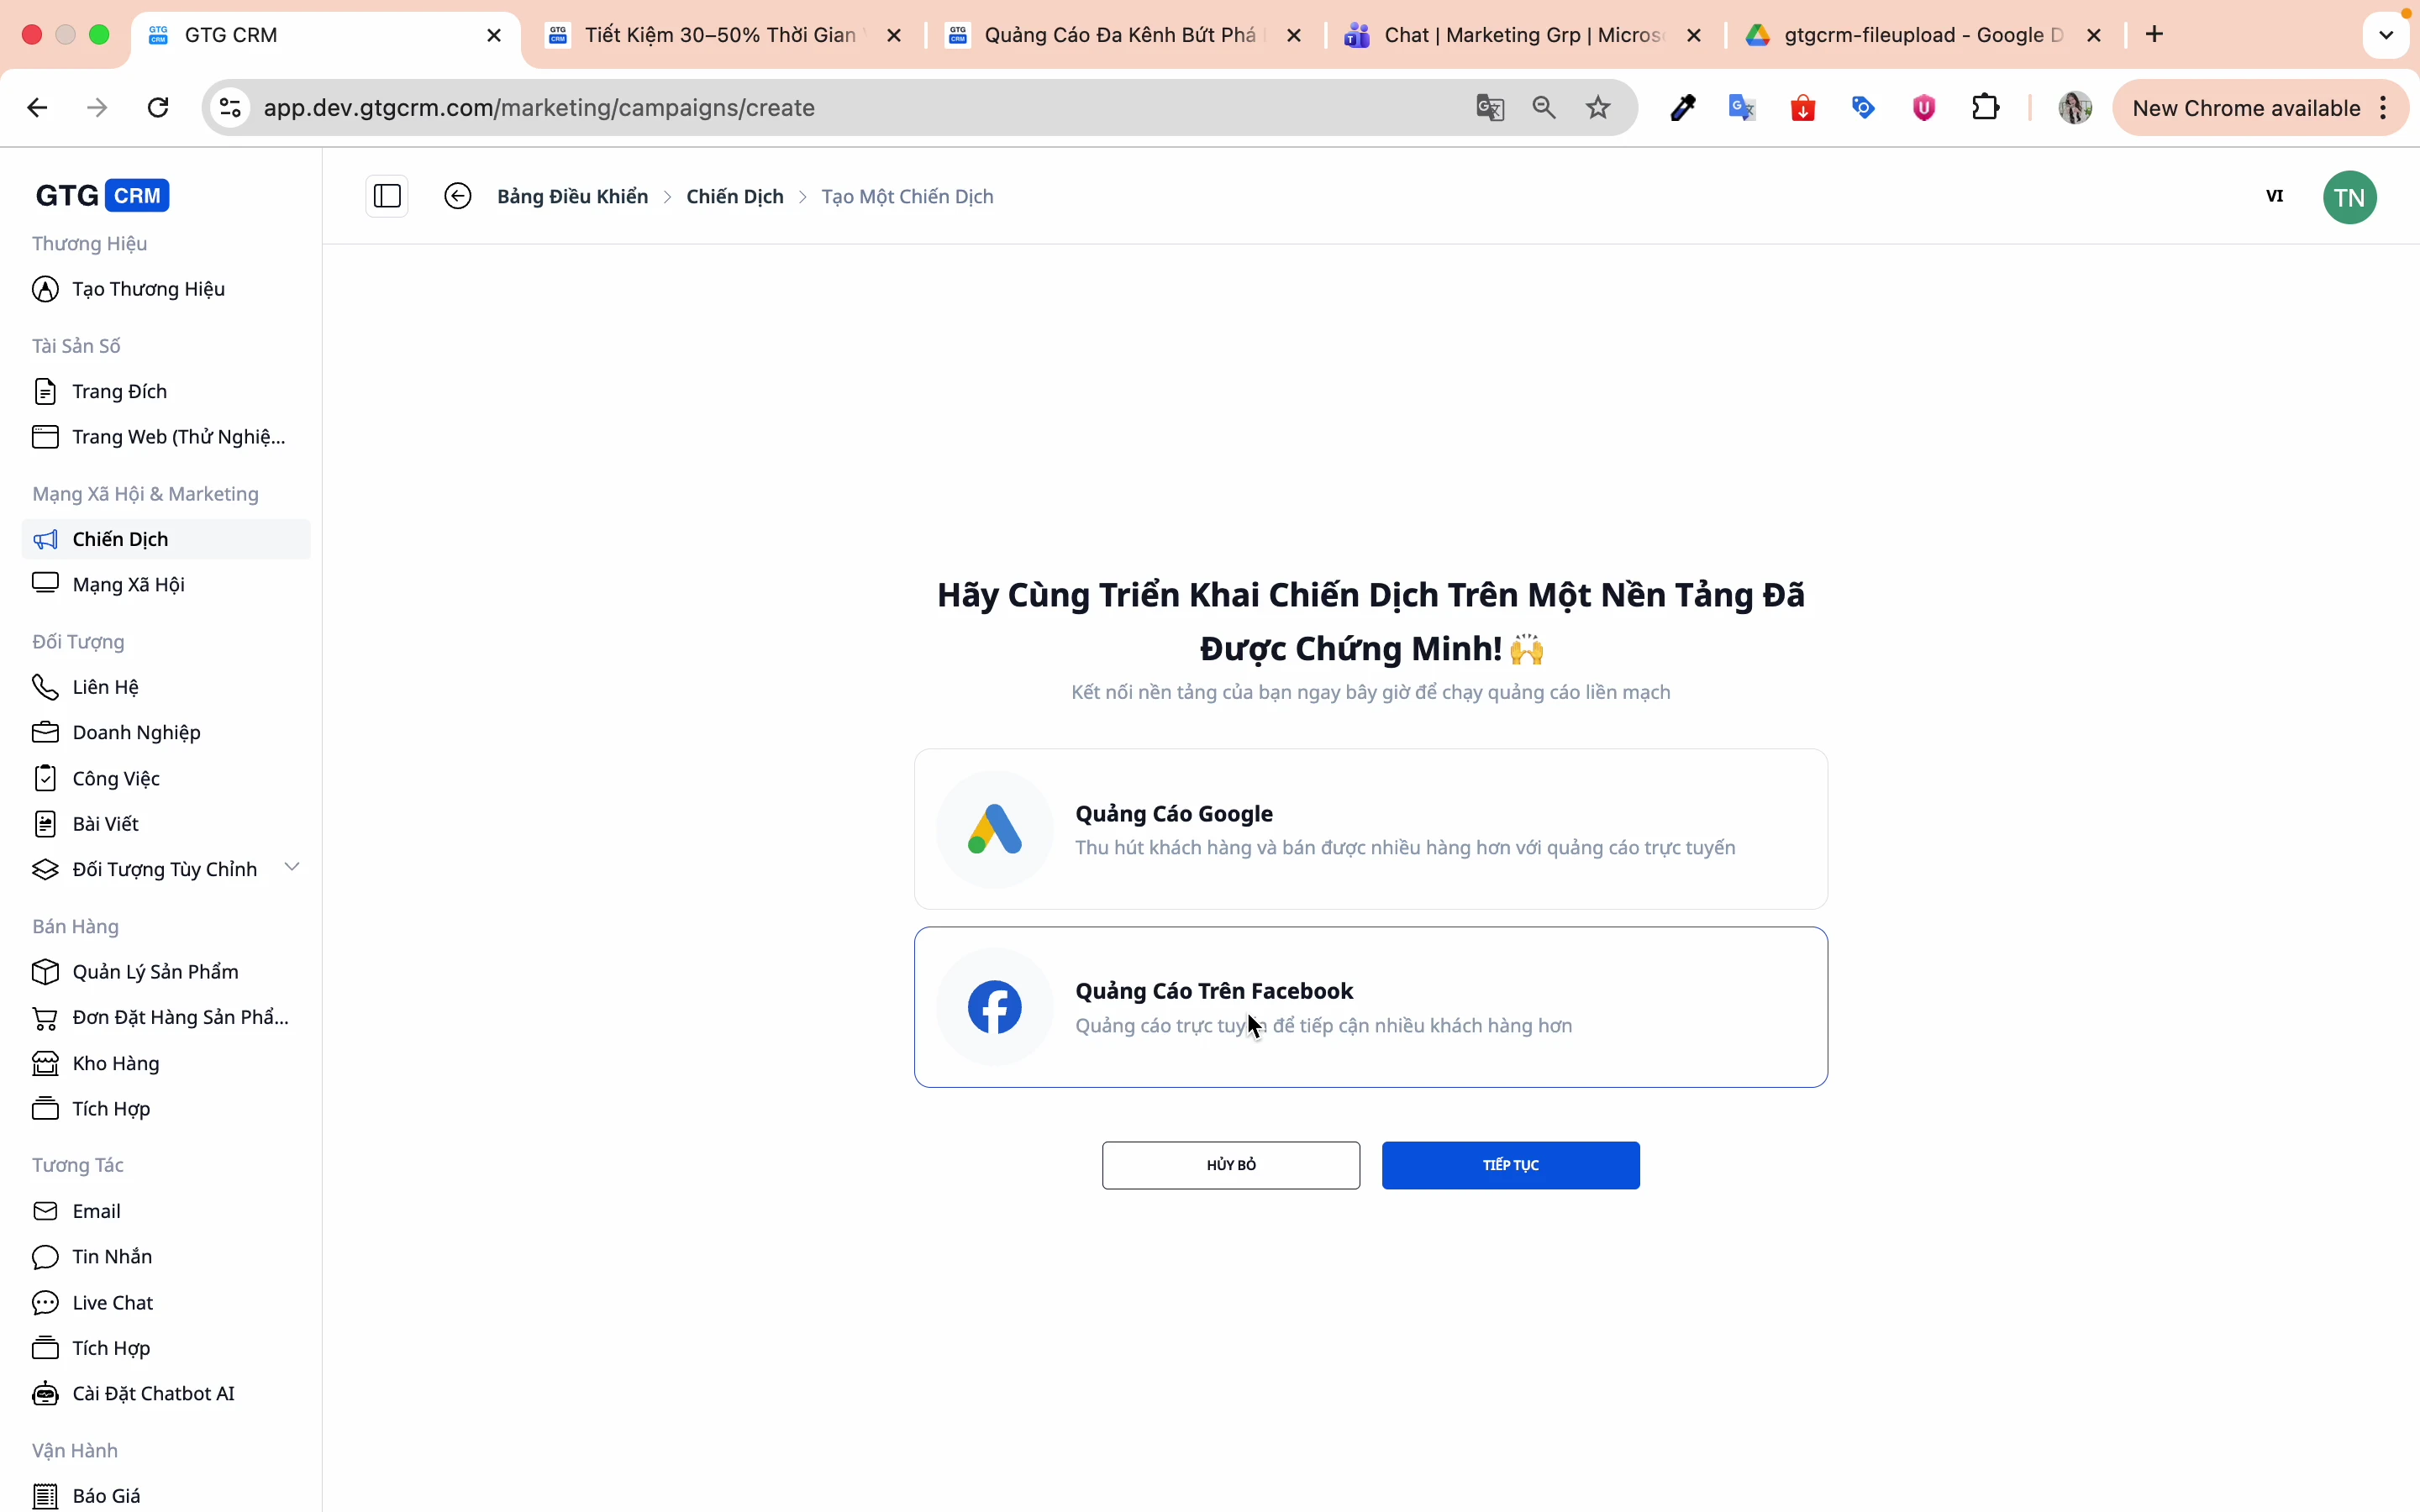
Step 2: Choose an advertising platform
Select Facebook and press Continue .
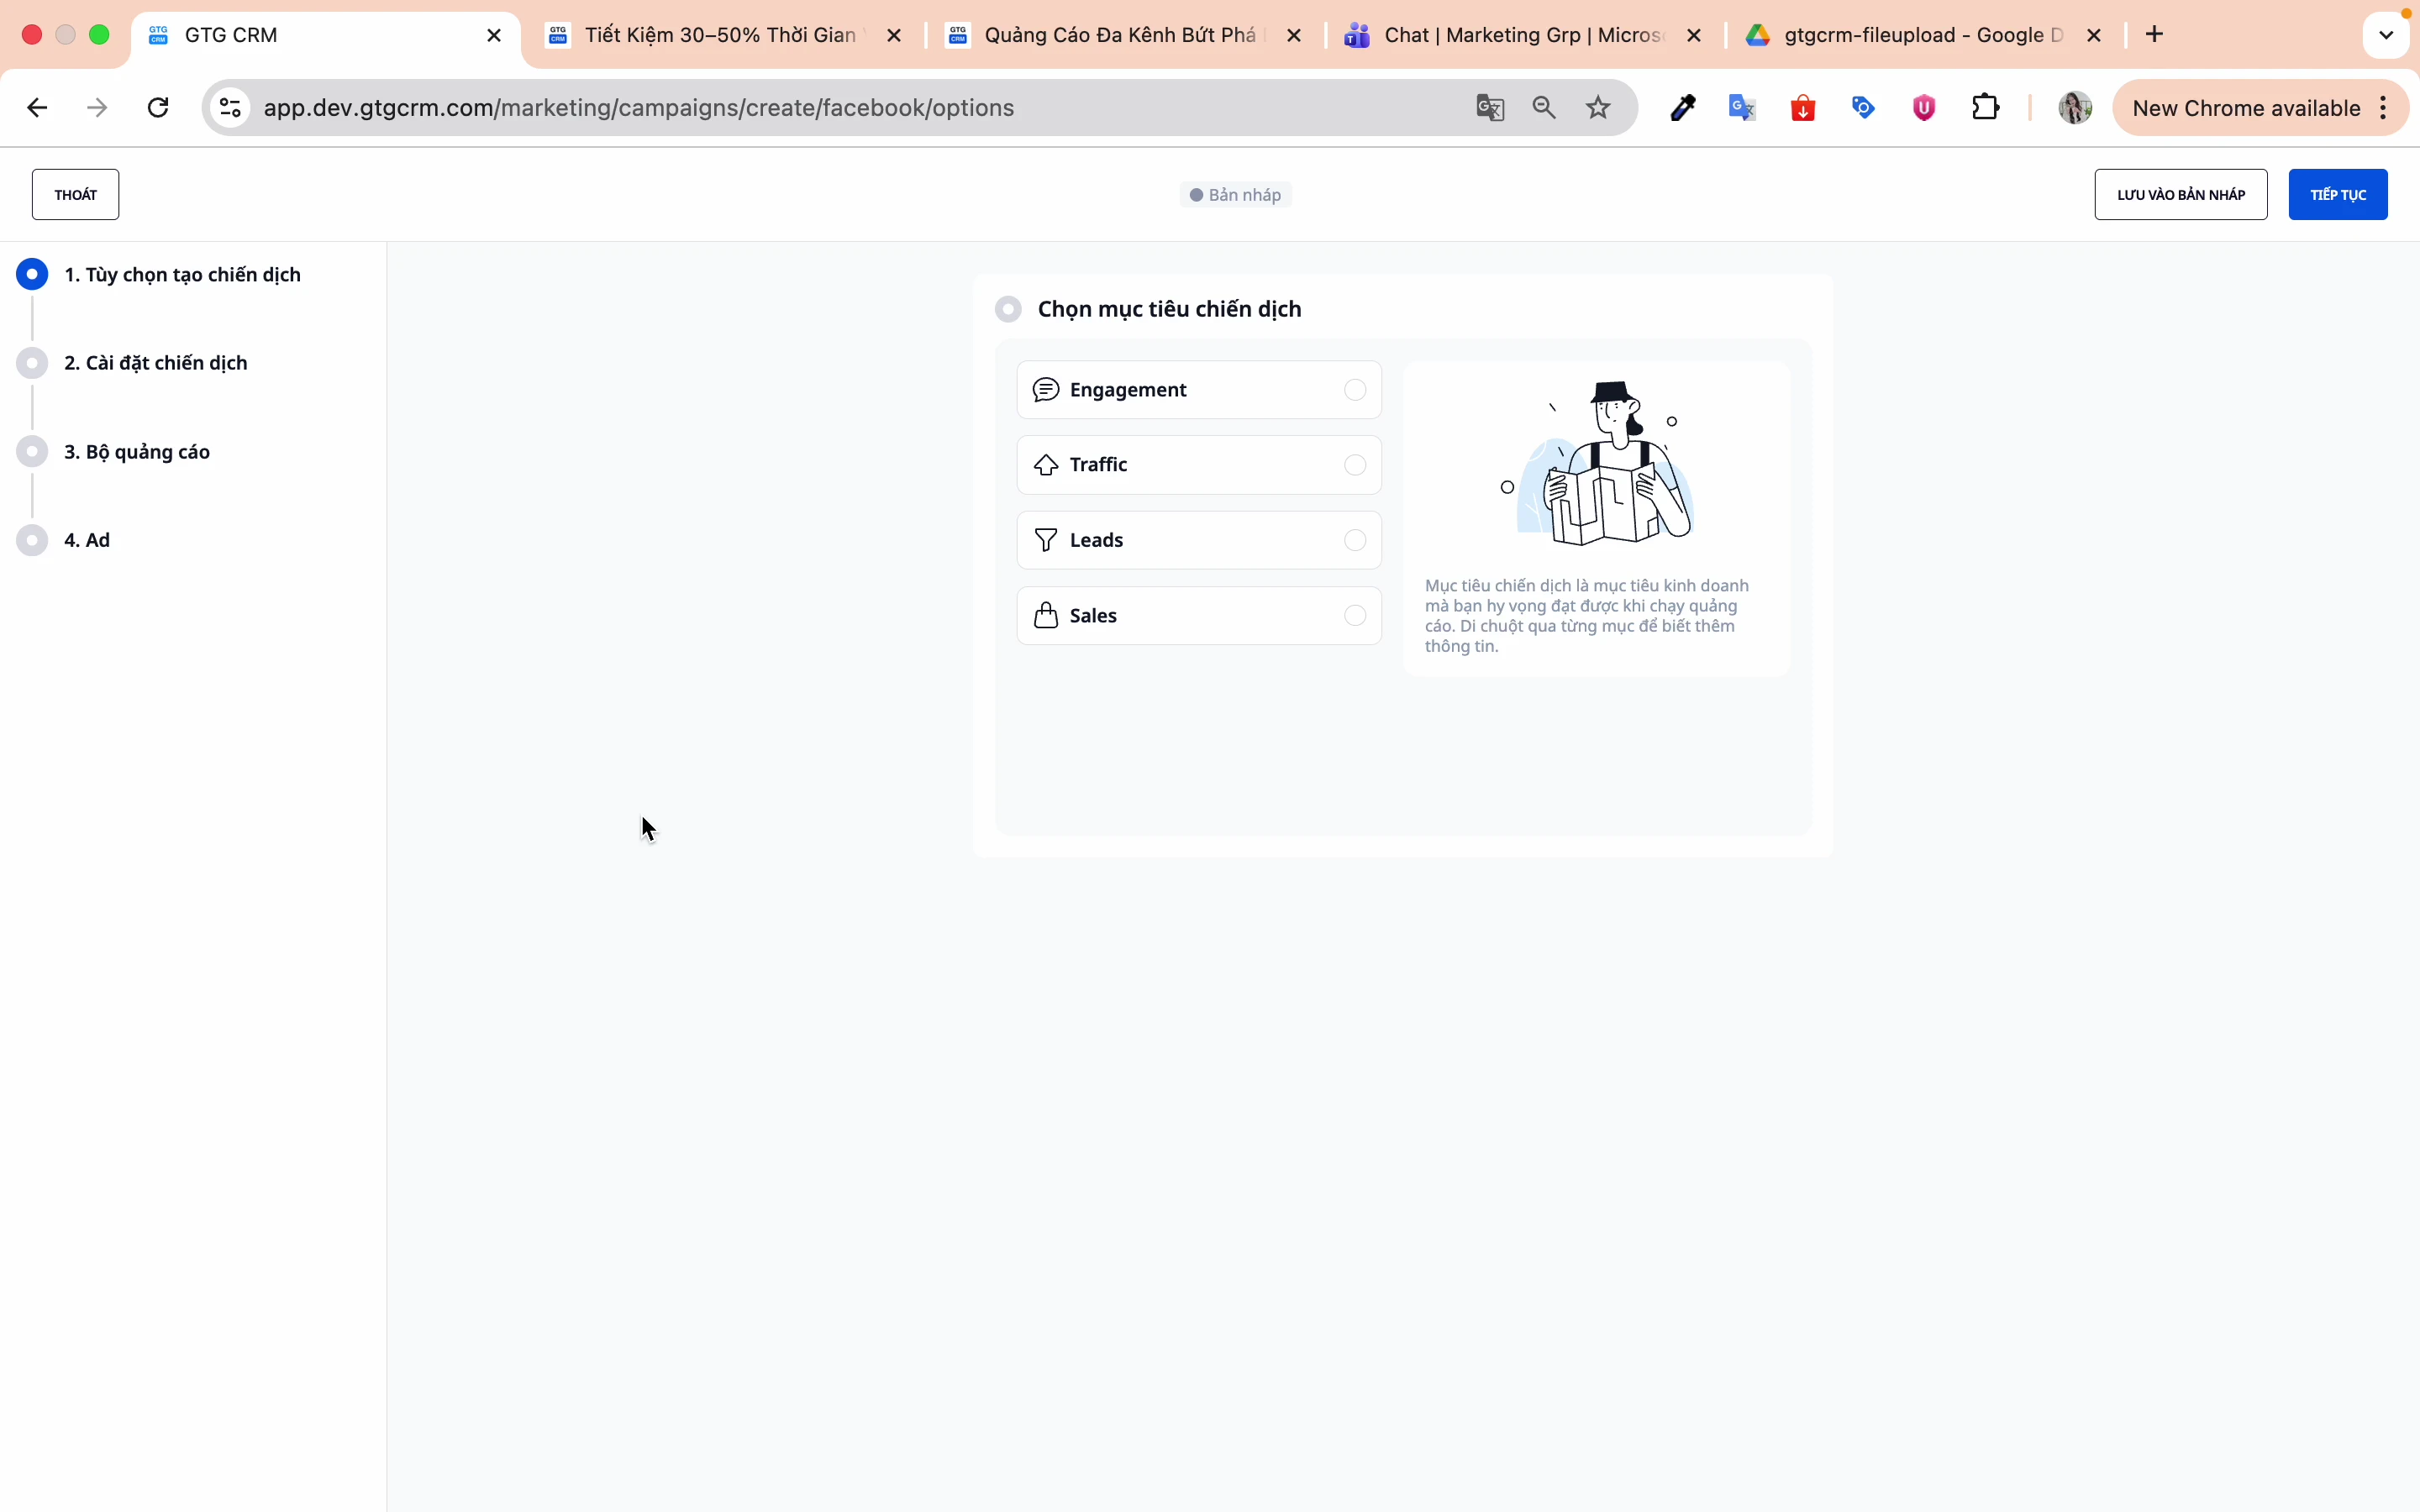
Step 3: Choose your campaign goals.
GTG CRM supports four main objectives:
| Target | Describe | Suitable for |
|---|---|---|
| Engagement | Increase post engagement. | Brand awareness, Community |
| Traffic | Increase website clicks. | Blog, Landing page |
| Leads | Collect registration forms | B2B, Consulting Services |
| Sales | Increase sales | E-commerce |
3. Campaign Setup
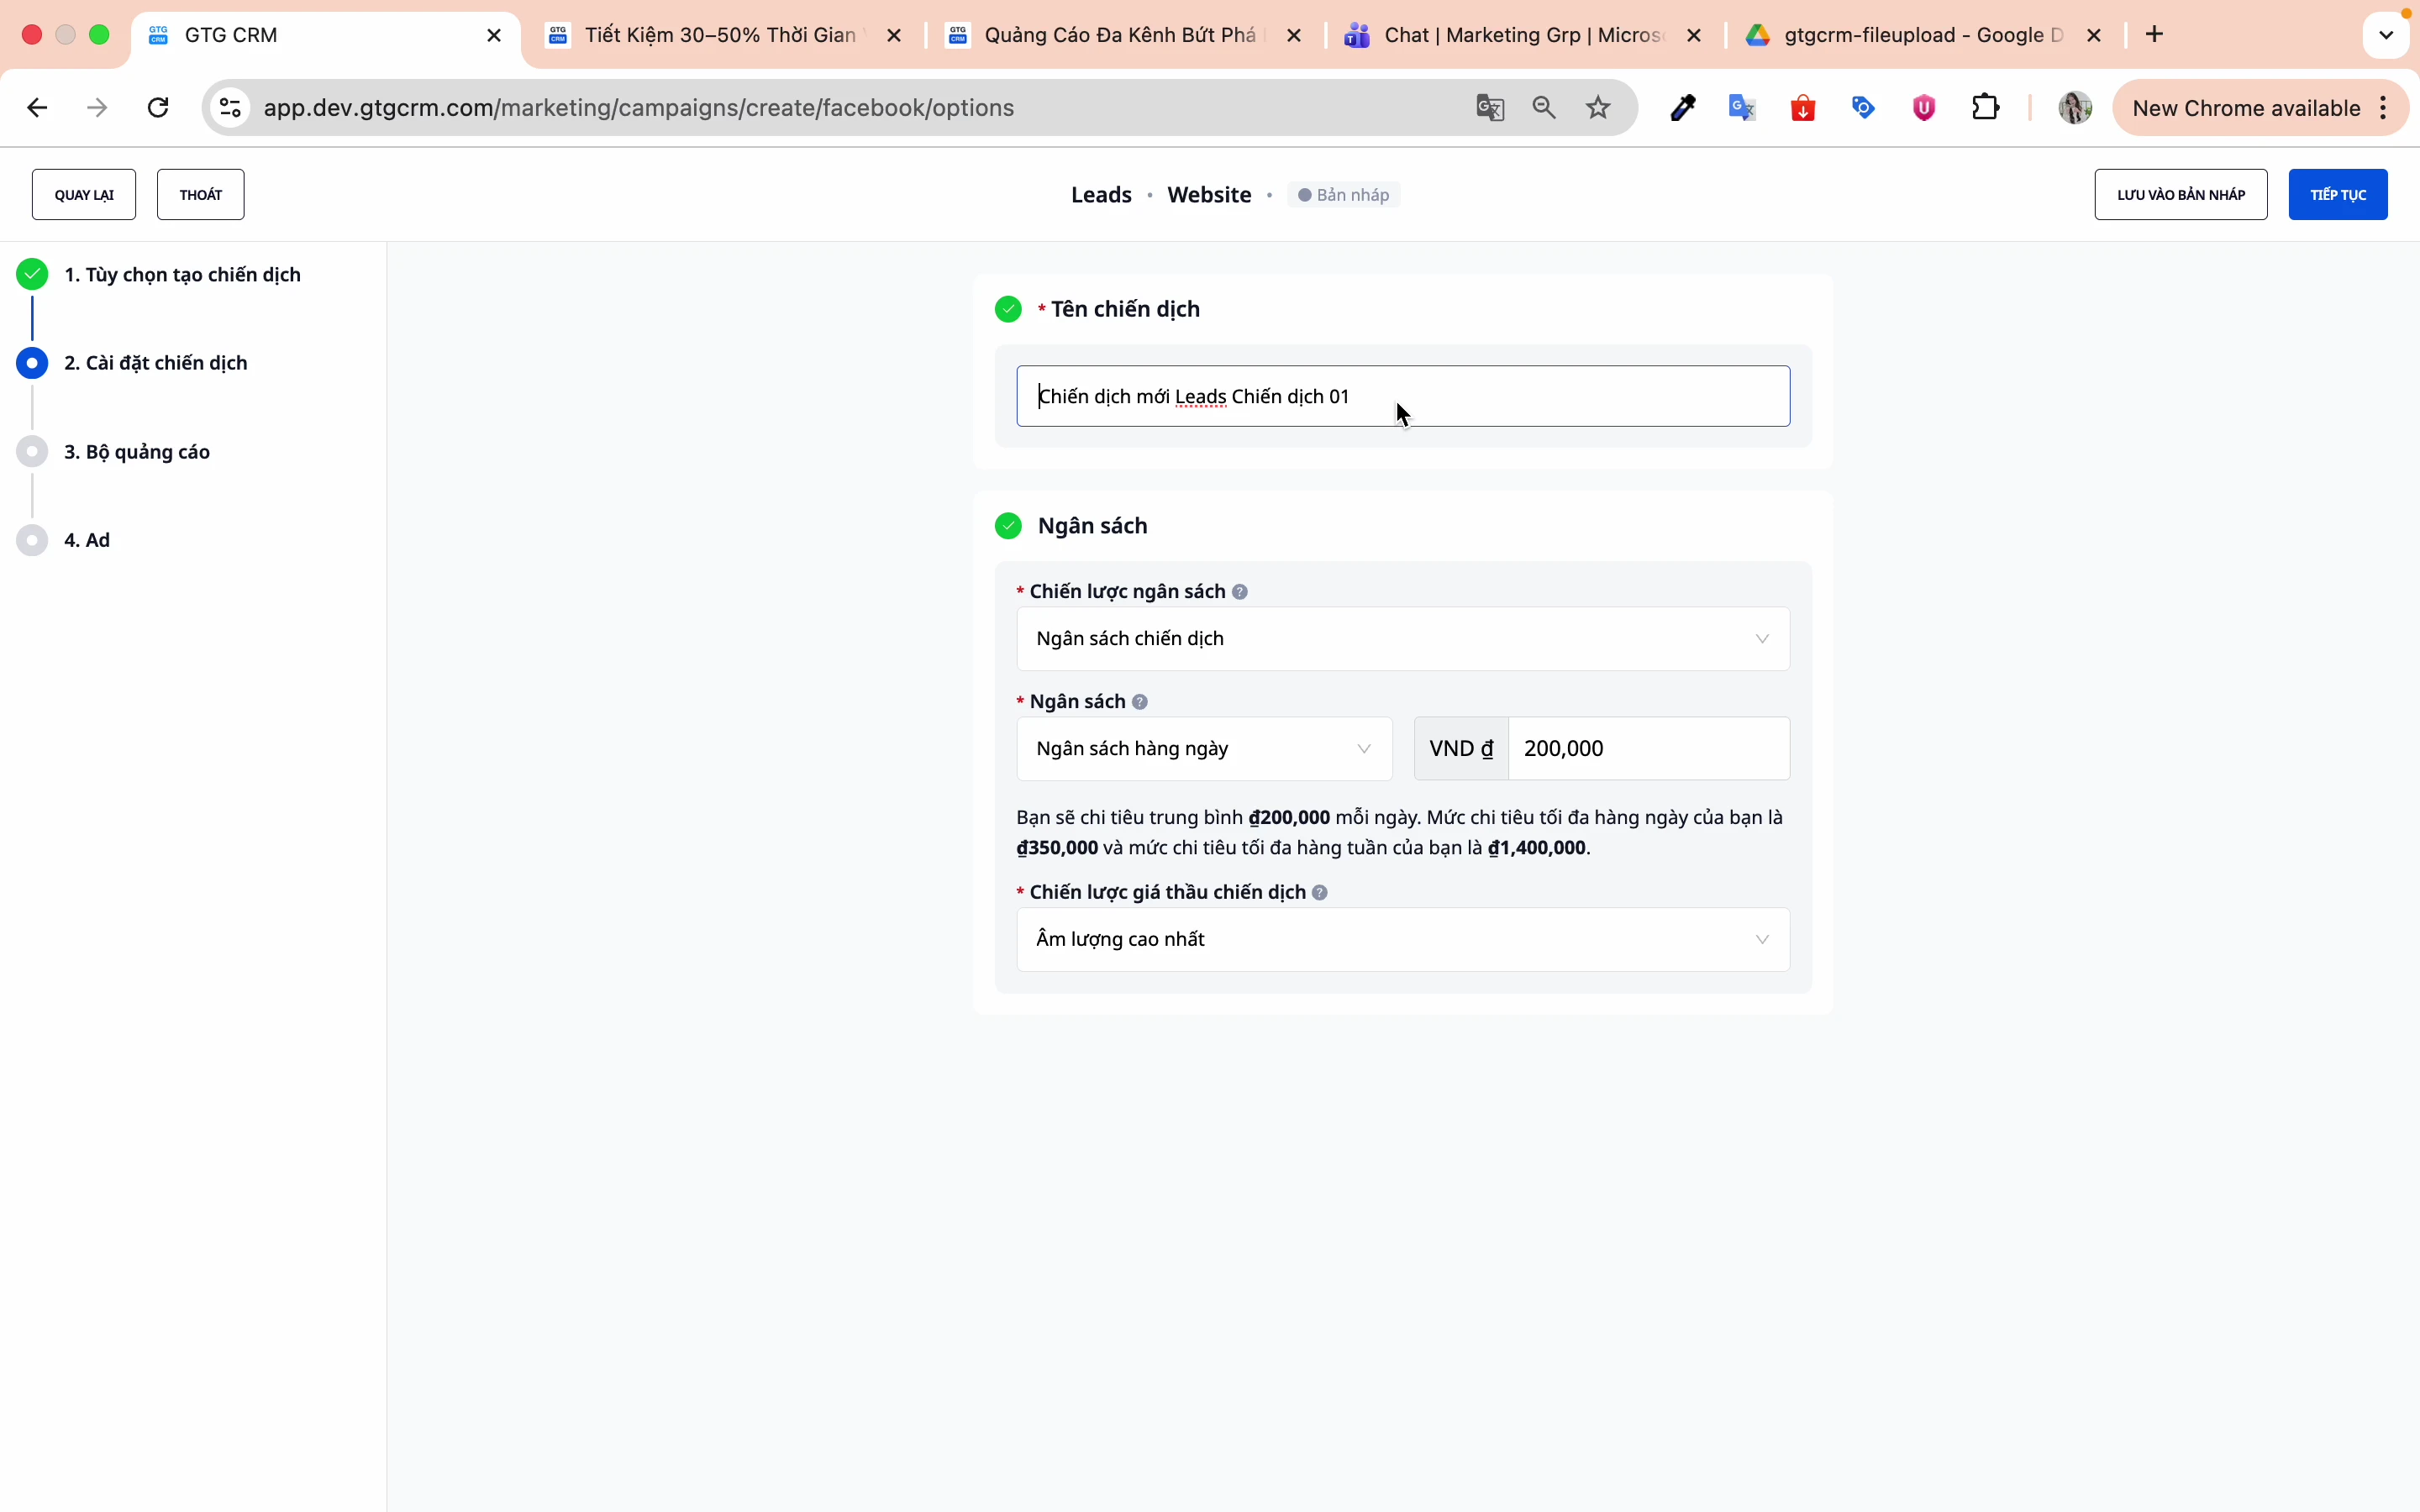
Step 1: Name your campaign
Choose easy-to-remember names for easier management and searching later.
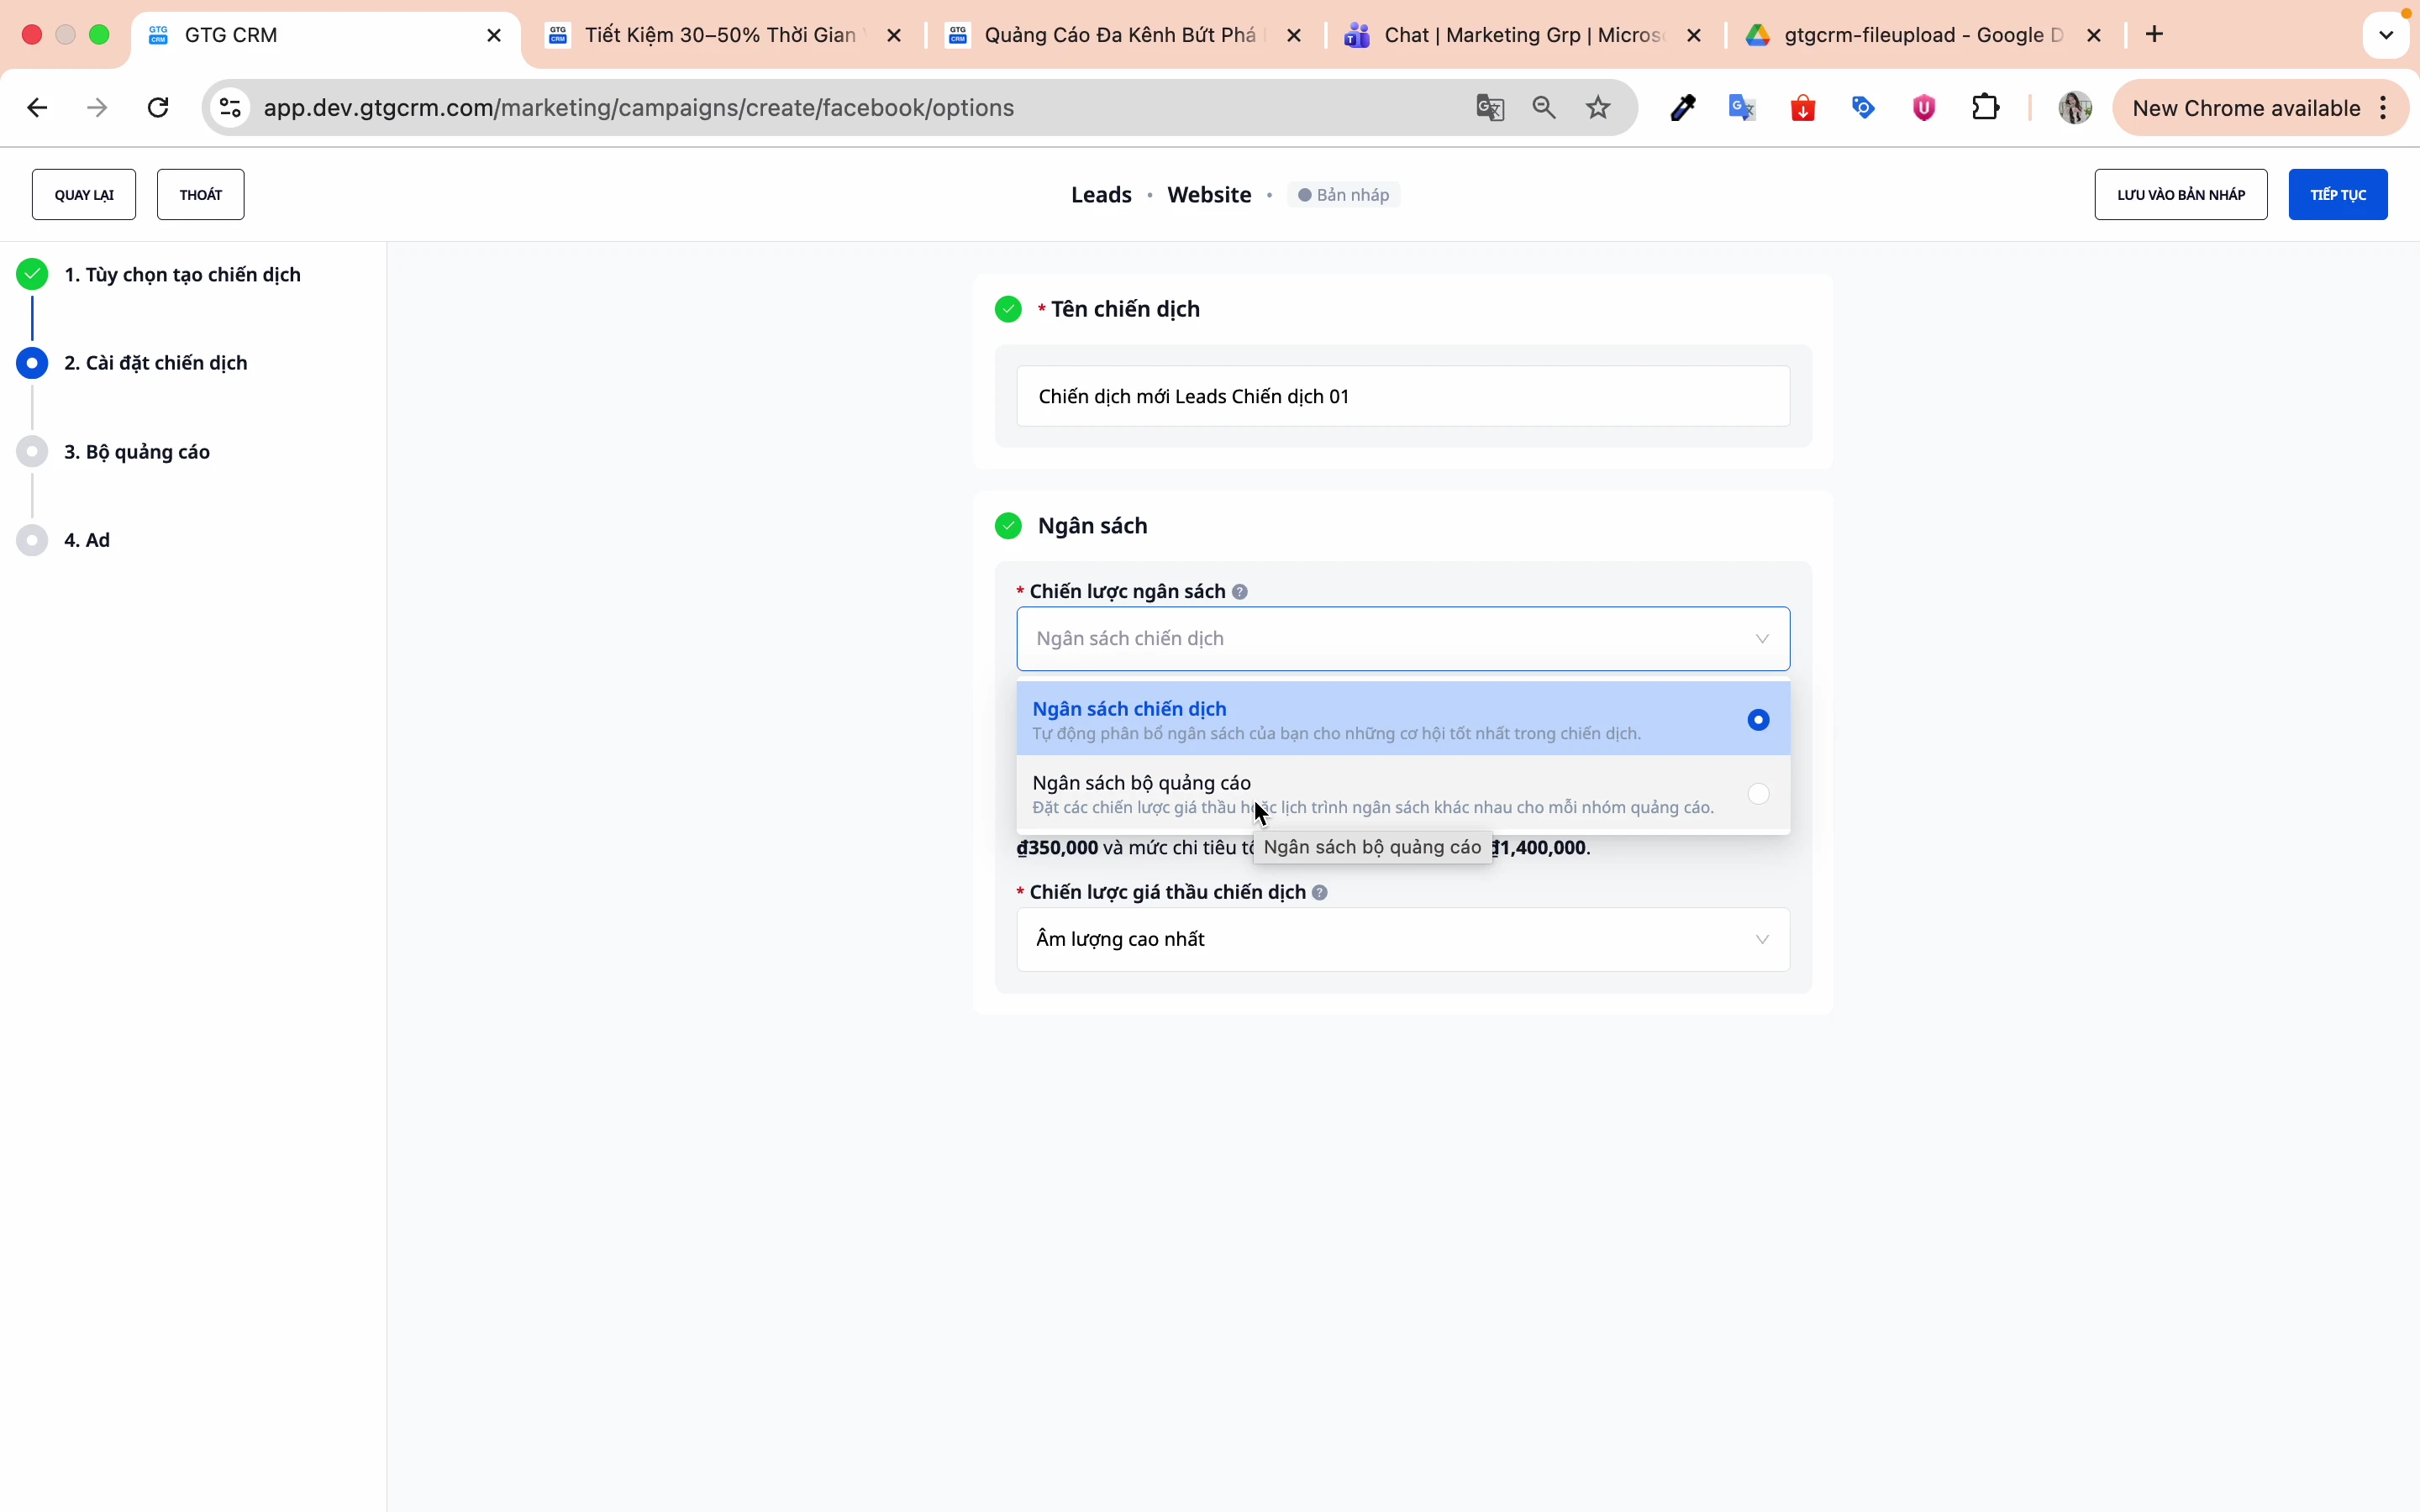
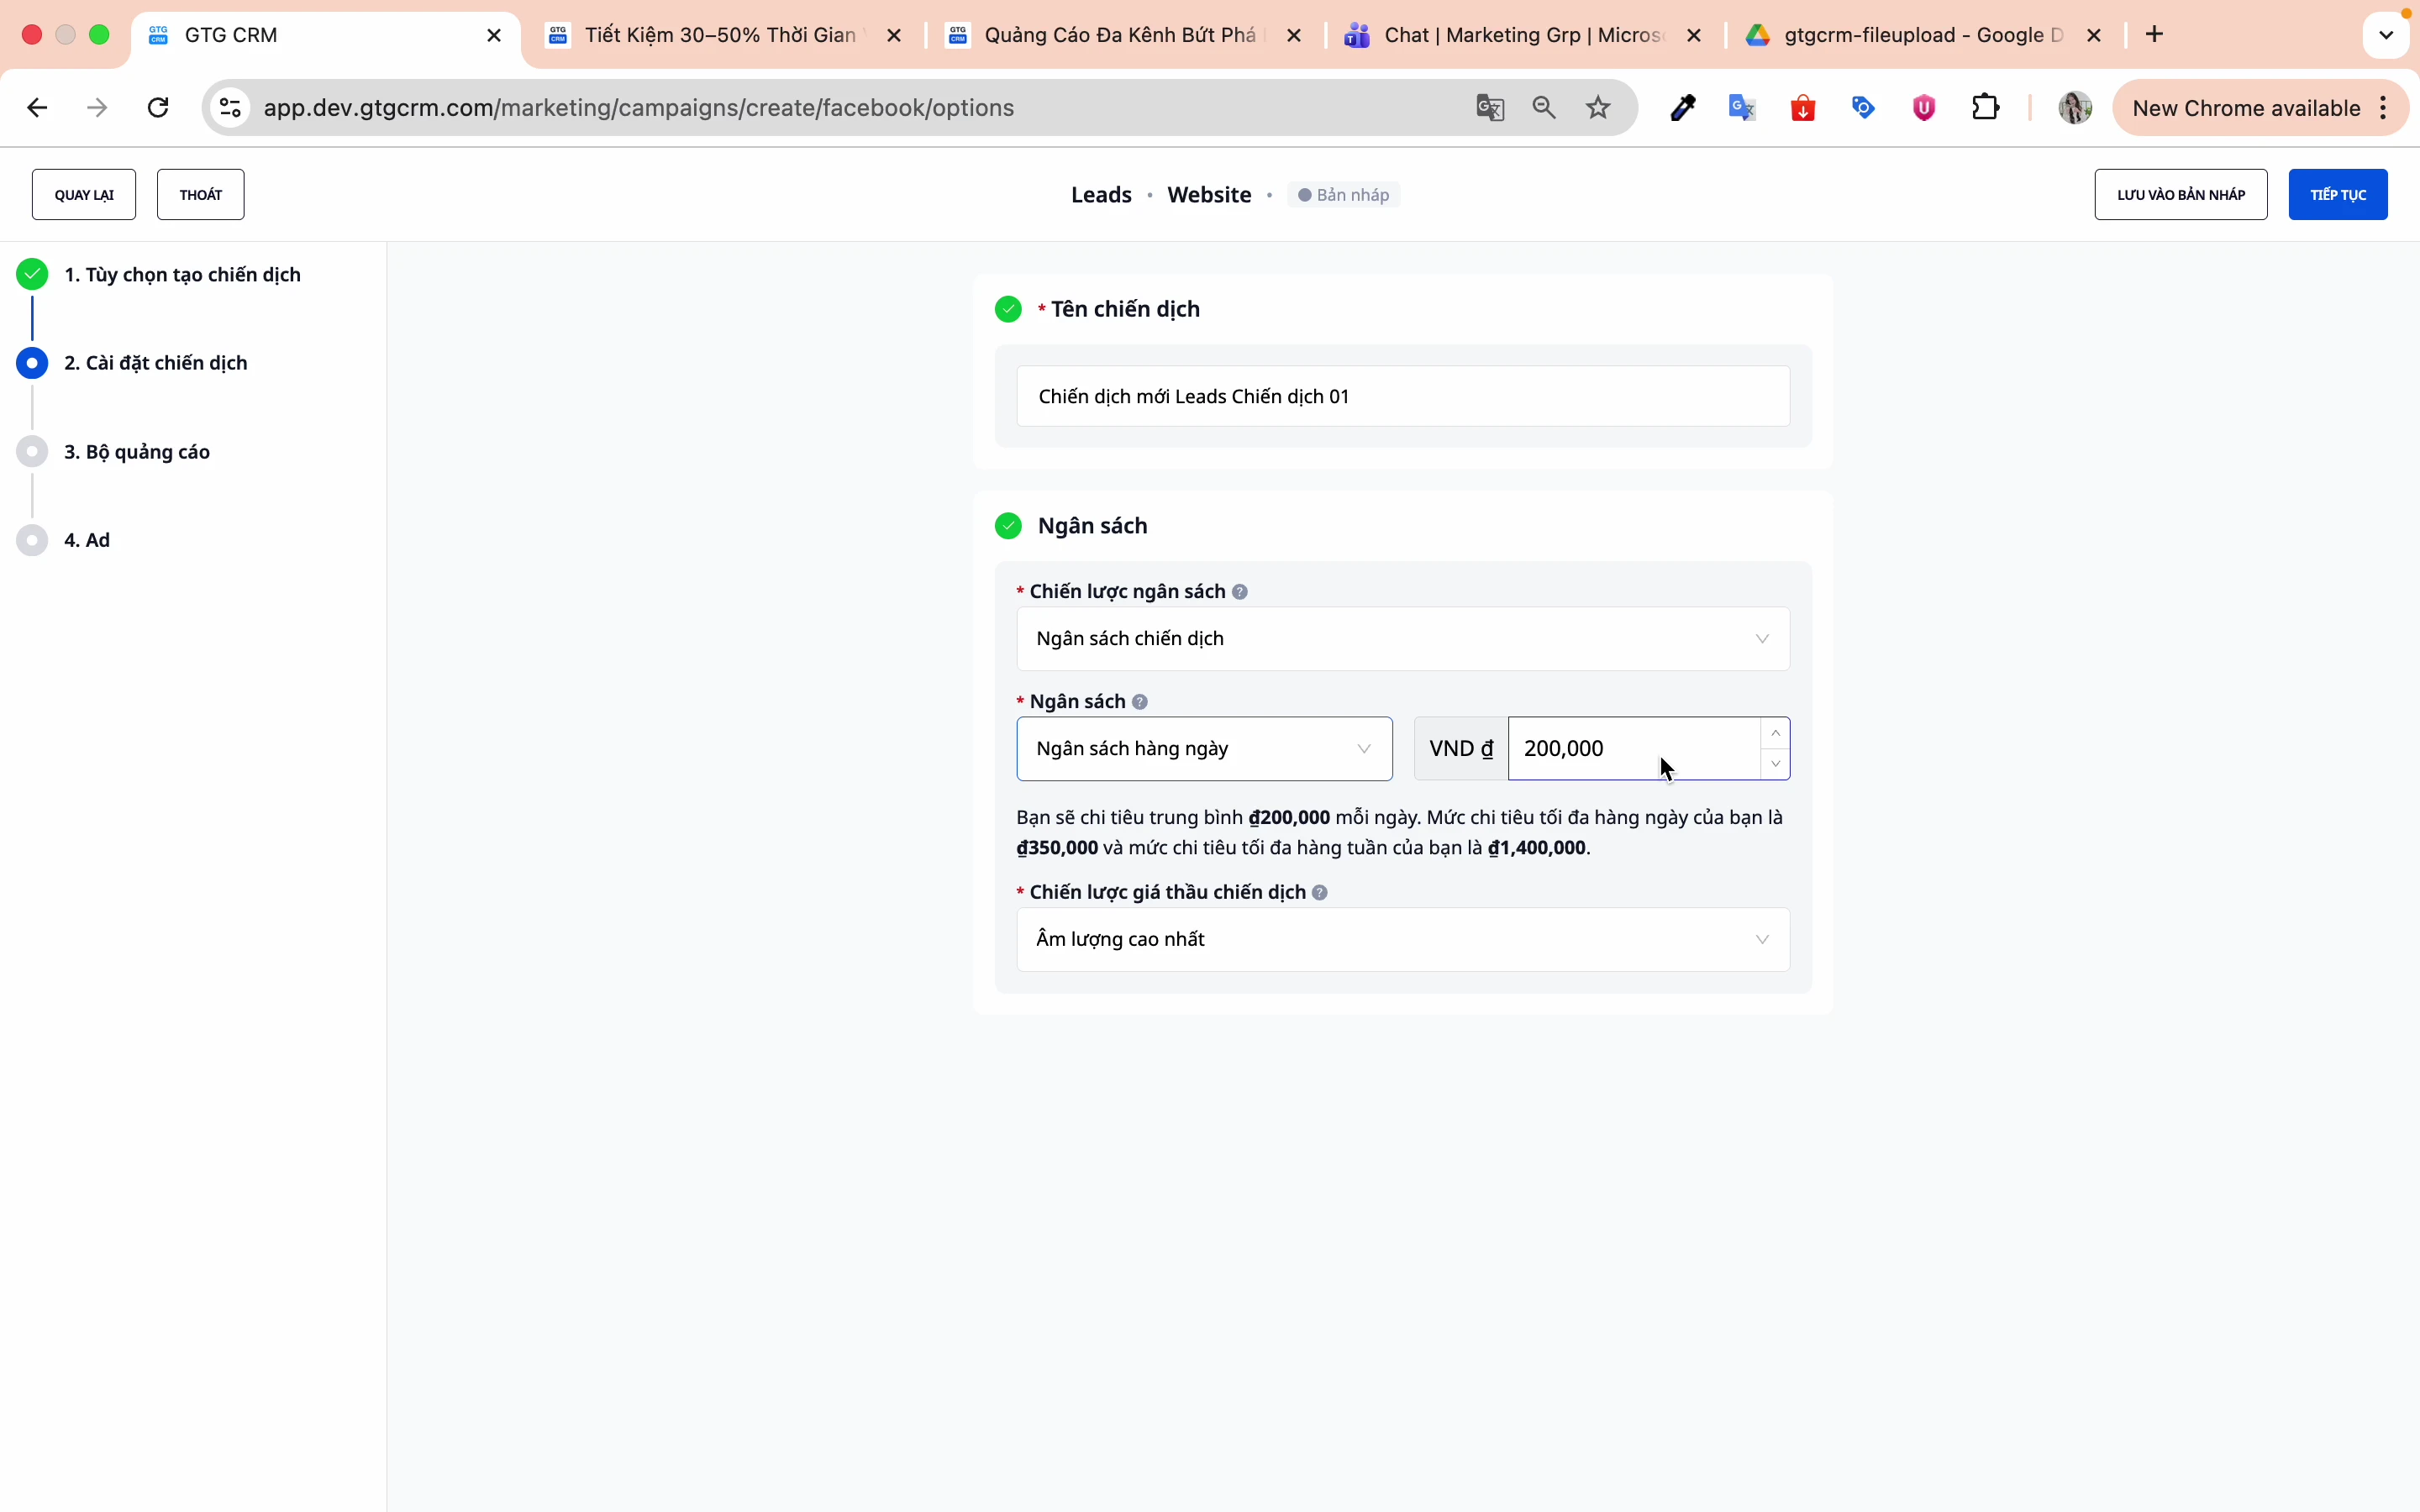
Step 2: Choose your budget level
There are two options:
- Campaign Budget (CBO) : Facebook automatically allocates the budget among ad sets.
- Ad set budget : You control the budget for each ad set yourself.
Step 3: Choose your budget type
- Daily Budget : Daily Spending Limit (Recommended)
- Lifetime budget : The total budget for the entire campaign.
Step 4: Enter the budget amount.
Example: 200,000 VND/day
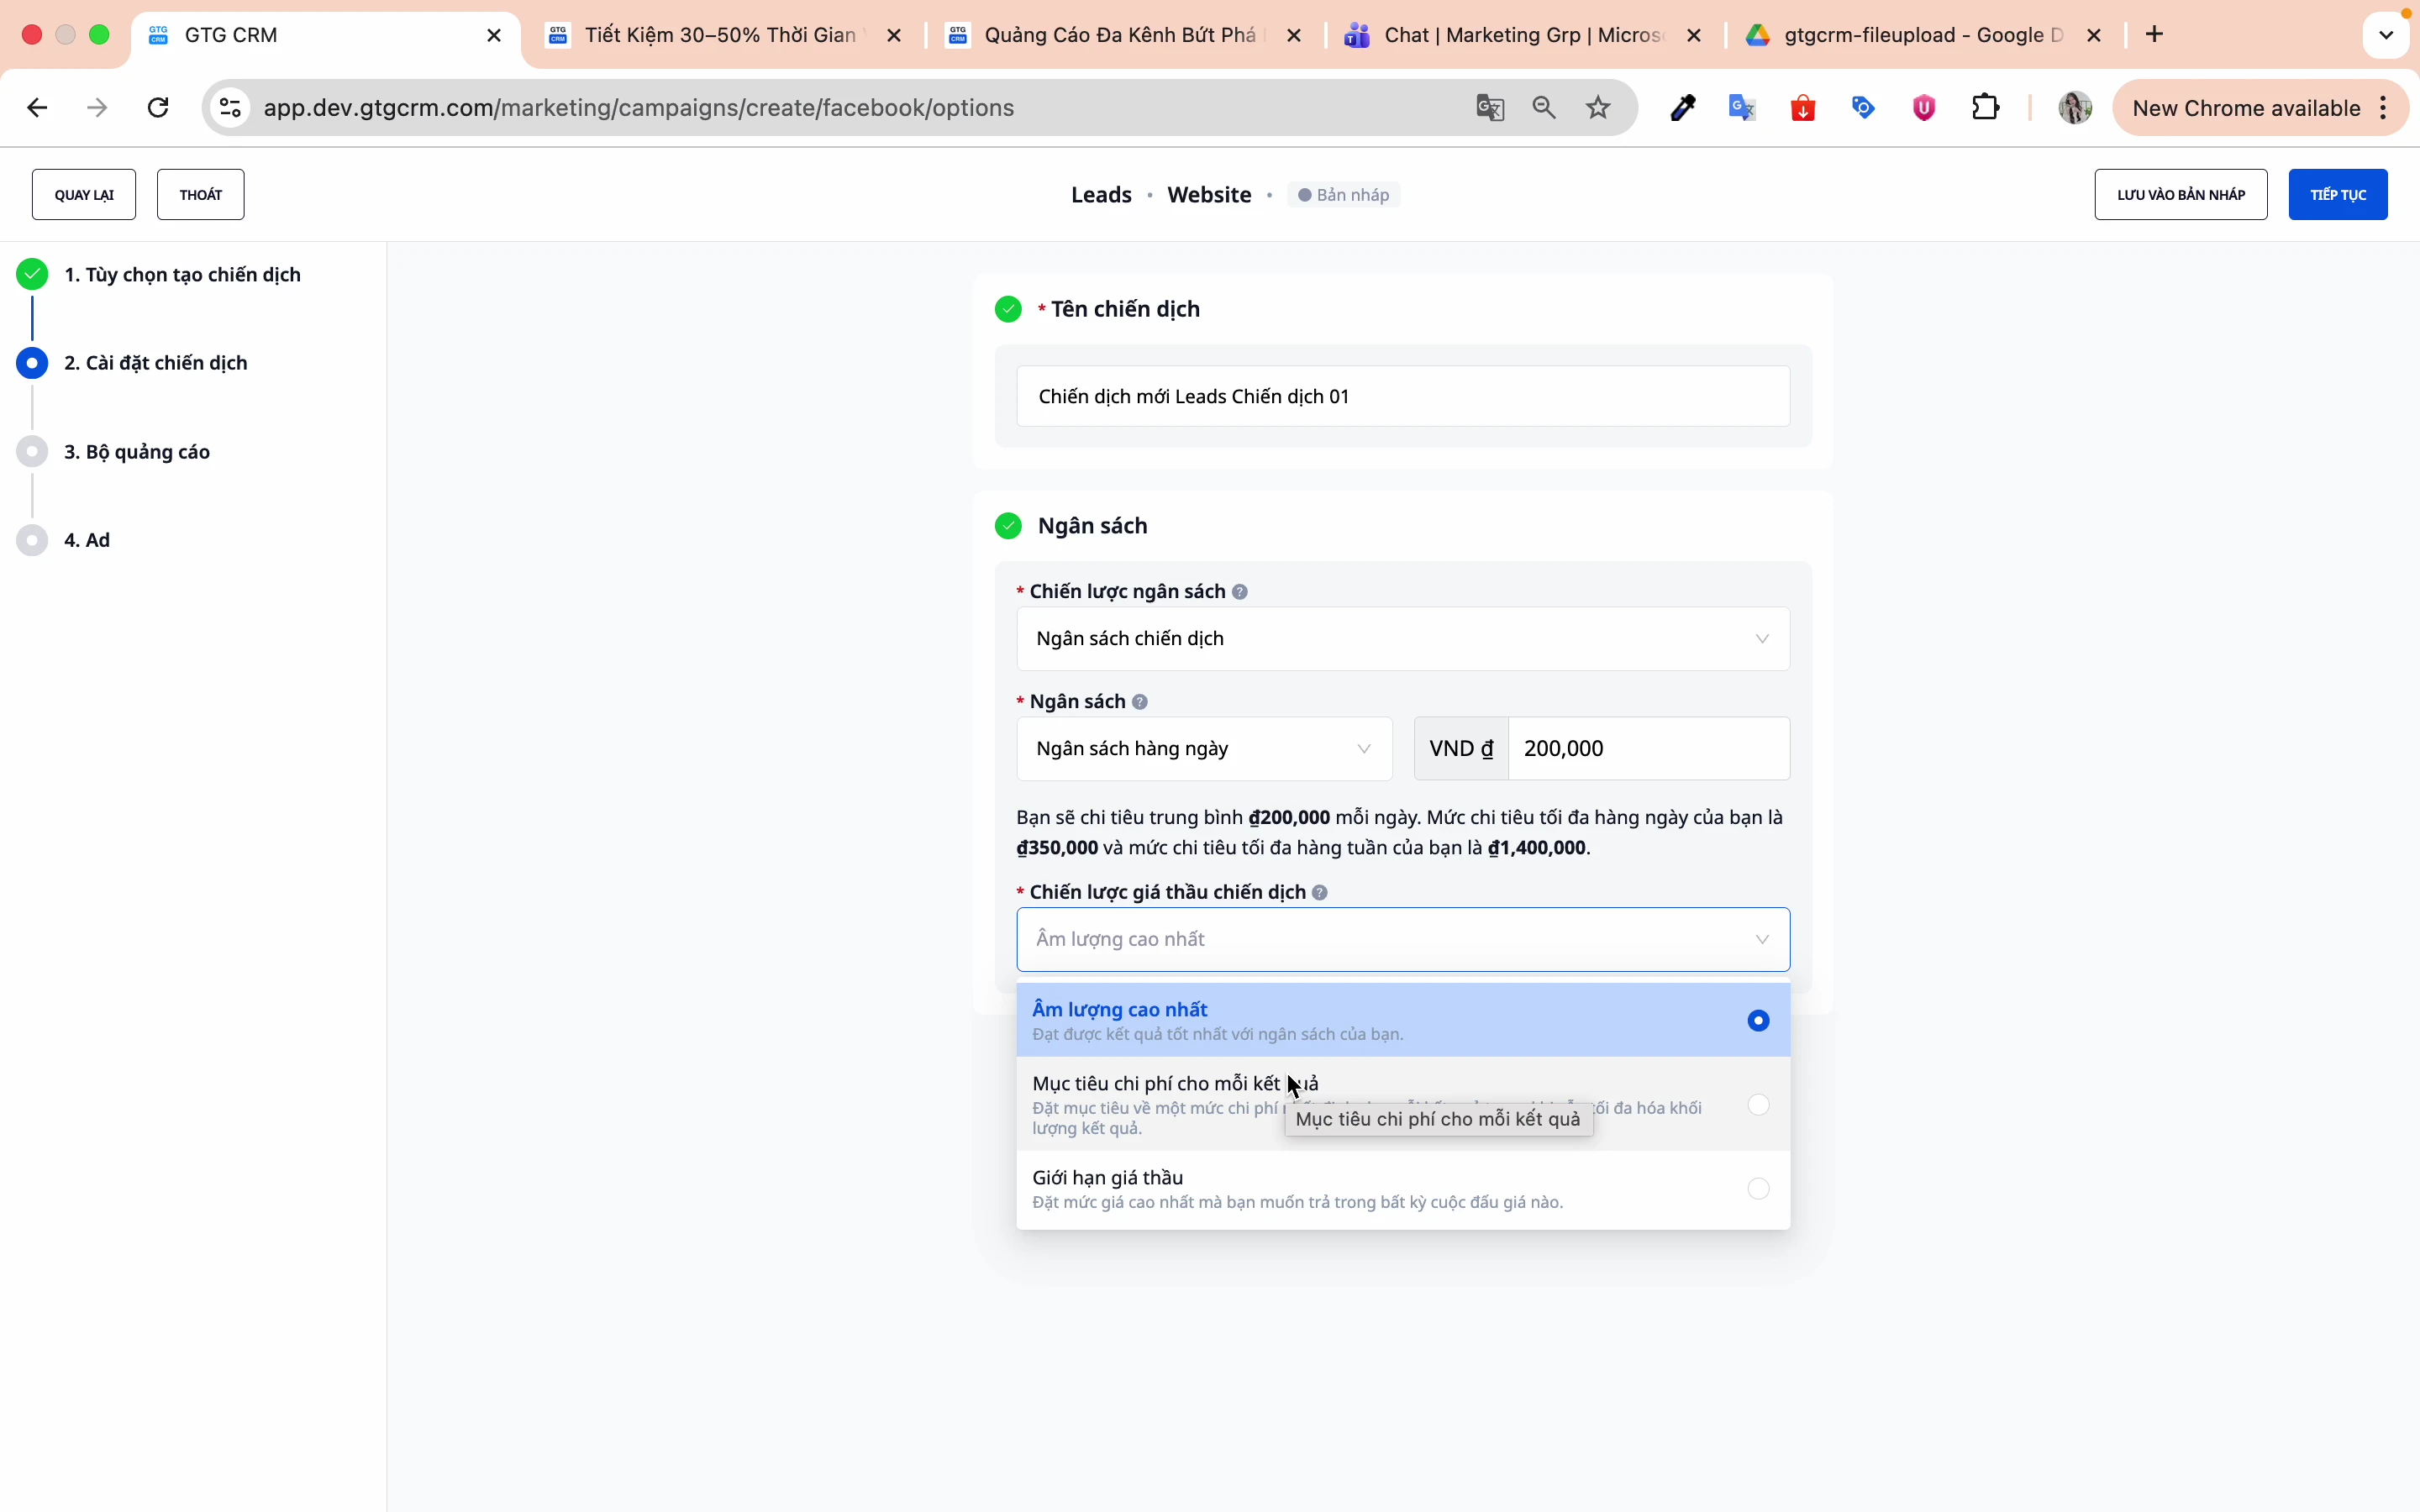
Step 5: Choose a bidding strategy
There are three main strategies:
| Strategy | Describe | When to use |
|---|---|---|
| Best results | Facebook optimizes automatically. | Just starting out |
| Cost per outcome target | Set your desired CPA. | There is historical data. |
| Bid limit | Place bid cap | Tight cost control |
4. Setting Up Ad Sets
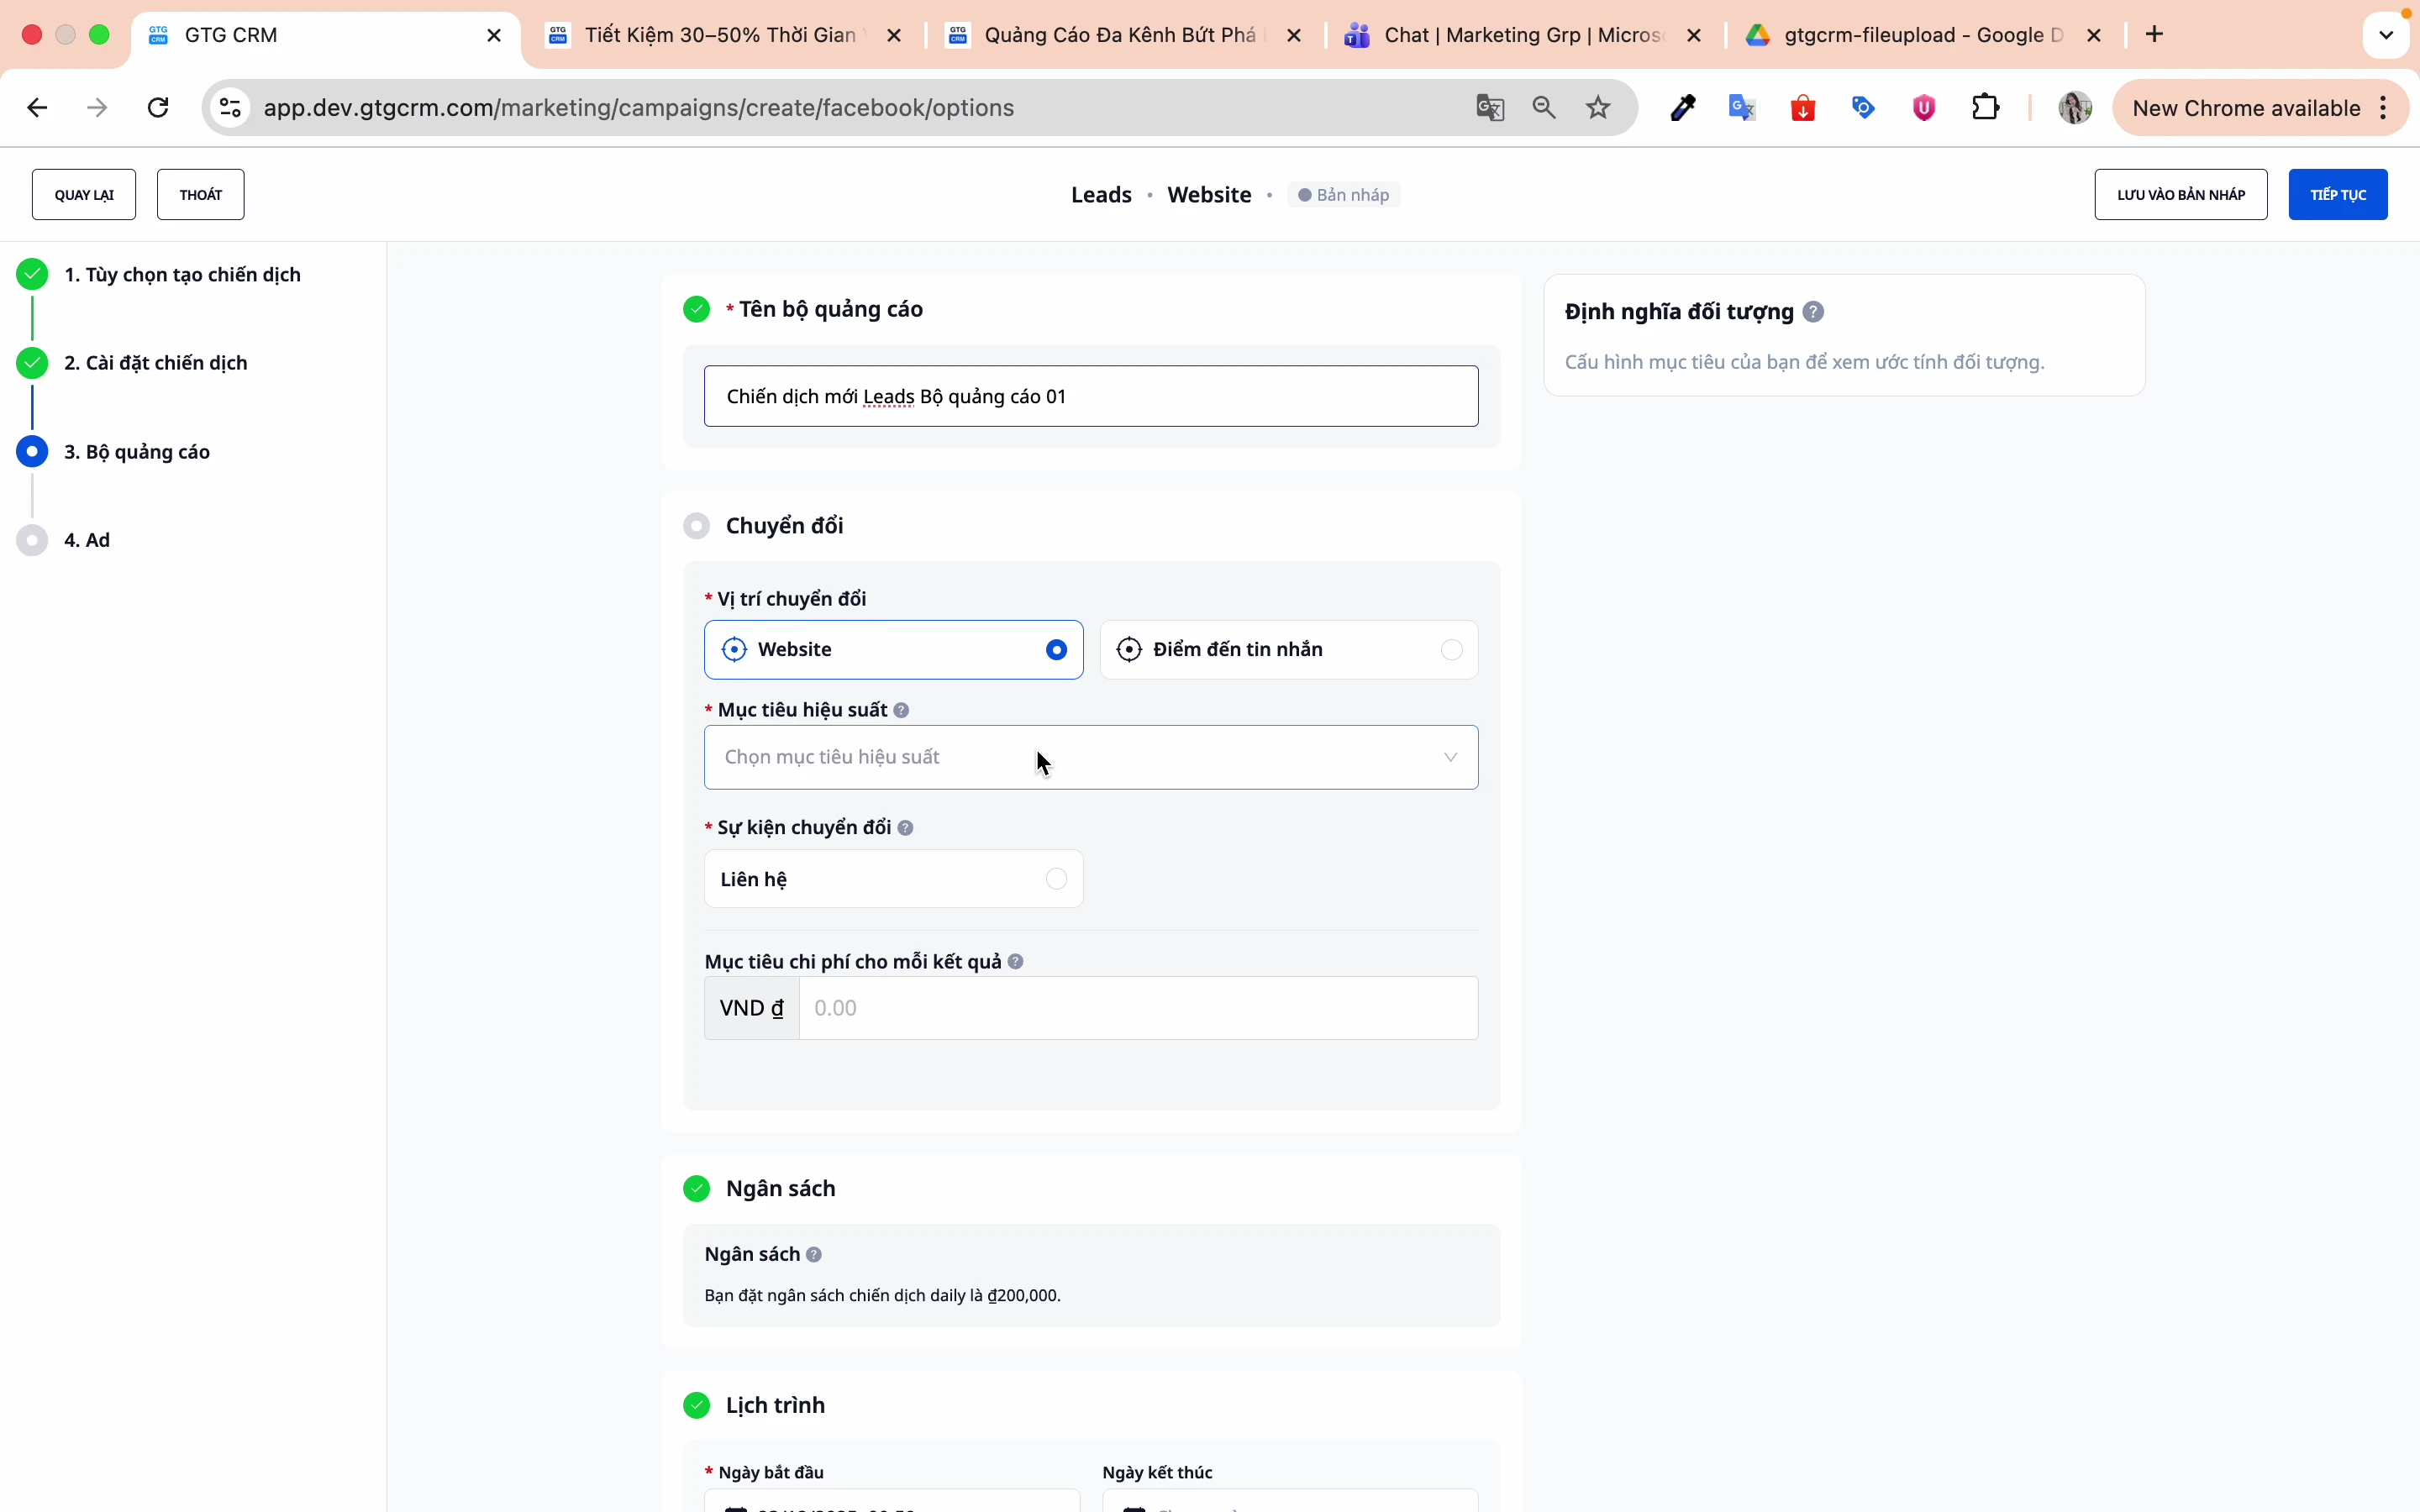
Step 1: Name the ad group
Using distinct names to differentiate ad sets is crucial. Correct naming from the start minimizes confusion, saves operational time, and supports more efficient ad scaling.
Step 2: Choose the conversion location
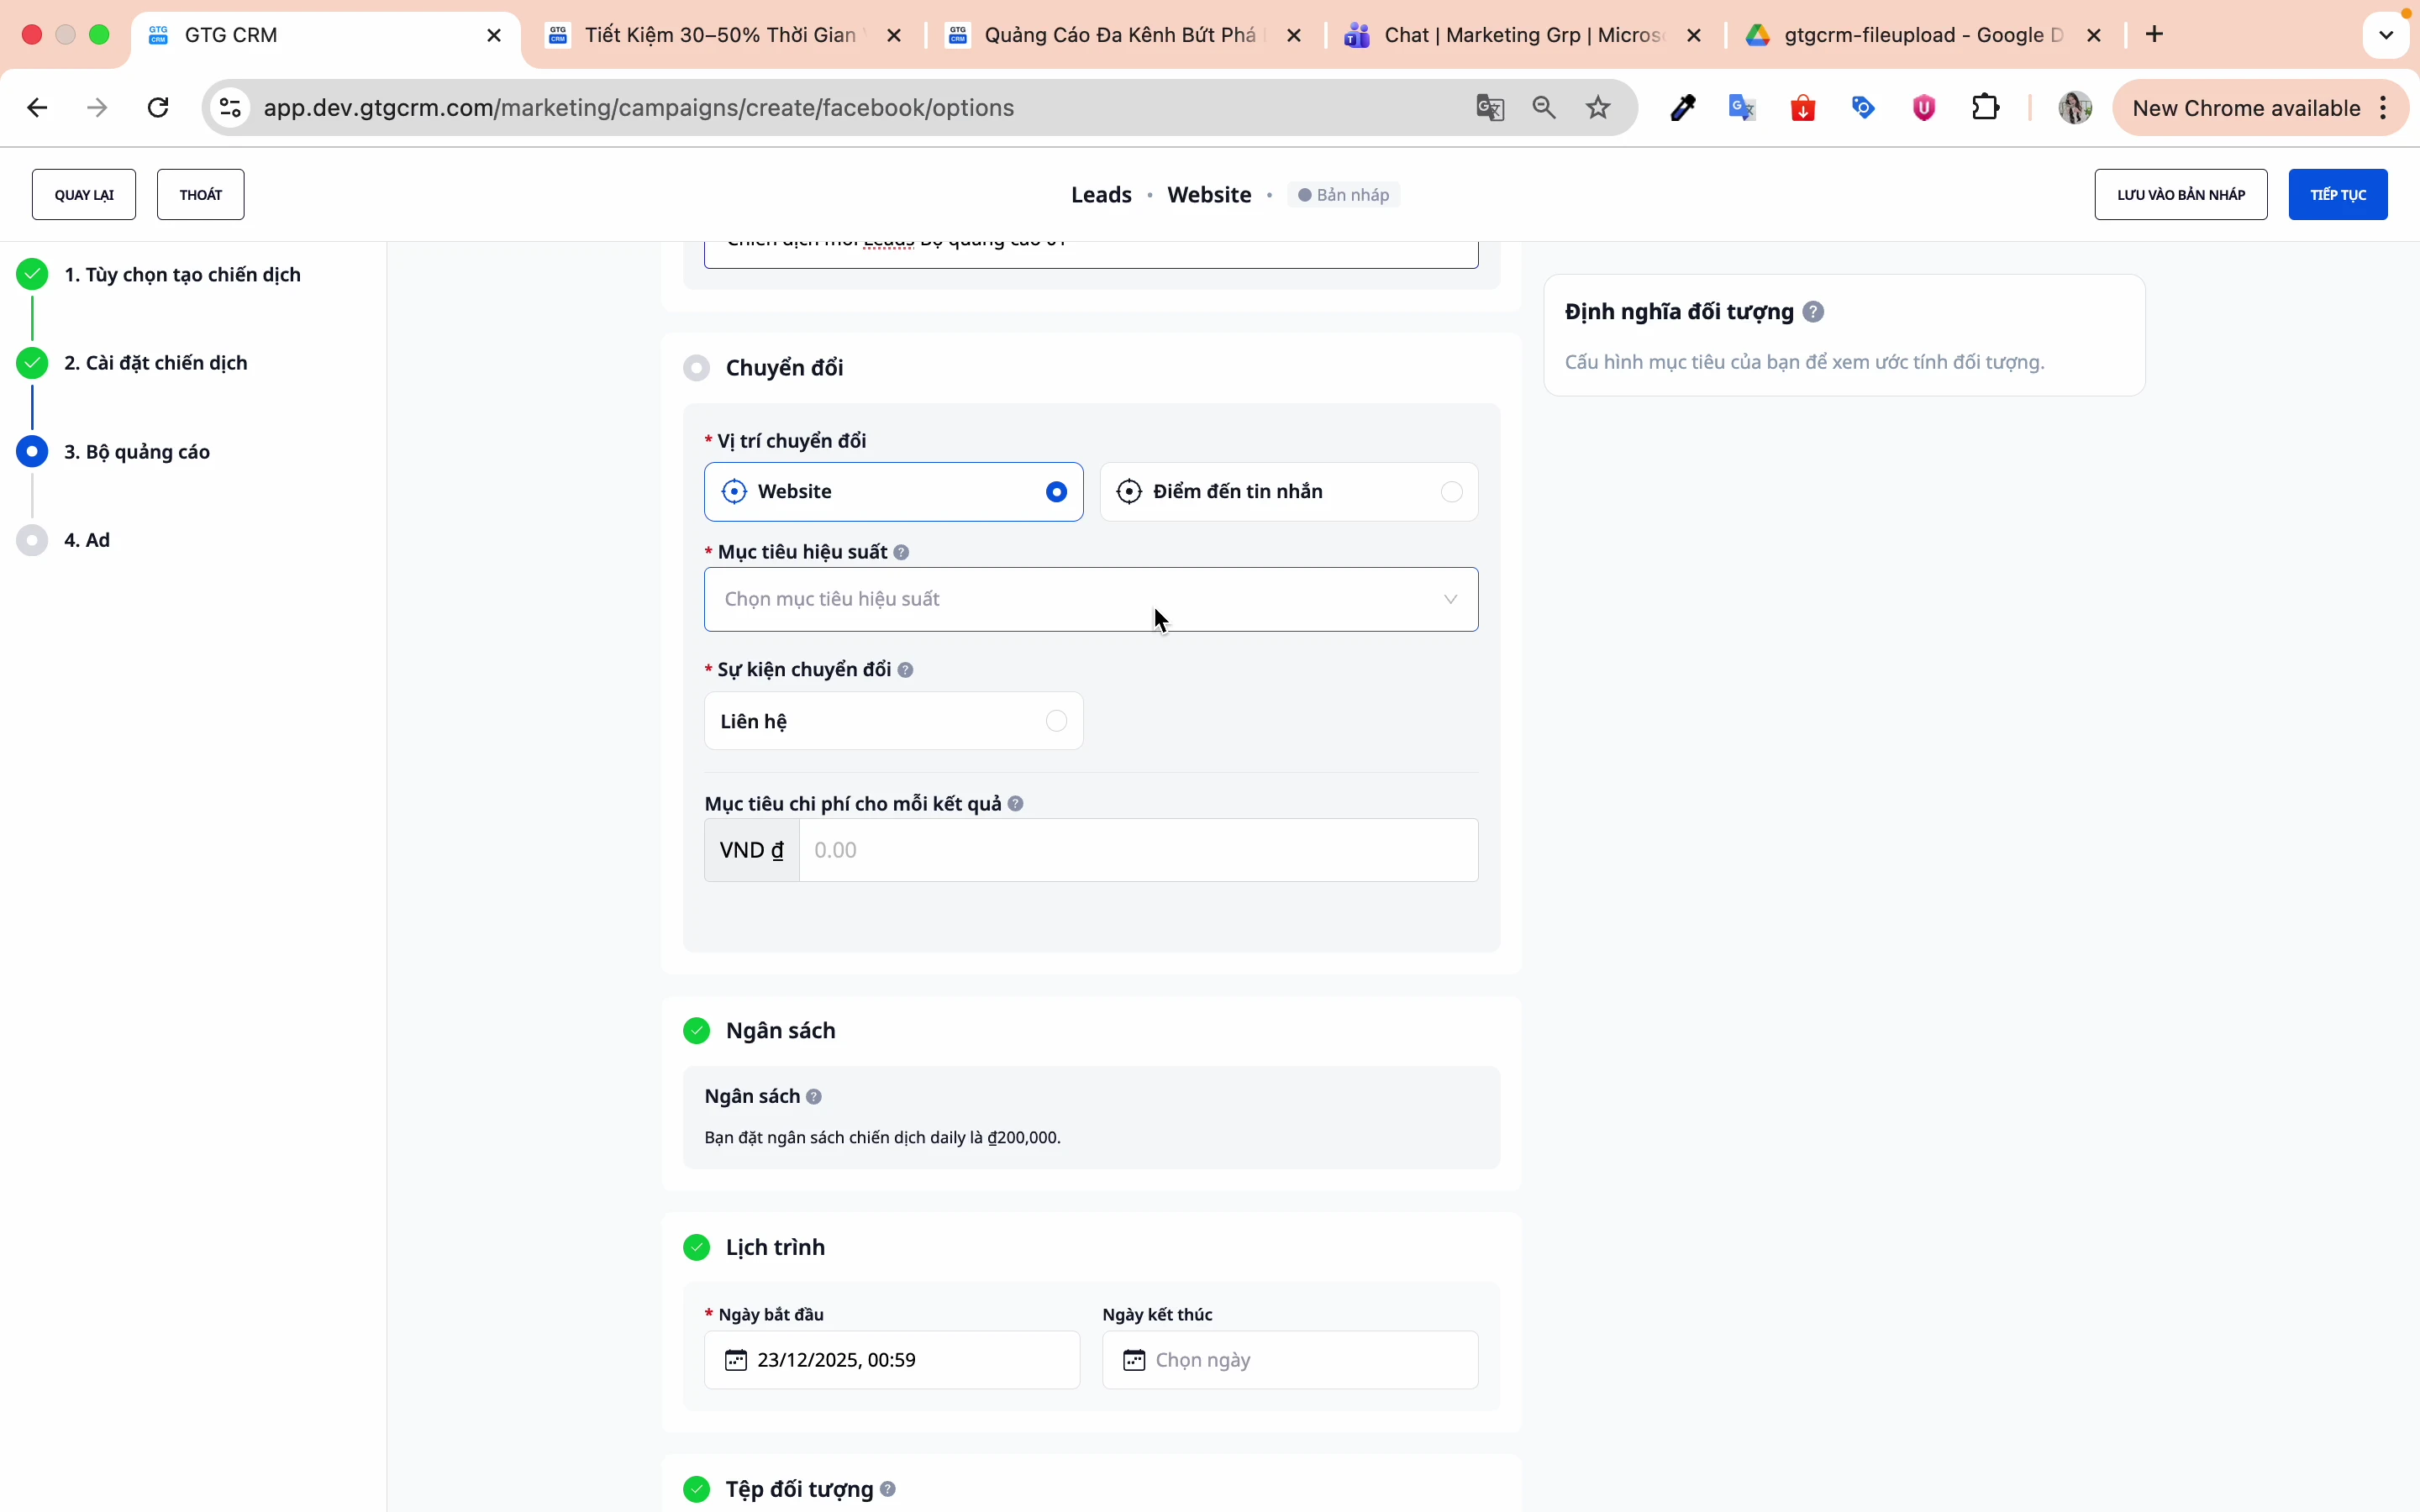
There are two main switching locations:
Website Translation:
- Conversions occur on the website.
- Facebook Pixel needs to be installed.
- Suitable for: E-commerce, Lead forms on websites
Messenger Logistics:
- Switch via text message
- Suitable for: Consulting, Customer Service, Sales Chat
Step 3: Select Pixel (if Website Conversion)
Select the Pixel that has been installed on your website.
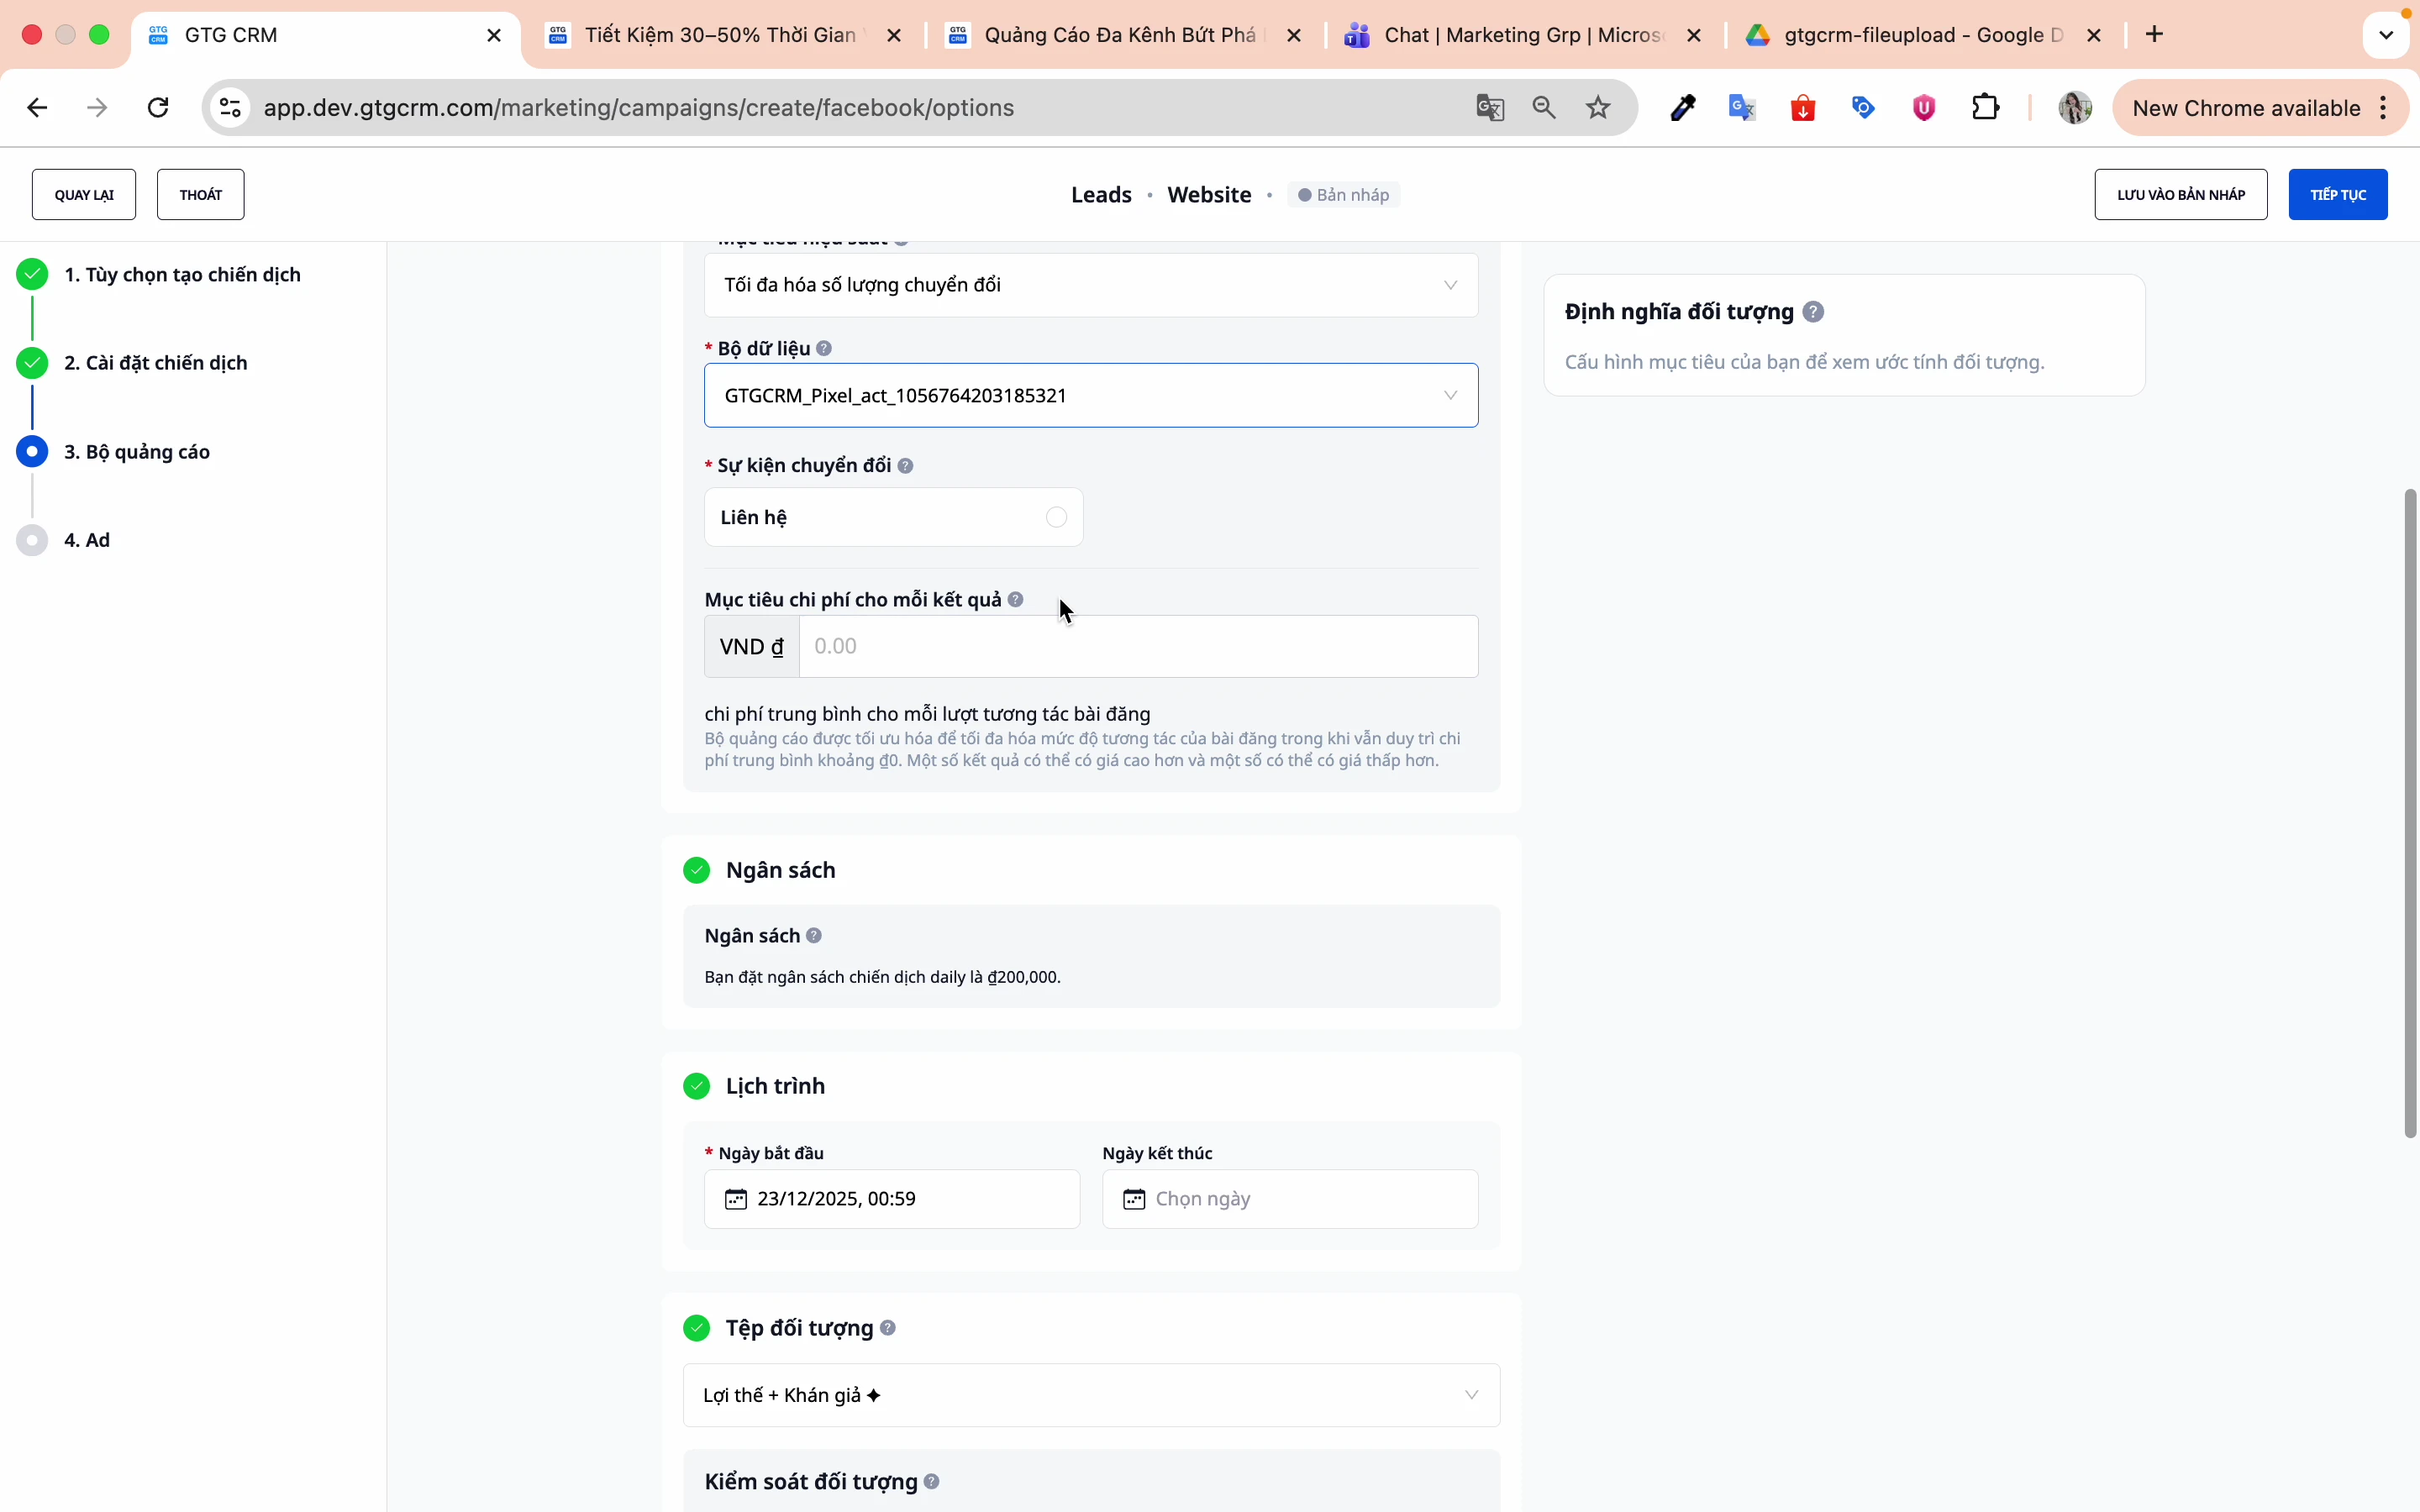
Step 4: Select the conversion event
Examples: Contact Us, Purchase, Register...
GTG CRM 's Facebook Ads feature will automatically learn and deliver ads to people most likely to take the desired action, based on behavioral data, interaction history, and signals within the Facebook ecosystem.
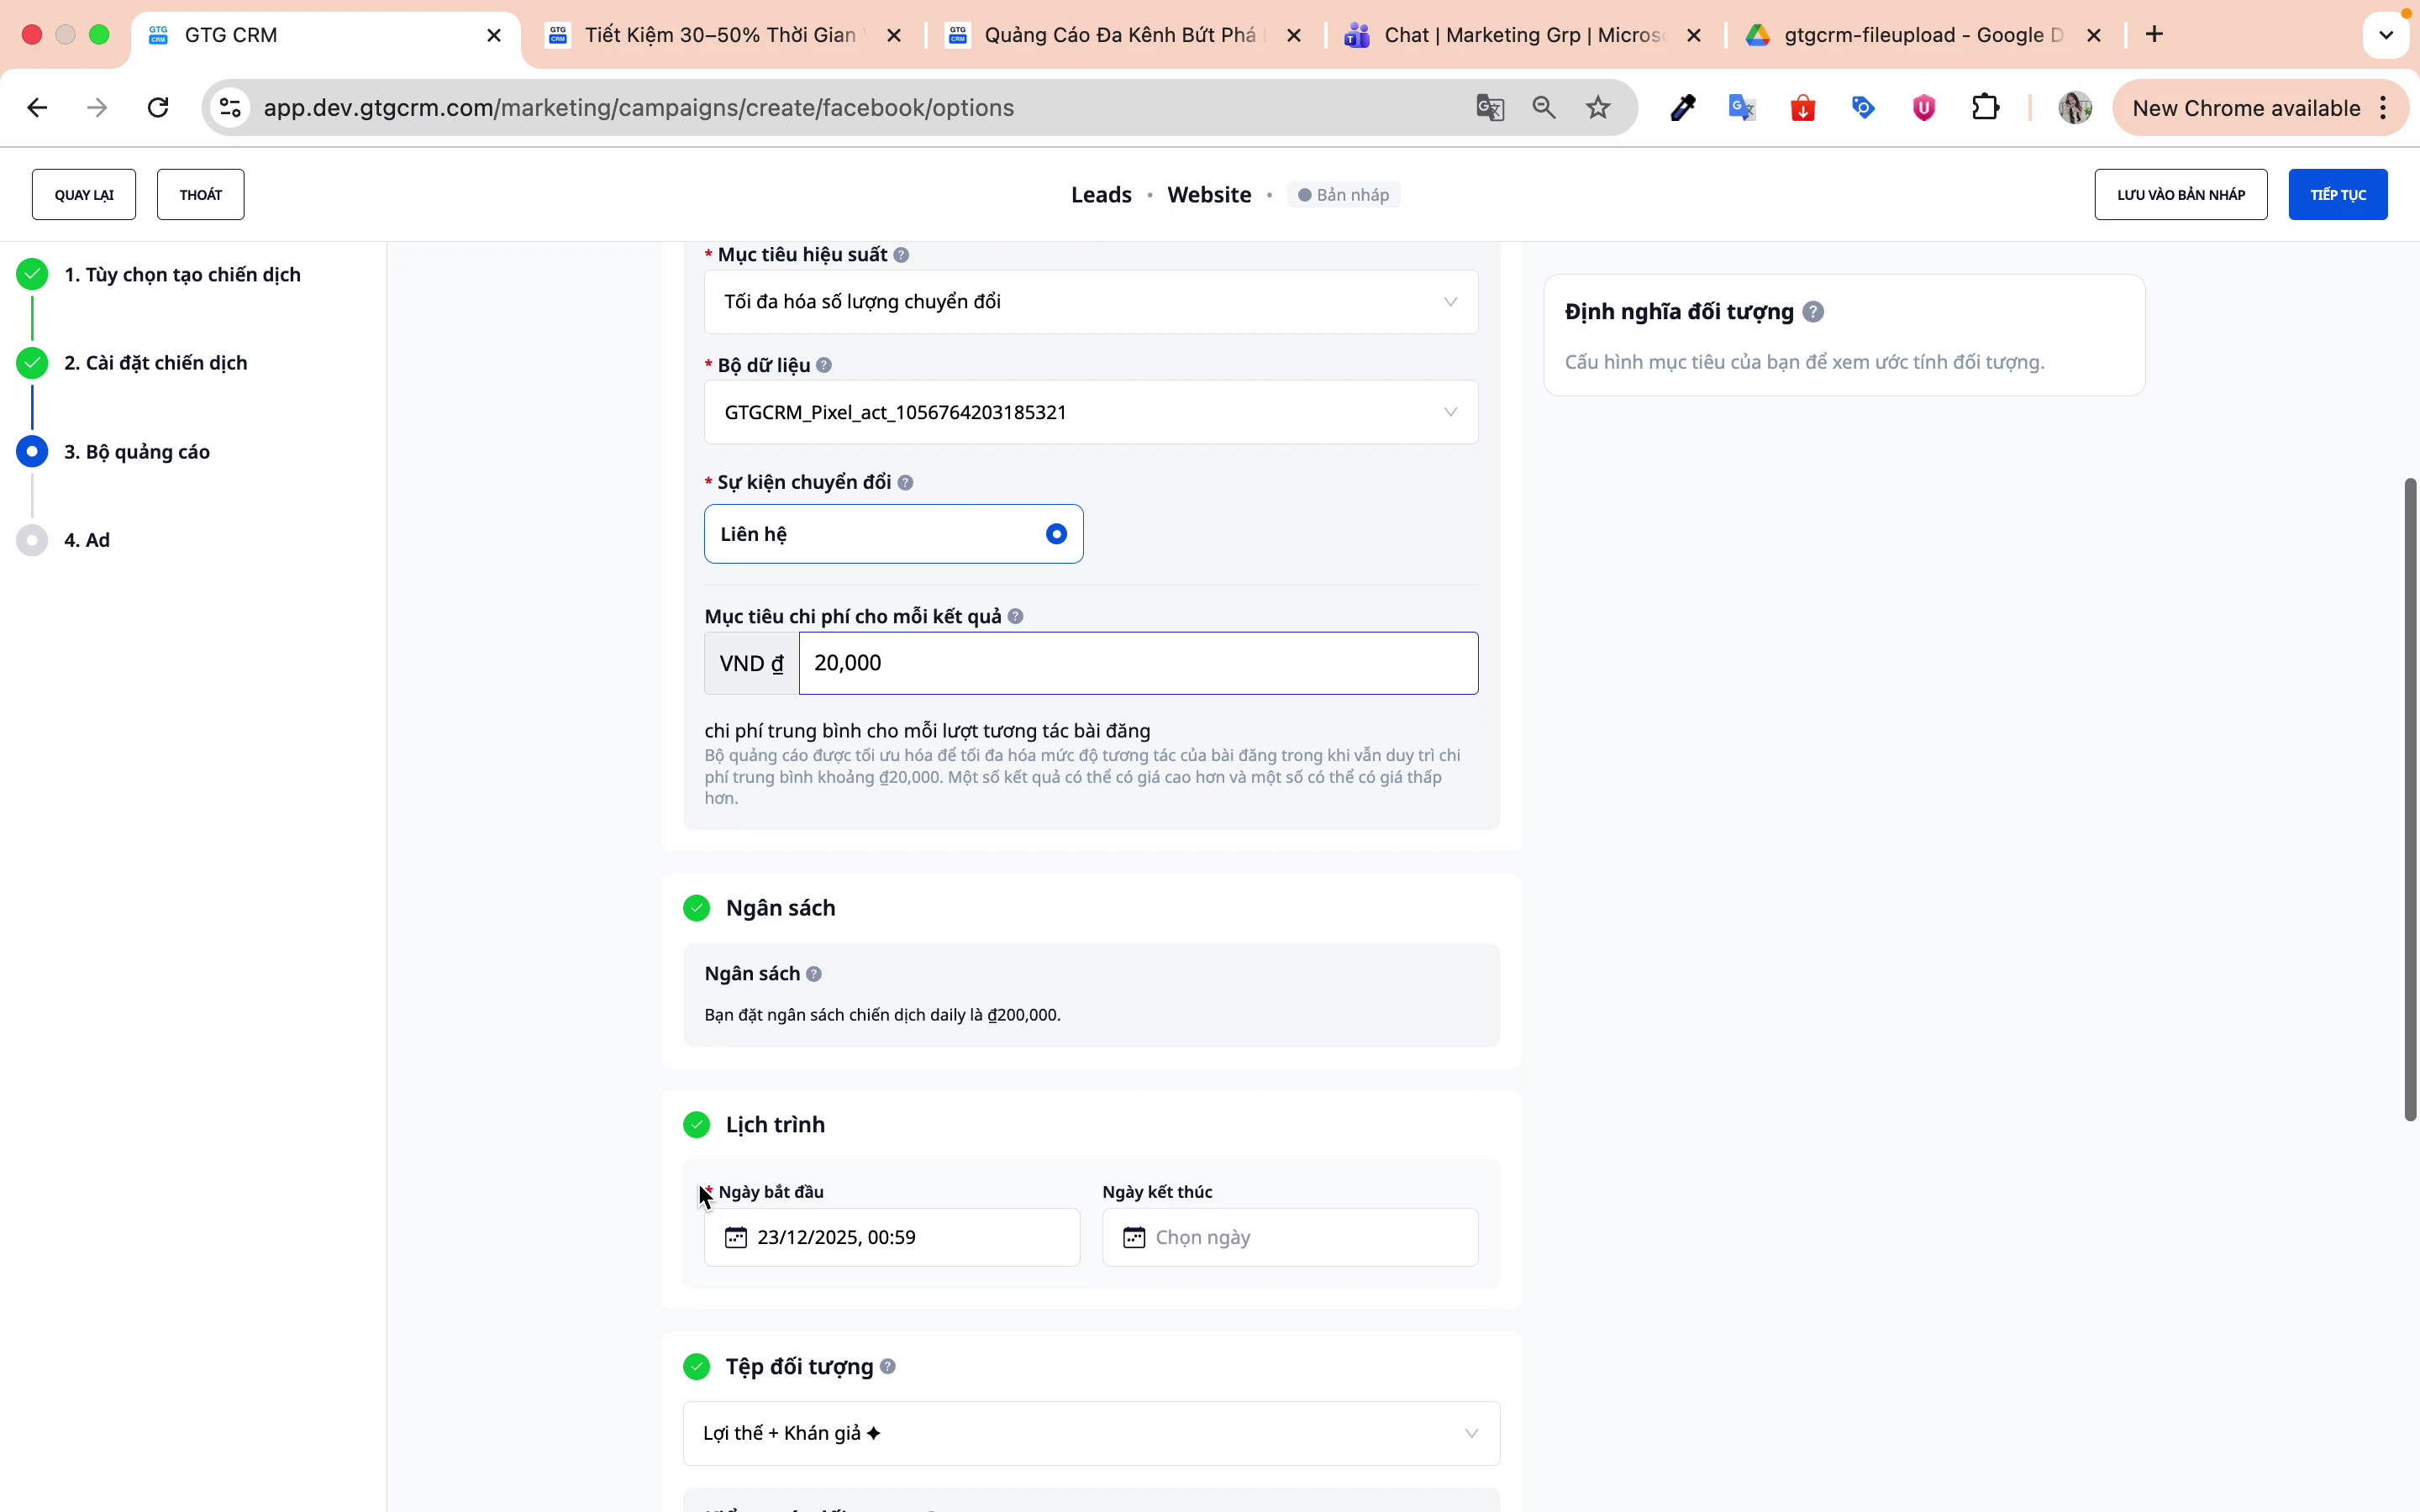
Step 5: Set a cost target (Optional)
At this step, you can set your desired cost per result (e.g., cost per lead, per sign-up, per order). This is optional, not required, and should only be used when you have sufficiently reliable data from previous campaigns.
When you enter a target budget, Facebook will try to distribute your ads in a way that maximizes results within that budget, rather than simply maximizing the number of conversions.
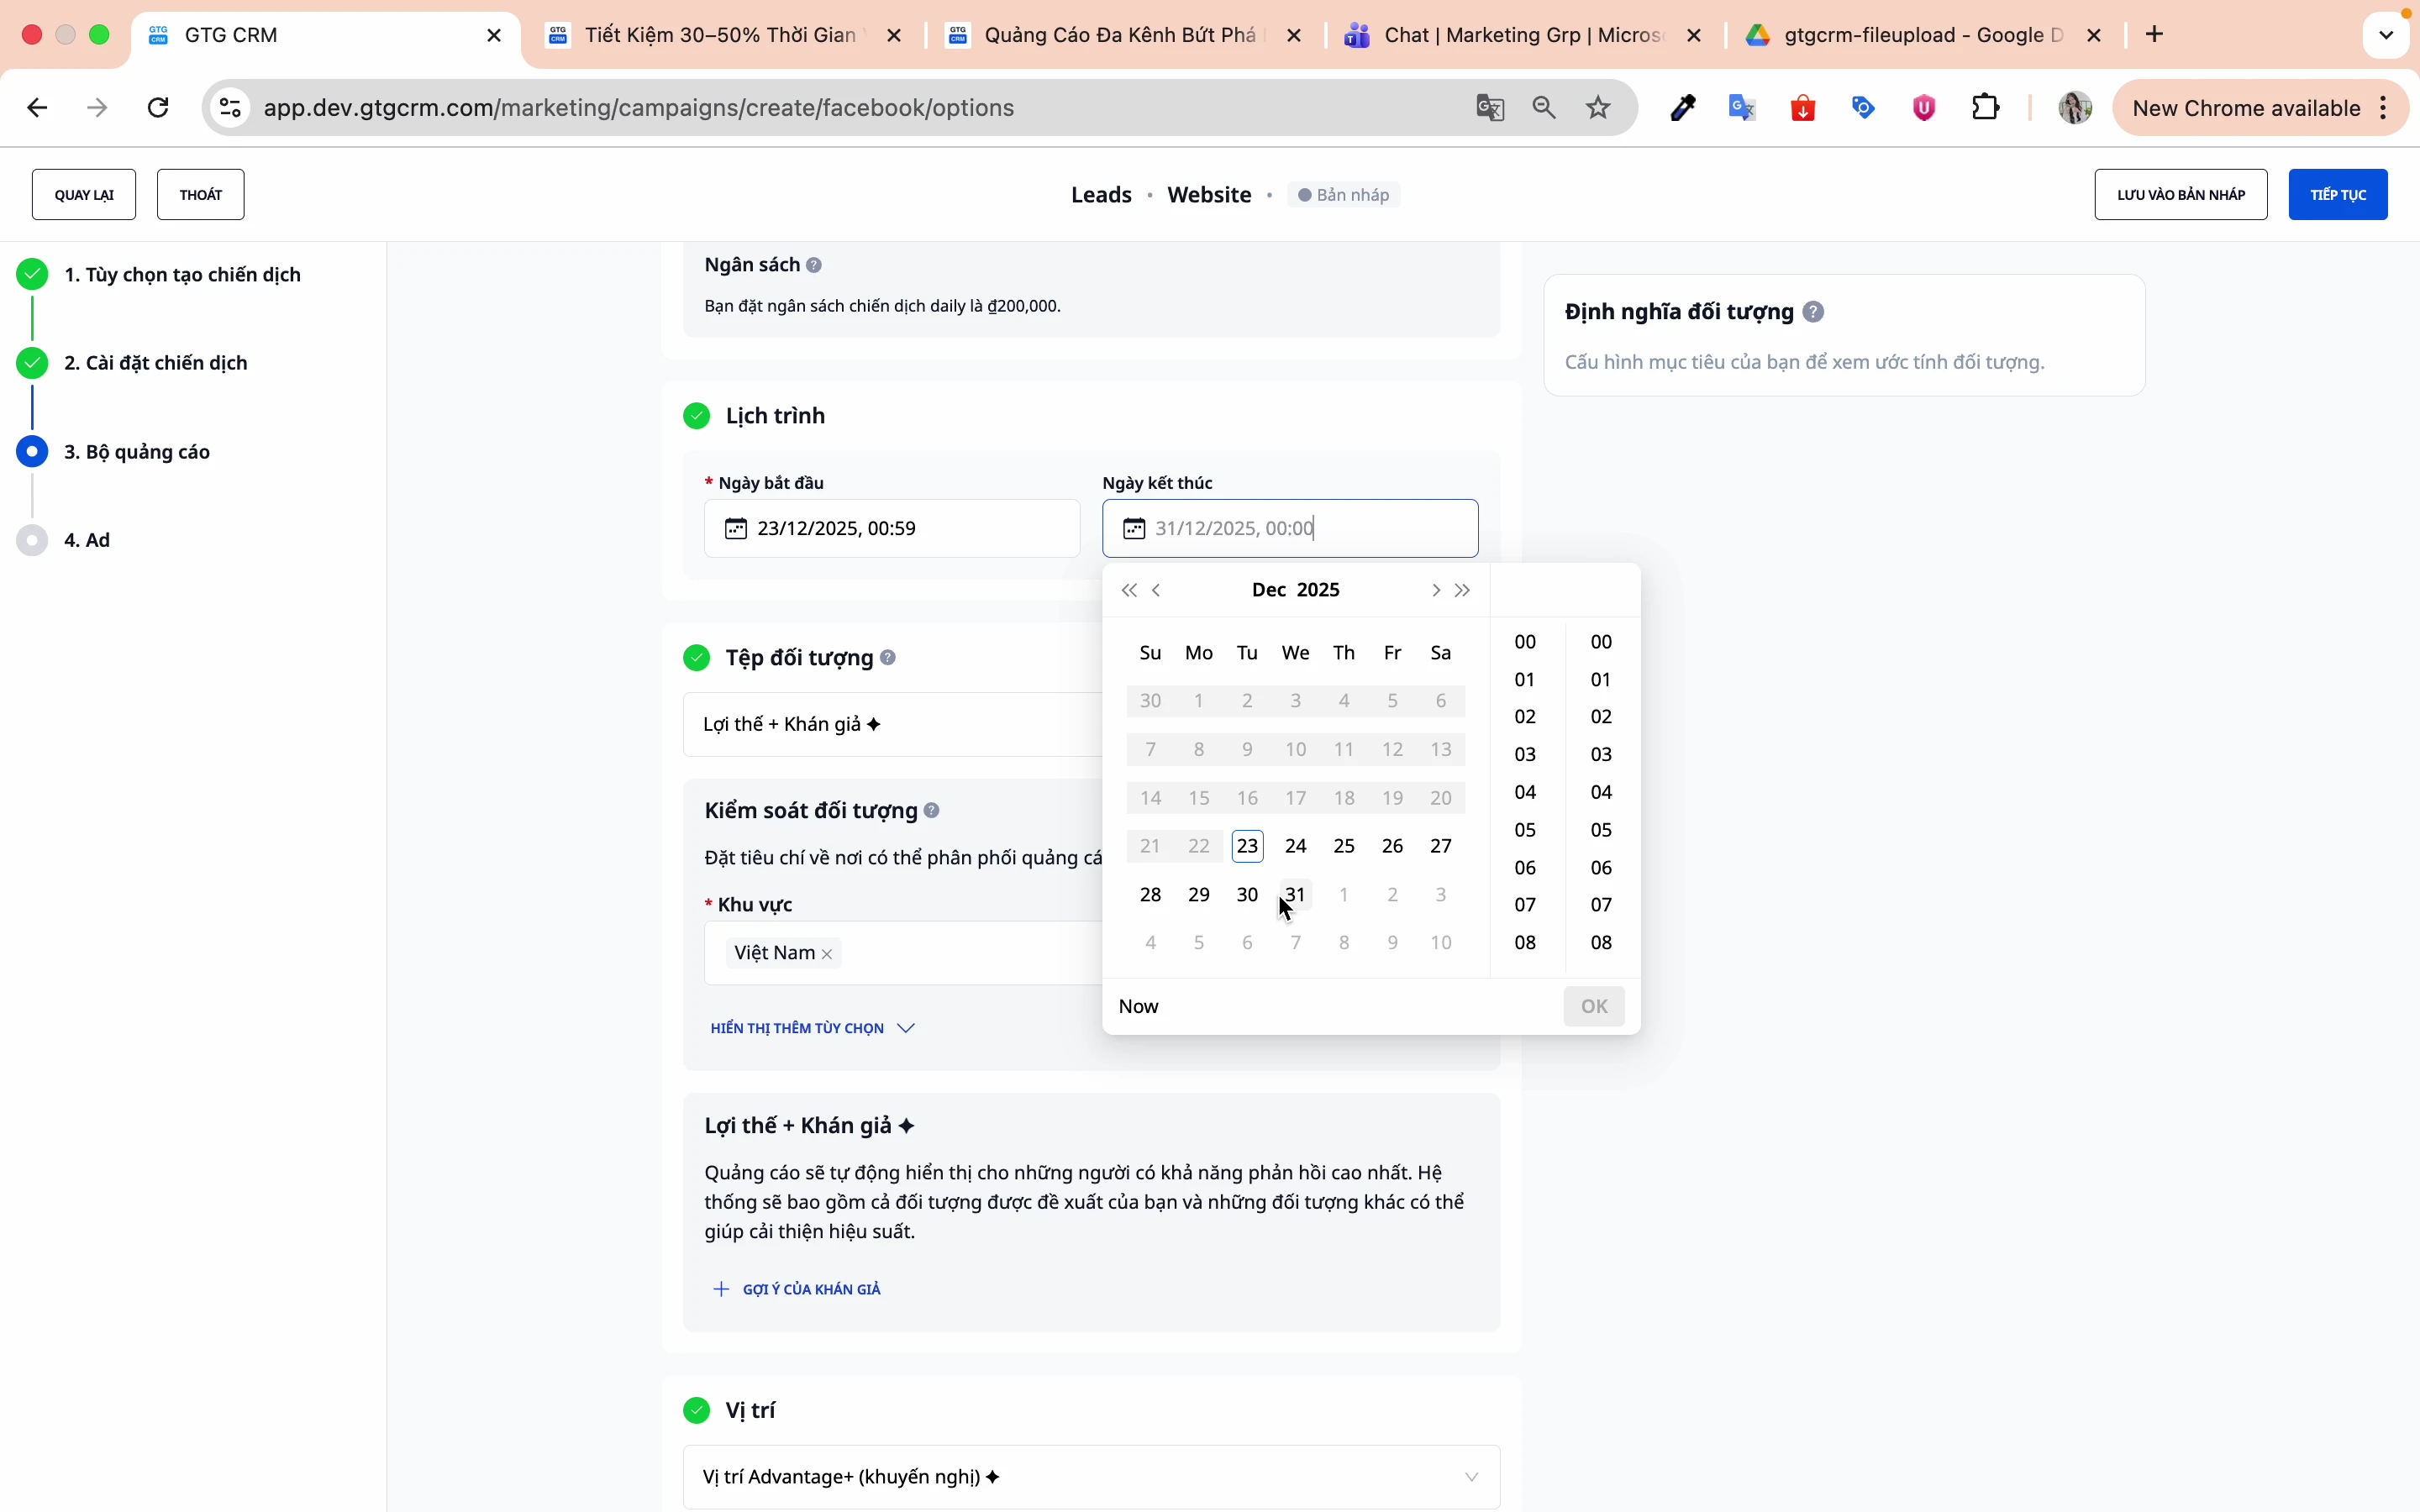
Step 6: Set up the schedule
- Start date : Select the start date for the run.
- End date : Select the campaign end date.
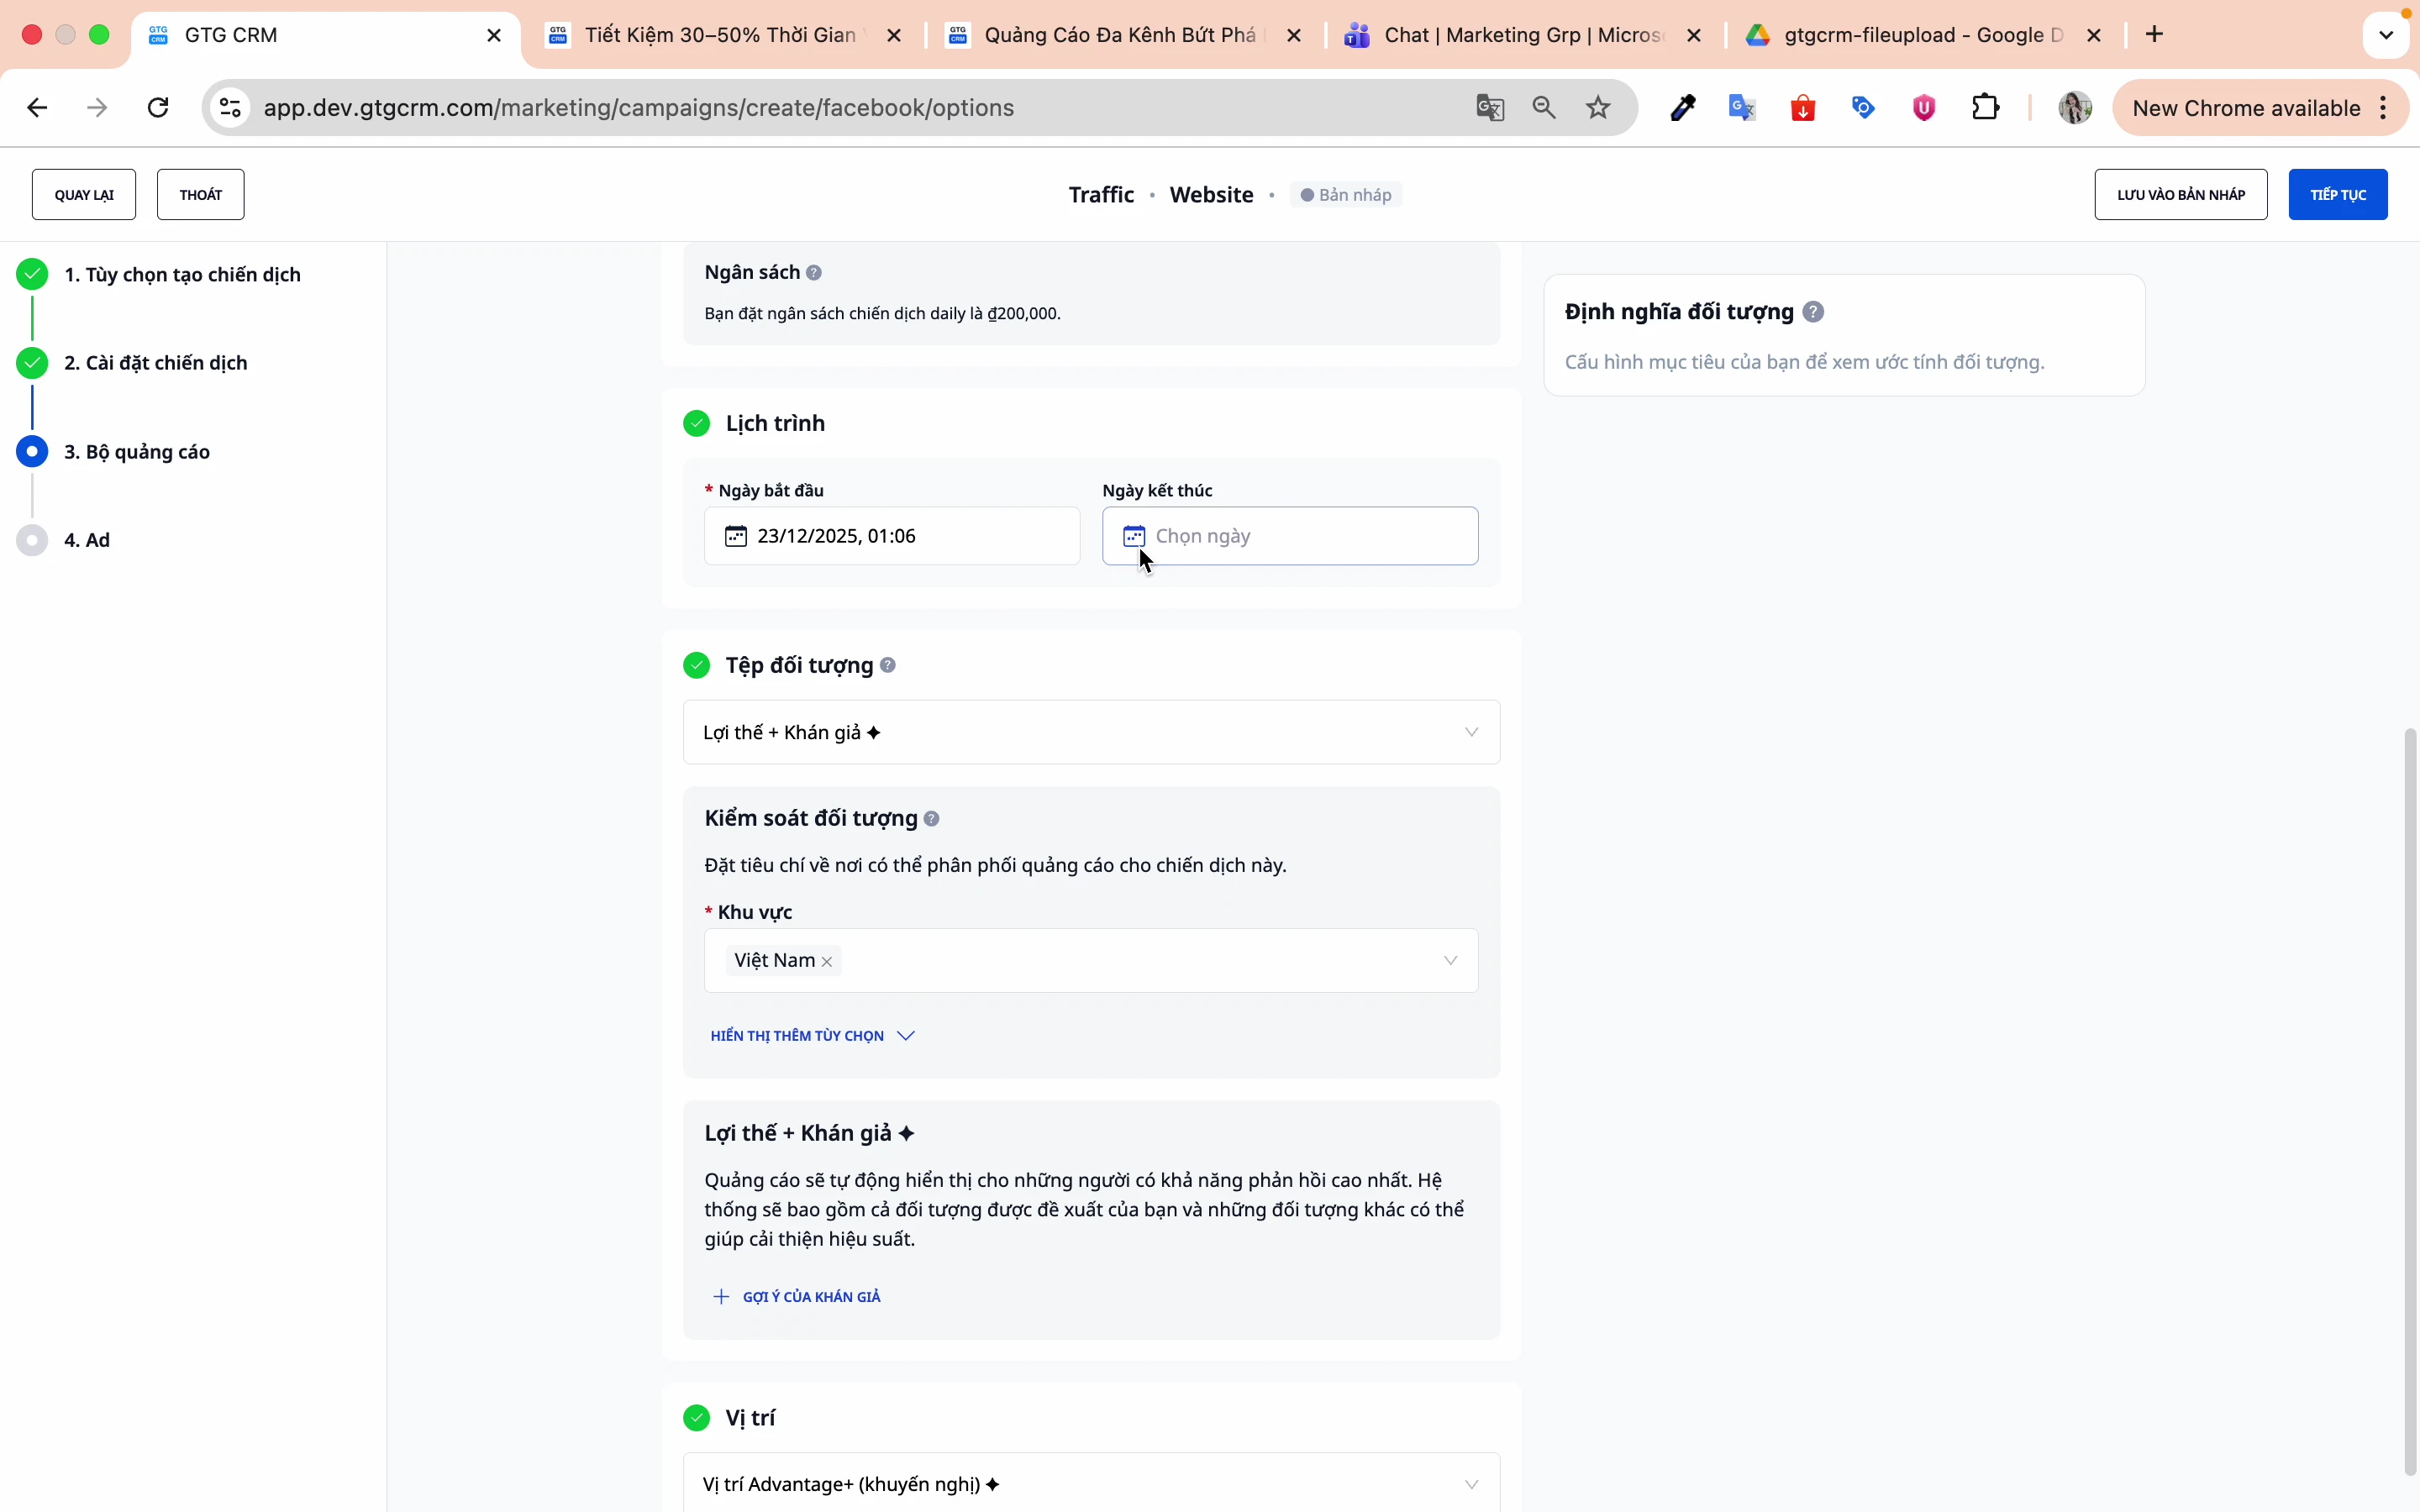
5. Setting up Audience Targeting
Method 1: Audience AI (Recommended for beginners)
Facebook AI will automatically find suitable matches based on machine learning.
Method 2: Create your own (Custom) Audience
Step 1: Select "Initial Audience"
Click this option to build your own audience.
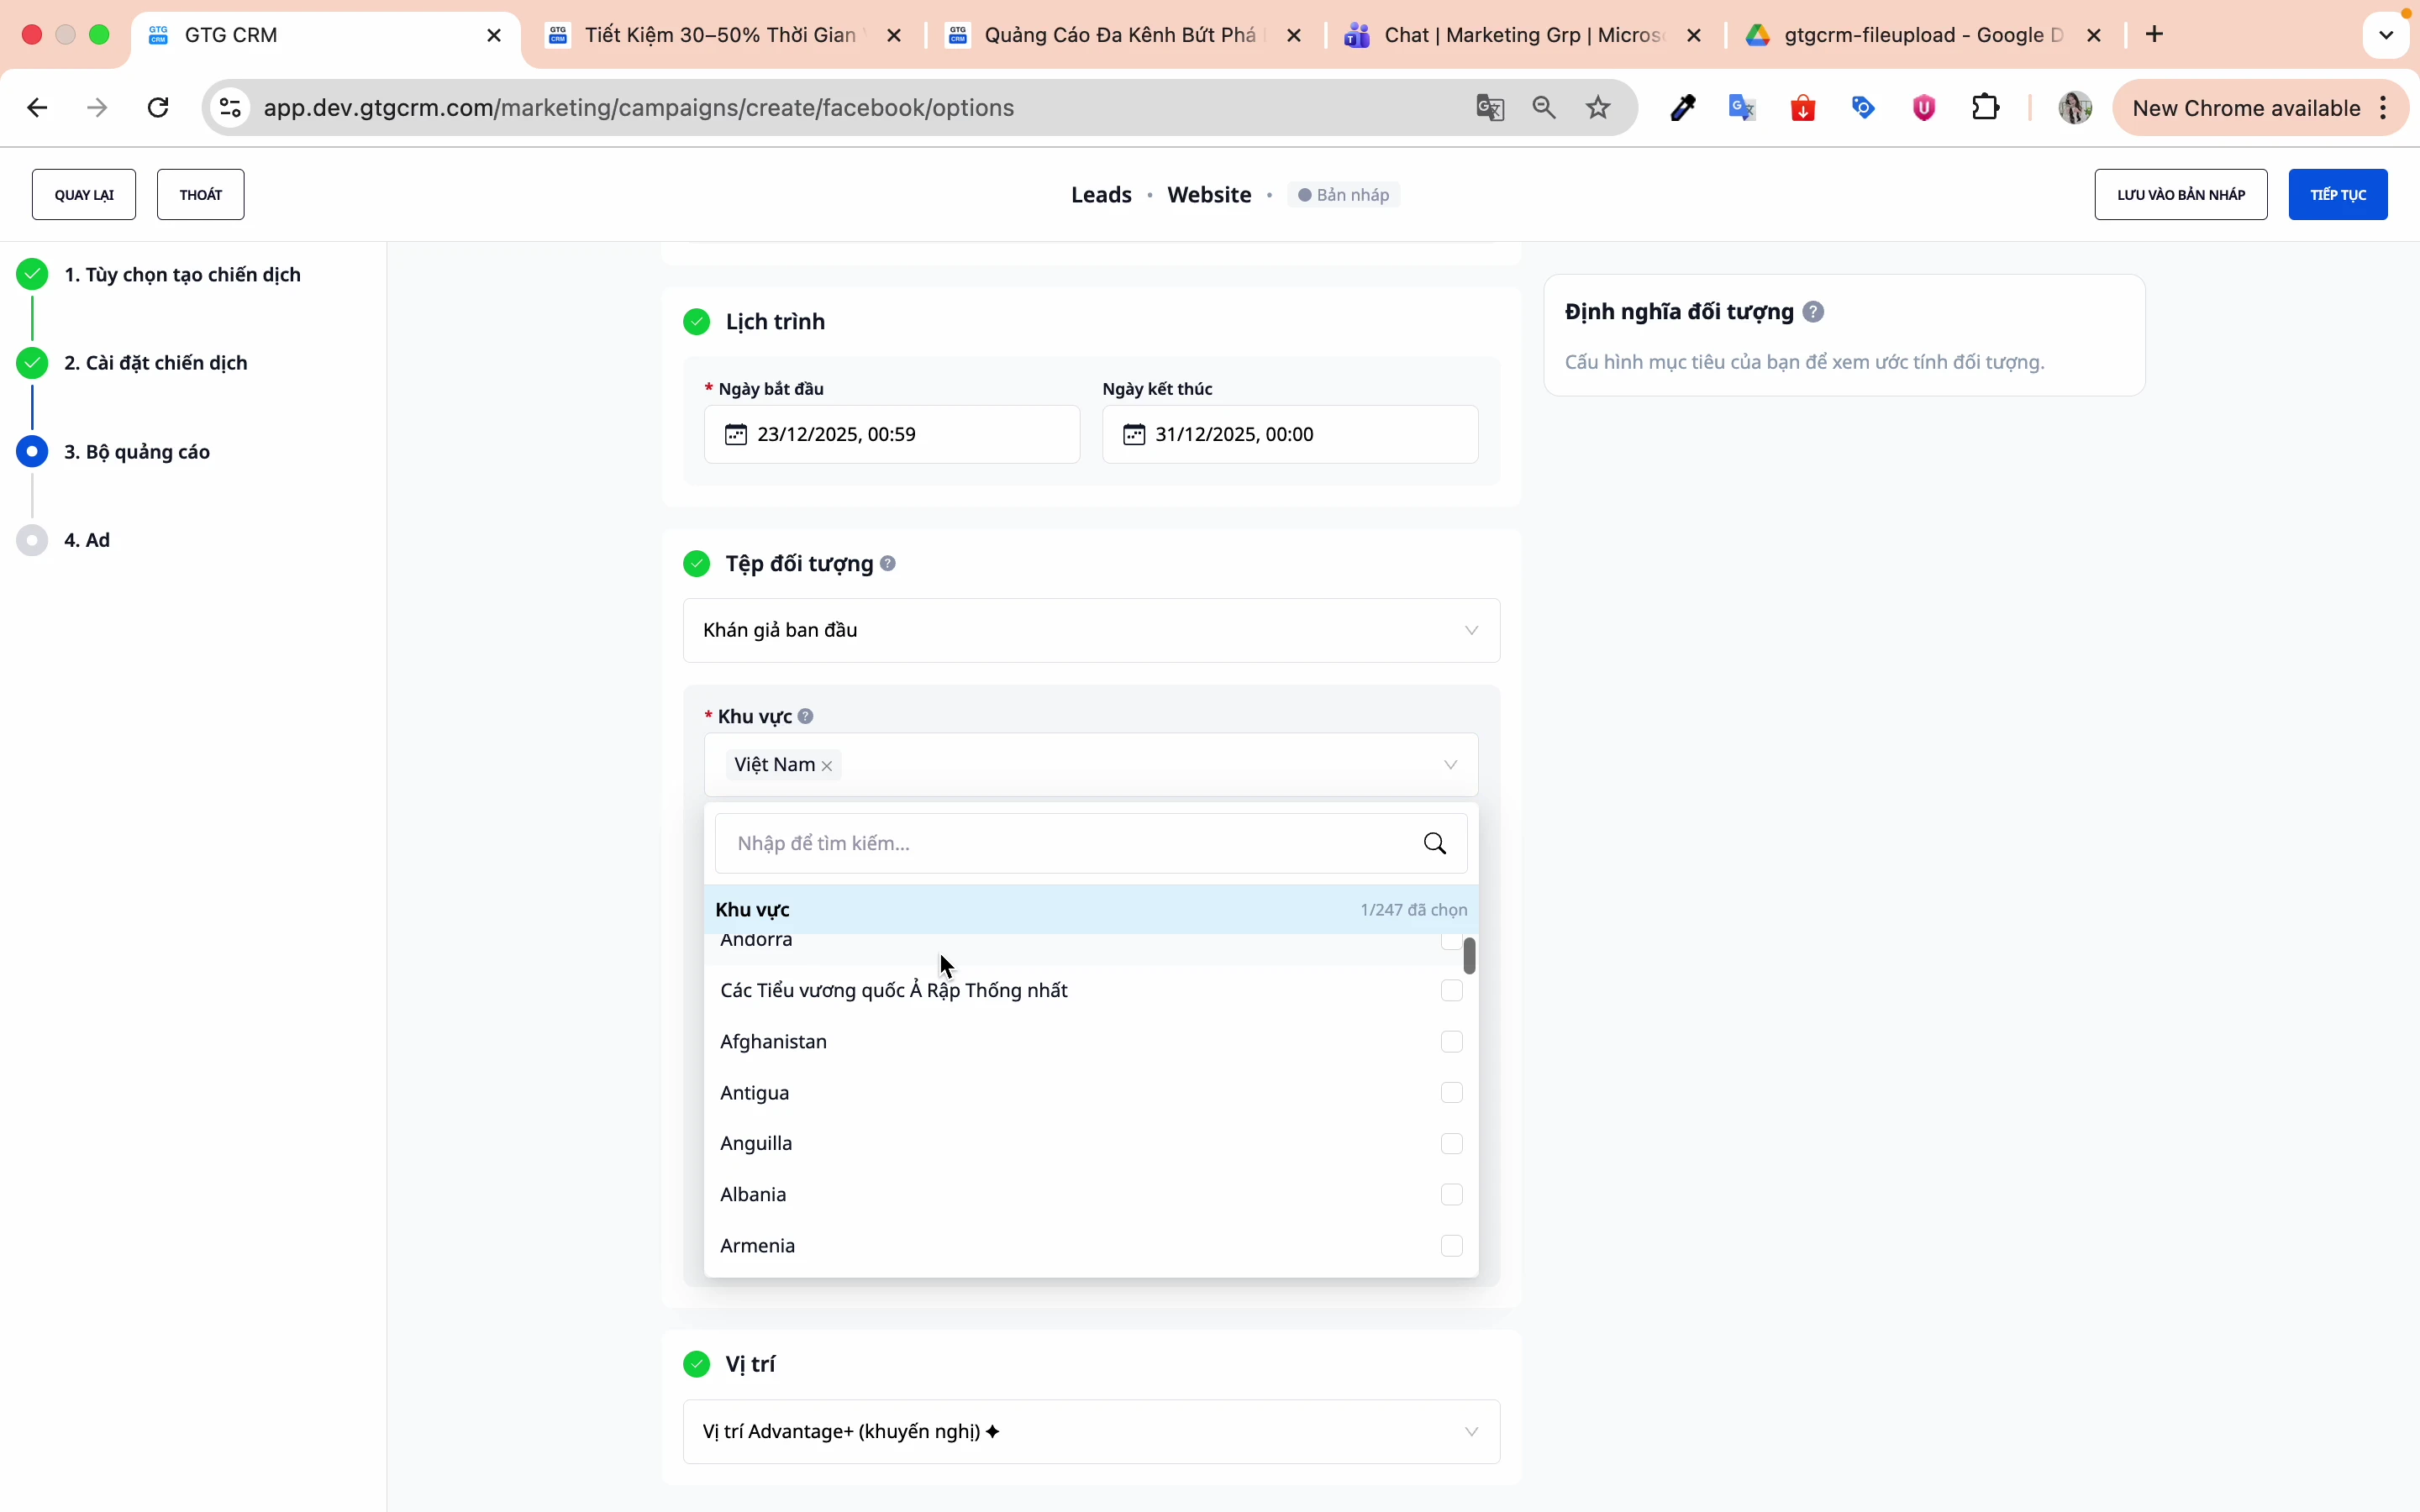
Step 2: Set the geographic location
- Select country: Vietnam
- Targeting is possible down to individual provinces/cities.
Step 3: Set the age limit
Choose an age range that is appropriate for the product/service. For example: 25-55 years old.
Step 4: Set the gender
- Male
- Female
- All
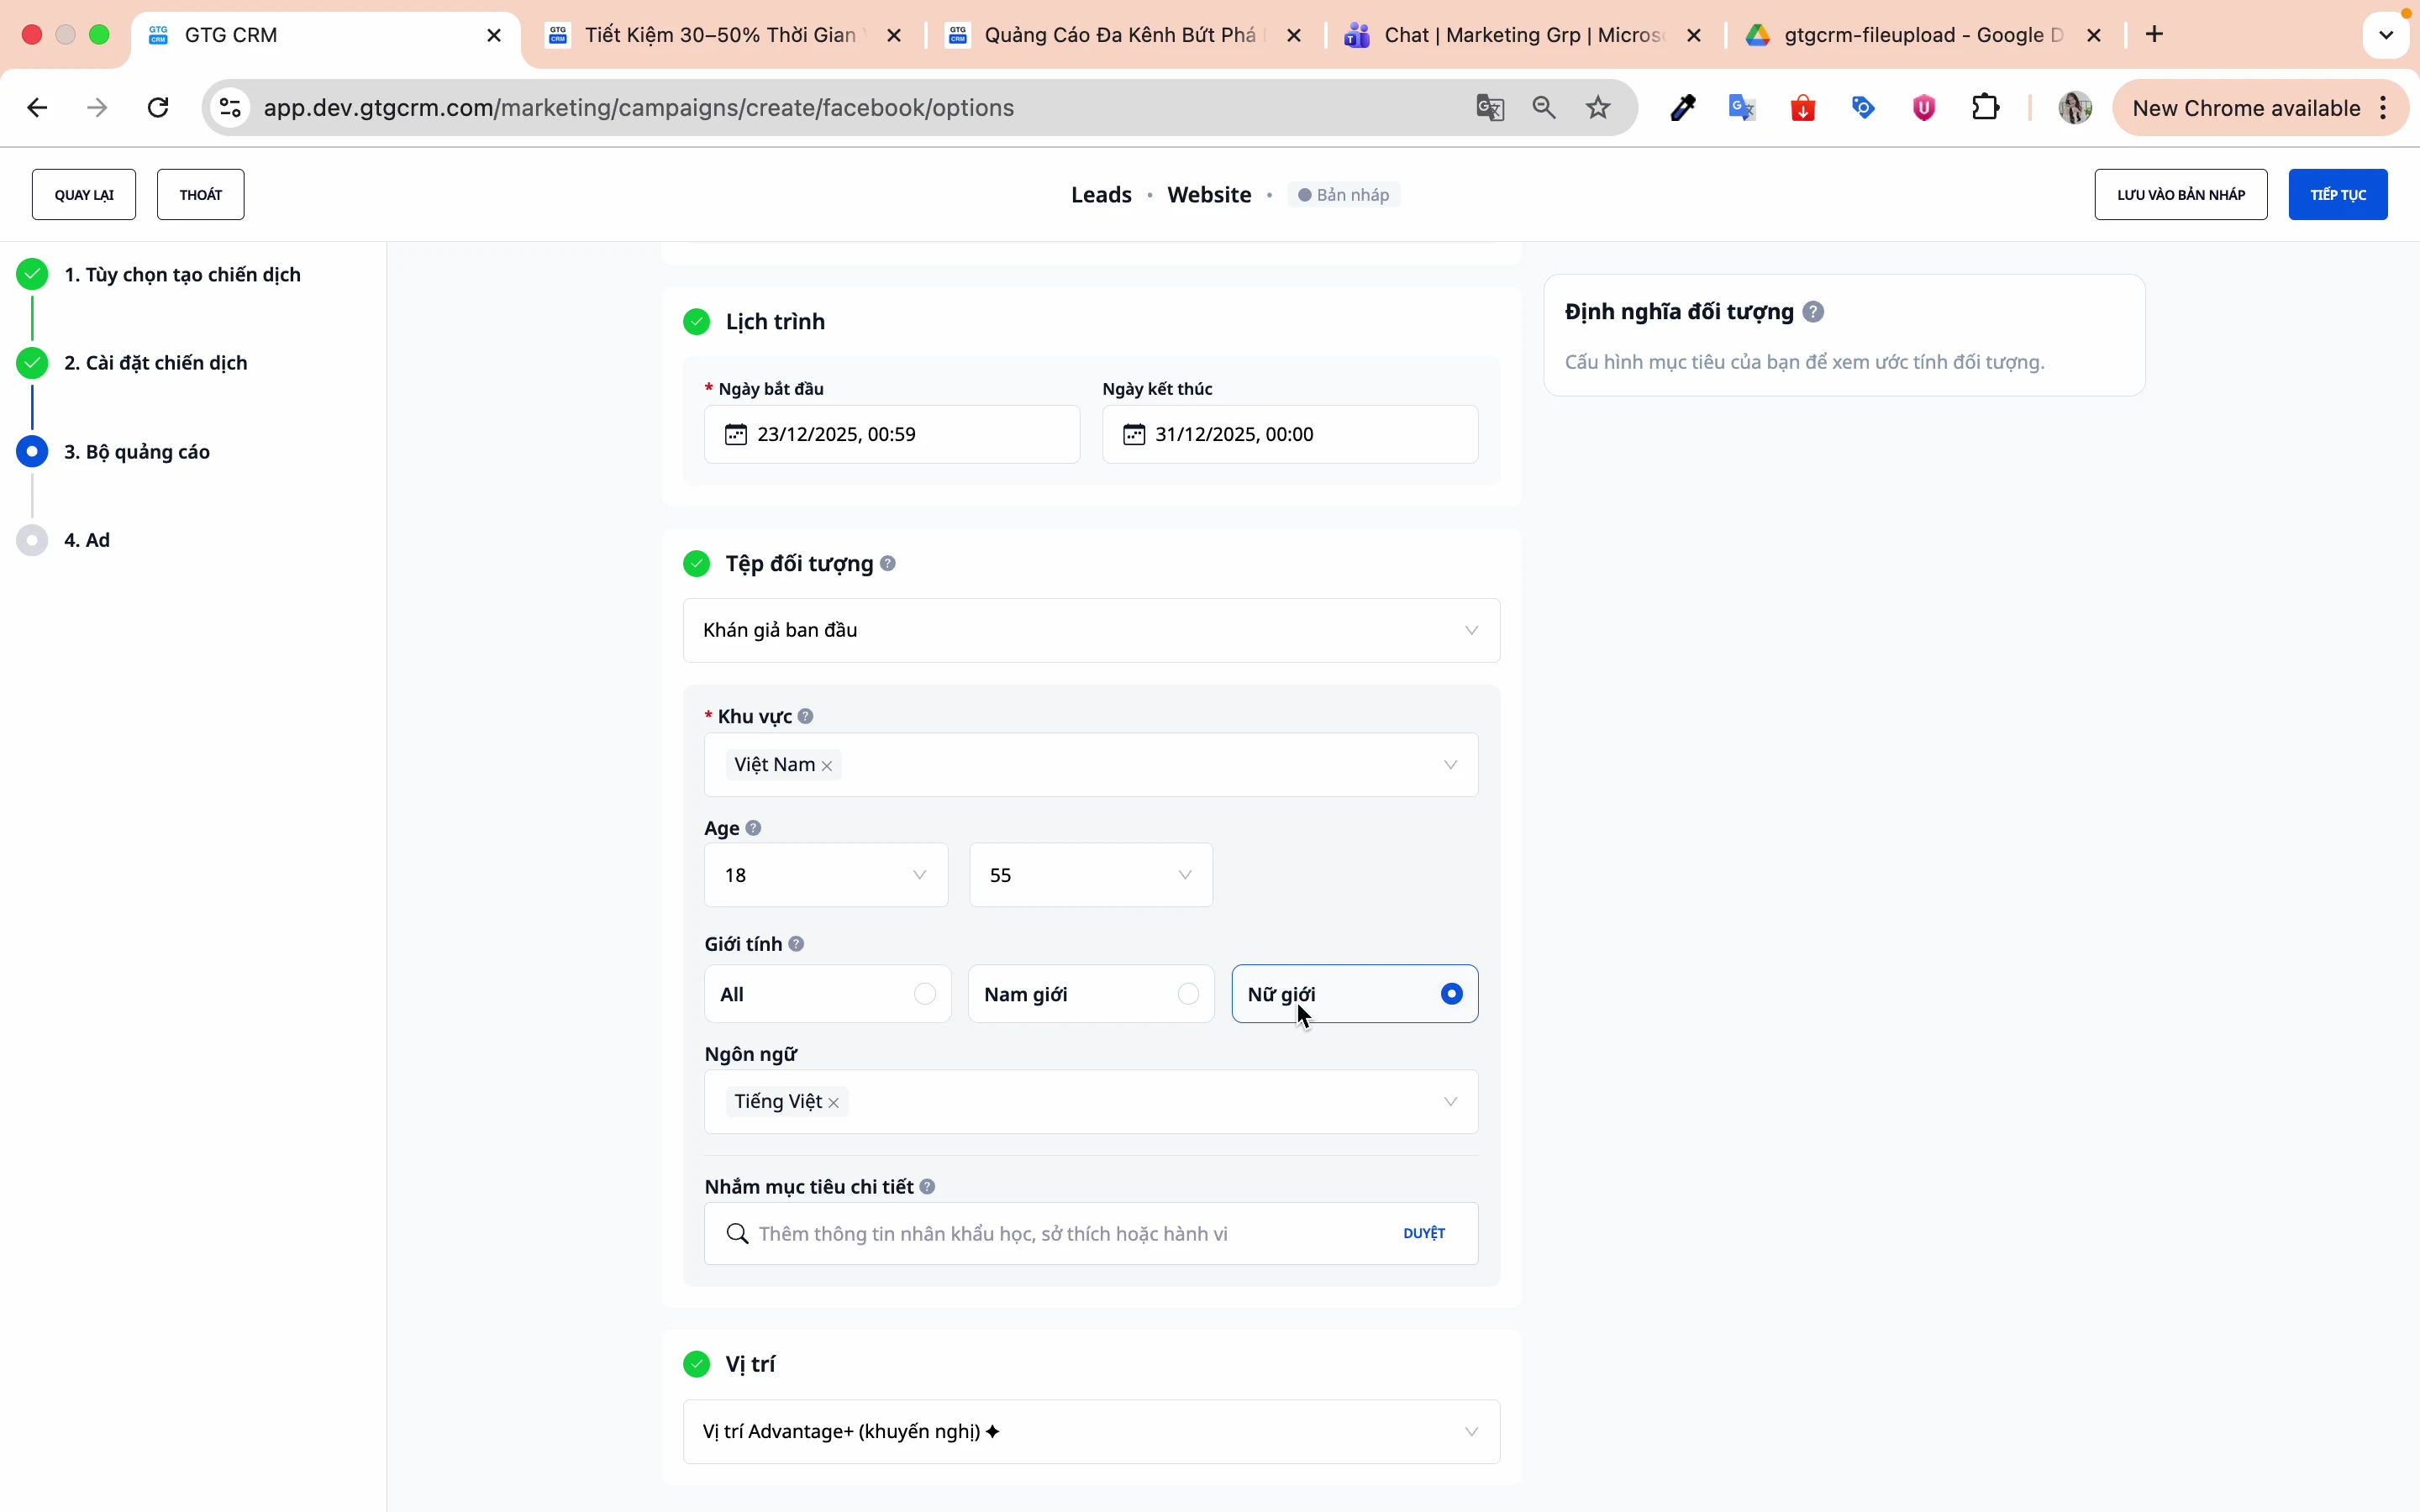
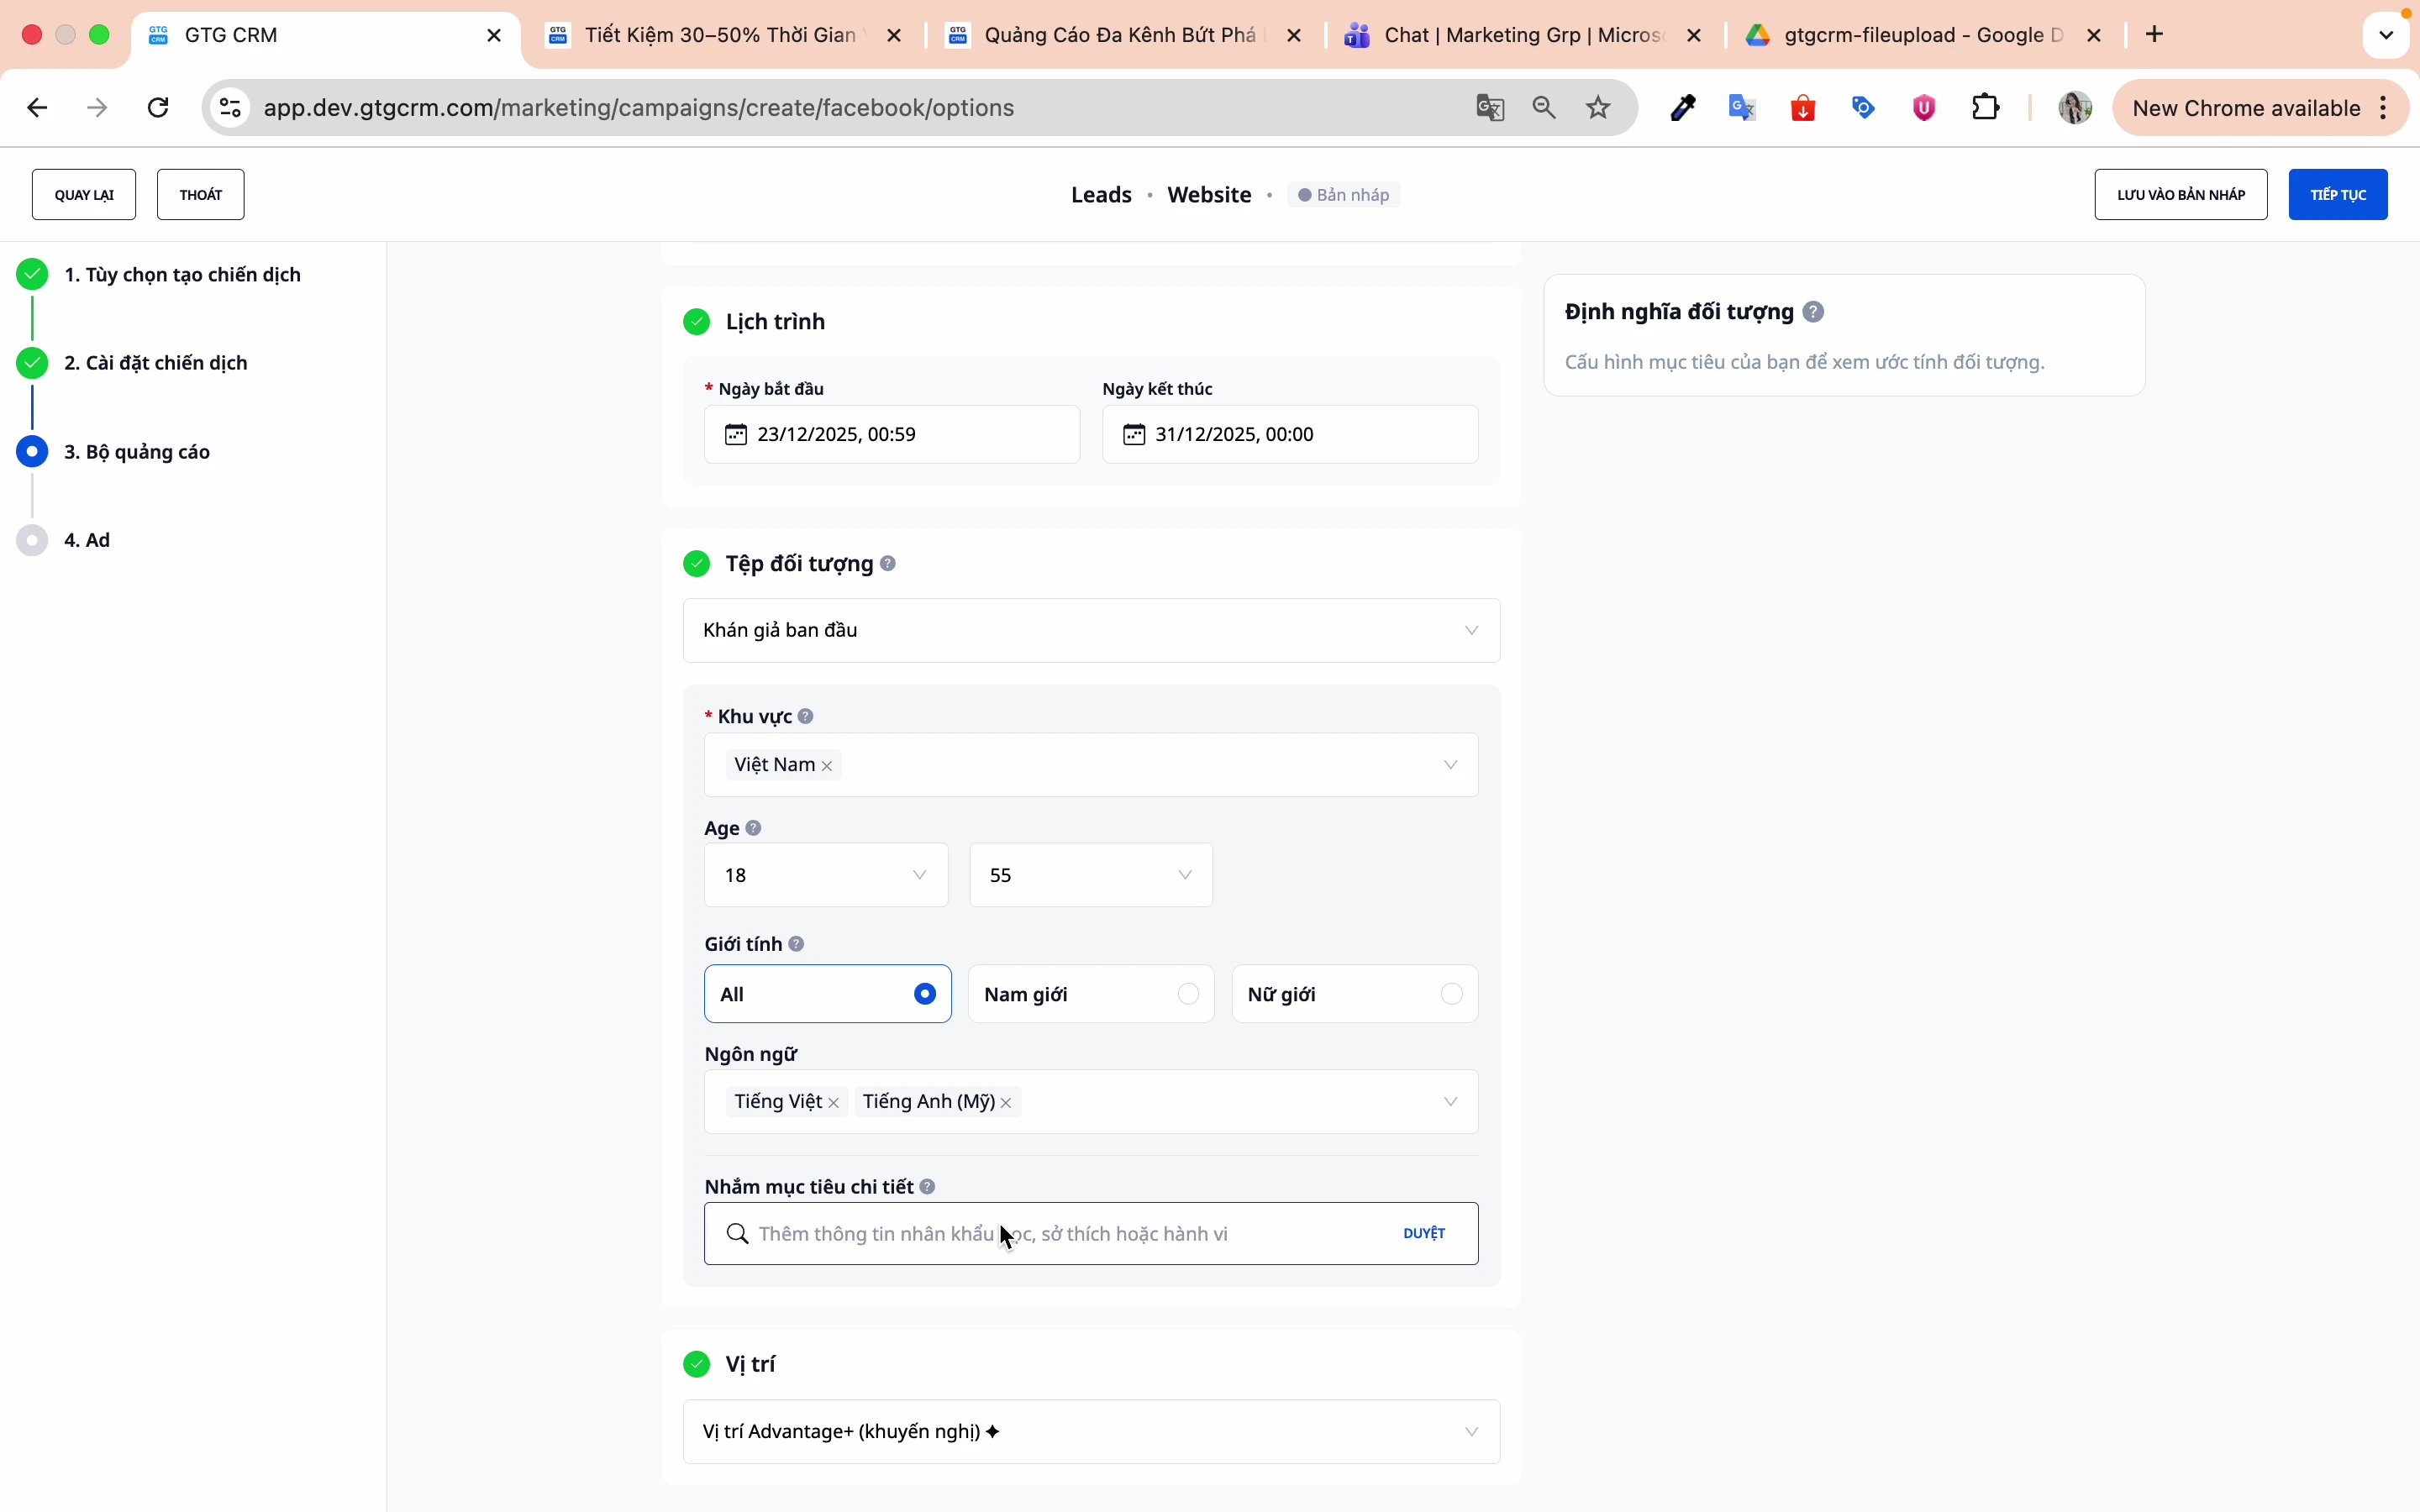
Step 5: Set the language
- Vietnamese
- English
- Or a language that suits the target audience.
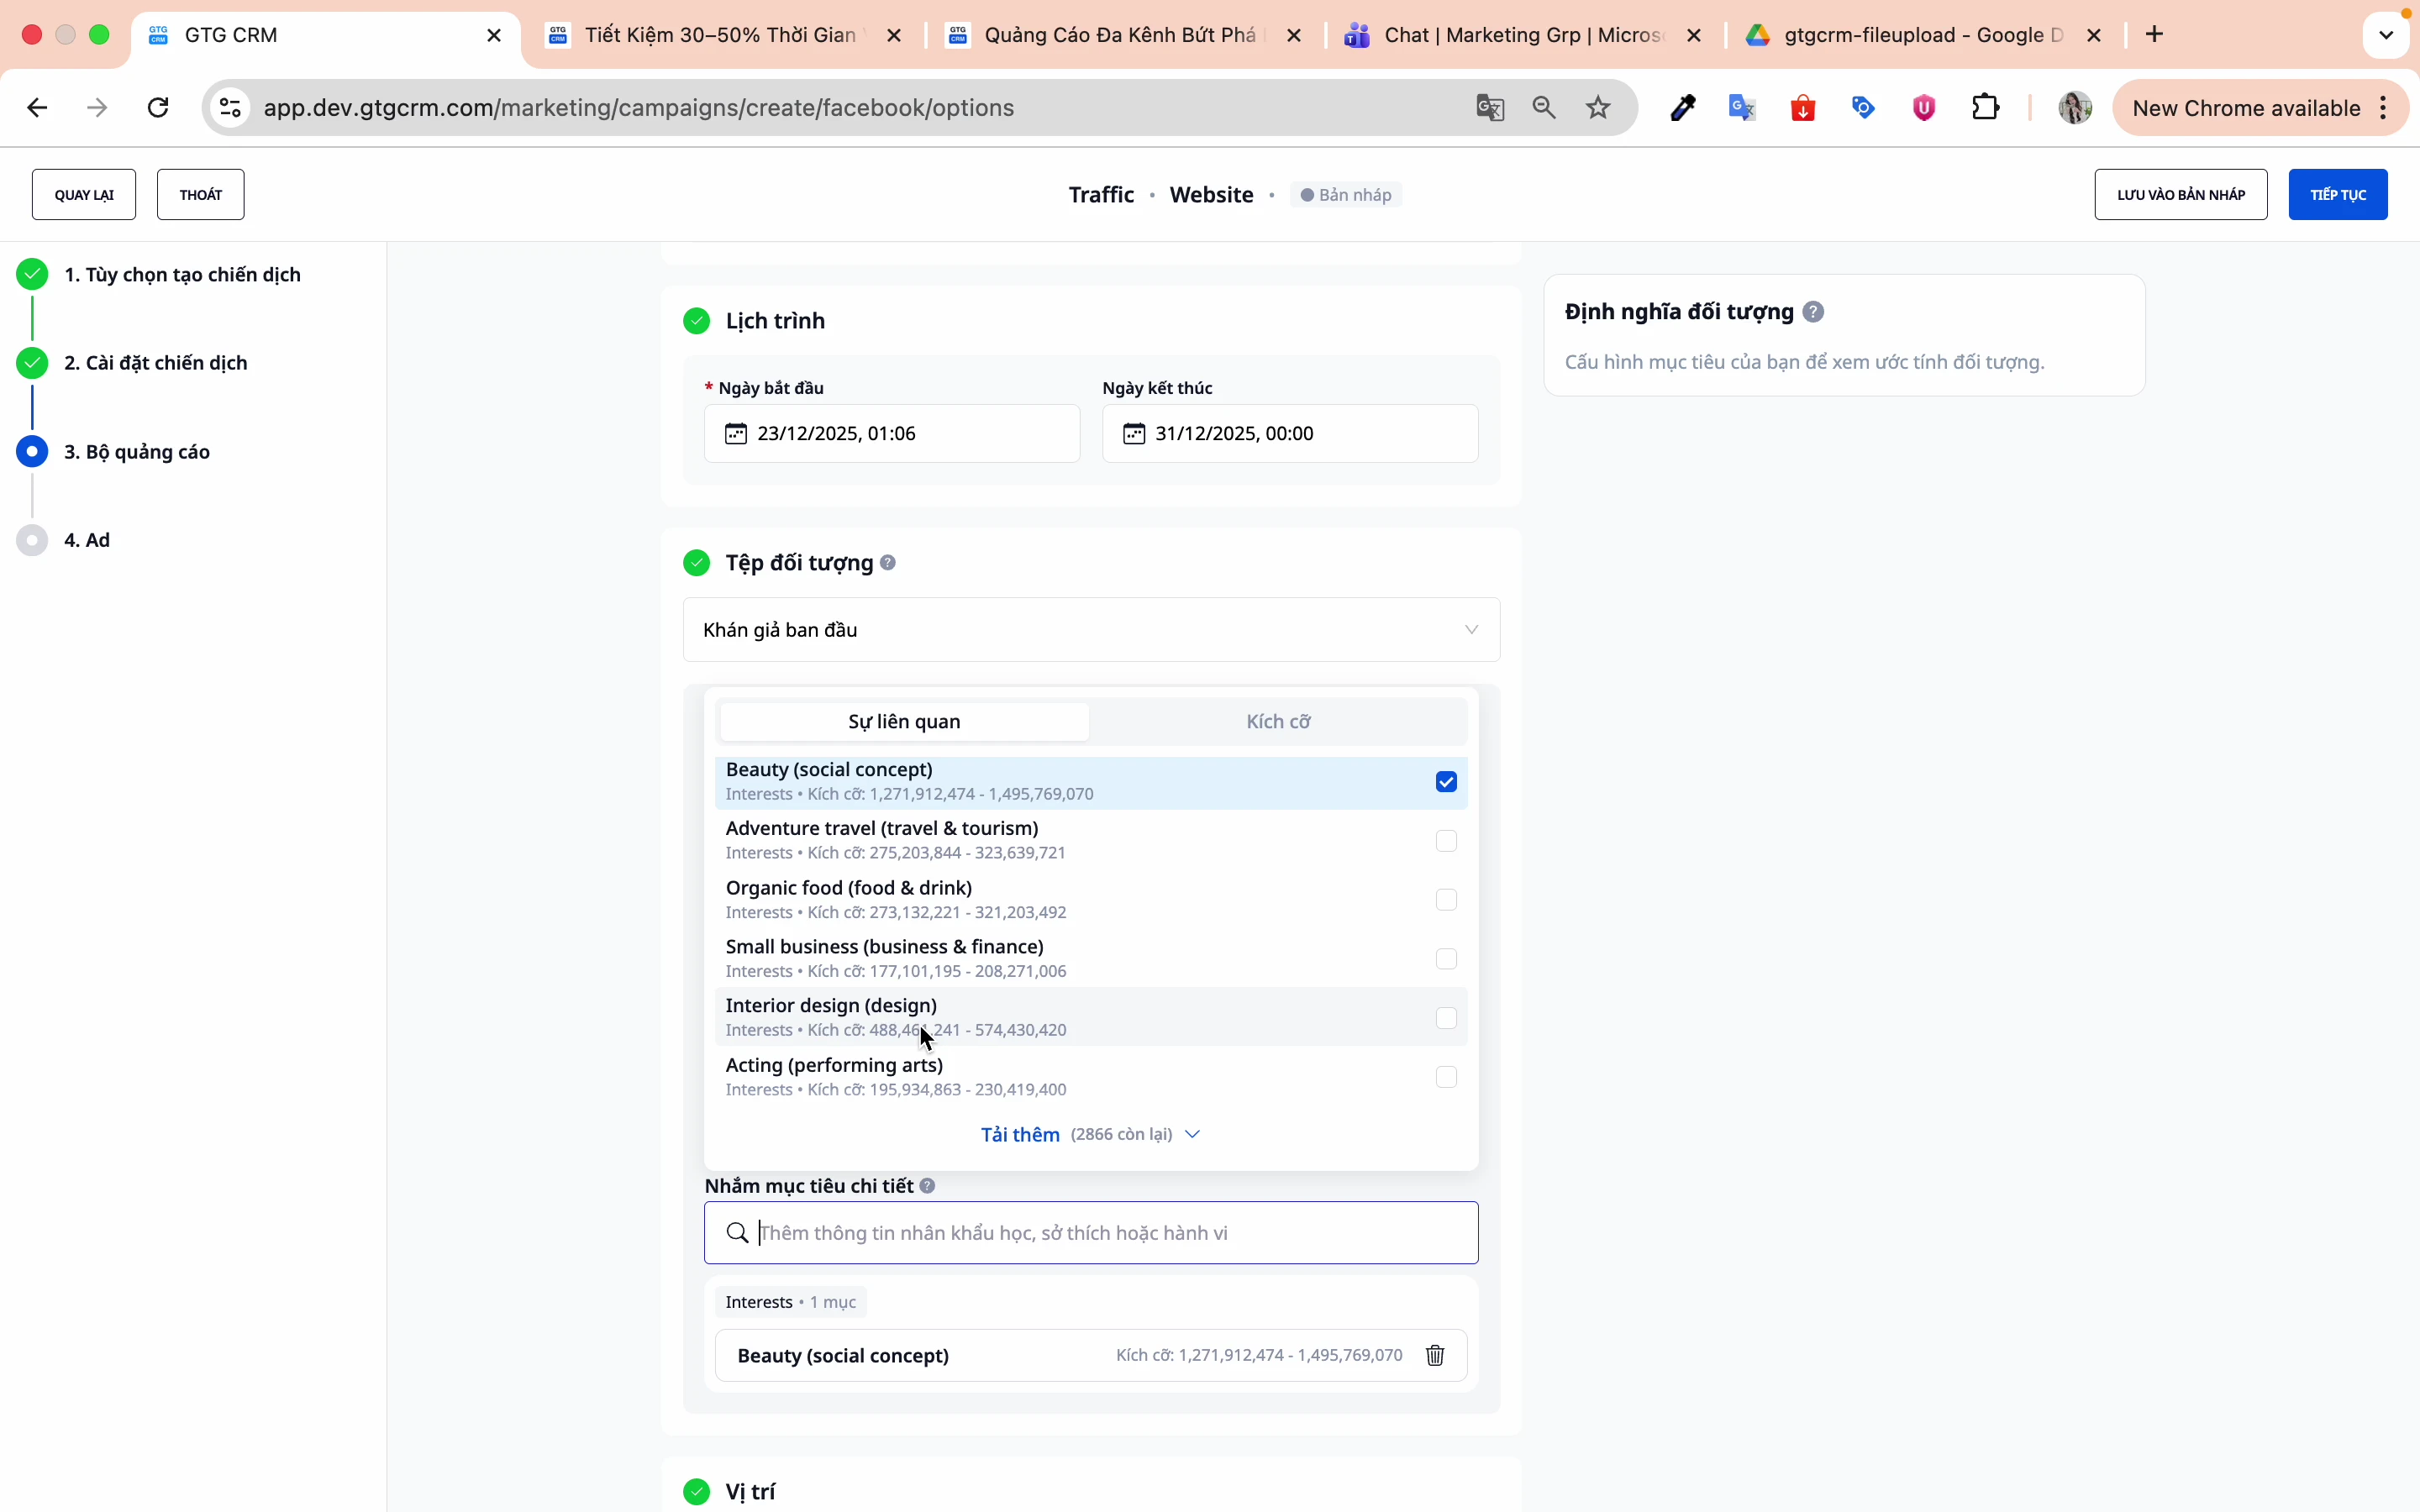
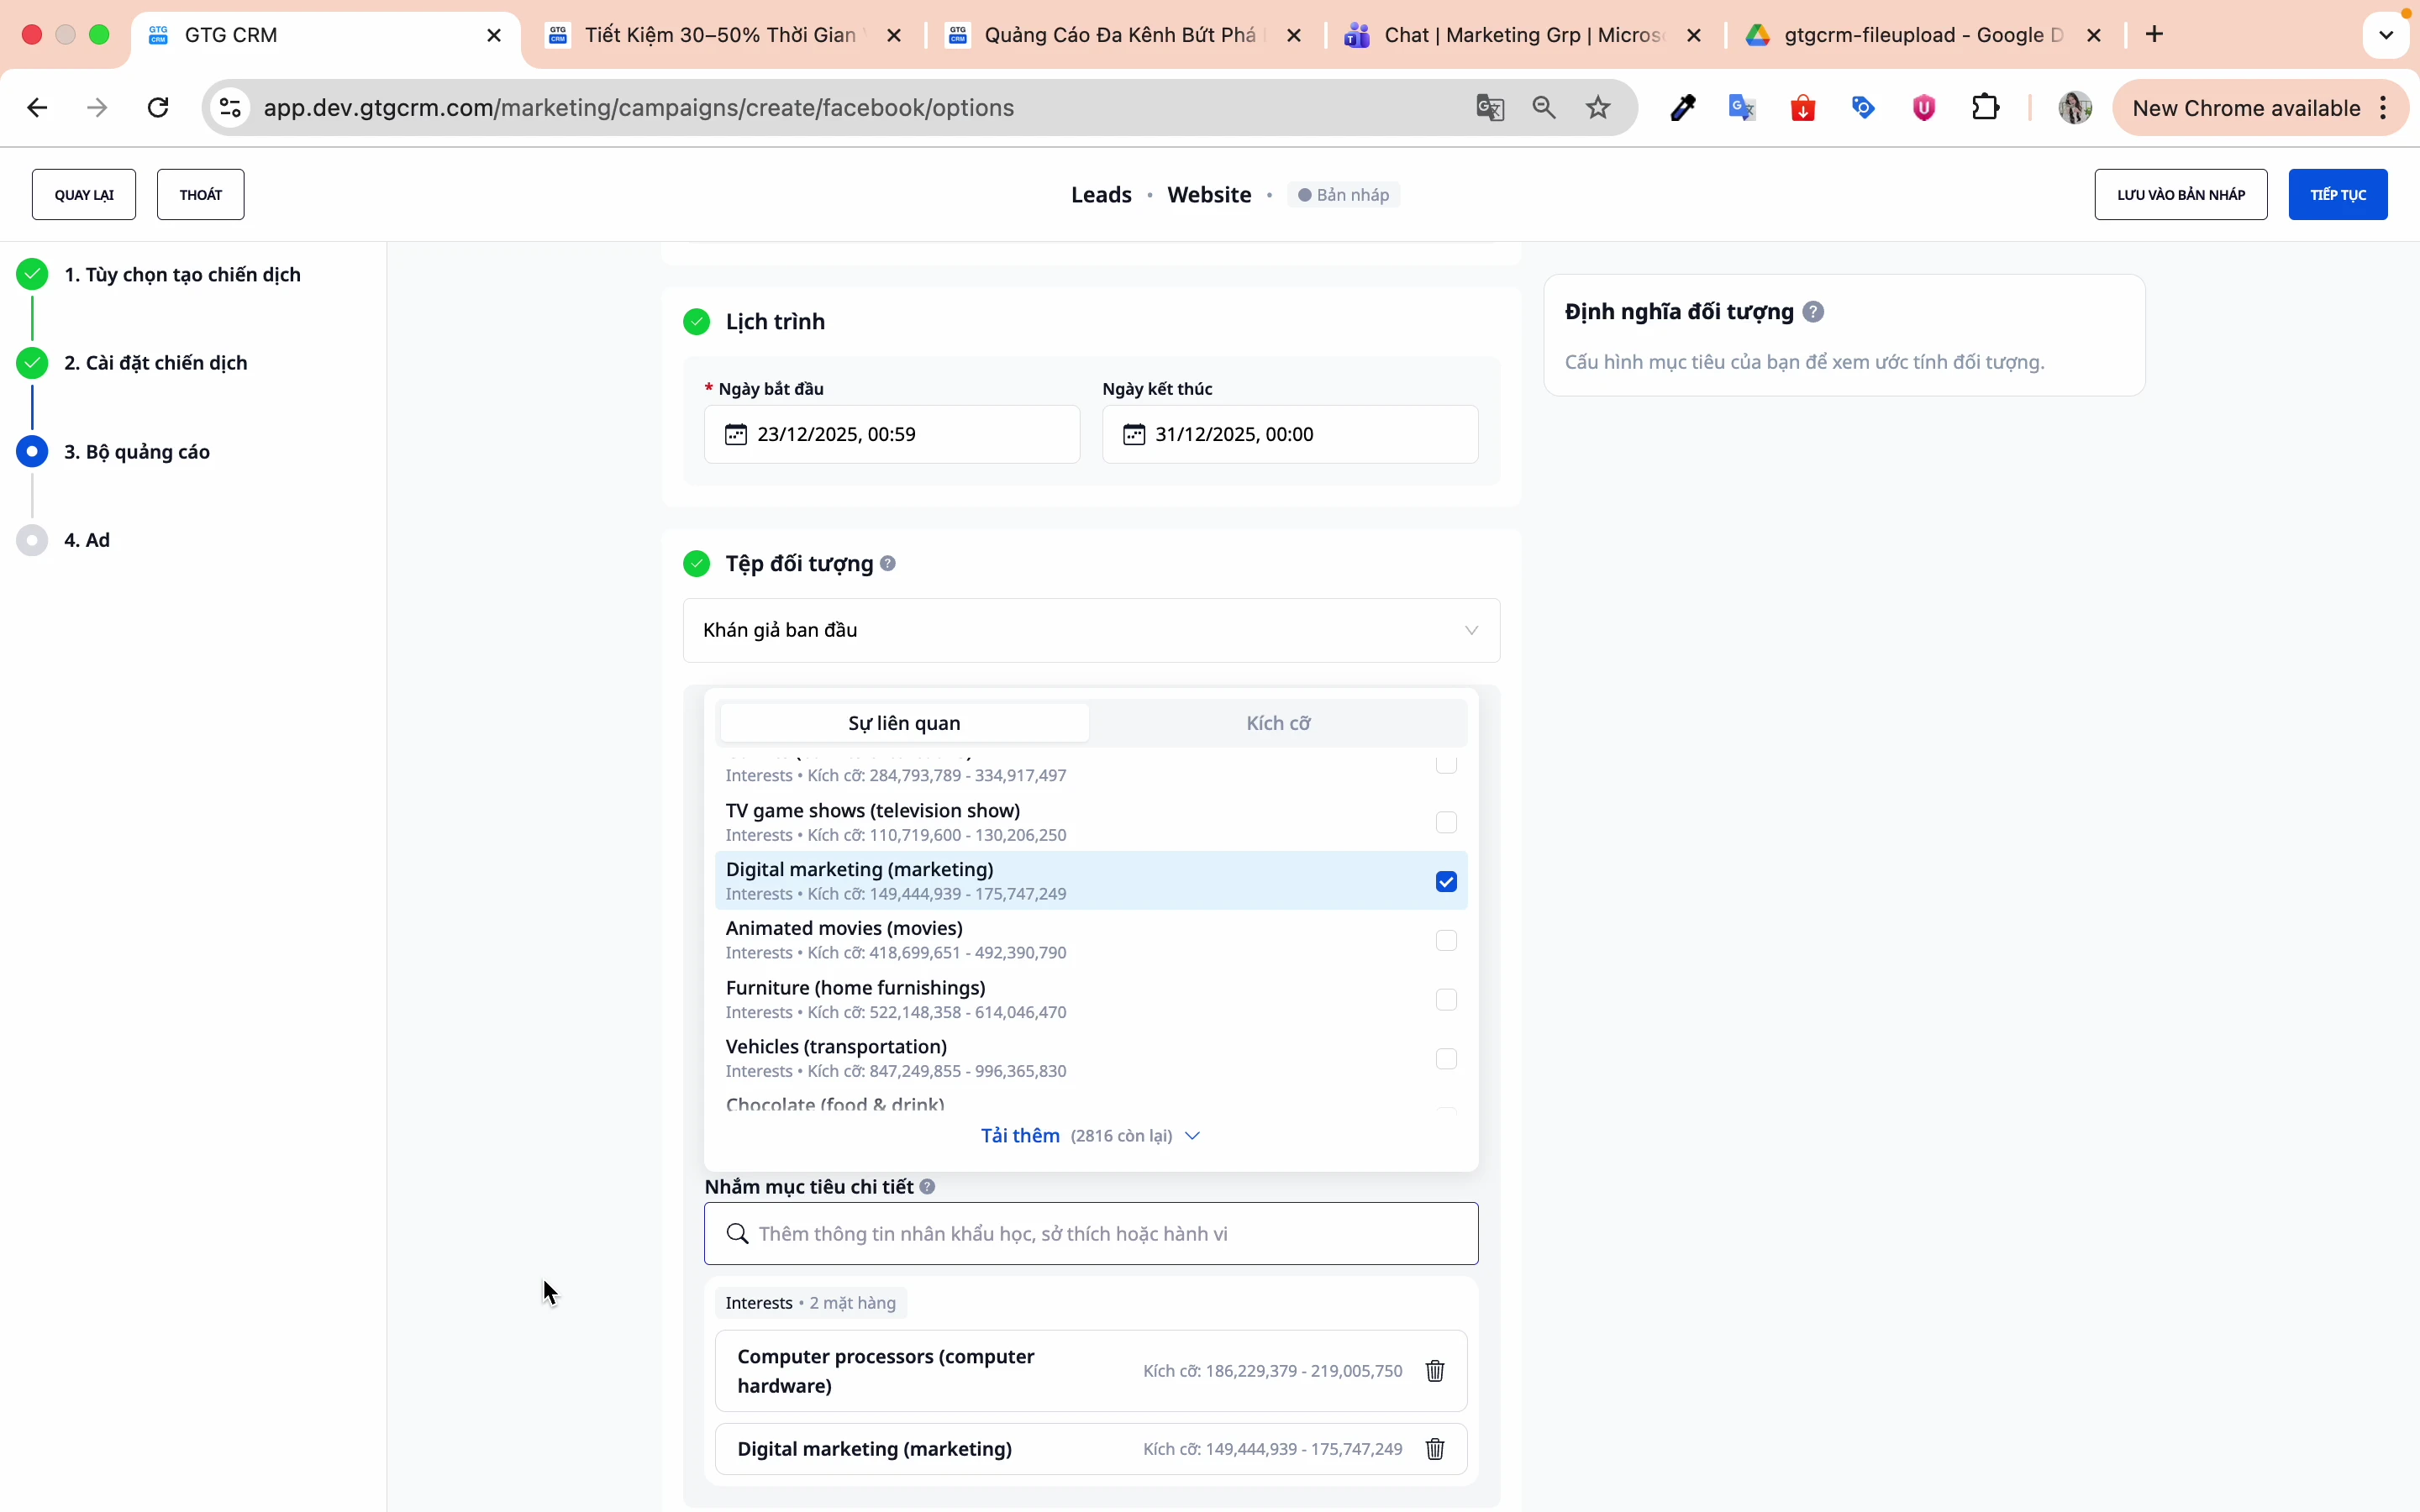
Step 6: Set detailed targets
Select relevant interests, behaviors, and demographics:
For example:
- Beauty industry: Beauty care, Spa, Cosmetics
- Food and Beverage Industry: Restaurants, Food Service, Food Delivery
- Technology industry: Startups, Entrepreneurs, SMEs
Click Continue to proceed to the ad creation step.
6. Create an Ad
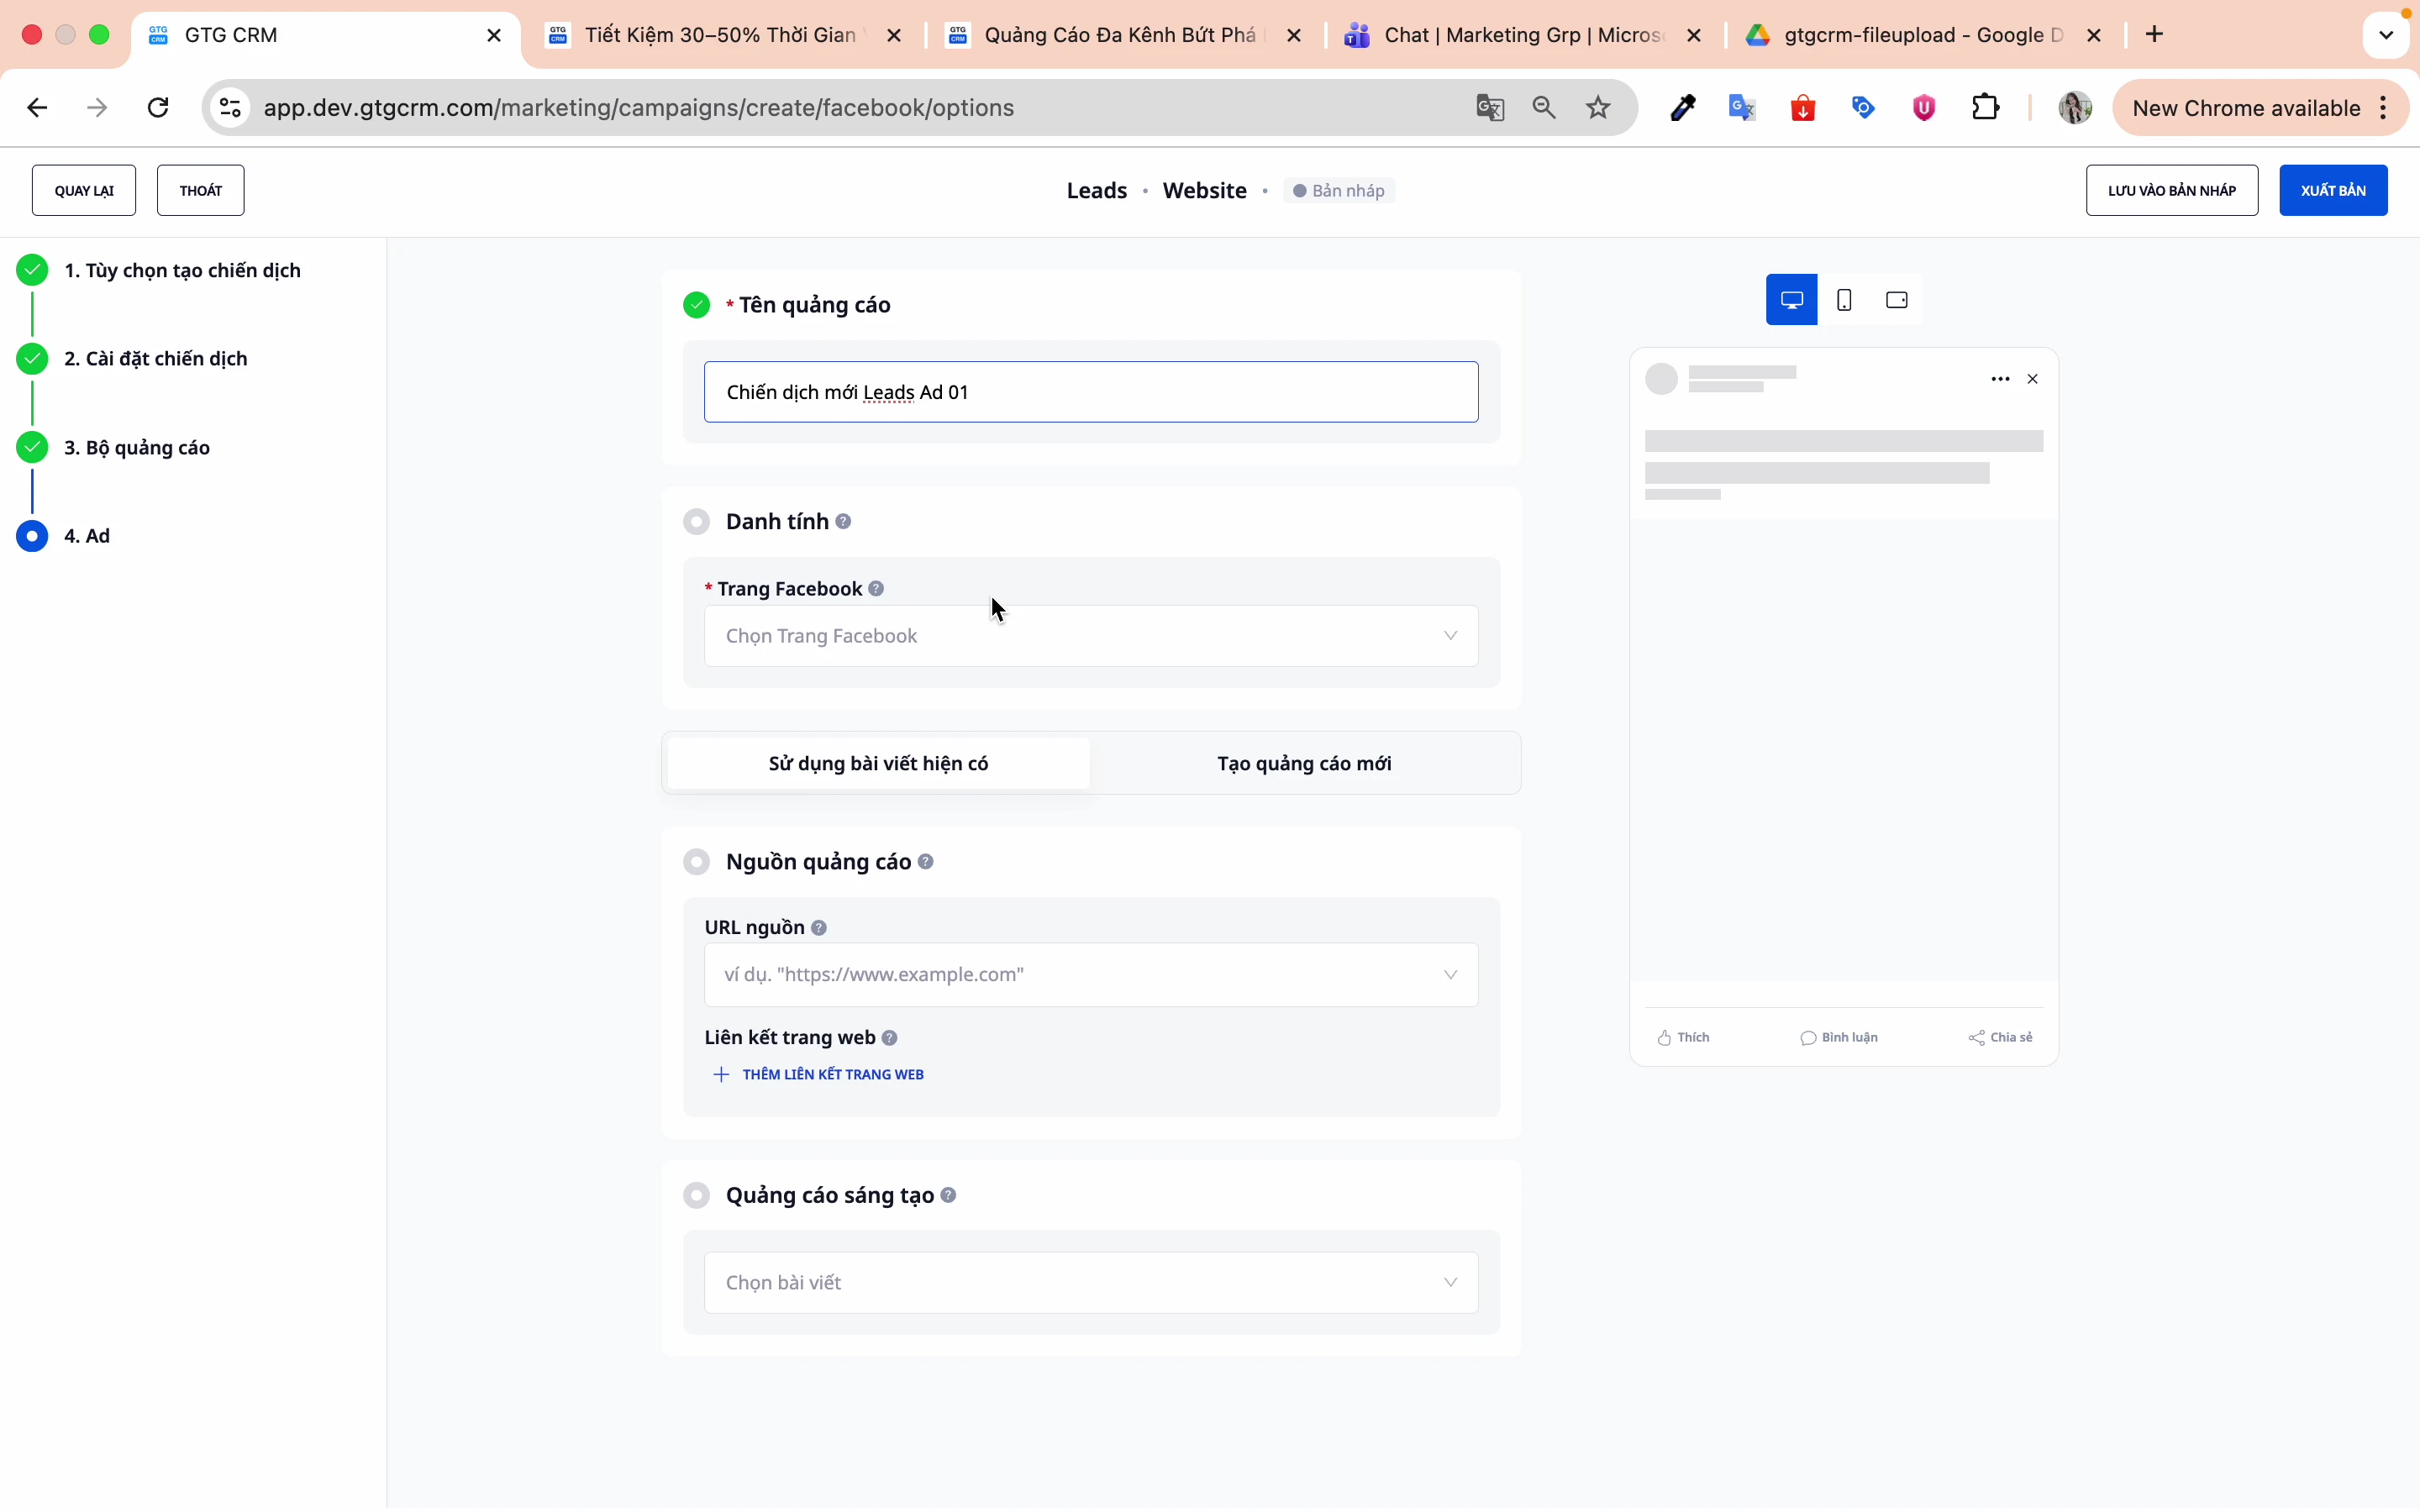
Step 1: Name your ad
Use names to differentiate between ads within the same ad set.
Step 2: Select the Facebook page
Choose the Fanpage you want to advertise.
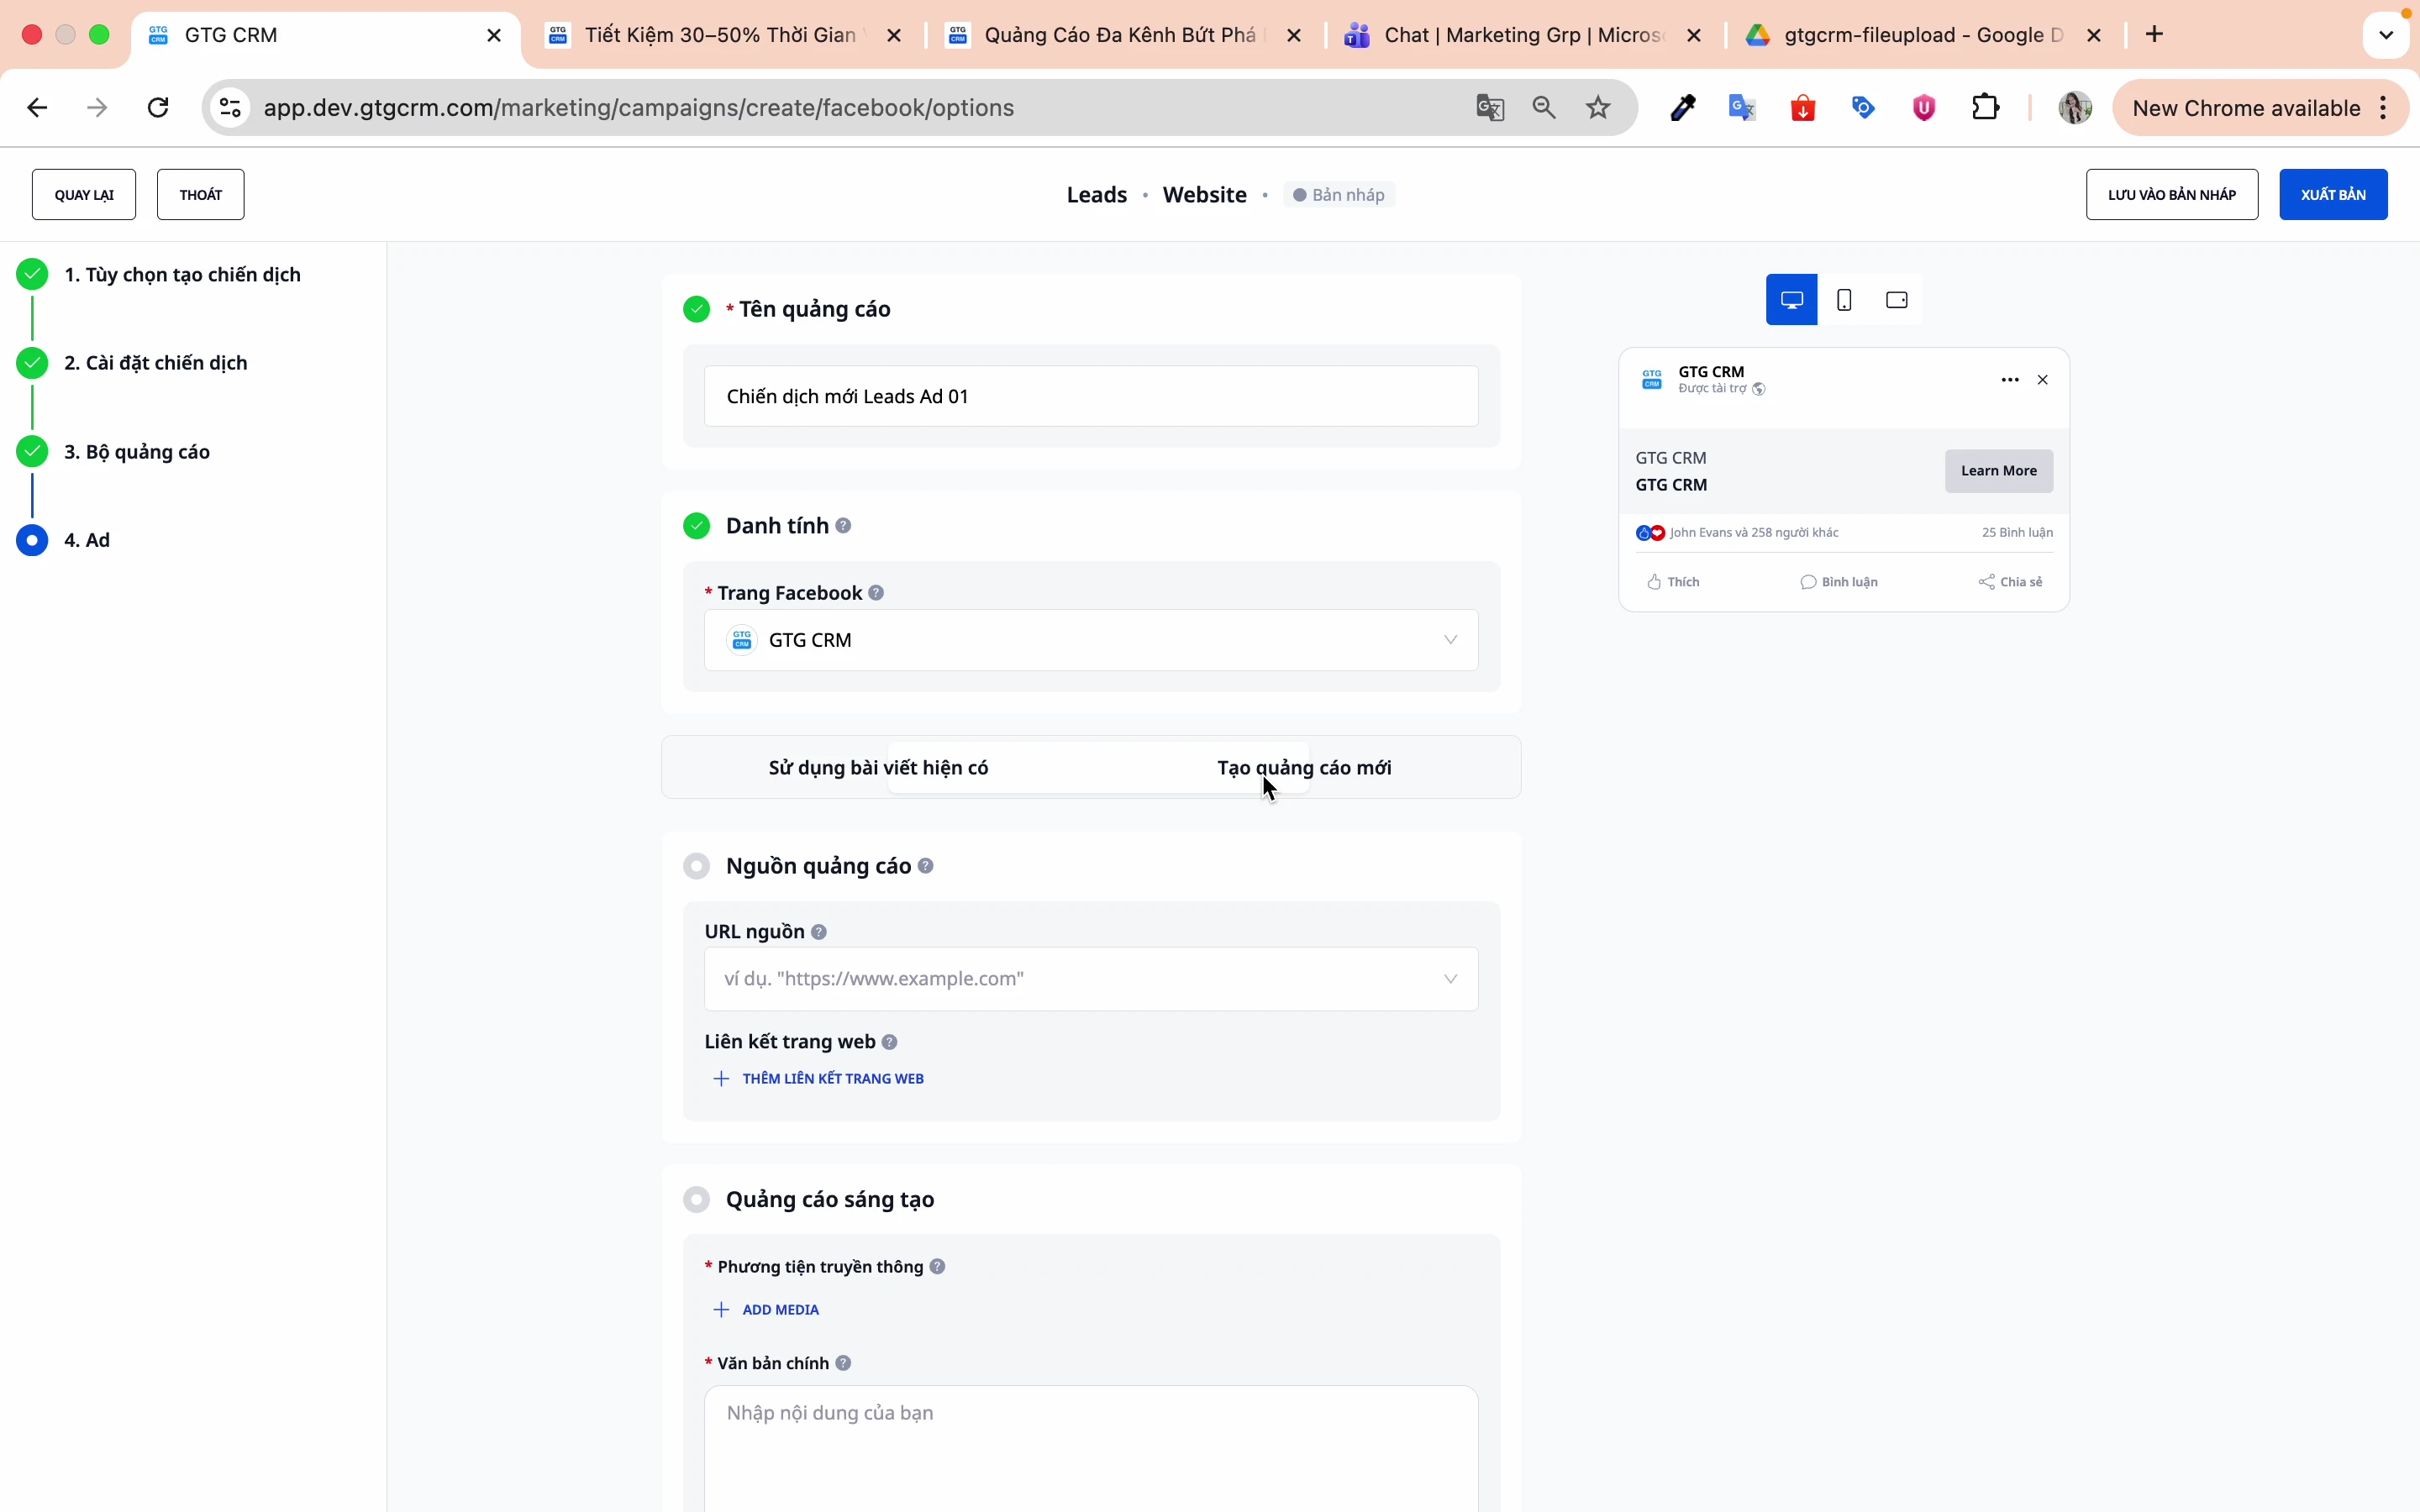
Step 3: Choose the article type
There are two options:
Option 1: Use an existing post
- Select an existing post on the Fanpage.
- Take advantage of social proof (likes, comments, shares)
- Quick, simple
Making:
- Click on Use existing post
- Select an article from the list.
- Preview and confirm
Option 2: Create a new ad
- Create entirely new content.
- Customize images, videos, and text.
- More flexibility in design
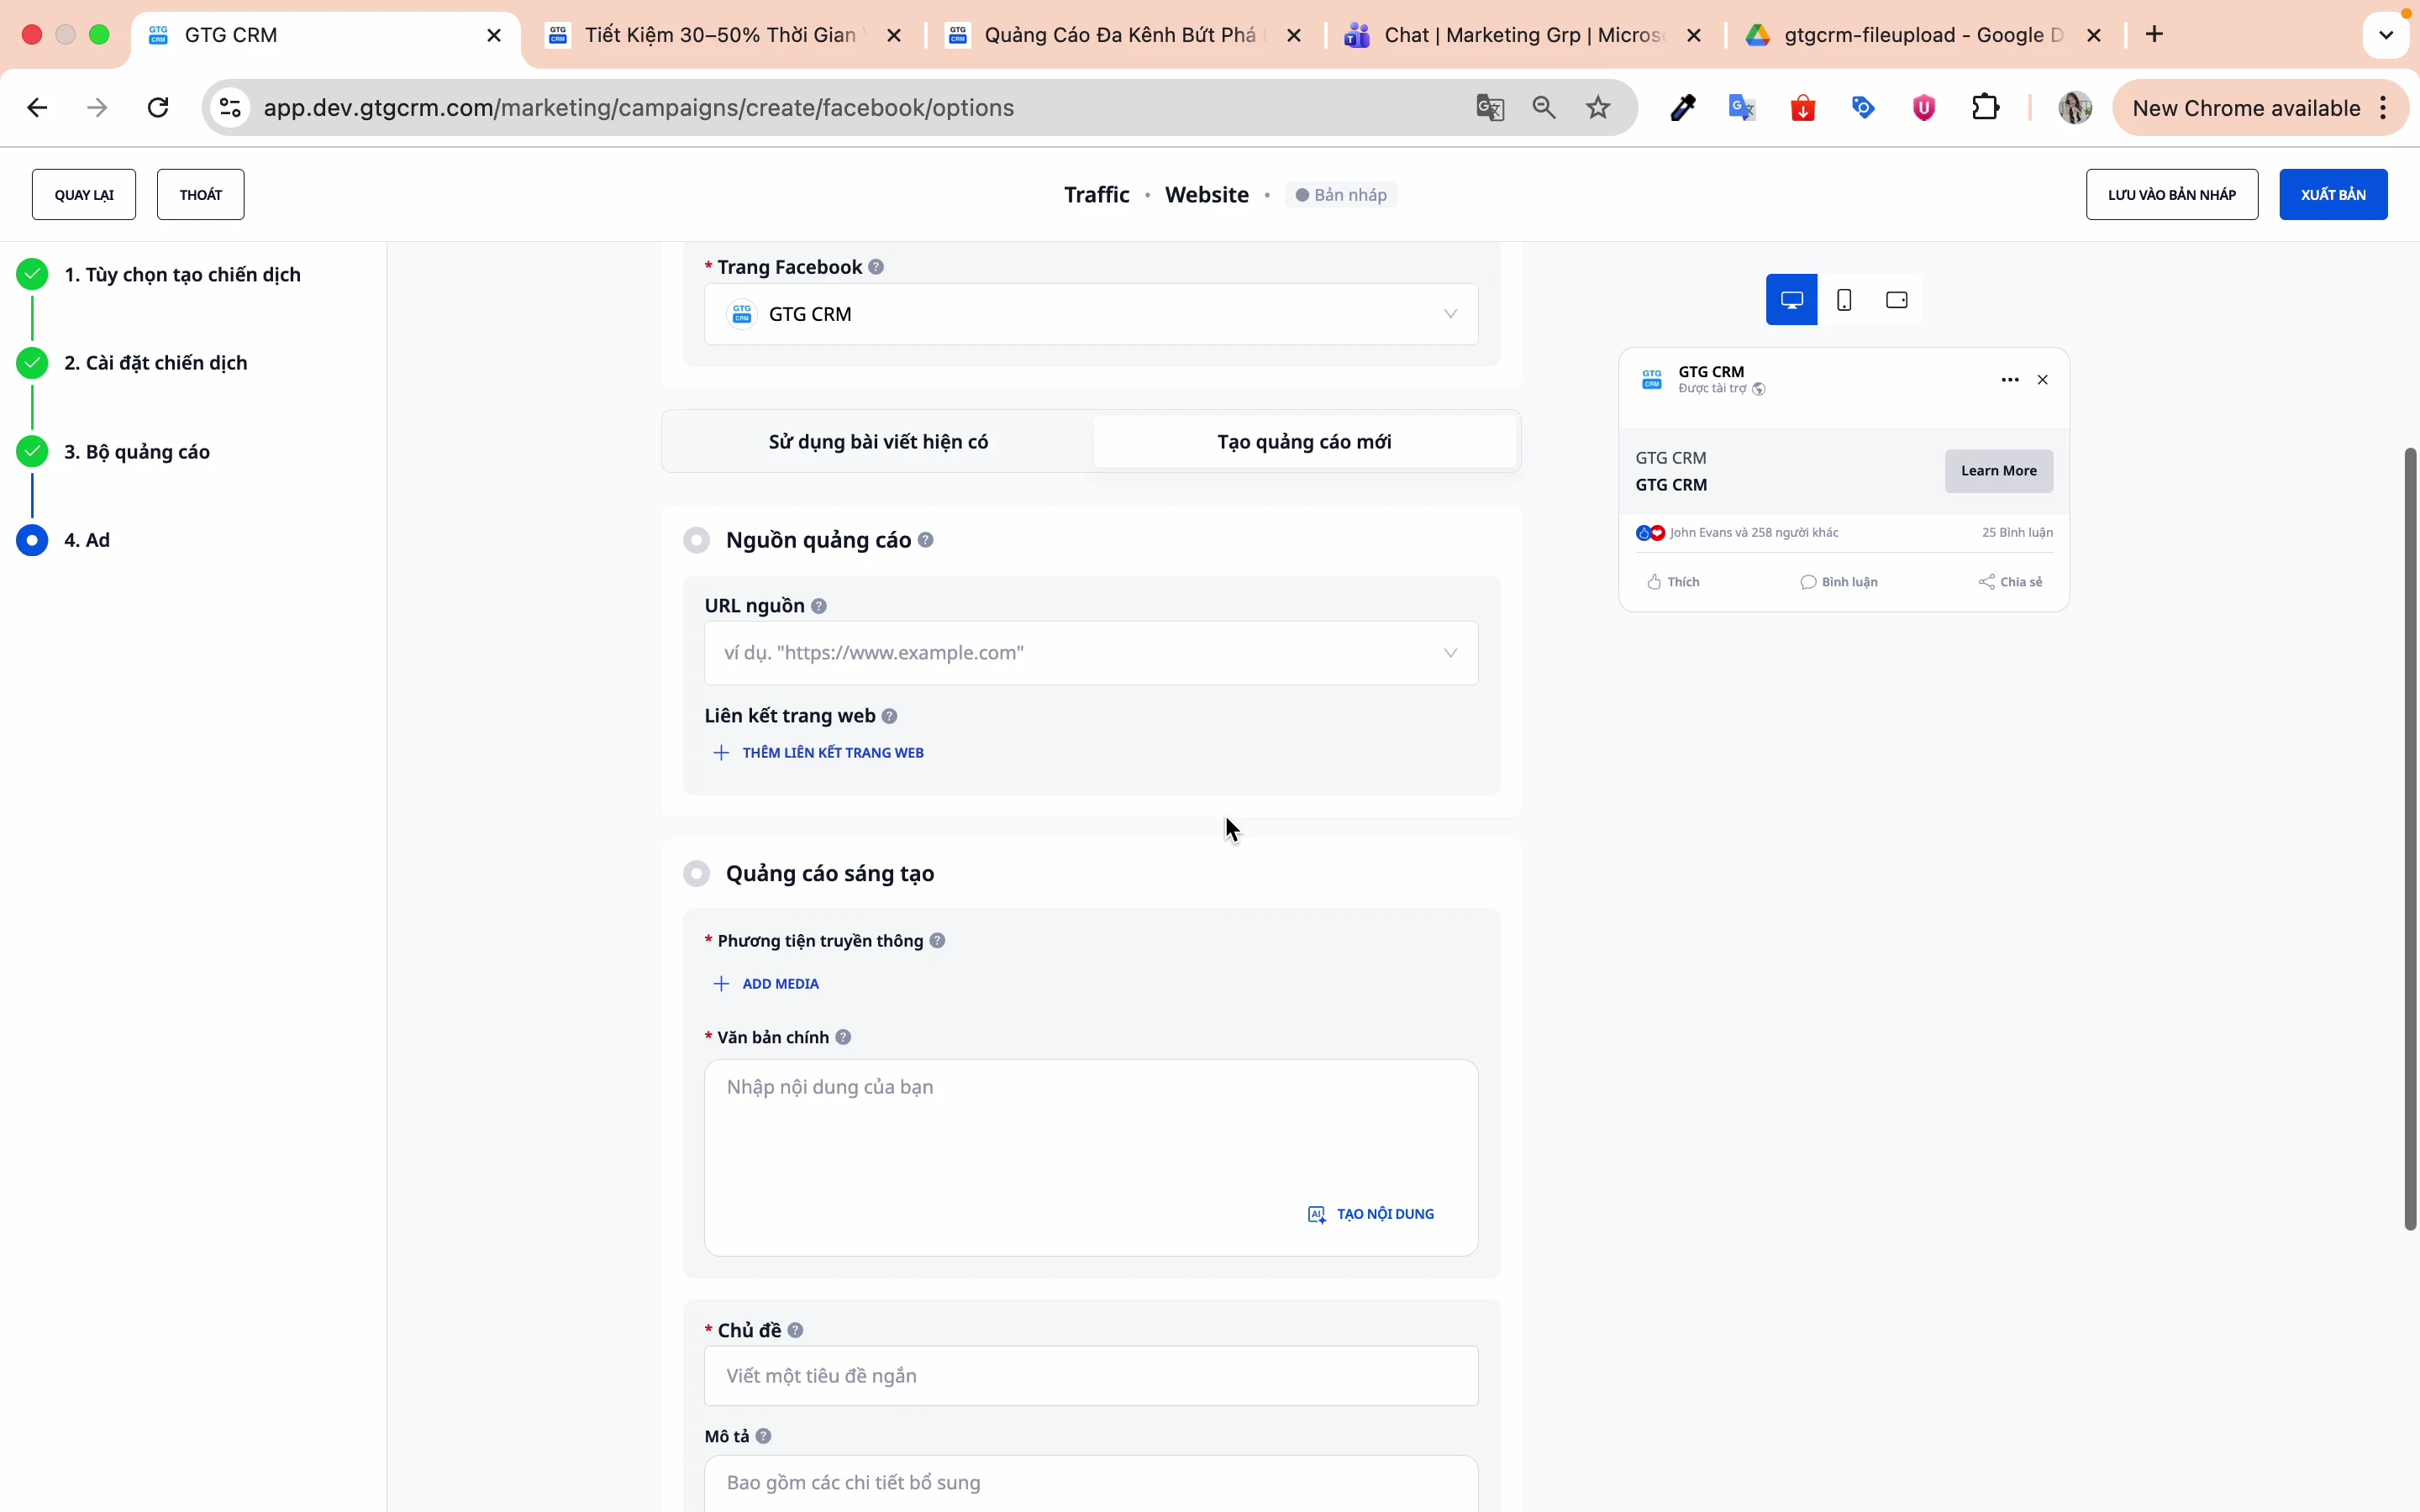
The following components need to be filled in:
- Content : Text of the advertisement
- Source : Images or Videos
- Topic : Headline
- Description : Link to description
Step 4: Enter the landing page link
Enter the URL that users will be redirected to when they click on the ad.
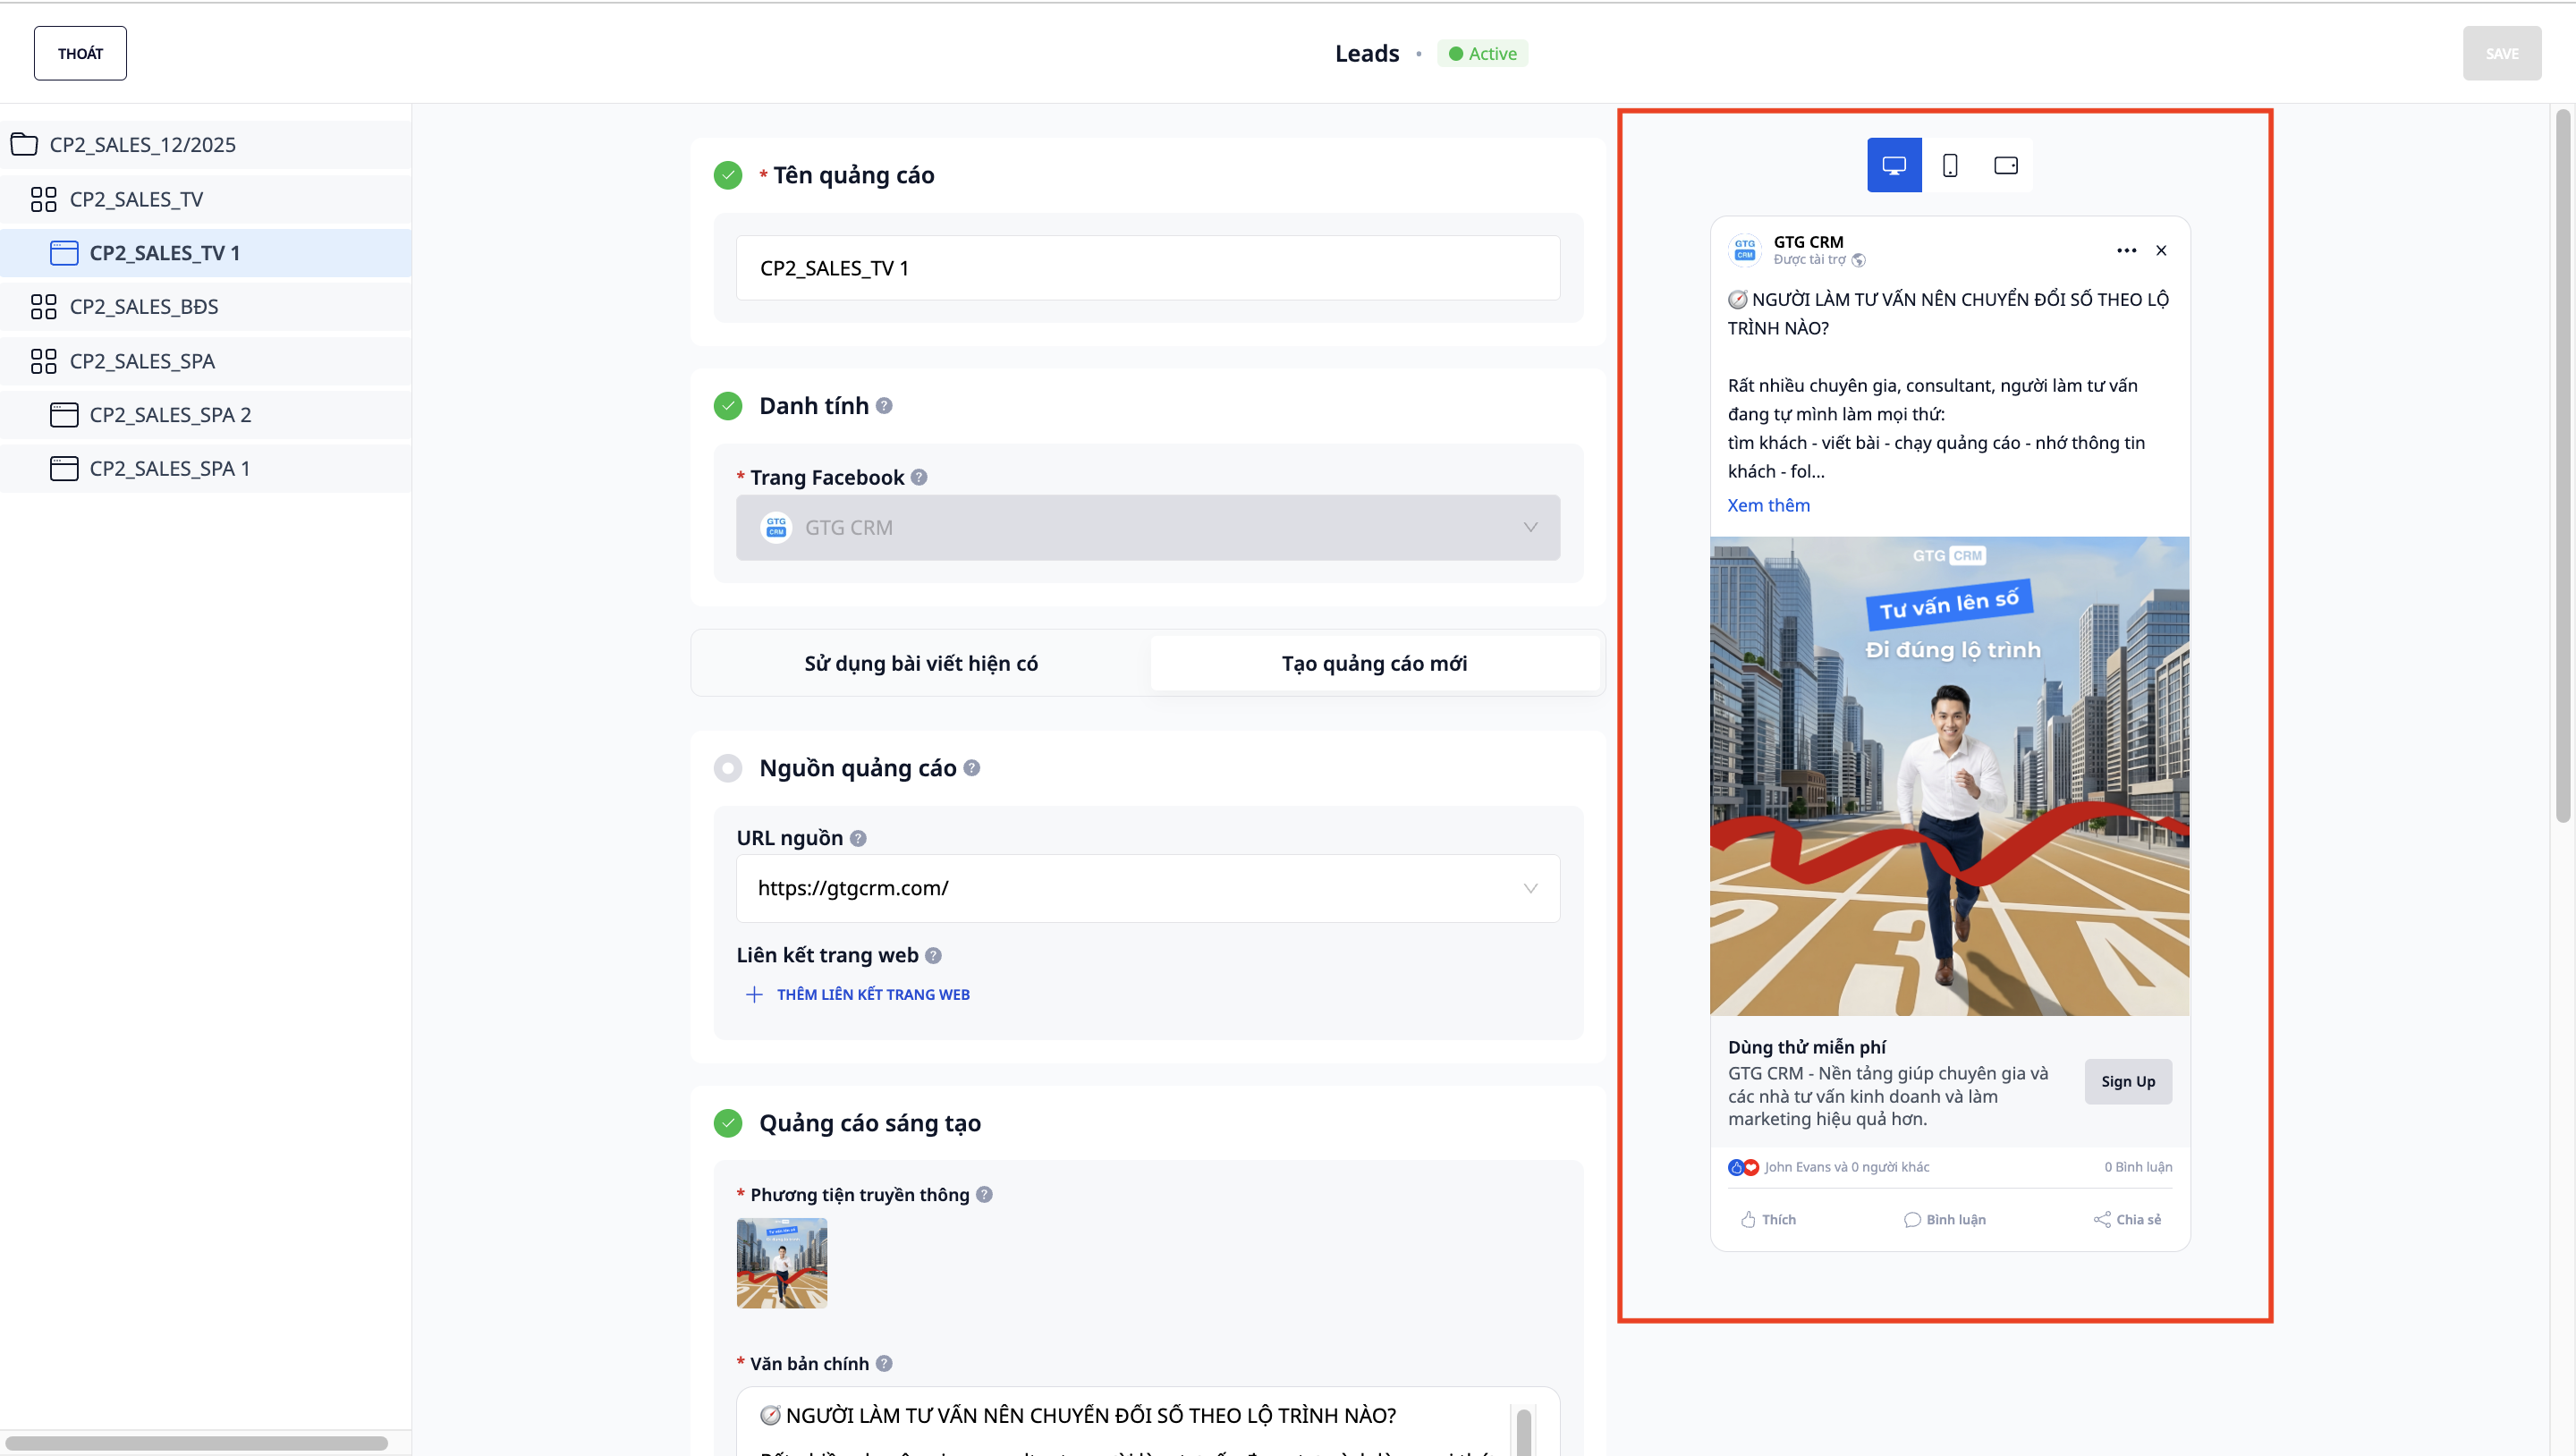
Step 5: Preview the ad
GTG CRM provides a preview screen to test ads before publishing.
7. Publish the Campaign
Step 1: Review all settings
Double-check:
- Campaign objectives
- Budget and bid
- Audience targeting
- Advertisement content
Step 2: Click "Publish"
Click the Publish button to create the campaign.
Step 3: Wait for Facebook's review.
Facebook will review the ad before letting it run (usually 15-60 minutes).
8. Other Campaign Objectives
Traffic Campaign
Objective: Increase website clicks
Special settings:
- Conversion site: Website
- Performance objective: Maximize landing page views.
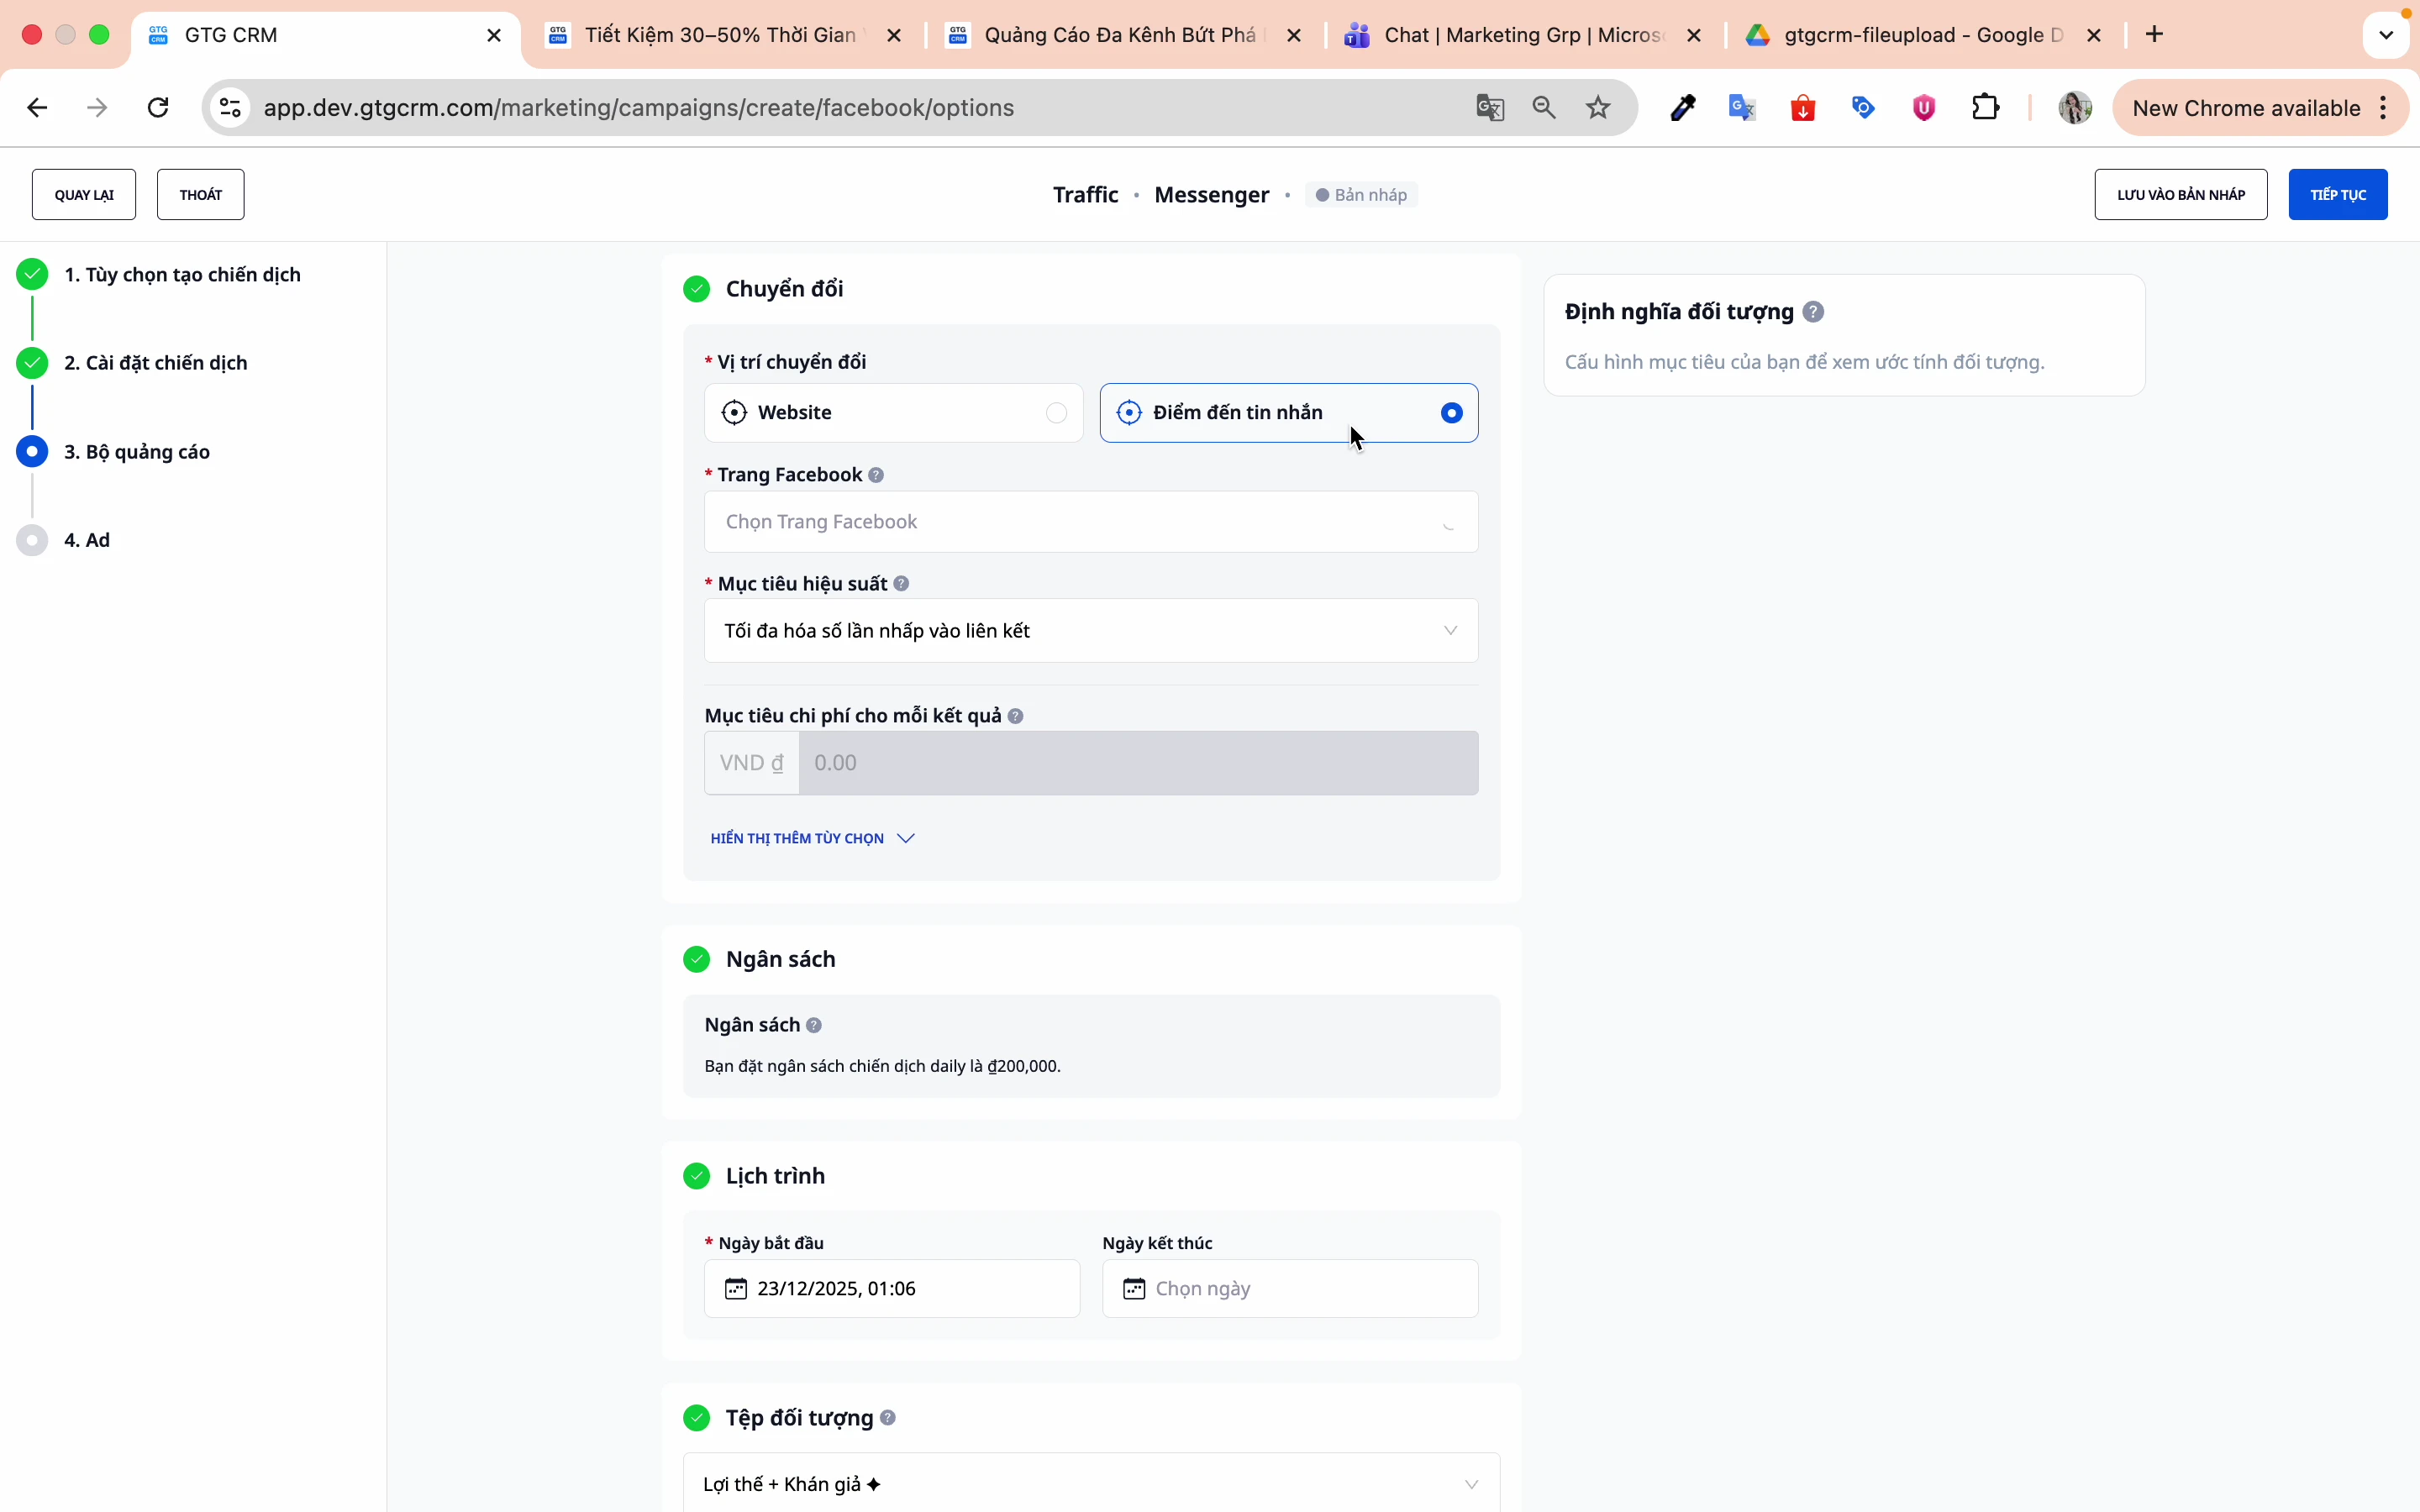
Messenger Campaign
Objective: Increase Messenger messages
Special settings:
- Conversion location: Message destination
- Performance objective: Maximize link clicks.
Tips for Effective Use
Regarding Audience Targeting
- Start with a broad audience, then narrow it down based on data.
- Use AI Audience for your first campaign.
- Create multiple ad sets with different audiences to test.
Regarding Advertising Content
- Prioritize using articles that have high engagement.
- Create multiple ad variations for A/B testing.
- Video generally performs better than still images.
Regarding the Budget
- Start with a small budget (100-200k/day)
- Run the test for 3-7 days before evaluation.
- Gradually increase the budget as you see results (20-30% at a time).
Regarding Tracking
- Always install Facebook Pixel on the website.
- Set up the Conversion API for more accurate tracking.
- Perform periodic performance checks in GTG CRM.
Frequently Asked Questions
Q: Should I choose a campaign budget or an ad set budget? A: If you're just starting out, choose a campaign budget (CBO) and let Facebook optimize it automatically. Once you have experience, use an ad set budget for more detailed control.
Q: What should the target cost be? A: Based on your historical data. If you don't have any, leave it blank and run the campaign for 1-2 weeks to collect data first.
Q: Should I use an existing post or create a new one? A: If the post already has many likes/comments, use the existing one to leverage social proof. If you want to test a new creative, create a new ad.
Q: Should the audience be wide or narrow? A: Start with a wide audience (1-5 million people) so Facebook has enough data for optimal results. Then narrow it down based on the results.
Support
If you need further assistance, please contact:
- 📧 Email: support@gtgcrm.com
- 💬 Chat: In the GTG CRM app
- 📞 Hotline: 1900-xxxx
GTG CRM - Manage your Facebook Ads simply and effectively! 🚀