You want loyal customers to refer more customers, and you want to pay them a commission that you yourself have named, numbered, and conditioned. This guide runs from turning on the program to the point where the referrer sees the payout in Paid status, following the order a shop would actually take.
The referral program is for shops with a website that you publish yourself. Referrers and buyers use your shop's site and do not need an account in your workspace. This guide follows the steps as someone in the business would review each item and pay out by recording it themselves.
What you will be able to do after this guide
Turn on the program → answer the Before you start checklist → set the rules (and a separate rate for one product if you want) → activate → a customer joins as a referrer, you approve → friends buy using the code → approve commissions → create a payout batch → another person approves and records the payment.
Before you begin
| # | Requirement | Why it's needed |
|---|---|---|
| 1 | Your website has been published | Referrers and buyers encounter the program on your website |
| 2 | A messaging provider is connected and enabled for the website | Referrers confirm their phone number with a text message code; until one is connected, the Activate button stays grey |
| 3 | Permission to manage the referral program for the person setting it up and approving commissions; permission to create payout batches for the accountant; permission to approve payout batches for a different person (granted under Settings ▸ Access level control) | The person who creates and the person who approves a payout must be two different people |
| 4 | The chart of accounts is applied, and the person choosing accounts can view the chart of accounts | You choose two accounts: one to record commissions as an expense, and one as the liability still owed |
| 5 | At least one product is for sale on the website | To test an order with a referral code |
Step 1 — Turn on the program
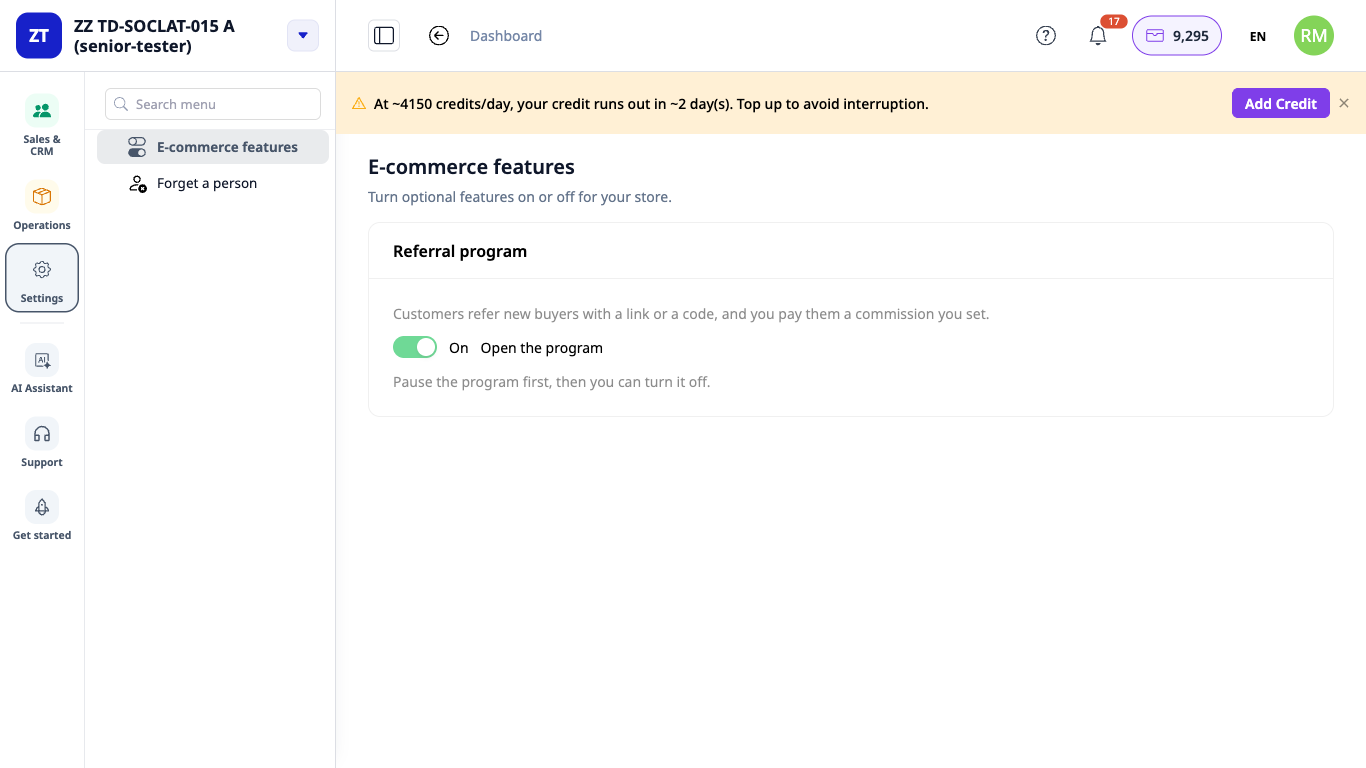
- Open Settings ▸ E-commerce features.
- On the Referral program tab, turn on the toggle.
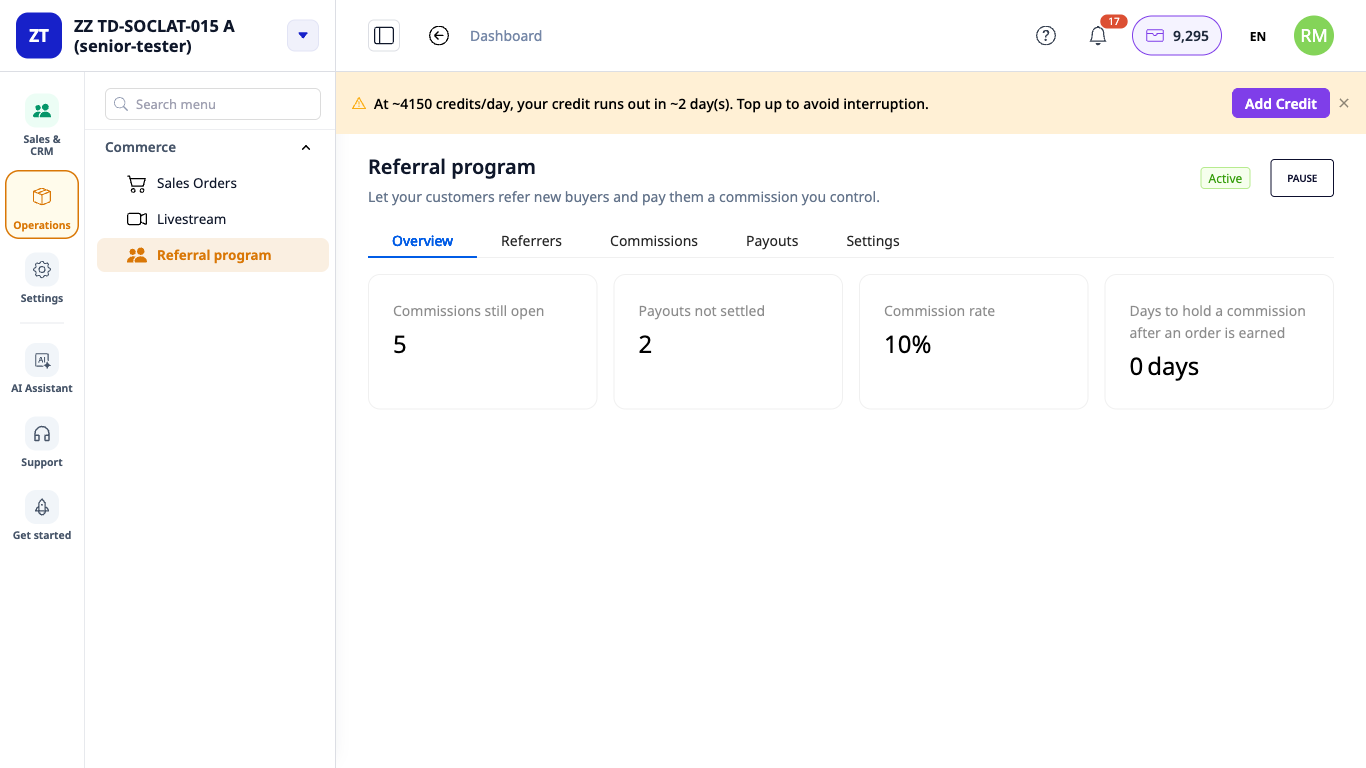
✅ Expected result: the line "Referral program is turned on." and an Open program button appear; the Commerce ▸ Referral program item appears in the menu. A newly created program has nothing selected by default.
Step 2 — Answer the Before you start checklist
- Open Commerce ▸ Referral program, on the Overview tab.
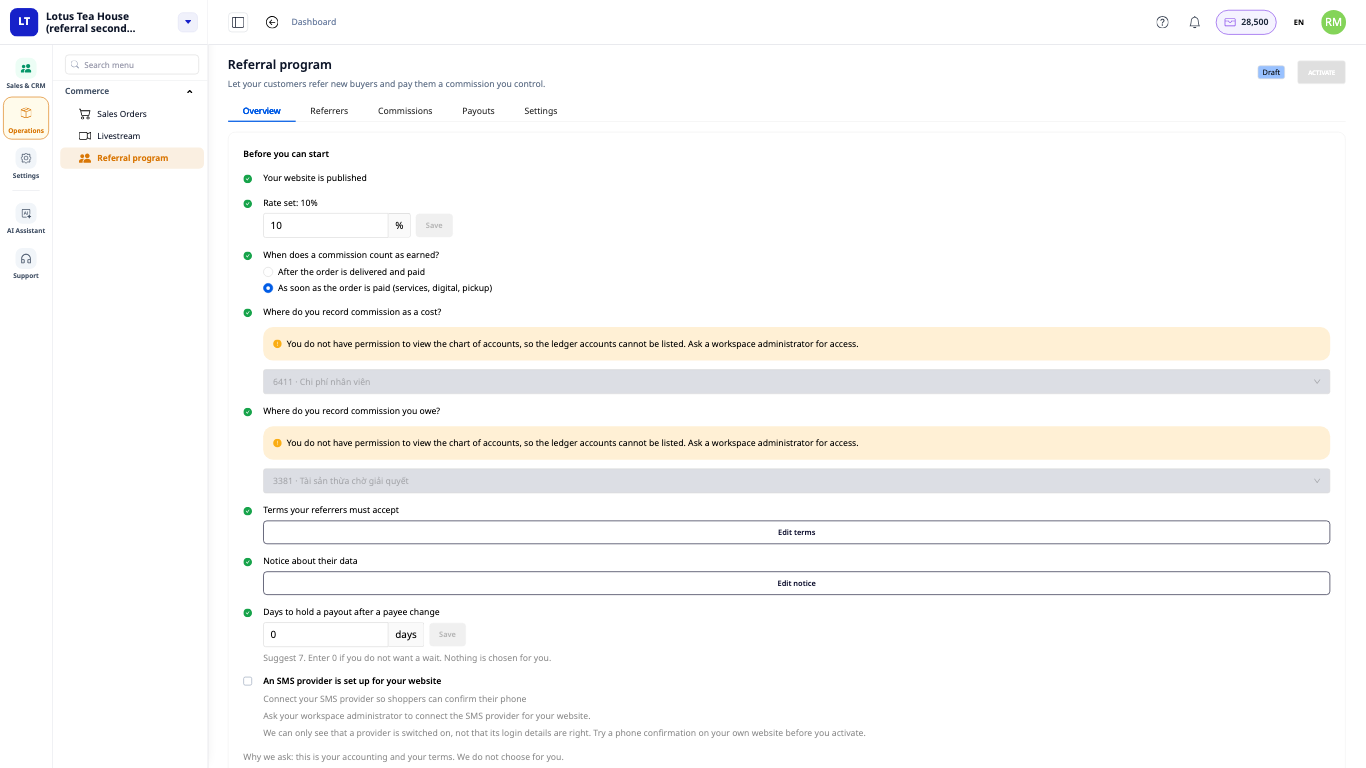
- Answer each item in the Before you start panel: Commission rate; When is a commission considered earned? (after the order is delivered and paid, or as soon as the order is paid); the two accounts for recording commissions (expense and liability); Terms referrers must accept (click Draft terms); Notice about their data (click Write notice, write your own content, then click Apply this notice); Number of days a payout batch is held after recipient information changes.
- The last item, the website's messaging provider, is marked automatically once the provider has been enabled.
✅ Expected result: each item changes to a completed state (for example, "Rate set: 10%"). The Activate button stays grey until every item is done.
ℹ️ All items are decisions for your business, so the system does not pre-fill them. Terms and data notices are written by you: GTG CRM does not supply content and does not write your legal sections. The waiting days field reads "Suggested 7. Enter 0 if you don't want to wait."; the system does not choose for you.
Step 3 — Set the program rules
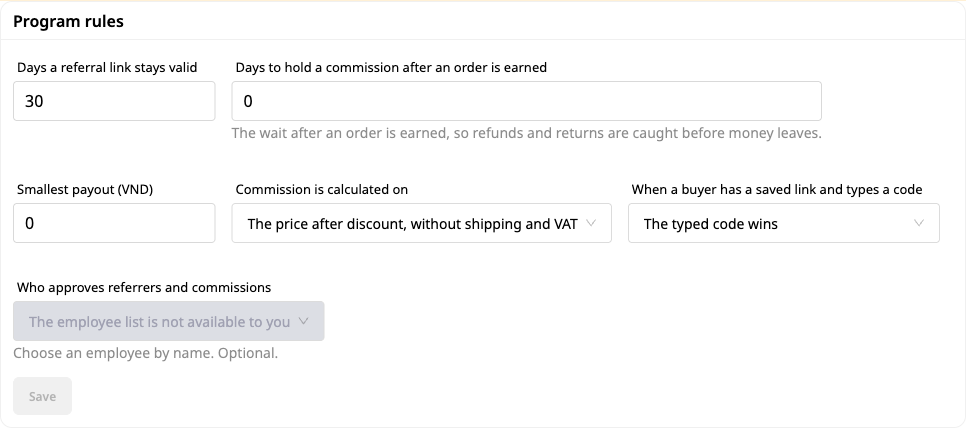
- Open the Settings tab, section Program rules.
- Set the number of days a referral link remains valid, the number of days commission is held after an order is calculated, the minimum payout, whether commission is calculated on the price before or after discount, and what takes priority when a buyer has both a saved link and enters a code (the entered code or the saved link).
- Click Save.
✅ Expected result: the message "Settings saved." appears and the Save button turns gray (the button only lights up when something differs from the saved values).
A field never automatically changes the value you type. If a value is not valid, the field keeps exactly what you entered, a red line below states the reason (for example "Enter a rate from 0 to 100."), and the Save button stays gray.
| Field | Accepts |
|---|---|
| Commission rate | from 0 to 100 |
| Number of days a referral link remains valid | whole number of days, from 1 to 90 |
| Number of days commission is held after an order is calculated | whole number of days, from 0 to 365 |
| Number of days a payout is held after the recipient's information is changed | whole number of days, from 0 to 365 |
| Minimum payout | 0 or more, with no more decimal places than your currency (currencies without fractional units accept whole numbers) |
Step 4 — Set a custom rate for a product (optional)
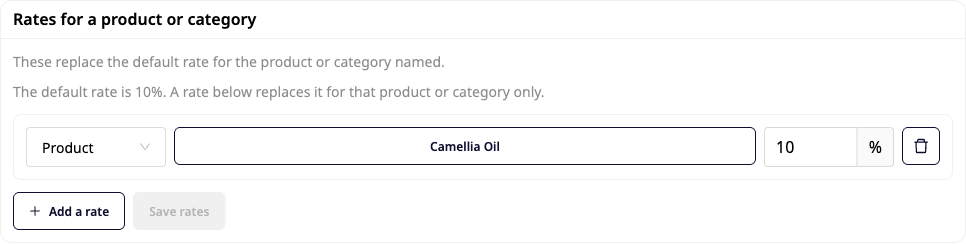
- On the Settings tab, find the card Rates by product or category. When nothing has been added yet, the card reads "No special rates. The default rate applies to all."
- Click Add rate tier. Under Applies to, select Product, click the name field, and choose a product from your product catalog by name (a search box is available).
- Type the rate. The starting field is empty: nothing is pre-filled. The rate must be greater than 0 and no more than 100; each product can have only one row.
- Click Save tiers. The Save these tiers? dialog lists what is about to change (new tiers, changed tiers, deleted tiers). Confirm.
✅ Expected result: the message "Rates saved. Orders placed from now on will use these rates." appears. To change a rate, type the new number; to delete one, click the trash icon on the row, then Save tiers and confirm.
- Orders placed from now on. Orders already placed keep the rate they had when they were placed.
- A product's rate takes precedence over the rate of the category it belongs to; products with no rate of their own use the default rate.
- If you use categories: the category is taken from the Category field of the product in the Product Center, and it must match exactly (a rate for "Food" does not apply to products in "Food › Snacks"). If a product belongs to several categories that have rates, the category listed first in the product's list wins, not the highest rate.
- Only people allowed to change the program can save rates; anyone else who opens the program can see the list but cannot edit it.
Step 5 — Activate the program
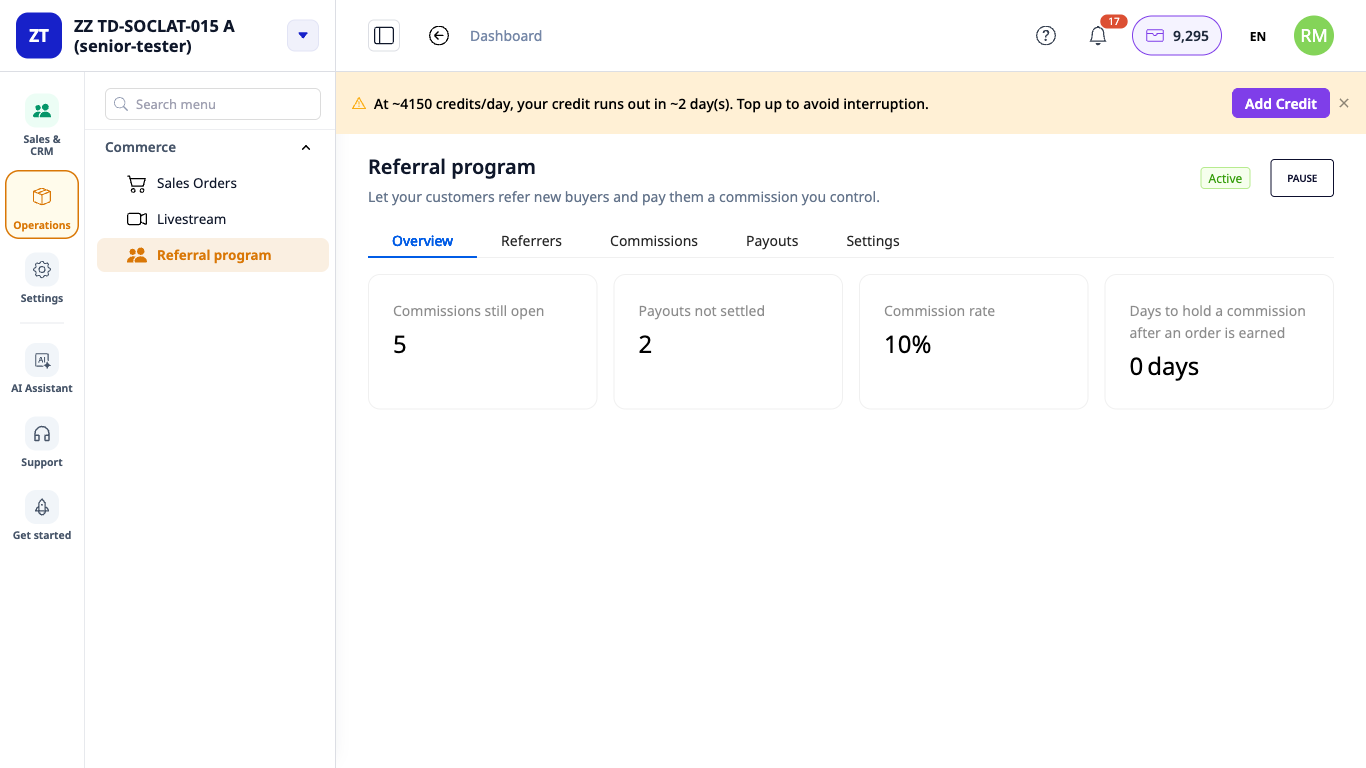
- Go back to the Overview tab.
- Click Activate.
✅ Expected result: the status changes to Running.
- To stop accepting new referrers, click Pause: commissions already generated will continue through to payout, and order refunds will still reverse commissions. Click Resume to reopen it.
- The feature can only be fully turned off when there are no unprocessed items left; the screen will clearly show how many commissions or payout batches still need to be handled first.
Step 6 — A customer joins as a referrer (on your website)
- The customer logs in to your store's website and opens Account ▸ Referral Program.
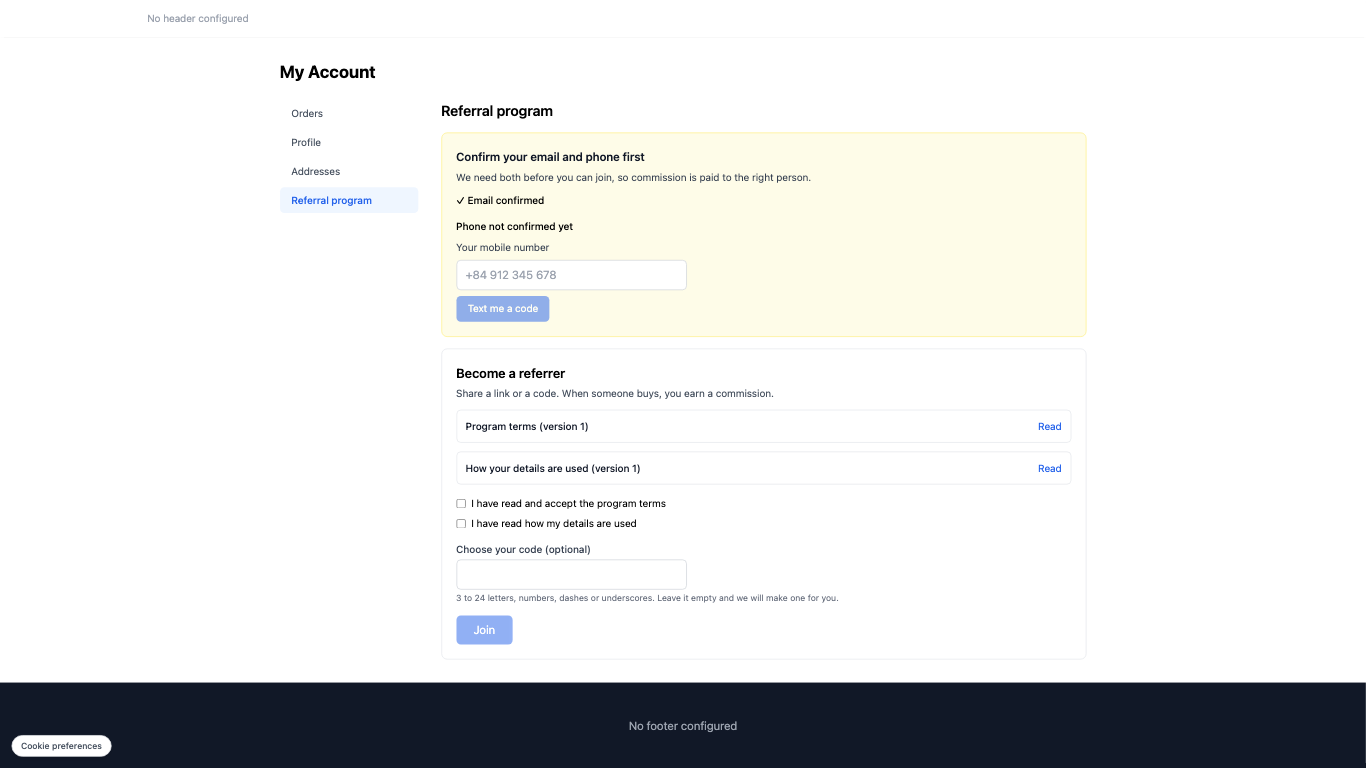
- They verify their email and phone number: under Your mobile number, they enter the number, click Send me a code, enter the code they receive, and click Verify phone number.
- They tick I have read and agree to the program terms and I have read how my information is used (both texts that you wrote in Step 2), optionally choose a custom code (3 to 24 letters, numbers, hyphens, or underscores; leave it blank and the system will generate one), and then click Join.
✅ Expected result: the page shows Pending approval with the message "The store is reviewing your request. Your code and link will appear here once approved." While pending, they have a Withdraw my request button: a confirmation dialog appears, nothing is lost, and they can rejoin later.
ℹ️ If the phone number cannot be verified, the page states this in plain language without referring to the store's settings. If the website does not yet have a messaging provider, connect one first (see Before you begin).
Step 7 — Approve the referrer and get the link
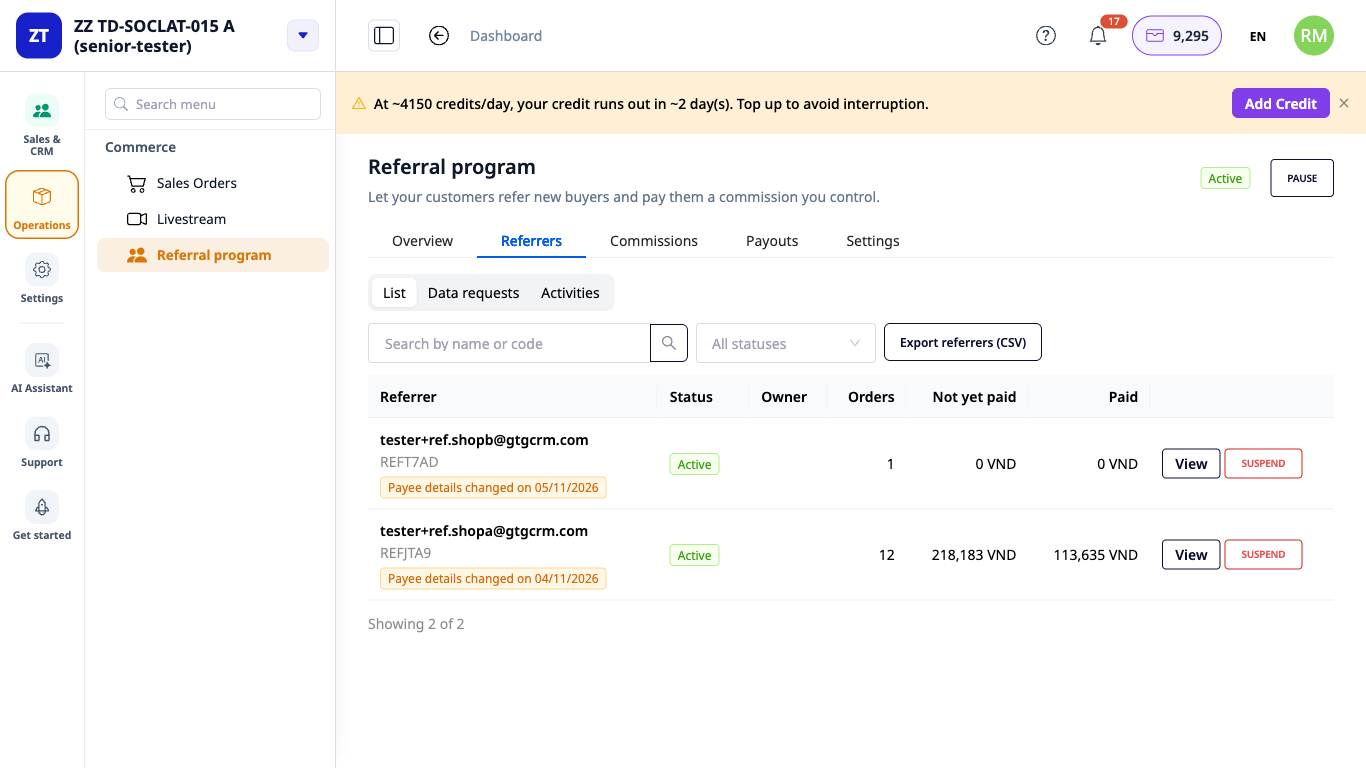
- In the program, open the Referrers tab. The customer's row shows Pending.
- Click Approve. If that person's account number or tax code matches one of your employees, the row is flagged: check it before approving.
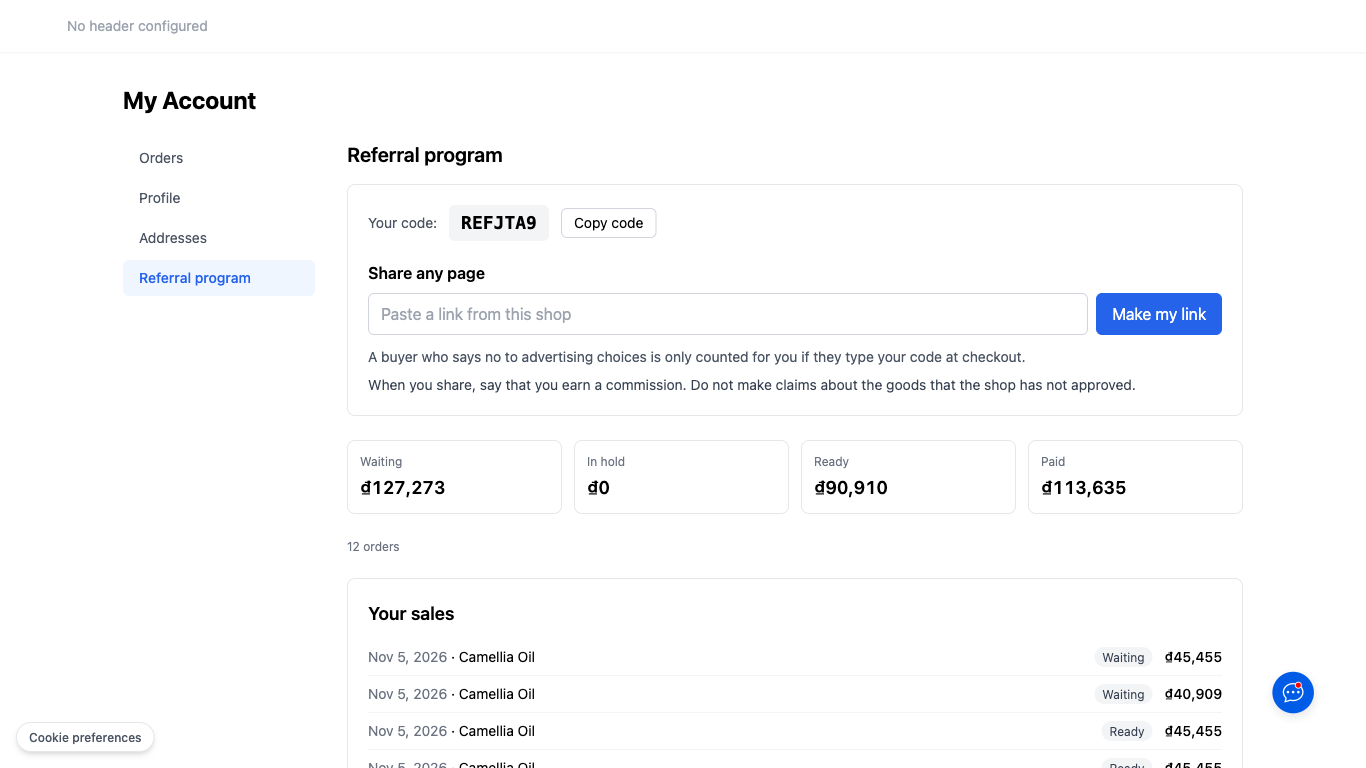
- On the website, the customer reloads the page. They see Your code with a Copy code button.
- Under Share any page, they paste the link to one of your store's pages and click Create my link.
✅ Expected result: your customer's row changes to Active; Your link is the address of that page with ?ref= and a code added at the end, and the Copy link button appears. If you paste another website's link, the page says "The link must be a page of this store."
- To stop an affiliate, click Pause on the row and choose whether to keep or pay out the earnings they have already made; Reactivate to turn it back on.
- When sharing, affiliates see a reminder that they should clearly disclose that they earn a commission.
Step 8 — Friends buy using a code or link
- The buyer clicks the affiliate's link, or at checkout clicks Have a referral code? and types the code into Referral code, then completes the order.
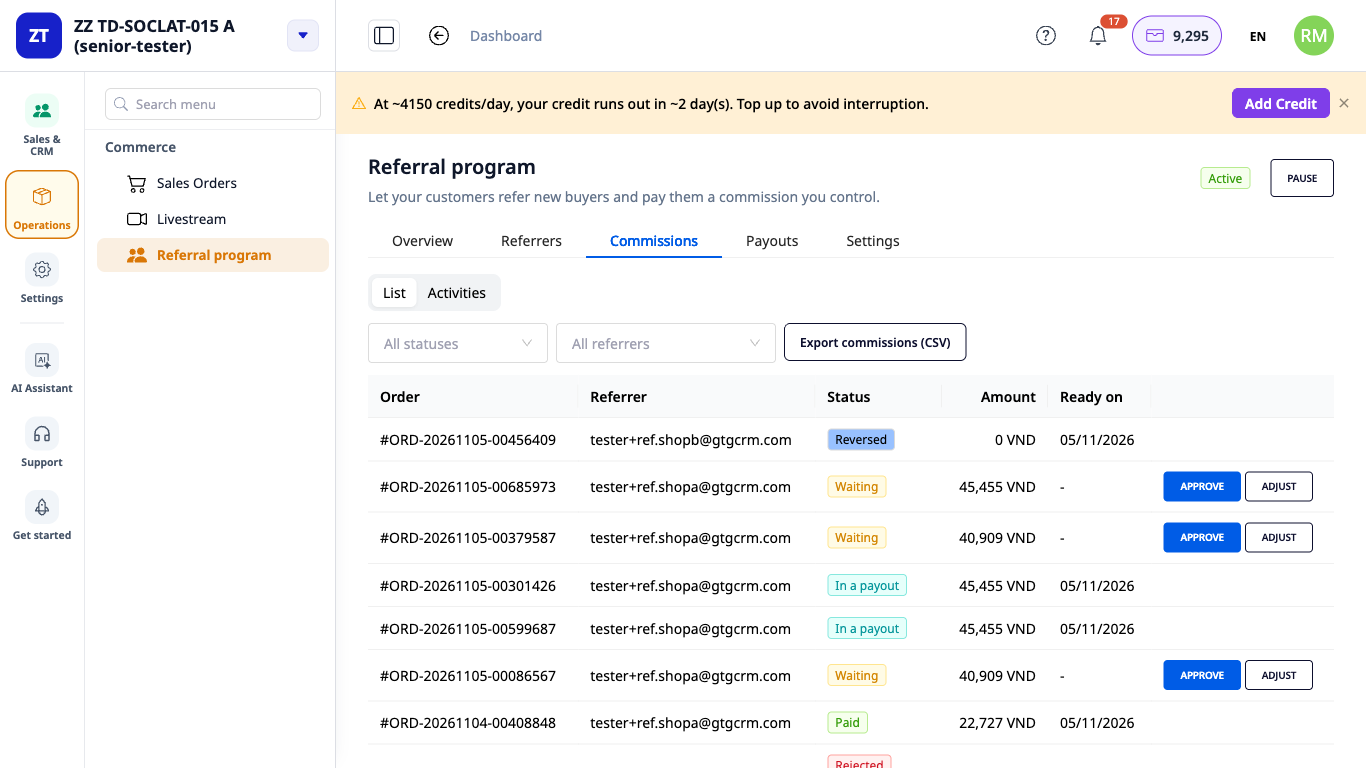
- You open the Commissions tab of the program.
✅ Expected result: a valid code shows "Code is valid", and an invalid code shows "This code is not valid" (the order can still be placed, but no commission is earned). The Commissions tab has a row for that order, with the status Pending until the order is calculated. An incorrect code leaves a Rejected row with an amount of 0 and the reason. If the order is refunded, the row changes to Refunded.
- Commission statuses: Pending, On hold, Awaiting approval, Ready, In a payout batch, Paid, Refunded, Rejected. Adjust adds a correcting row with a required reason, and does not edit the original row.
- A buyer who declined the ad option is counted only if they enter the code themselves.
- Example from our test shop (prices include 10% VAT, rate 10%): an order of 250,000 ₫ earns a commission of 22,727 ₫, which is 10% of 227,273 ₫. Your store's figure depends on your rate and on whether you choose to calculate it before or after discounts.
Step 9 — Approve commissions
- When a commission has been earned and its hold period has ended, its row shows Awaiting approval, with no Approve button, only the Open approvals link.
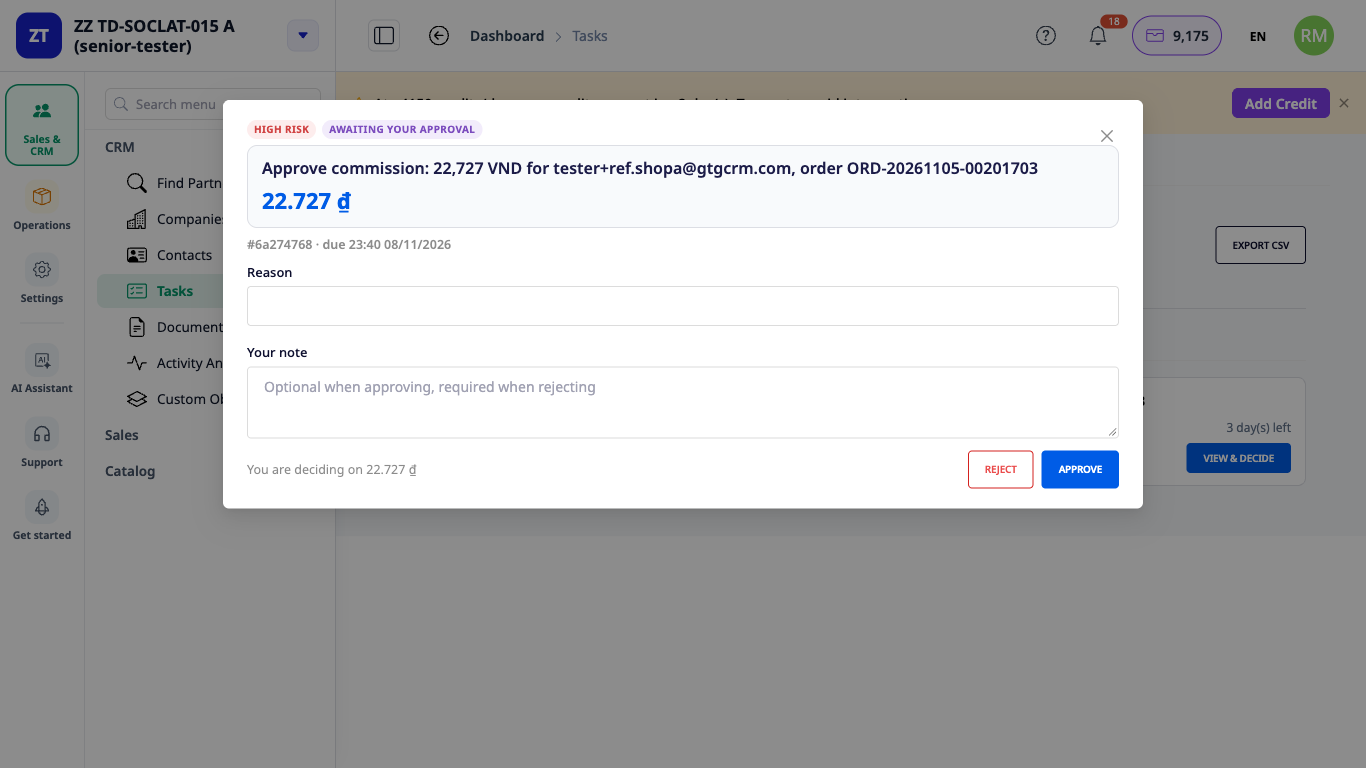
- A person with commission approval rights opens Tasks ▸ Pending approval, finds the commission approval request (showing the amount, the affiliate, and the order count), and clicks View & approve.
- Click Approve.
✅ Expected result: the request leaves the pending list, and after a few seconds the row on the Commissions tab changes from Awaiting approval to Ready. Until you approve, no amount is paid out. On the website, the affiliate sees that amount as On hold until you approve it.
- If you decide differently (approving the affiliate from the list, or the order is refunded), the pending request closes automatically; the Approval history notes clearly that nothing was approved by that request.
- Refunding an order automatically reverses its commission.
Step 10 — The referrer adds a payout method
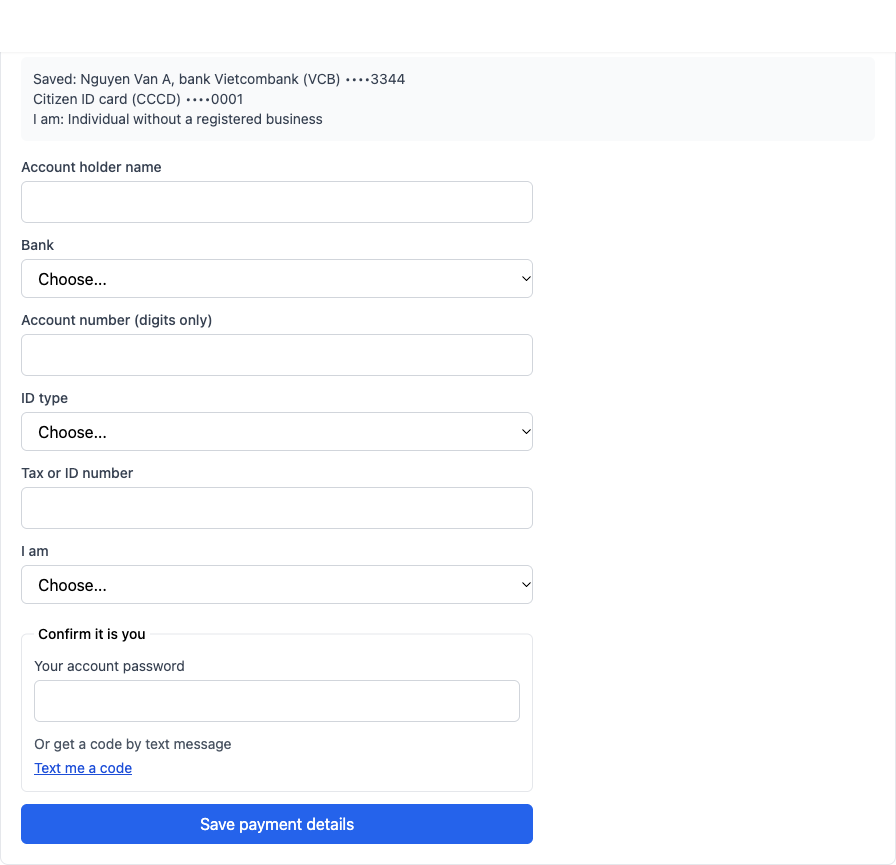
- On the website, the referrer opens the Payout method section and fills in Account holder name, Bank, Account number (digits only), Document type, Tax ID or document number, and I am (these three dropdowns start at "Select..." and are not preselected).
- Under Confirm it's you, they enter their account password or use a text message code, then click Save payout information.
✅ Expected result: the message "Payout information saved." The account numbers appear masked (only the last few digits are shown). If the information is changed, an email notification is sent to the old address, and the next payout cycle waits for the number of days you set in Step 2.
Step 11 — The accountant creates a payout batch
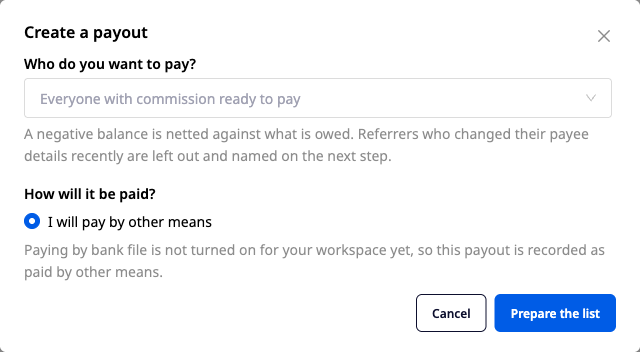
- Open the Payouts tab and click Create payout batch.
- Under Who do you want to pay?, select All people with commissions ready to pay. Under How will you pay?, select I will pay by other means. Click Prepare list. Anyone who just changed their payout information is left out and listed by name.
- For each person, answer two questions that only your business can answer: What is [Name] for tax purposes? and Tax you withhold (an amount, or no withholding with a reason). Both start empty.
- Click Create payout batch (or Save as draft to come back later).
✅ Expected result: the message "Payout batch awaiting approval". The batch appears in the list with the status Pending approval, the creator is listed as the accountant, and the creator has no Approve button. If no commissions have been approved yet, the screen shows that there is nothing to pay.
ℹ️ GTG CRM does not calculate withholding tax and does not give tax advice. Each withholding decision for each recipient is yours, and the system records that it was your decision.
Step 12 — Another person approves the payout batch
- The approver (not the creator) opens the Payouts tab and clicks Approve on the payout batch.
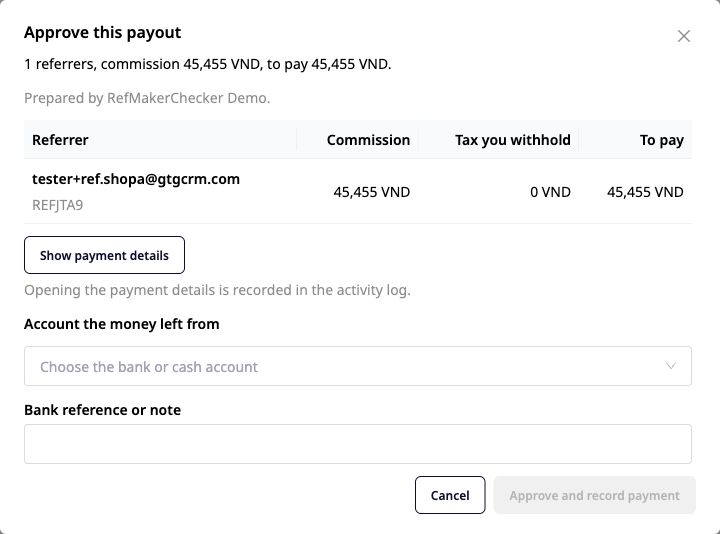
- The Approve this payout batch dialog shows the number of people, the commissions, and the amount to be paid, and "Prepared by [creator's name]."
- Under Money paid out from account, select a cash or bank account (the list contains only these two types), and enter a Reference or bank note.
- Click Approve and record payment.
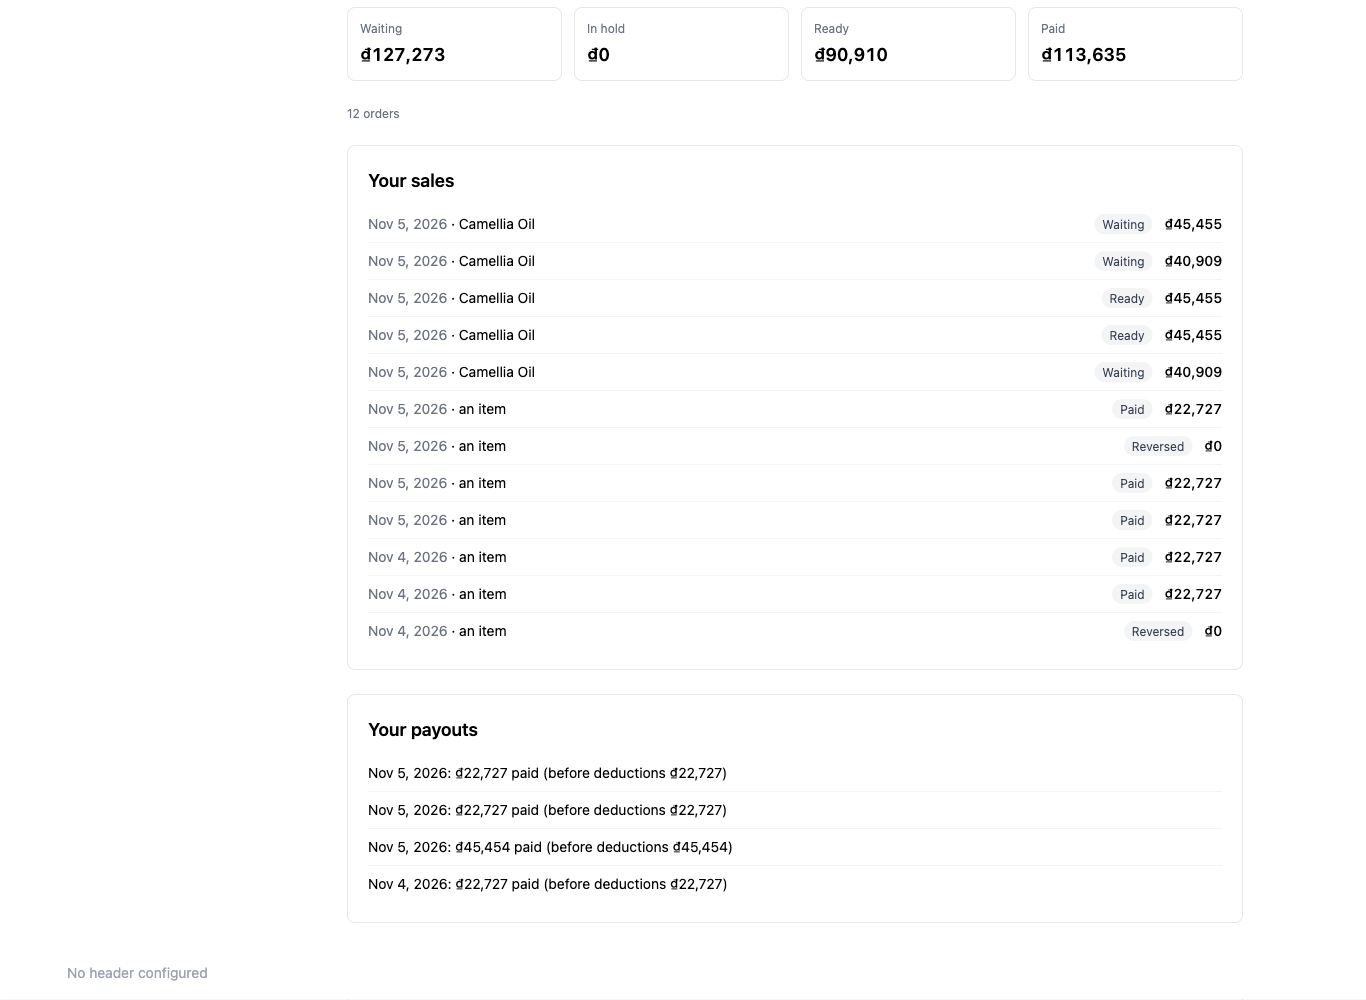
✅ Expected result: the payout batch changes to Paid, showing the approver and the payment date. In the accounting ledger, a journal entry reduces the amount payable and reduces the balance of the account you selected. On the website, the referrer's Paid total increases by the amount, and the batch appears under Payment history.
- A payout batch cannot be paid twice, and a commission cannot be paid twice.
- The creator cannot approve their own batch: the screen displays "You cannot approve a payout batch you prepared yourself."
Step 13 — Recipient report for the withholding tax period
- A user allowed to view full account numbers opens the Payouts tab, selects the period using the start and end dates, and clicks Recipient report (CSV).
✅ Expected result: a CSV file with each recipient's name, who they are from a tax perspective, your withholding decision and its reason, document type, bank, and full account number. Opening the full payment details is recorded in the activity log. Account numbers and tax codes are shown in full only in this report.
Quick reference table of expected results
| Action | What you will see |
|---|---|
| Turn on the Referral program toggle | "Referral program is on." and a new menu item |
| Look at the Activate button while items are still open | The button is grayed out until all items are done |
| Type 110 in the rate field | The field keeps 110, a red line reads "Enter a rate from 0 to 100.", and the Save button is grayed out |
| Save the rules | "Settings saved." |
| Save an individual rate | A "Save these levels?" dialog, then "Rate saved." |
| A customer clicks Join | "Pending approval" until you approve |
| Paste the URL of another website | "The link must be a page of this store." |
| A buyer enters the wrong code | "This code is not valid"; the Rejected line shows 0 if the order was placed |
| An order is refunded | The commission moves to Refunded |
| A commission's holding period ends | "Awaiting approval" with a link to Open approvals; it moves to Ready after approval |
| The preparer views their own payout | There is no Approve button |
| The approver records the payment | The payout is marked Paid; the referrer sees the Paid field increase |
| A user without export permission opens the Payouts tab | There is no Recipient report (CSV) button |
Notes
- All rules (rates, when to calculate, accounts, terms, data notices, waiting days) are your decisions and stay blank until you answer.
- If you change the terms or notices, referrers are asked to accept the new version.
- Referrers can request to view or delete their data directly on the website; you decide in the data requests section. Legal records you are required to keep will still be kept.
- Referrers can click Leave my referral program; orders already counted will continue through to payout.
- This guide describes manual approval: a person with permission decides each step. Payments by bank file are not covered in this guide.
- Withholding tax is your decision. GTG CRM does not calculate it and does not provide tax advice.
- Account numbers and tax codes are hidden on screen; only the recipient report shows them in full, for users allowed to export.