Notkunarleiðbeiningar fyrir Facebook Ads í GTG CRM
1. Tengja Facebook Ads reikning
Skref 1: Fara í reikningsstillingar
Á aðalskjánum GTG CRM, veldu Auglýsingar og smelltu svo á Reikningsstillingar til að tengja auglýsingareikninginn þinn.
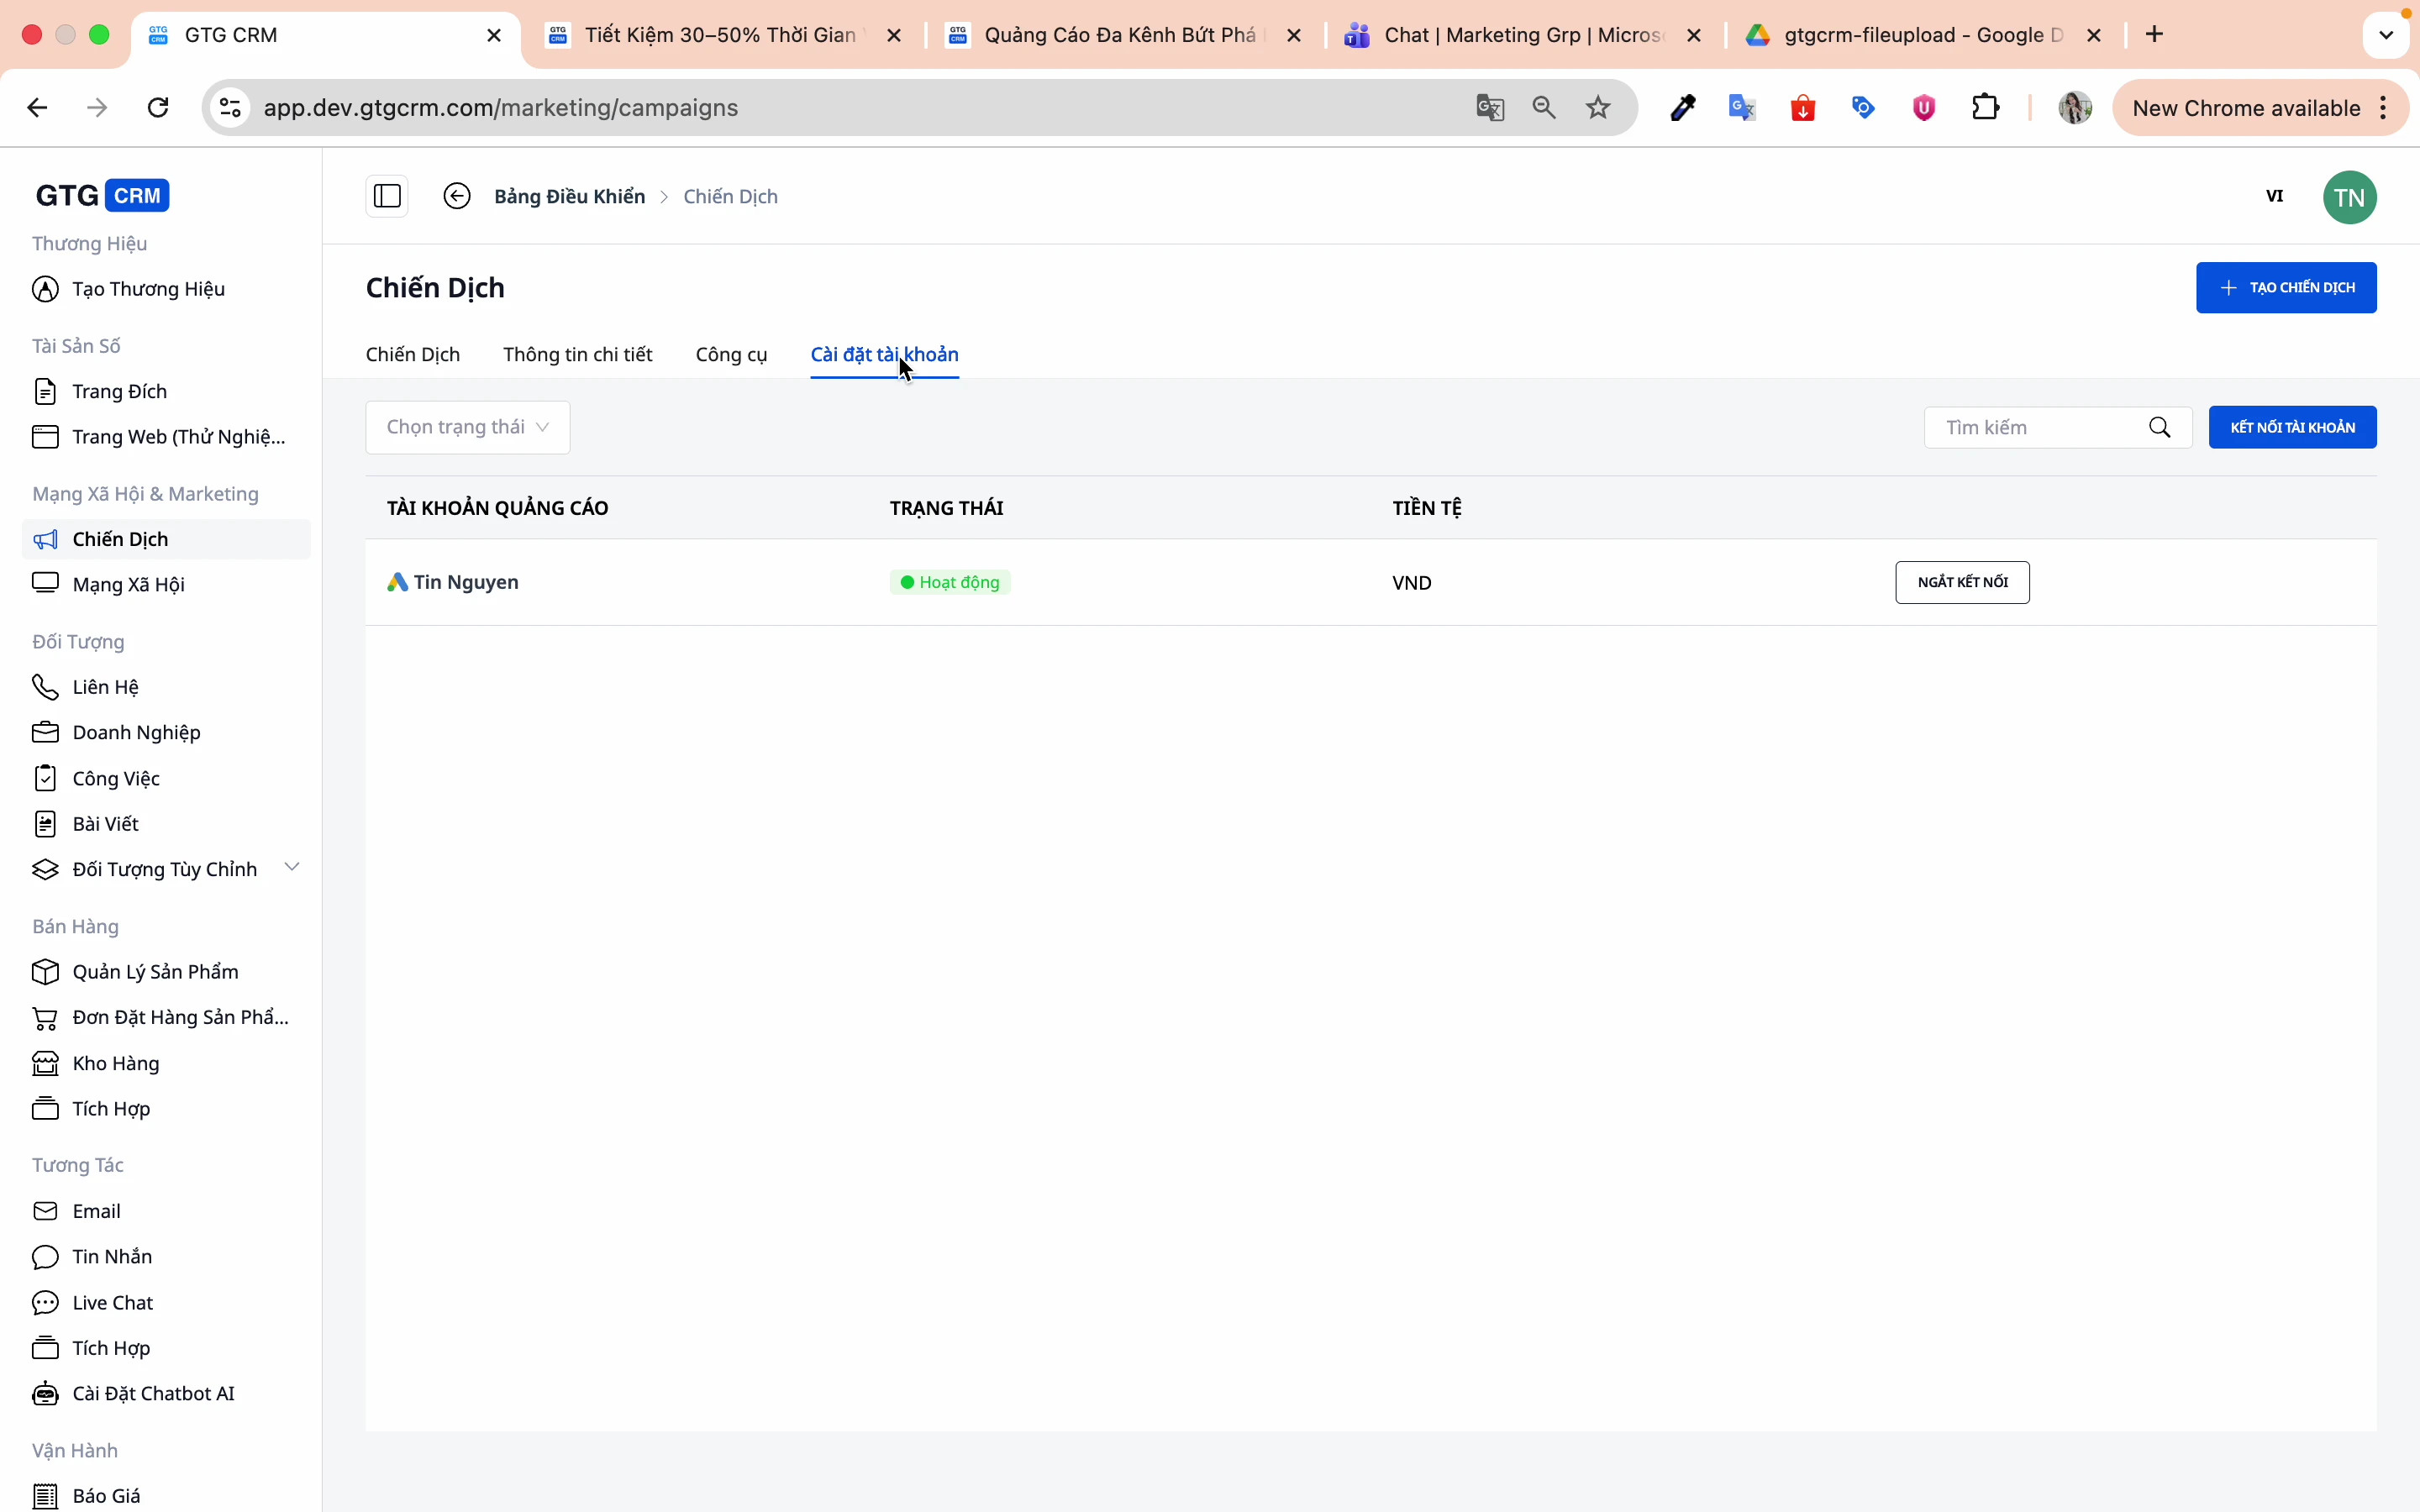
Skref 2: Smelltu á Tengja reikning
Smelltu á hnappinn Tengja reikning.
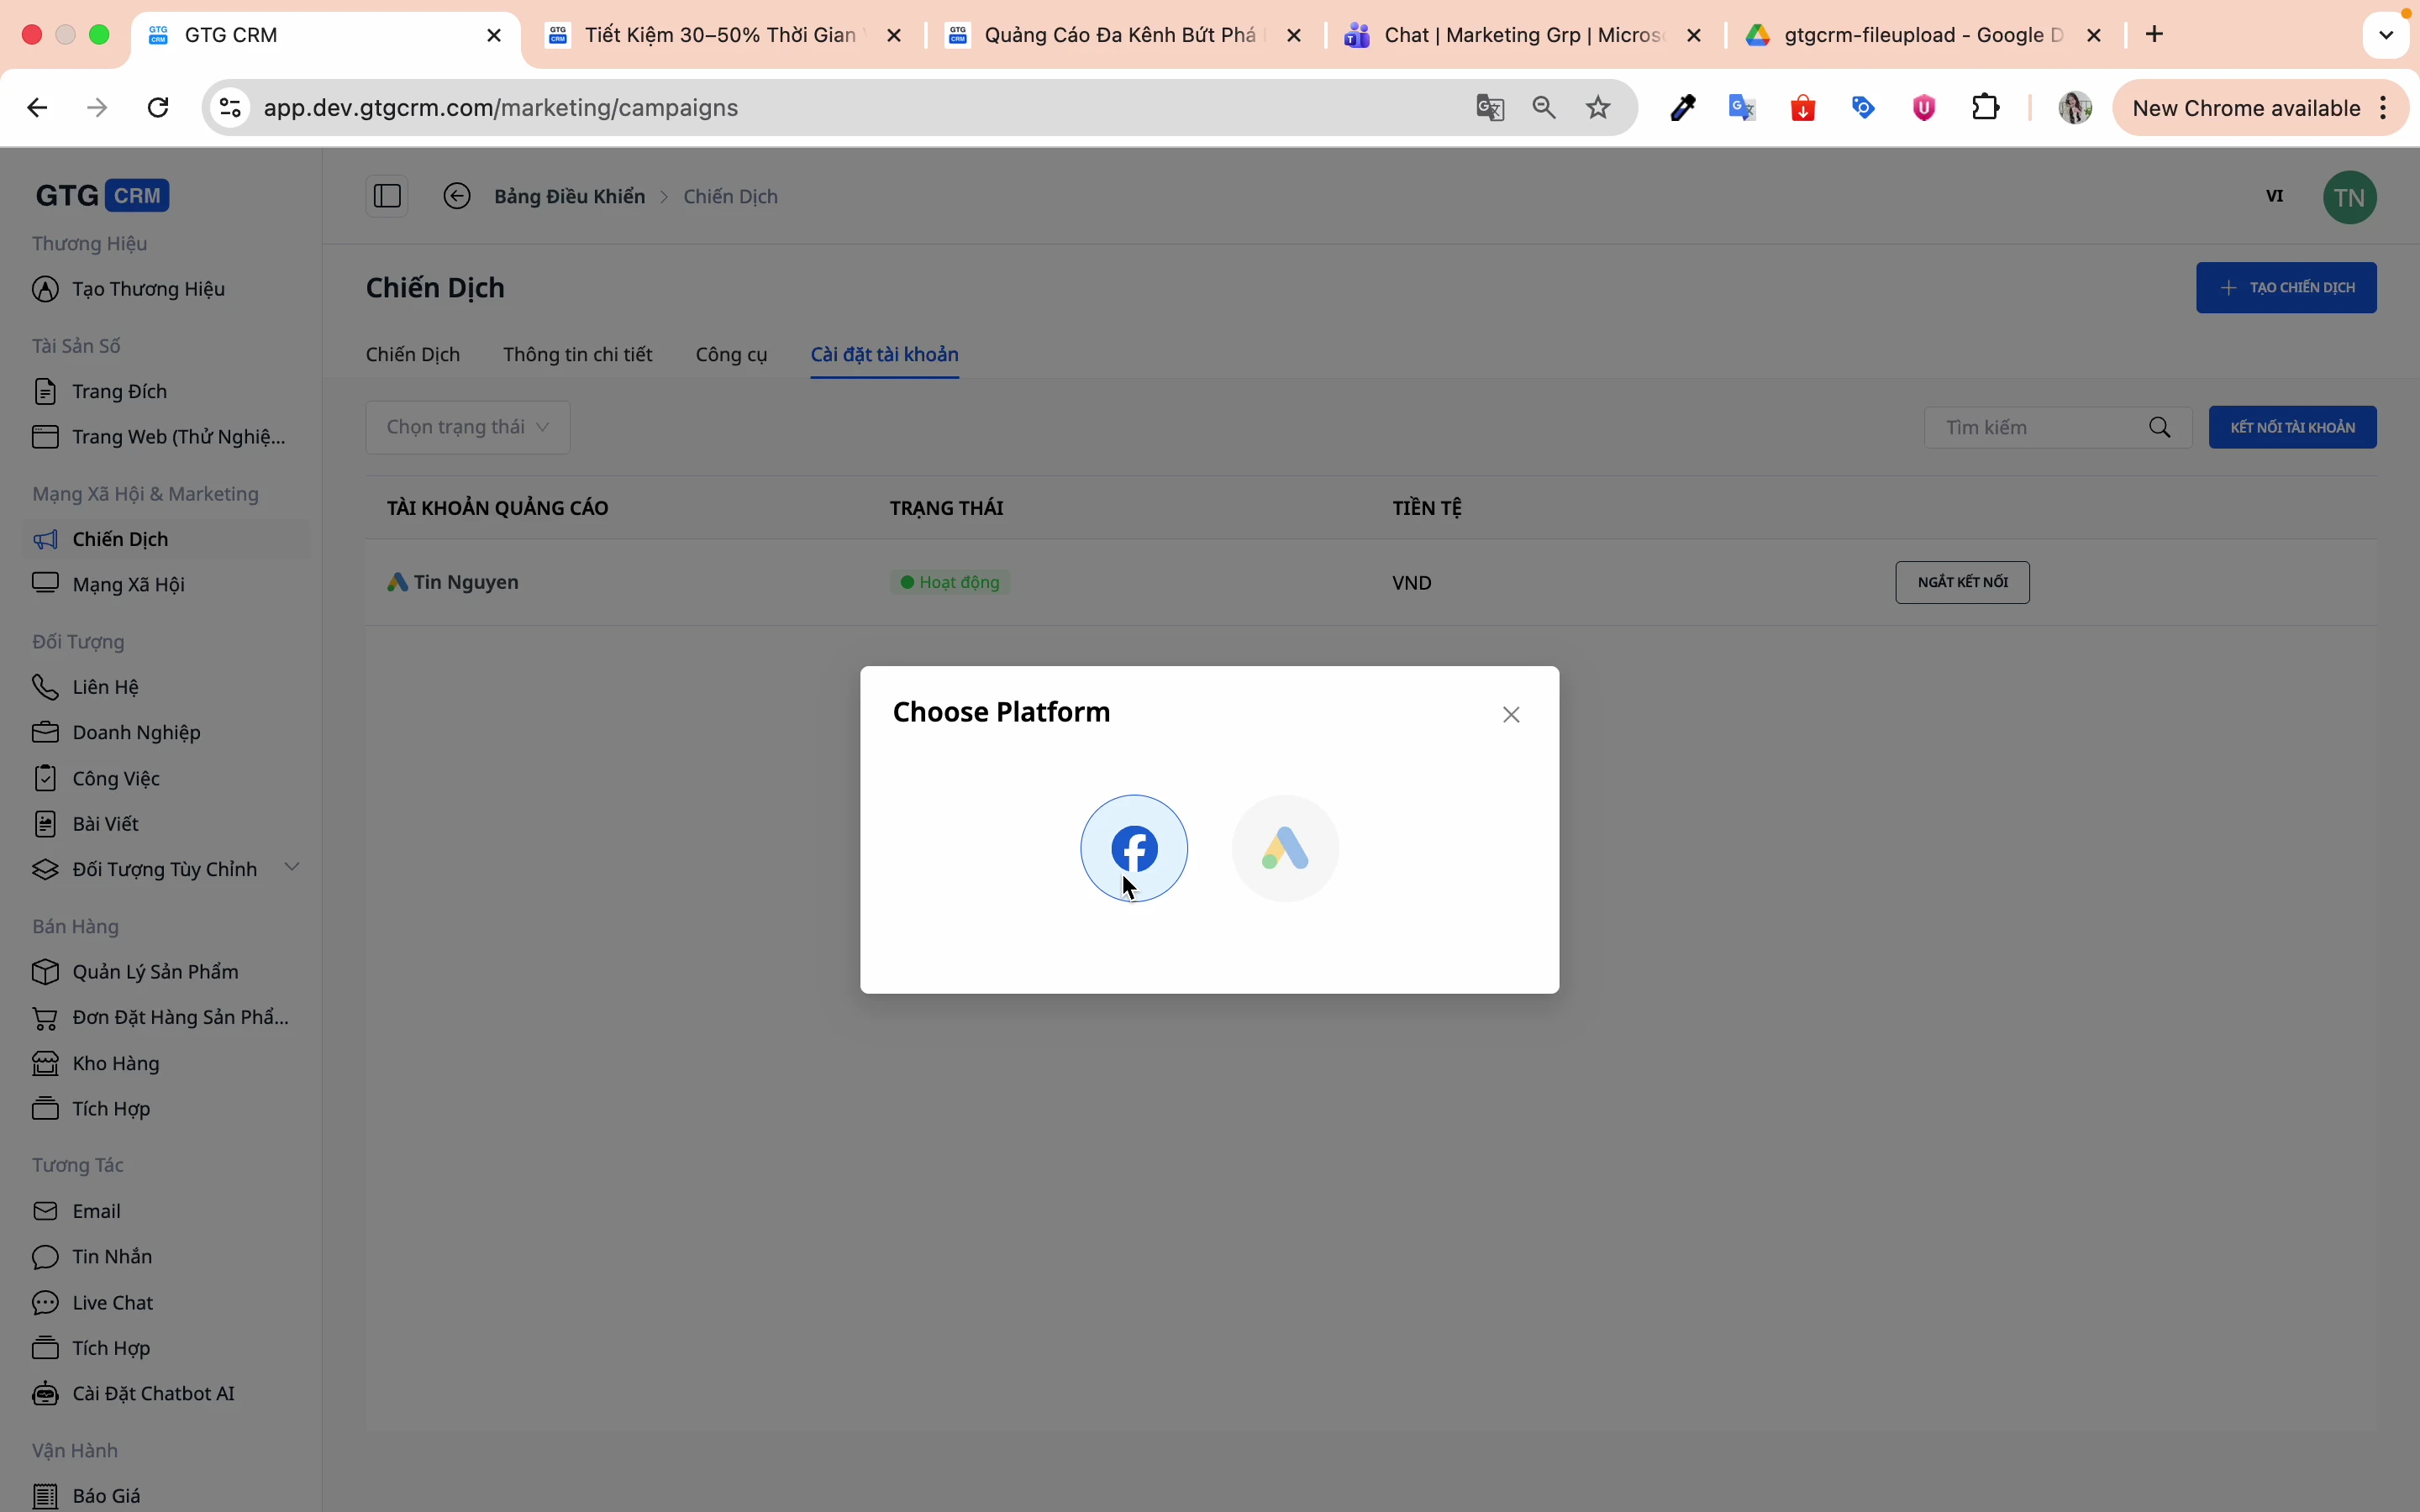
Skref 3: Veldu Facebook kerfi
Veldu Facebook kerfi til að tengja.
Skref 4: Veldu auglýsingareikning
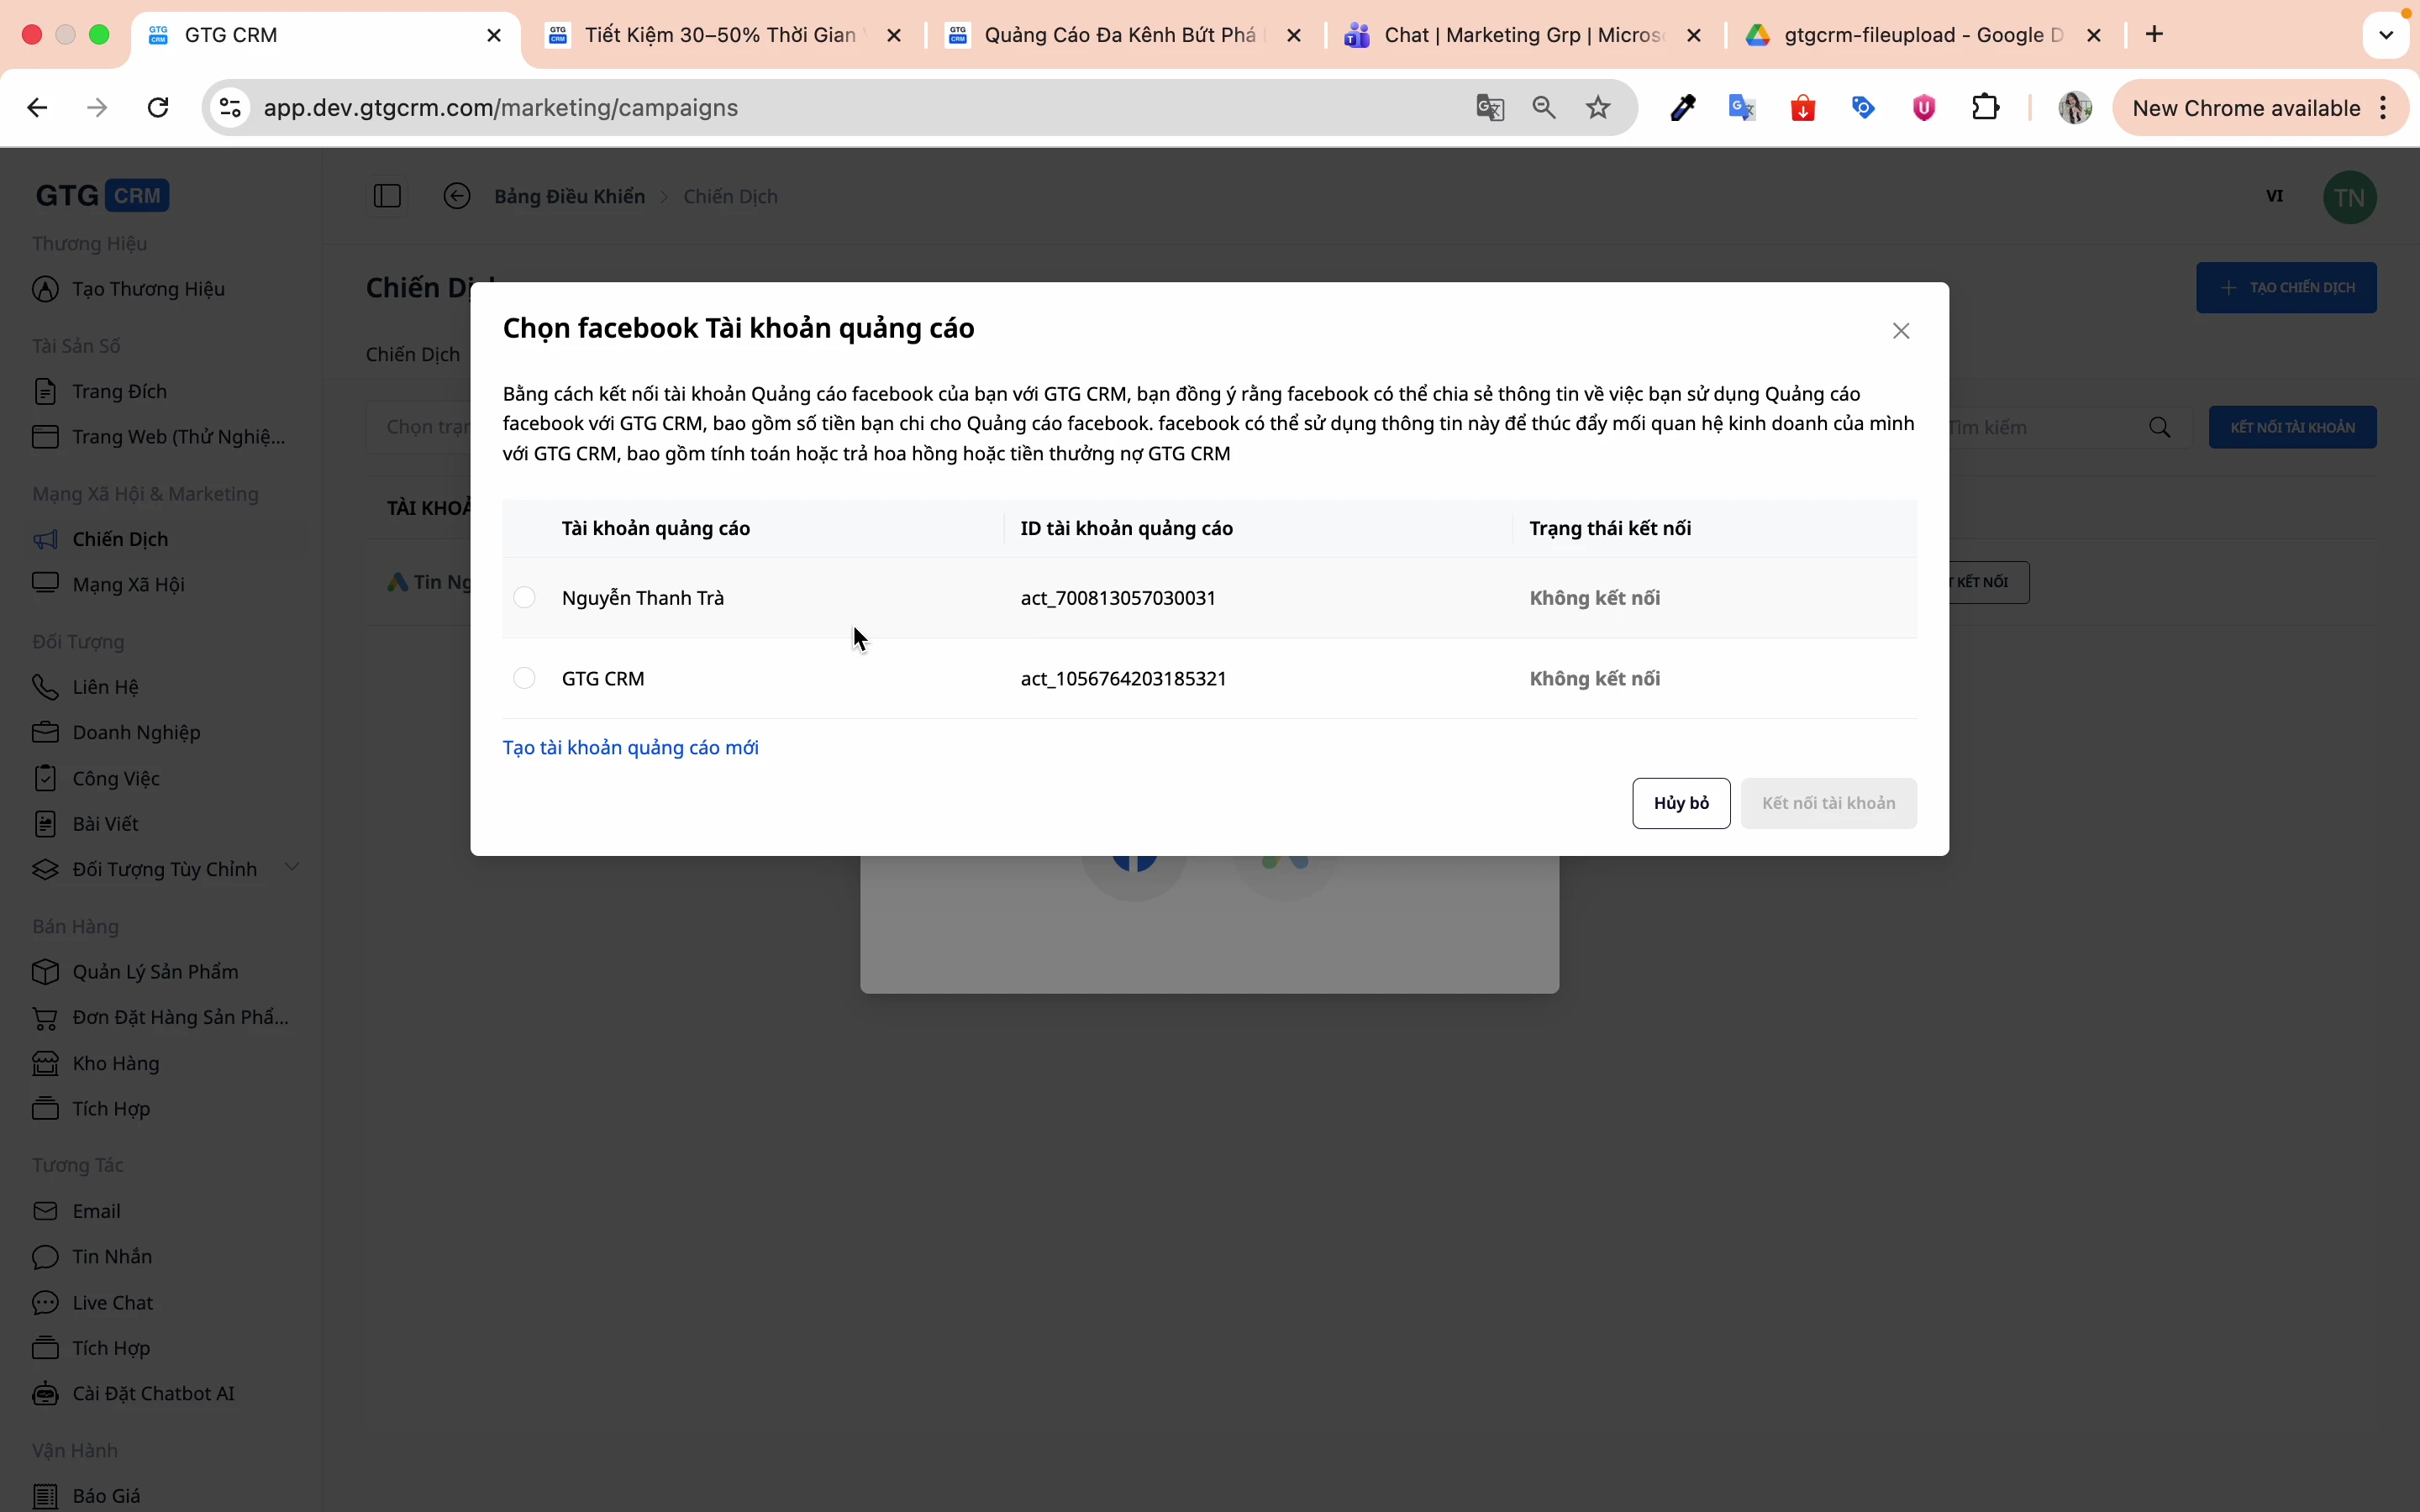
Kerfið mun sýna lista yfir auglýsingareikninga sem þú hefur umsjón með:
-
1. Veldu auglýsingareikninginn sem þú vilt tengja
-
2. Smelltu á Tengja reikning
Skref 5: Staðfestu að tenging hafi tekist
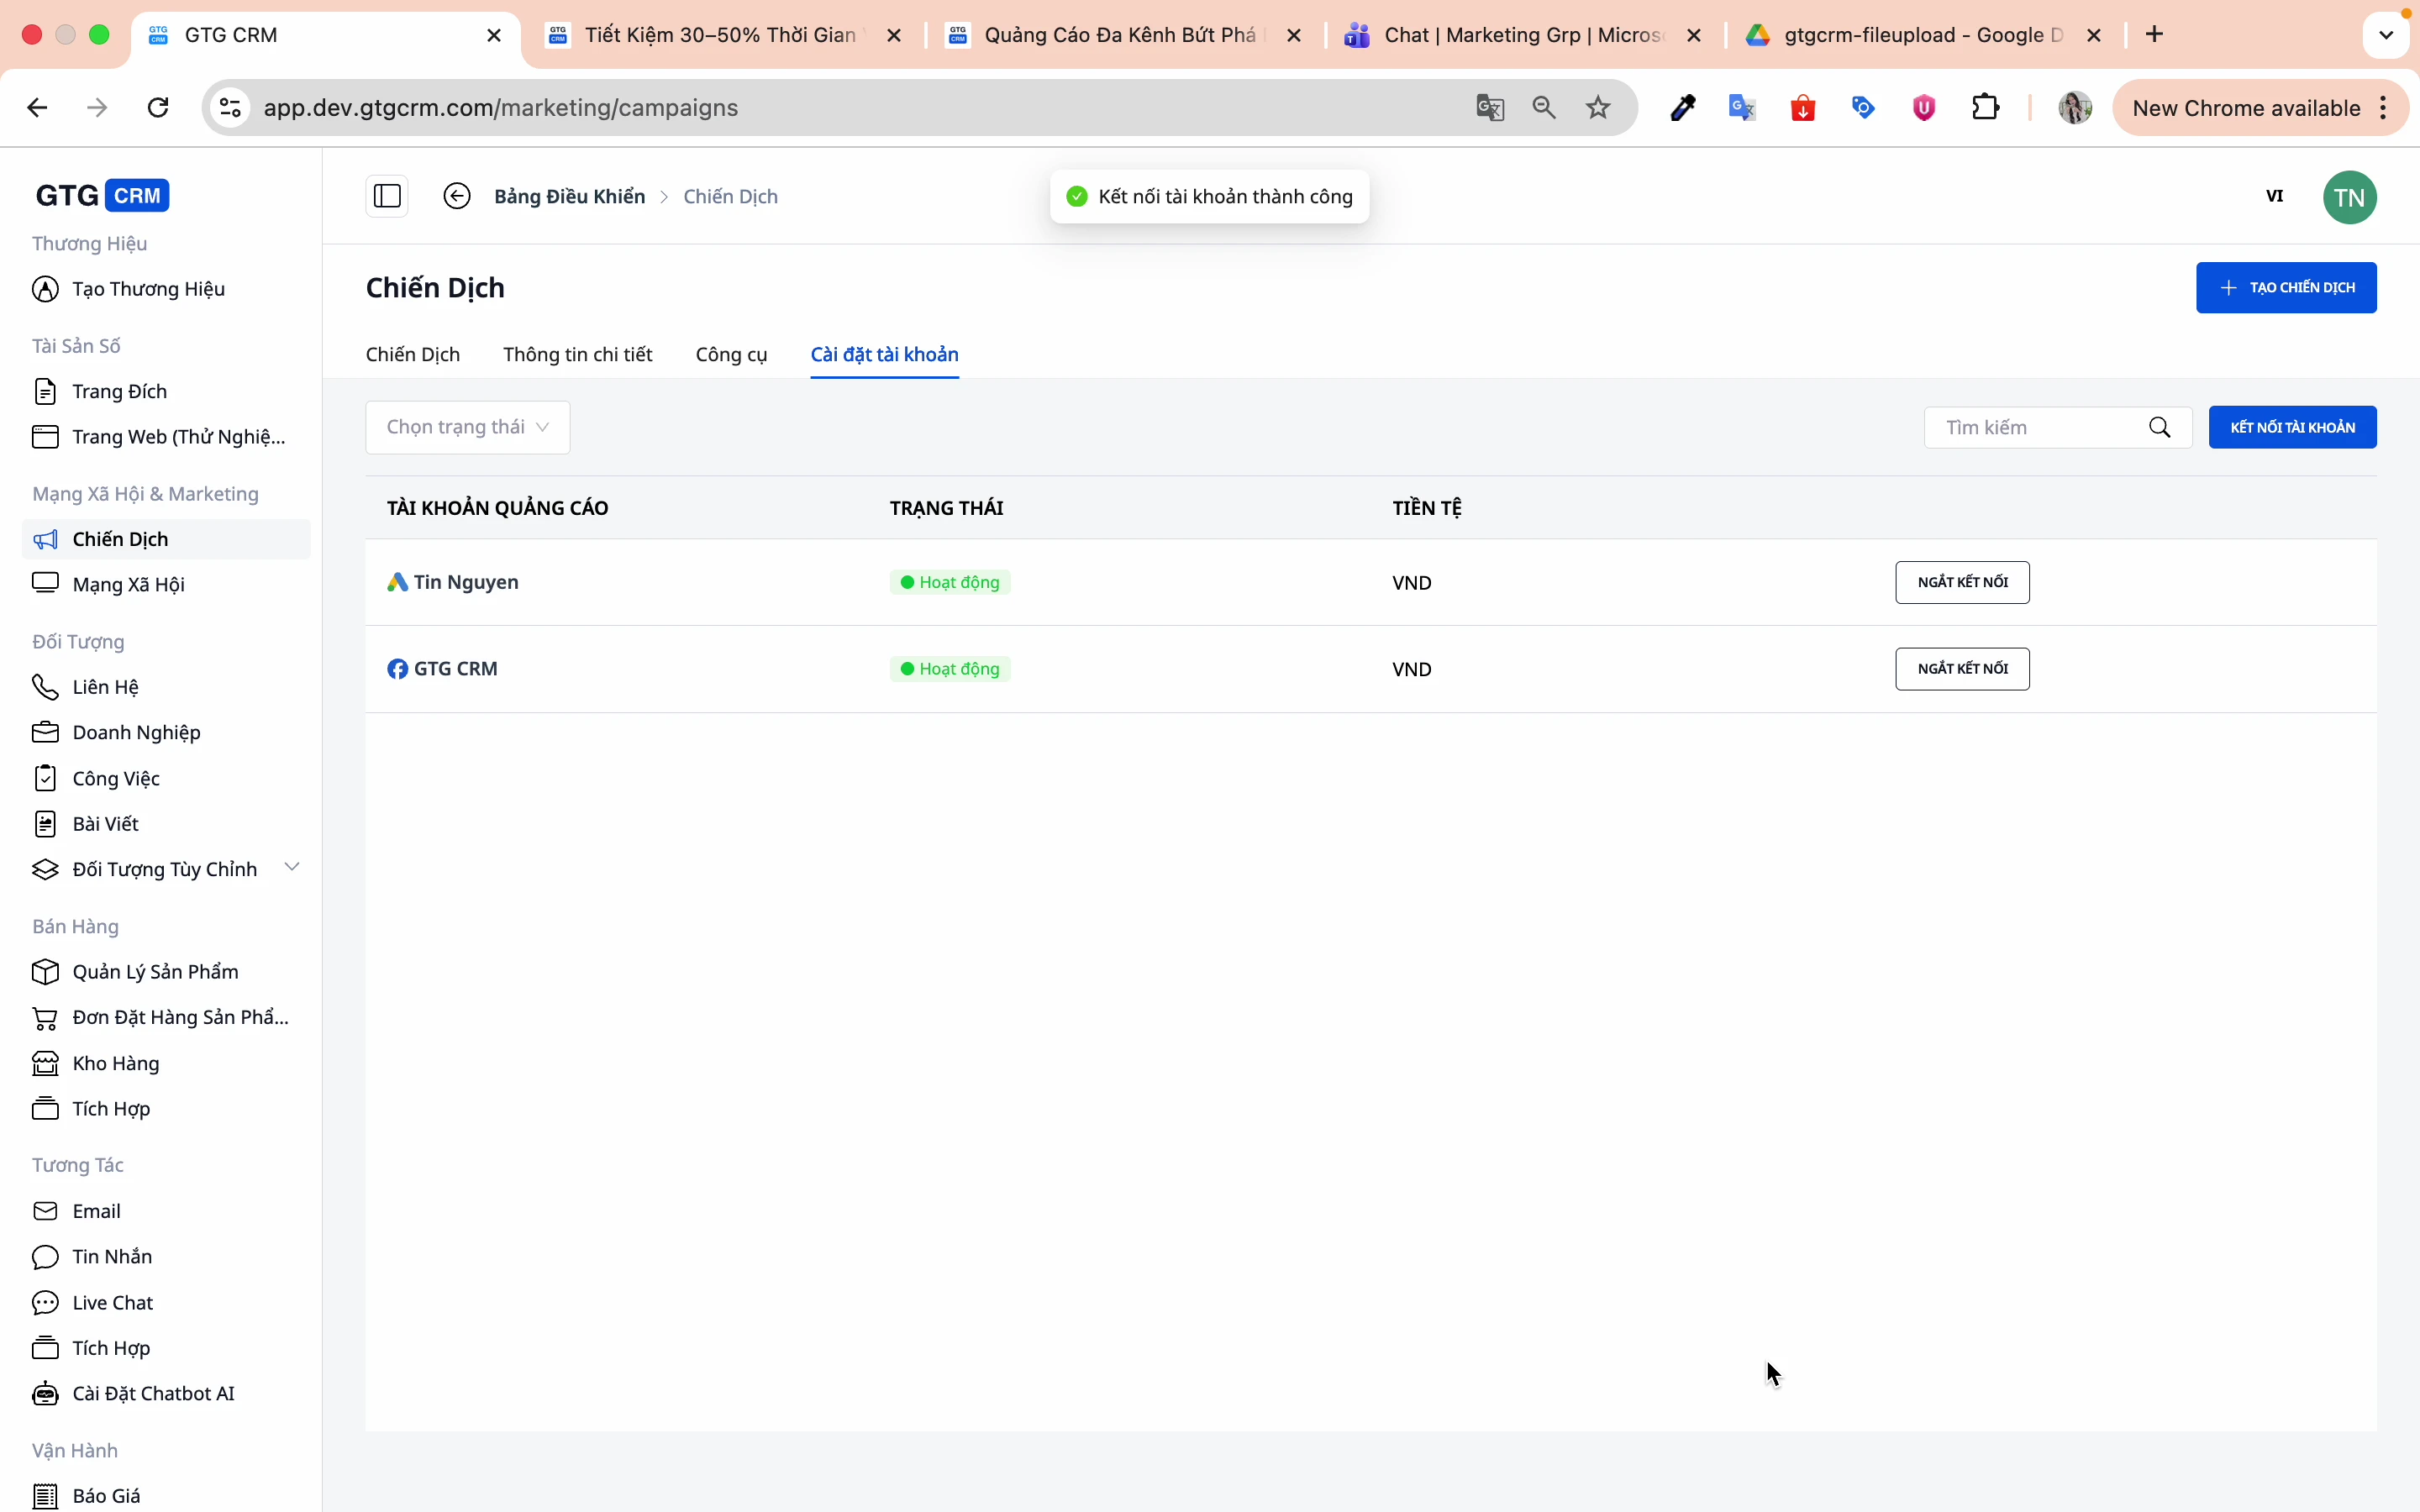
Þegar þú sérð staðfestingarskilaboð, hefur reikningurinn verið tengdur.
2. Búa til nýja auglýsingaherferð
Skref 1: Smelltu á „Búa til auglýsingaherferð“
Á aðalskjánum, smelltu á hnappinn Búa til auglýsingaherferð.
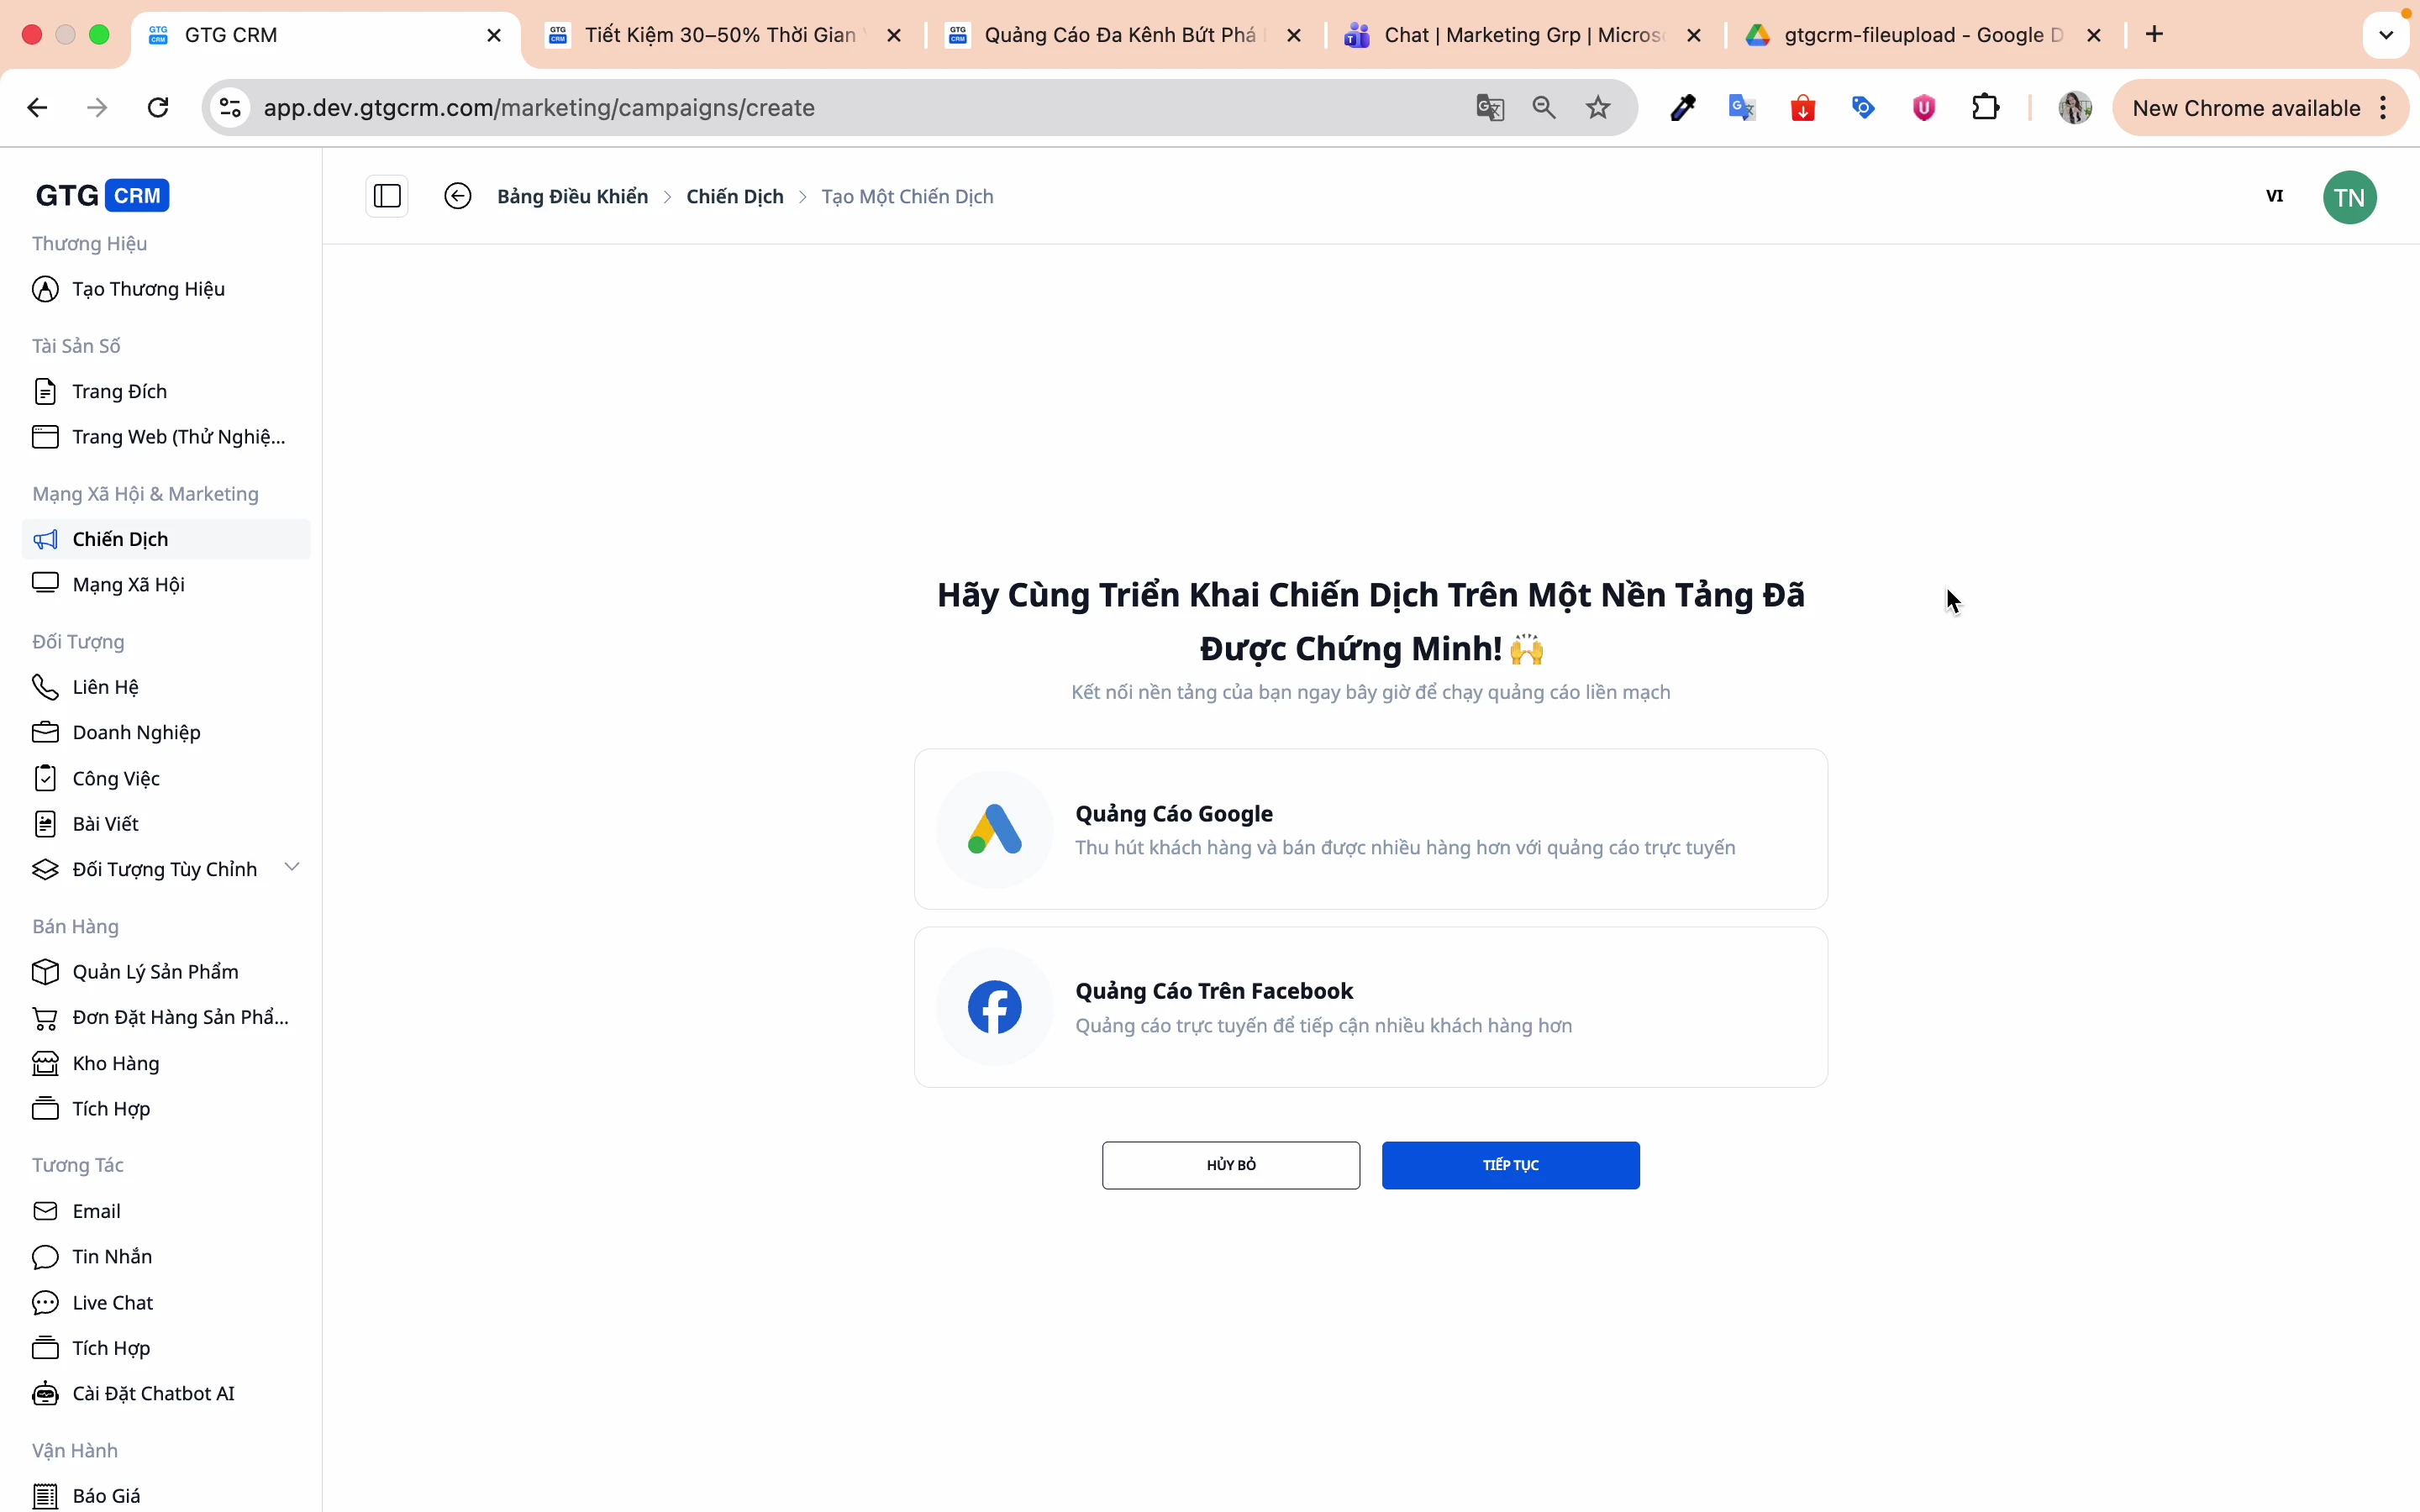
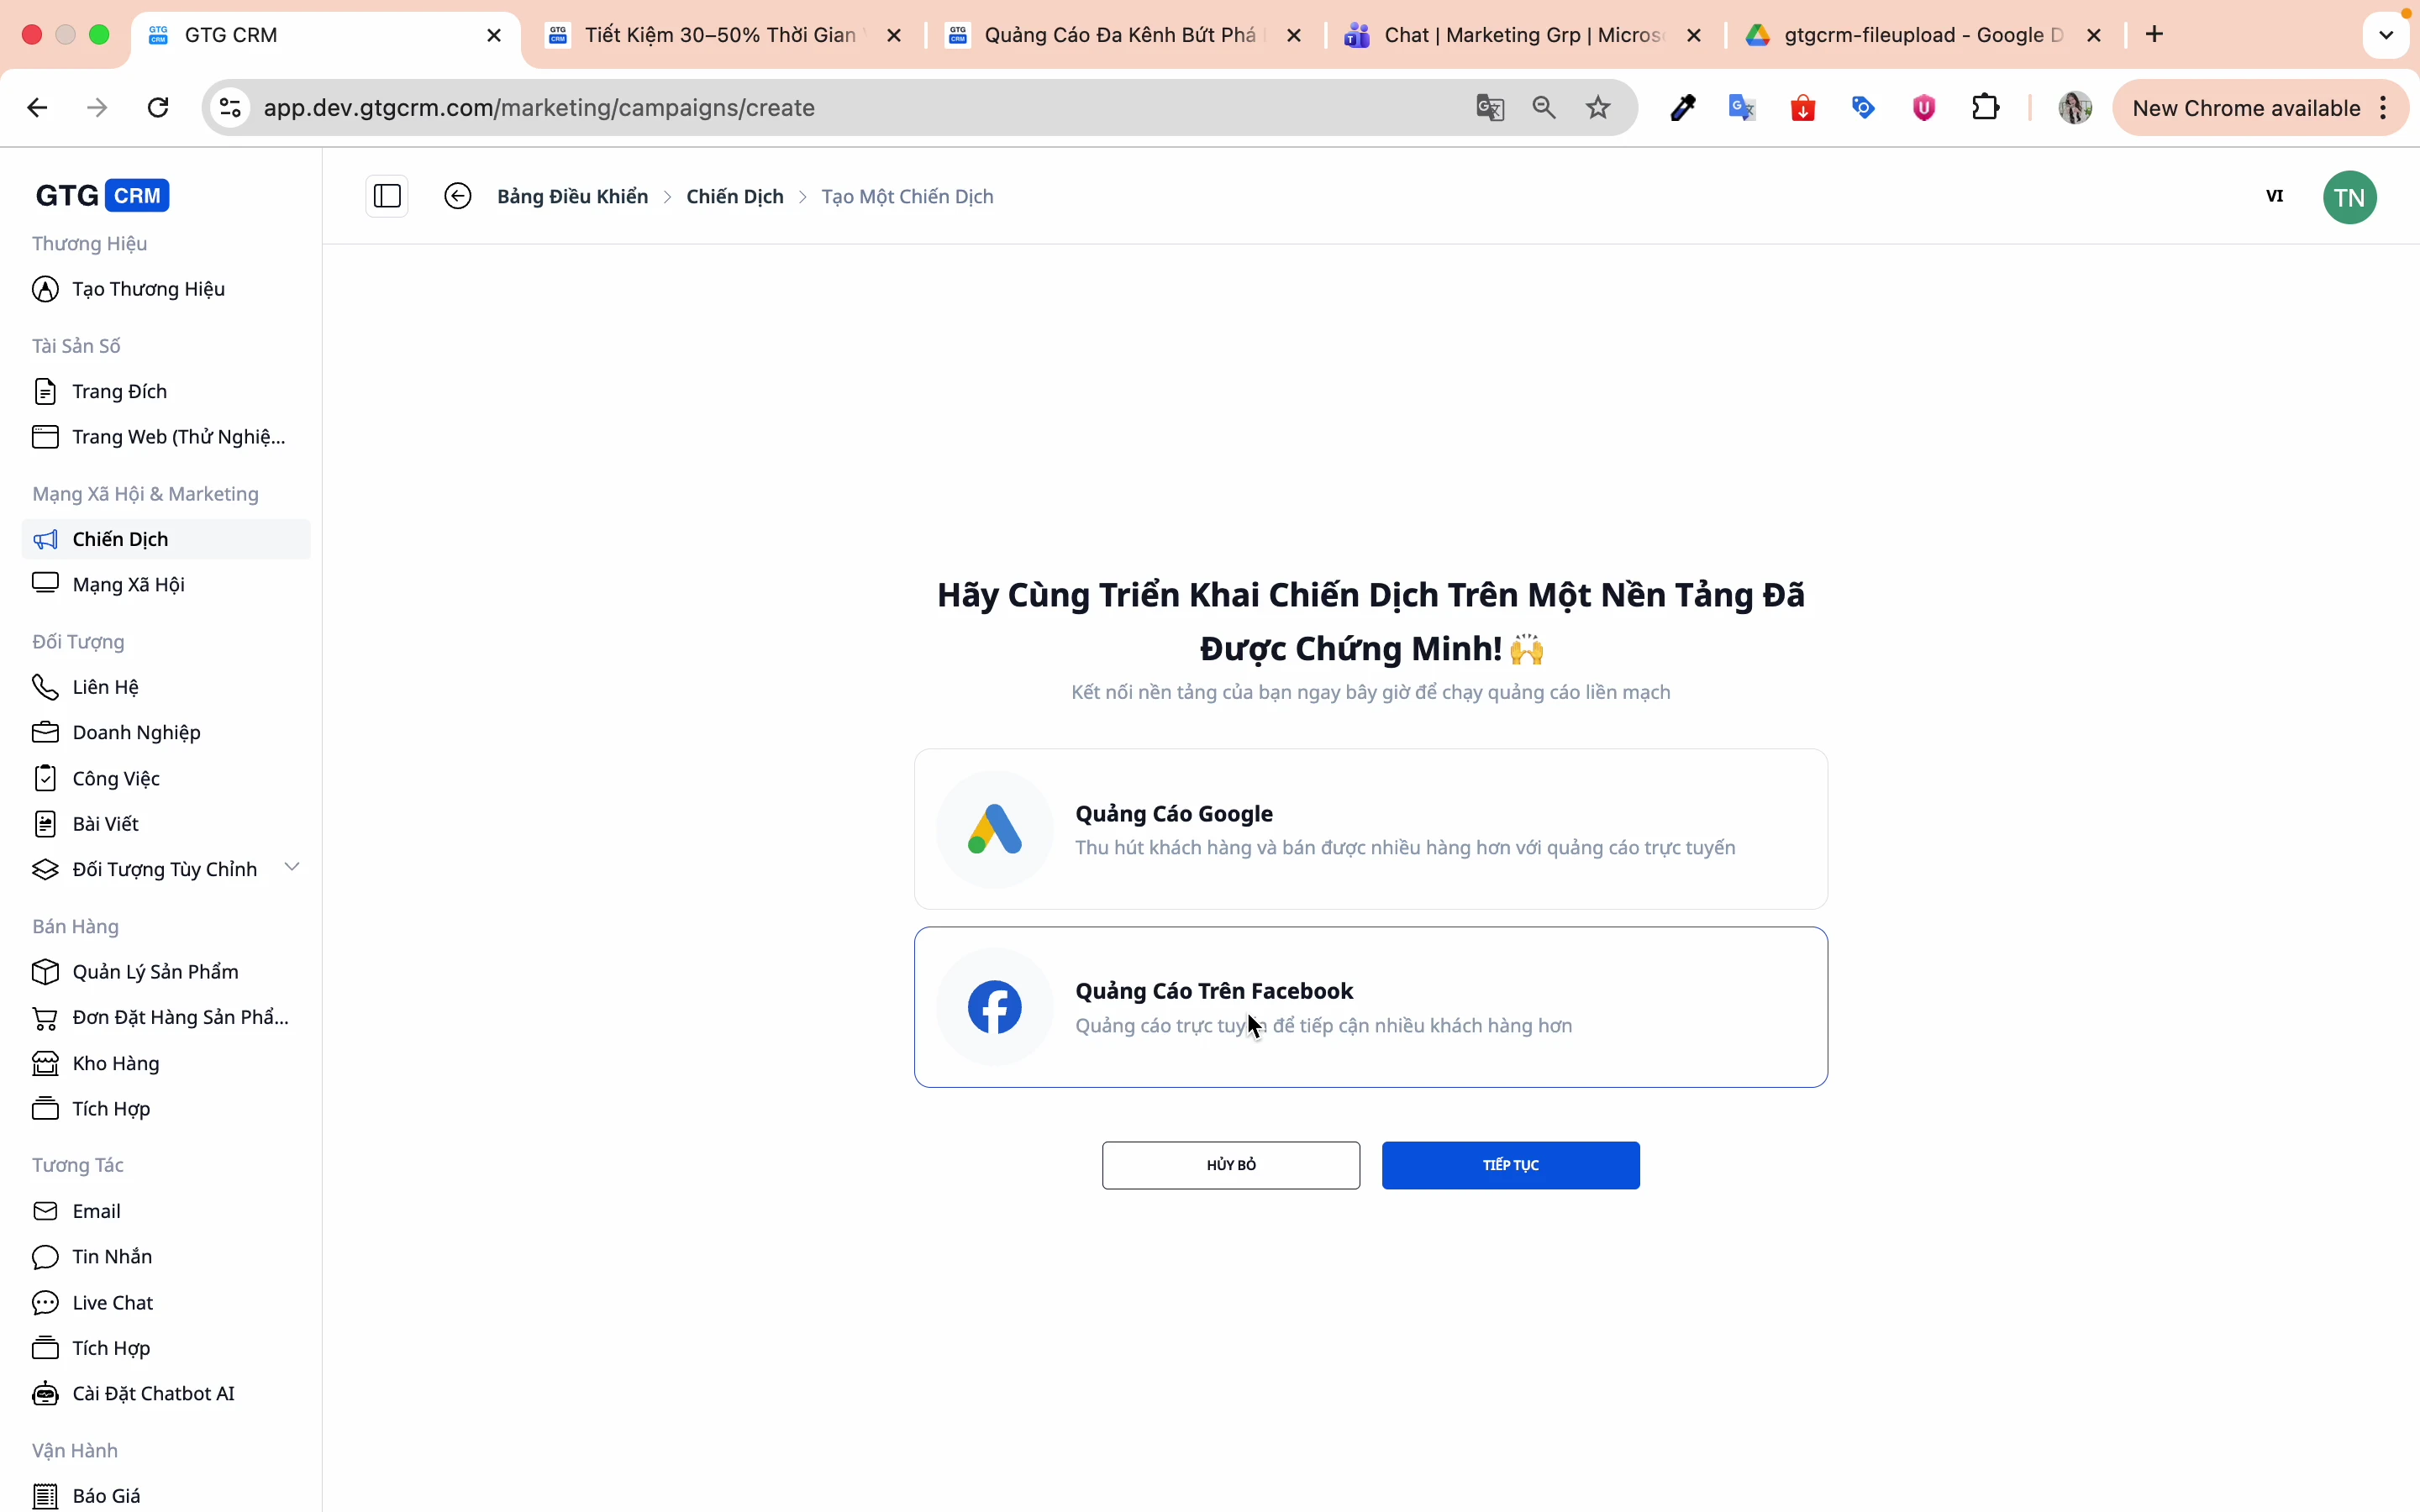
Skref 2: Veldu auglýsingakerfi
Veldu Facebook og smelltu á Áfram.
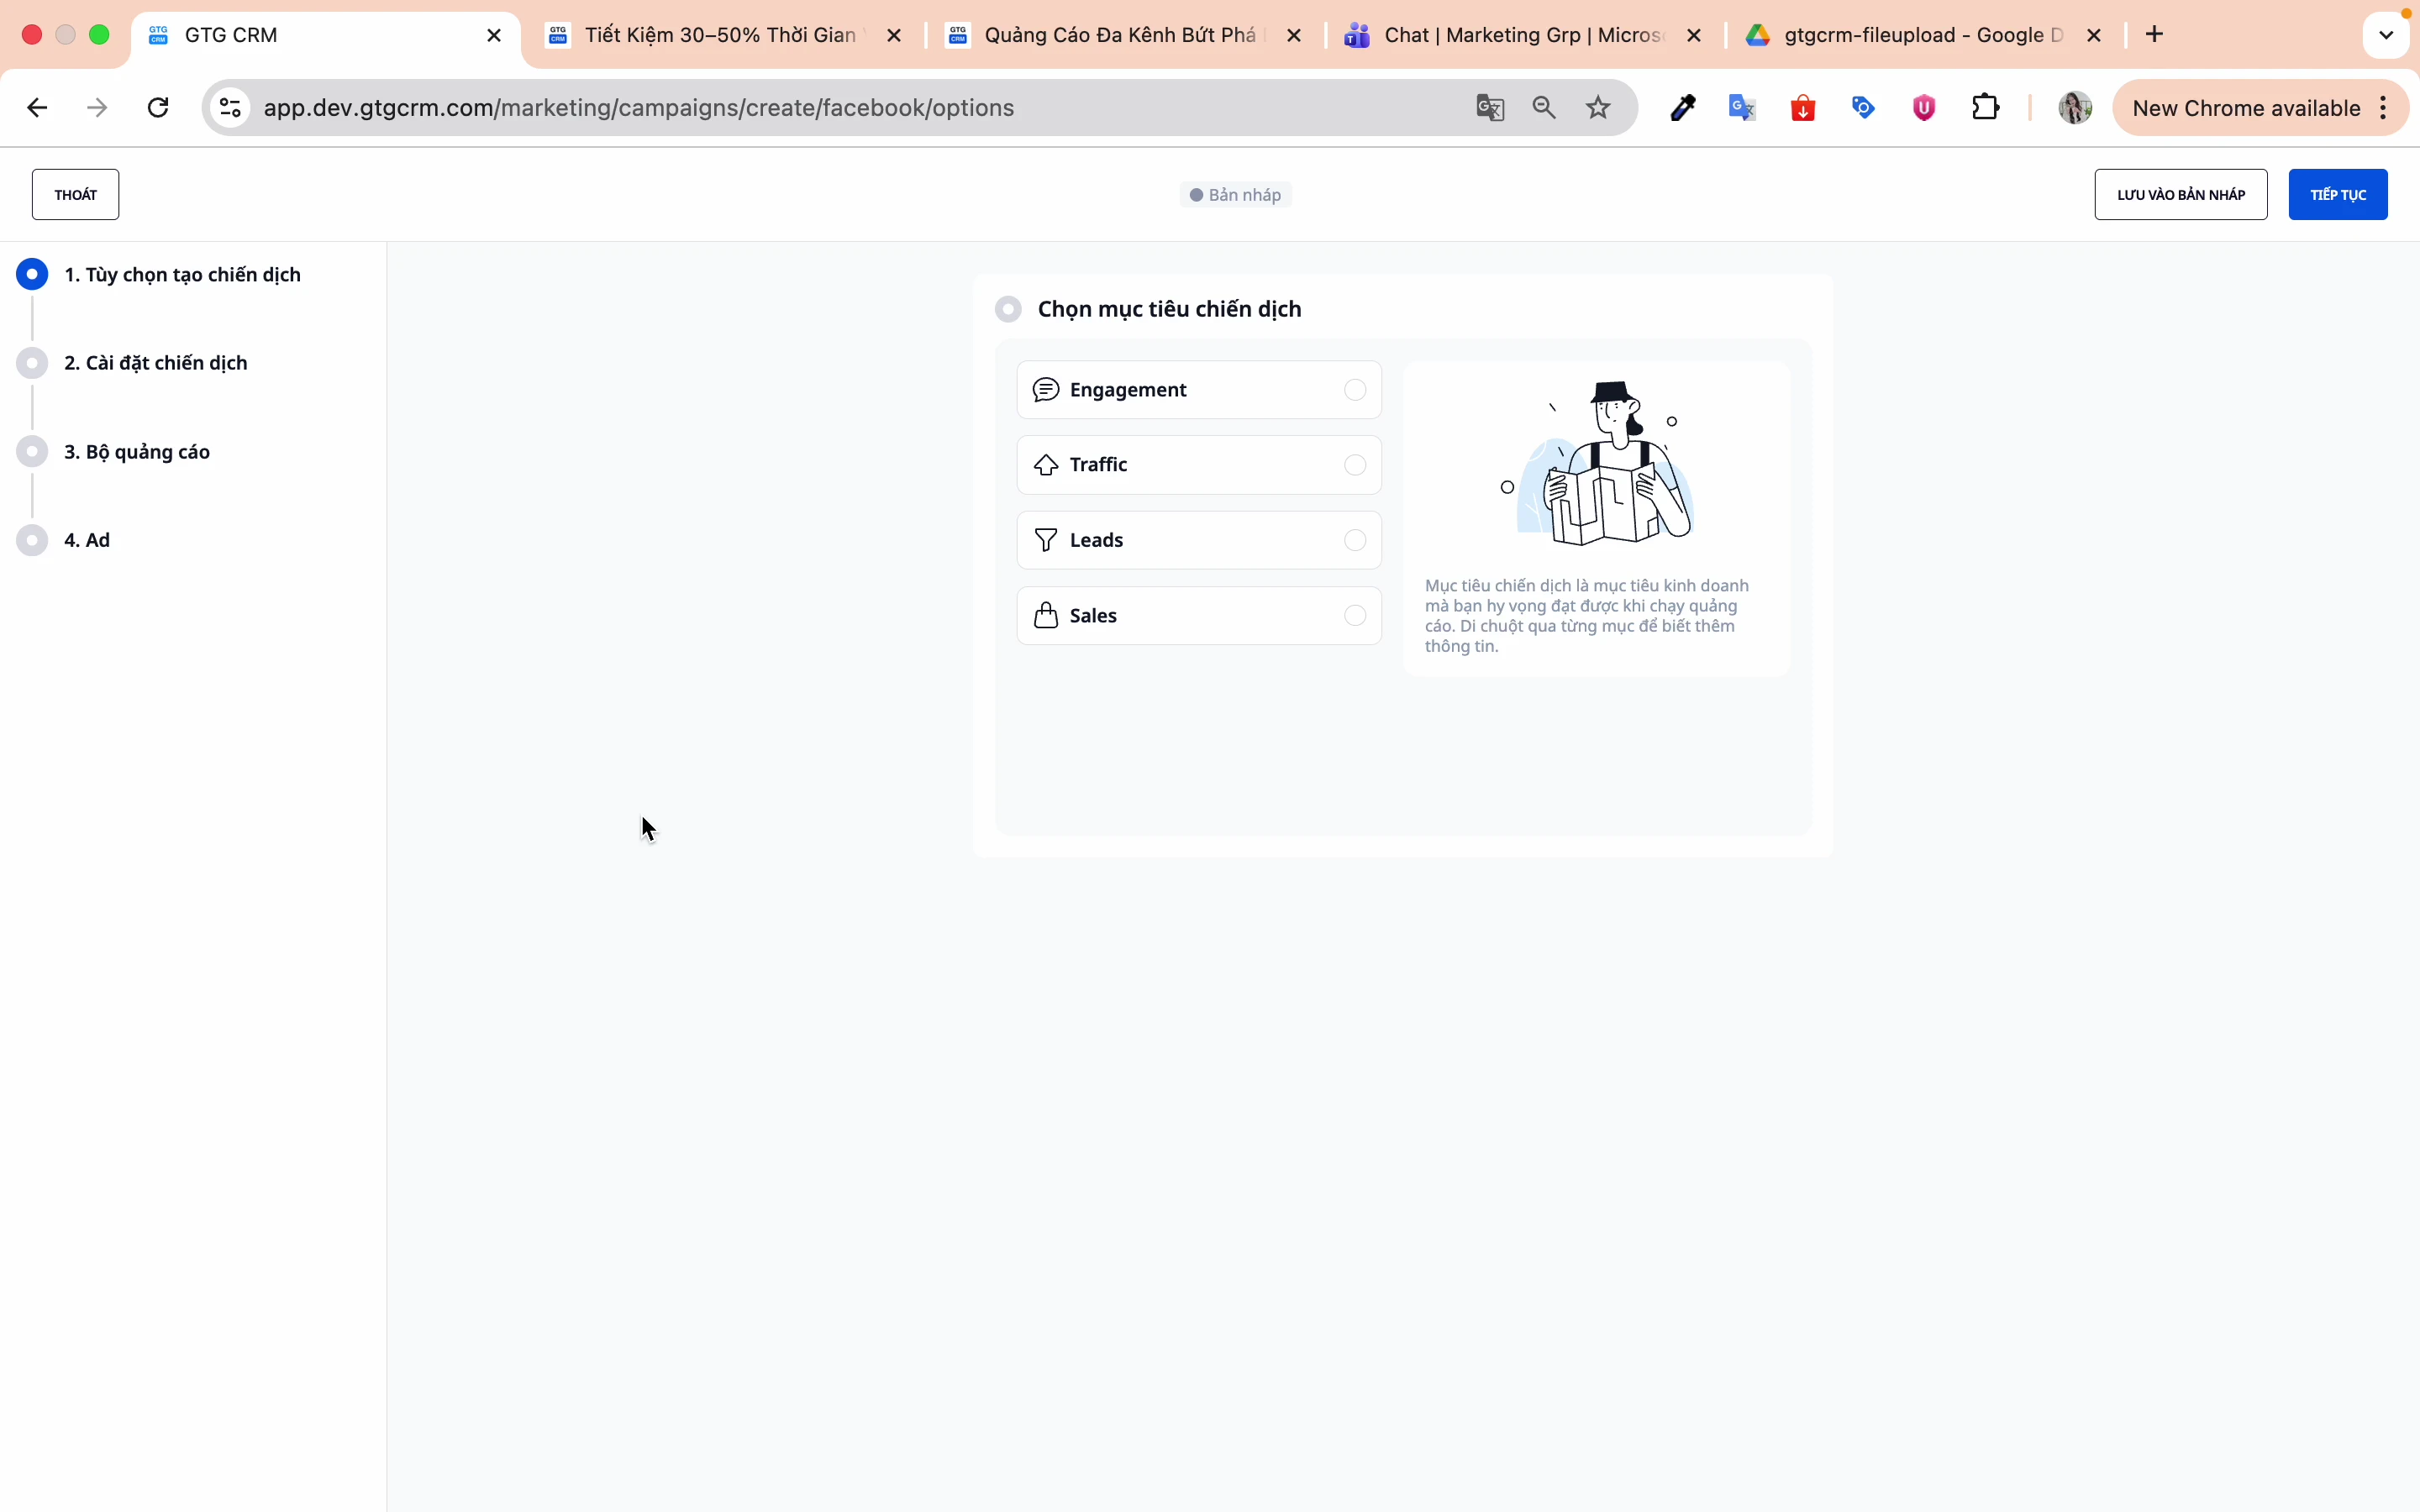
Skref 3: Veldu markmið herferðar
GTG CRM styður 4 helstu markmið:
| Markmið | Lýsing | Hentar fyrir |
|---|---|---|
| Engagement | Auka samskipti við færslur | Vörumerkjaþekking, Samfélag |
| Traffic | Auka smelli á vefsíðu | Blogg, Lækkunarsíður |
| Leads | Safna skráningareyðublöðum | B2B, Ráðgjöf |
| Sales | Auka sölu | E-verslun |
3. Stillingar herferðar
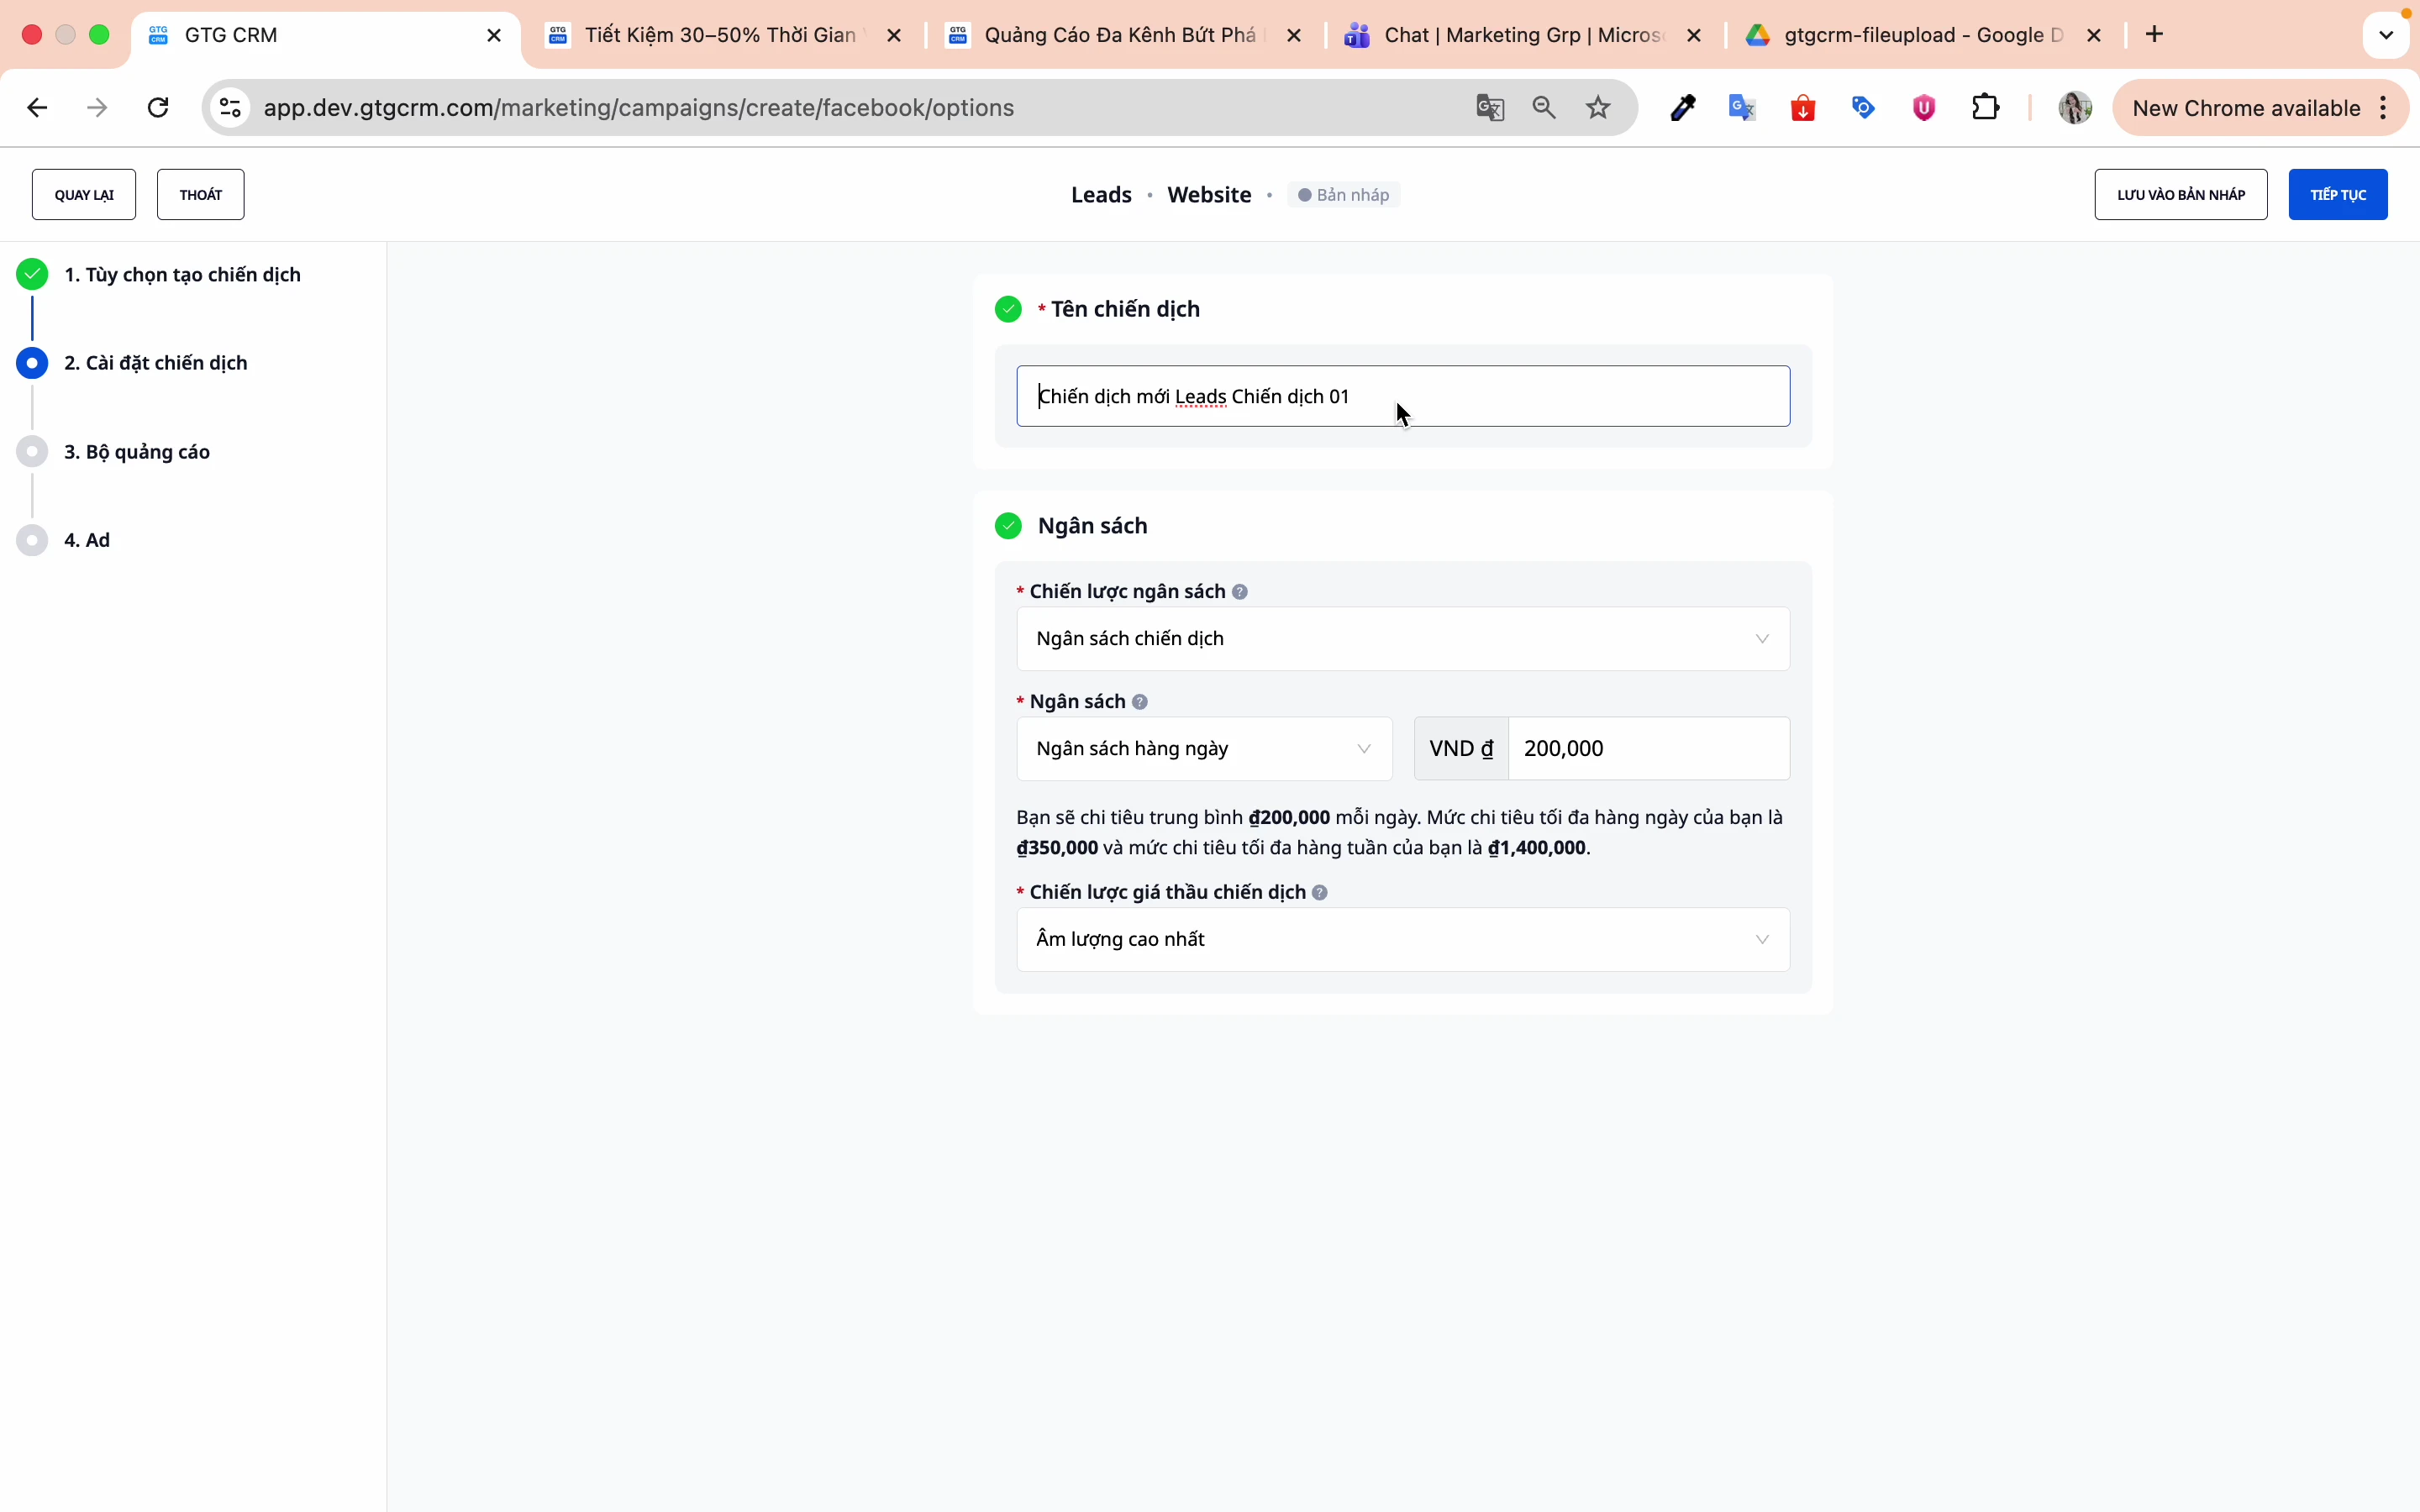
Skref 1: Nafngreina herferð
Gefðu henni auðvelt að muna nafn til að auðvelda umsjón og leit síðar meir.
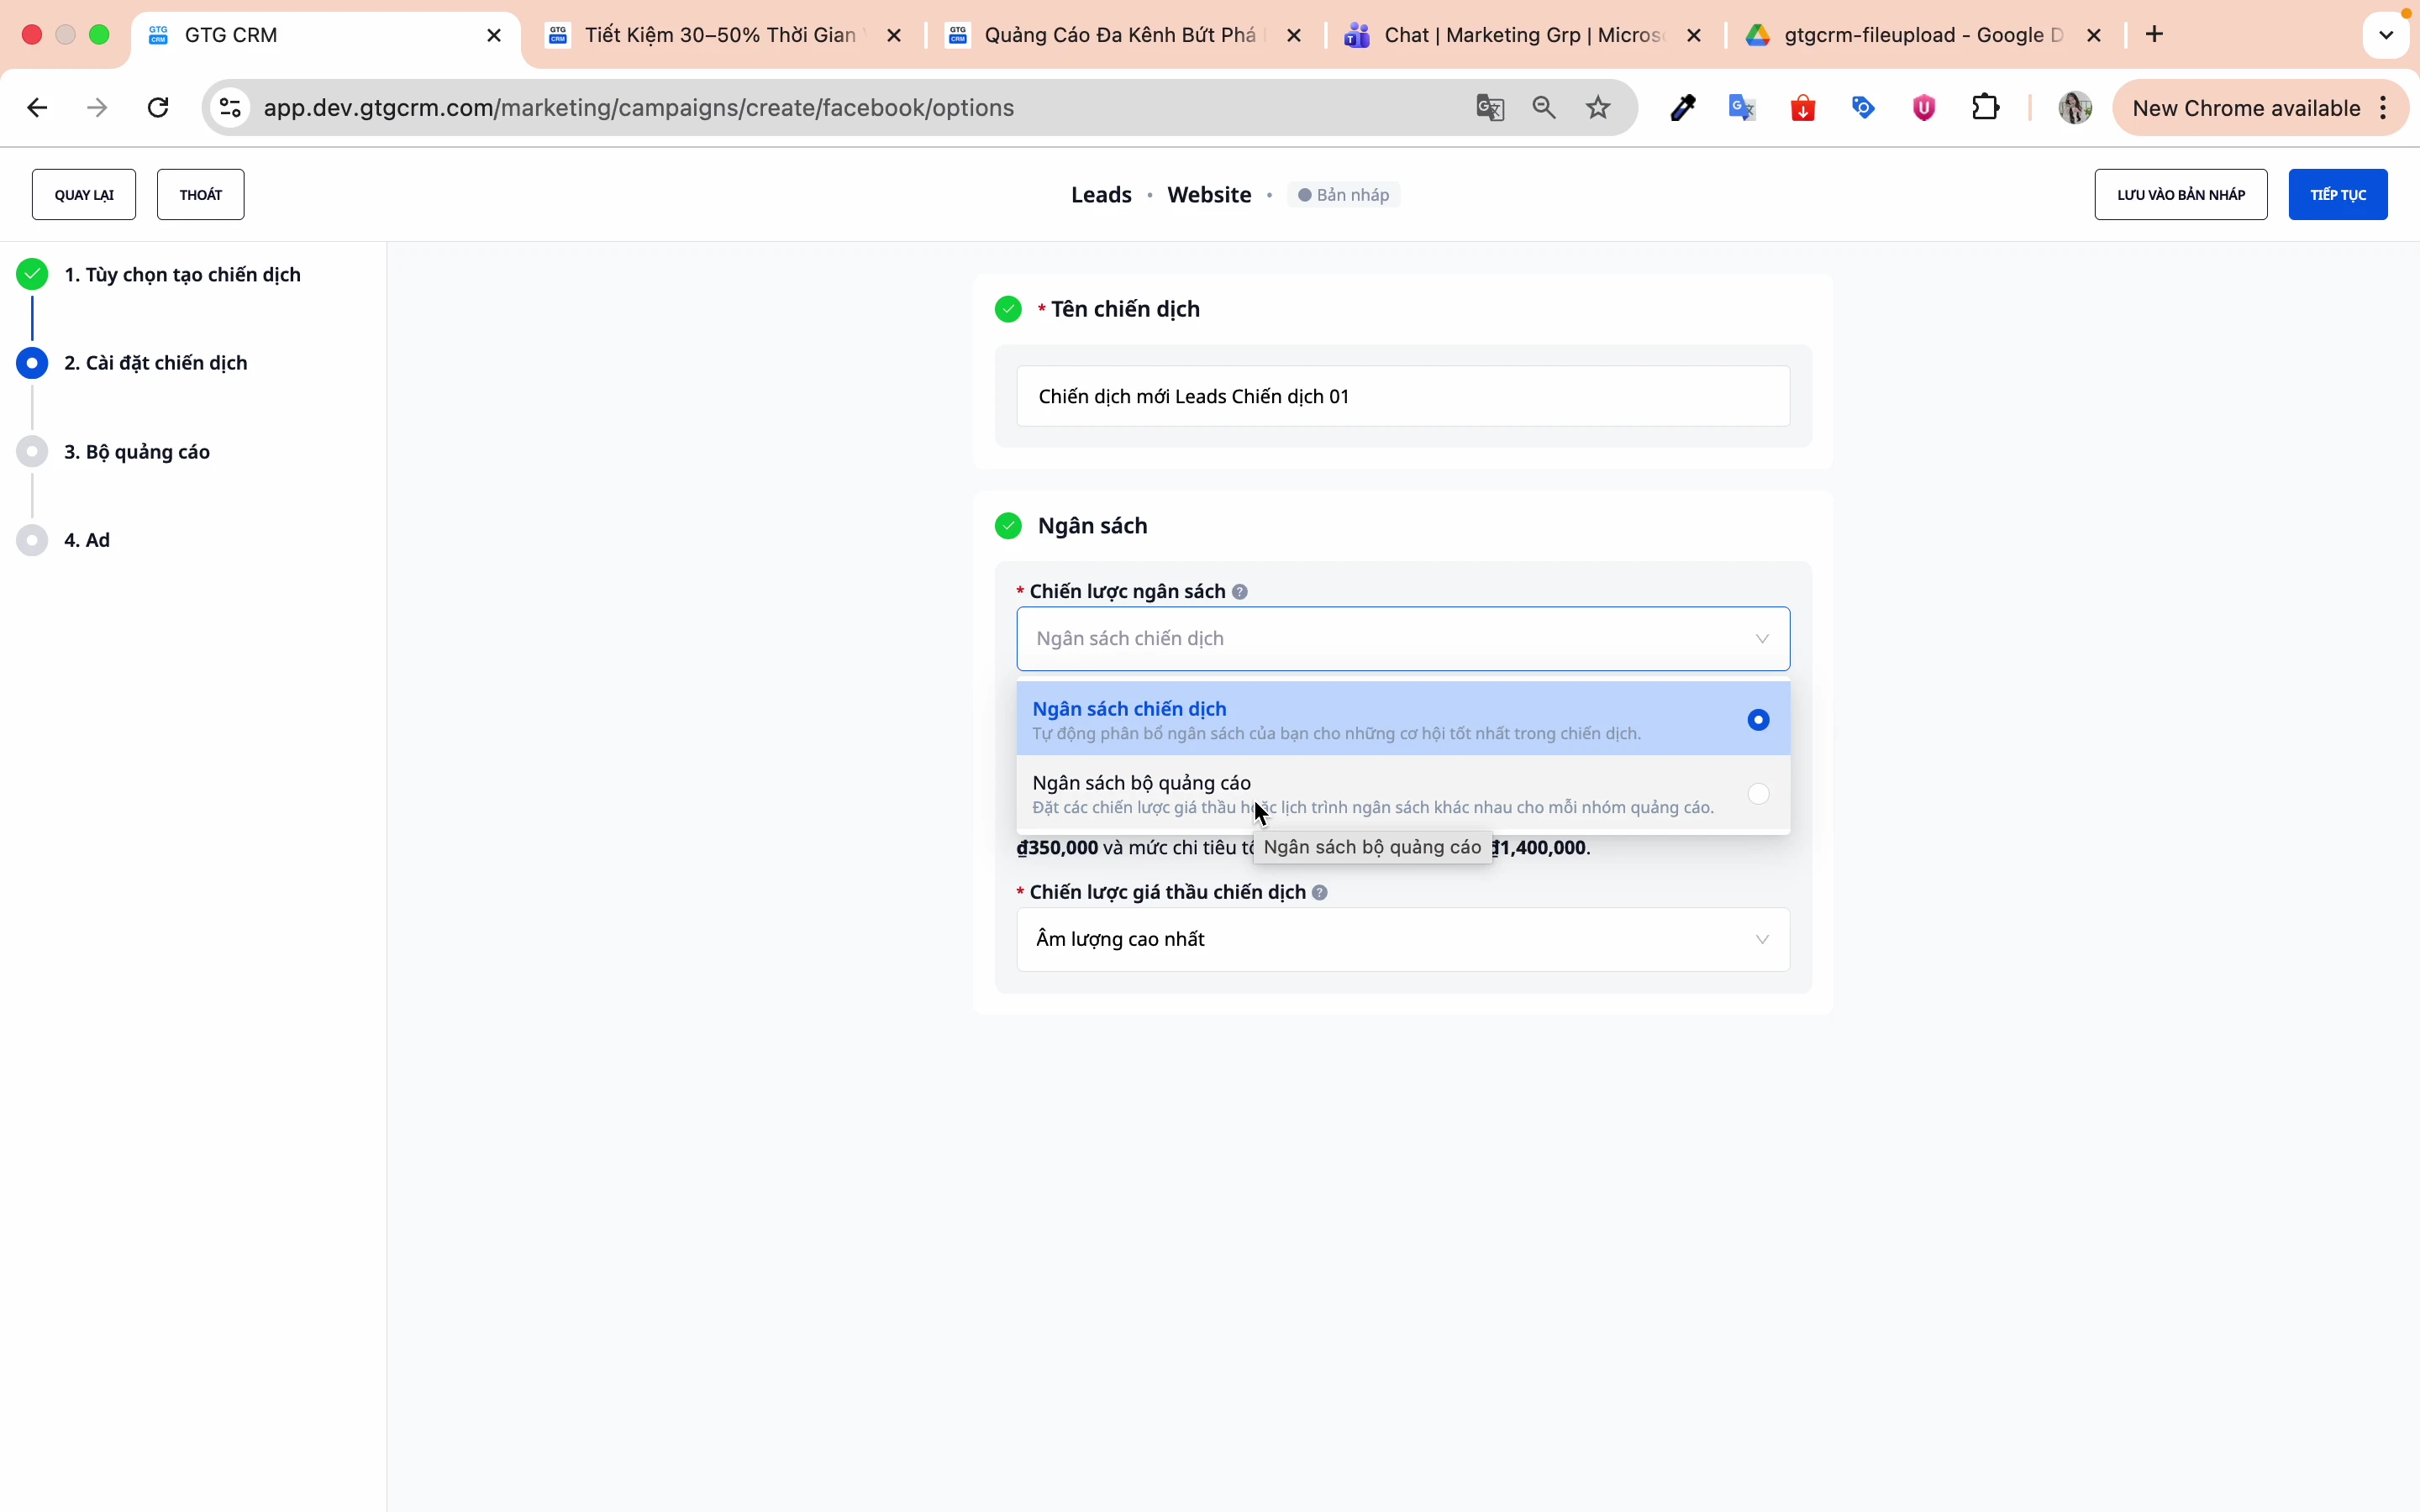
Skref 2: Veldu fjárhagsáætlunarstig
Það eru 2 valkostir:
- Fjárhagsáætlun herferðar (CBO): Facebook dreifir fjárhagsáætlun sjálfkrafa á milli auglýsingahópa
- Fjárhagsáætlun auglýsingahóps: Þú hefur sjálfstæða stjórn á fjárhagsáætlun hvers auglýsingahóps
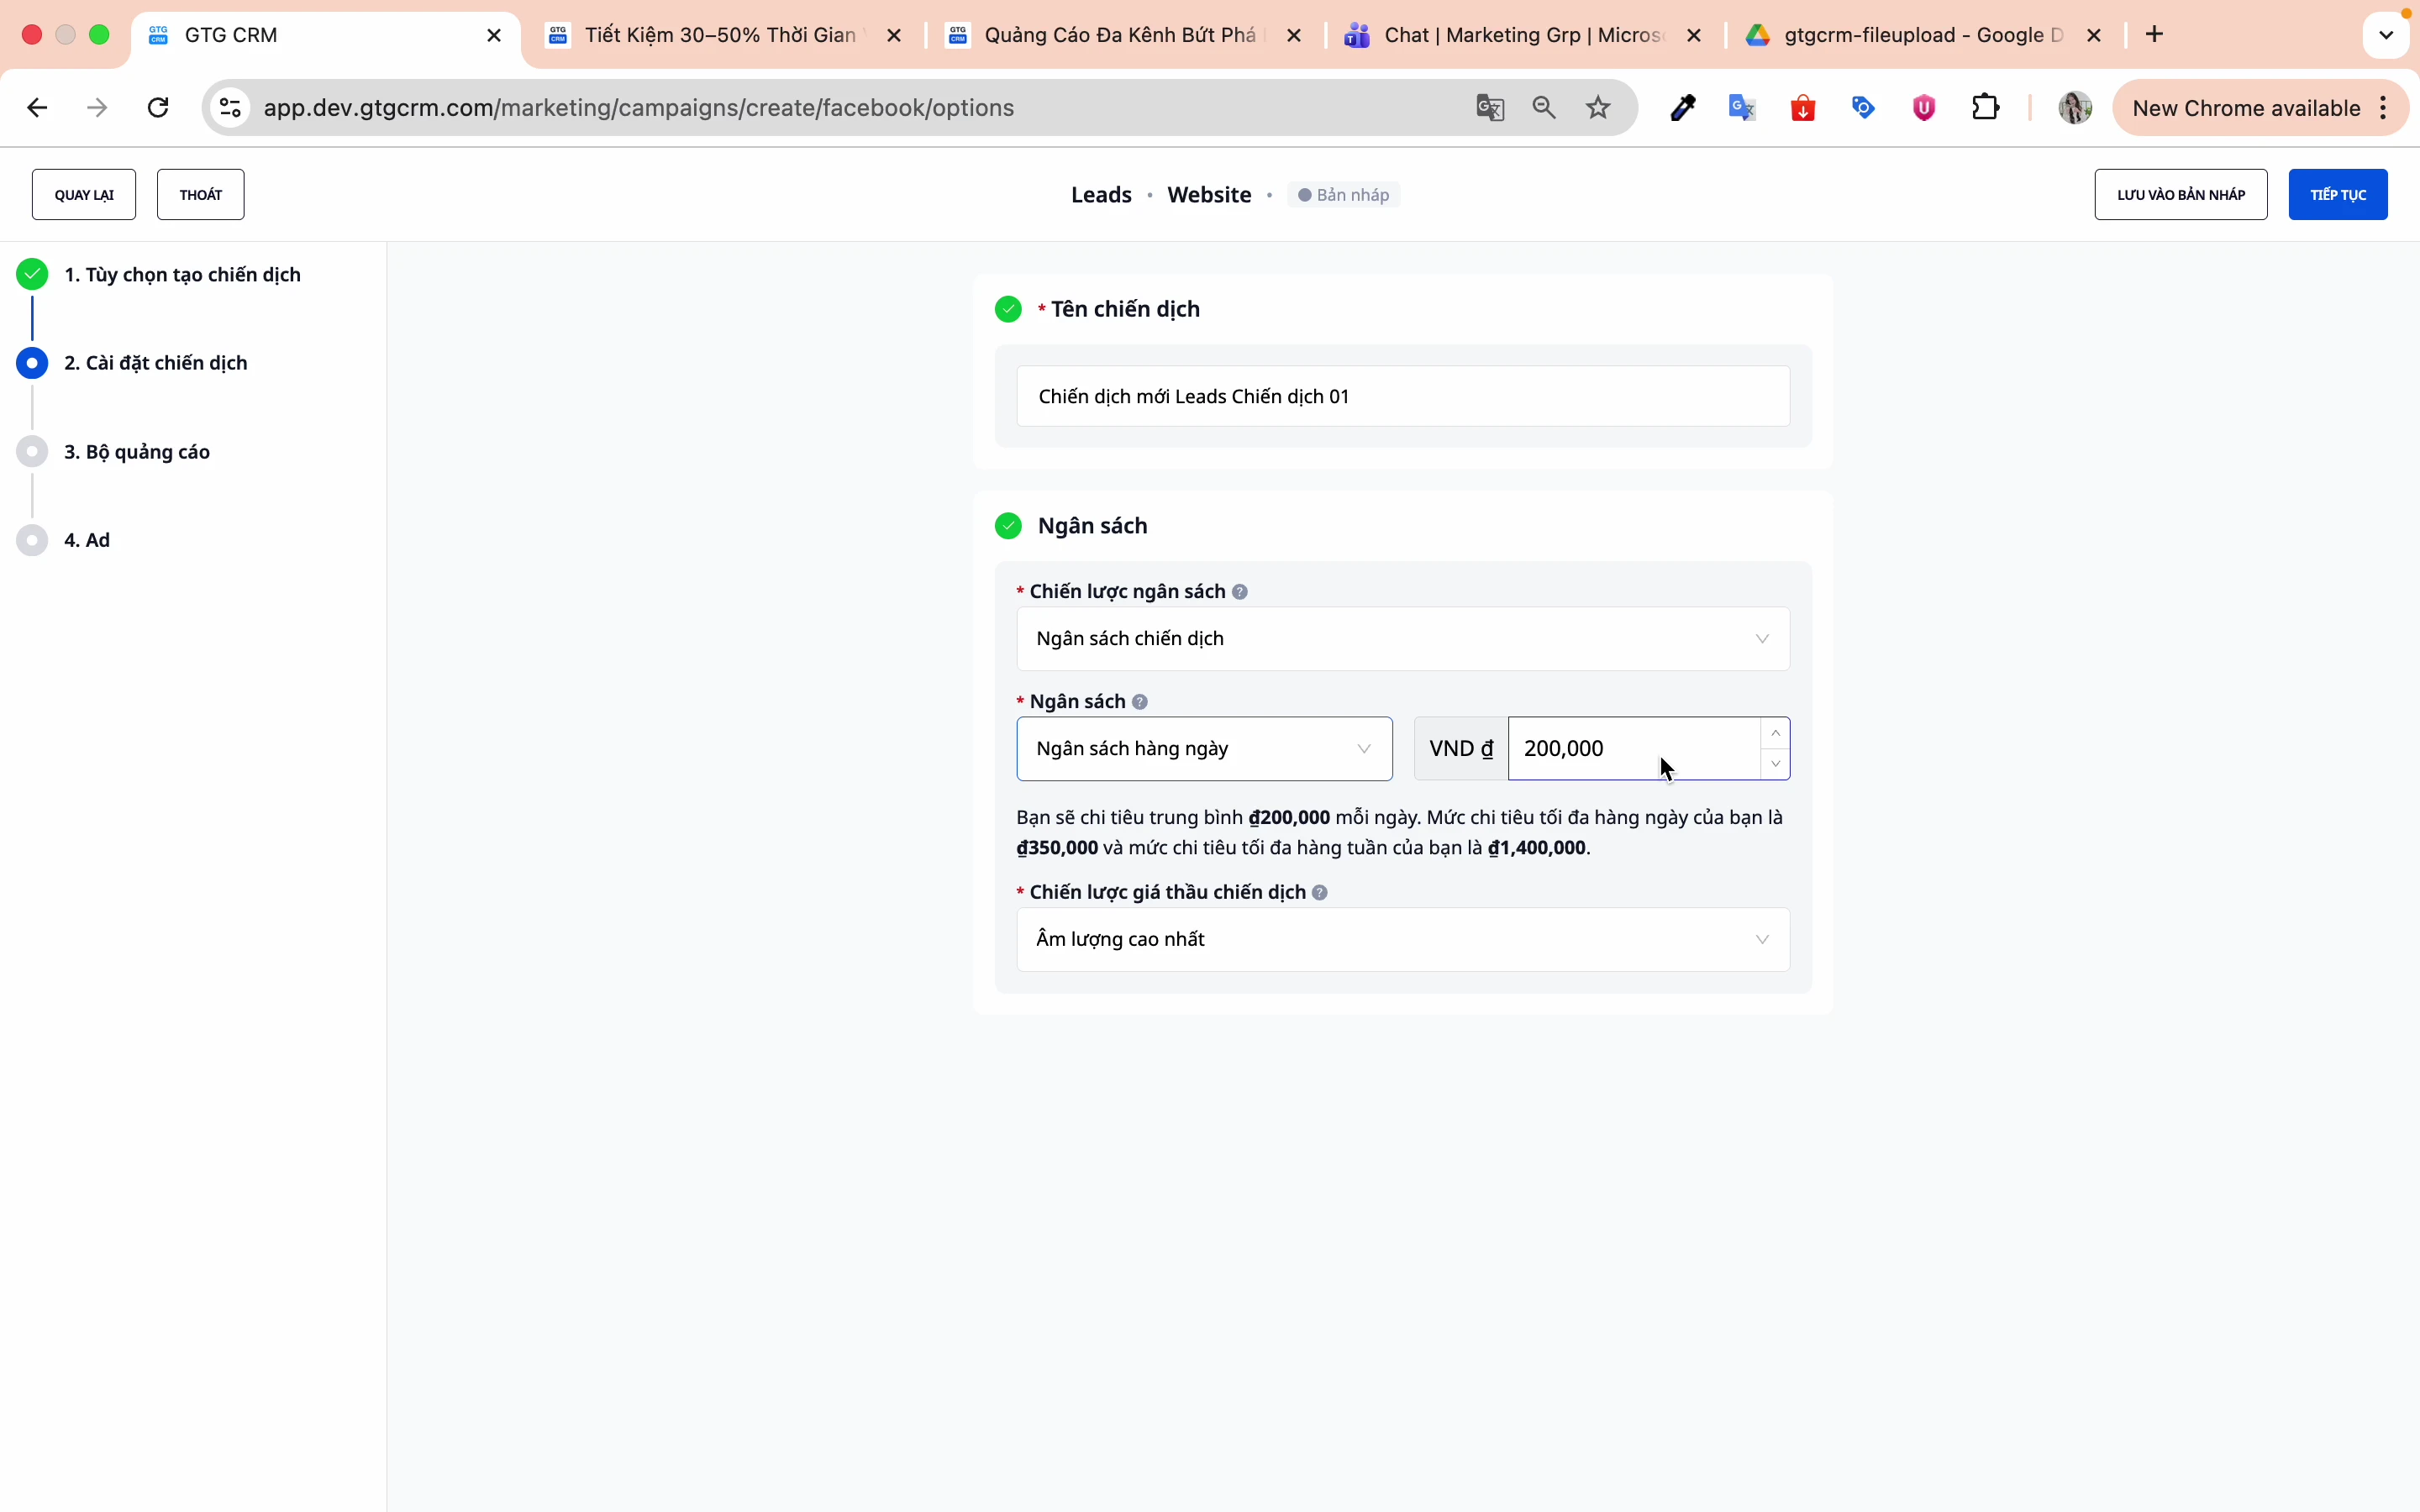
Skref 3: Veldu fjárhagsáætlunargerð
- Dagleg fjárhagsáætlun: Takmörkun útgjalda á hverjum degi (Ráðlagt)
- Heildarfjárhagsáætlun: Samtals fjárhagsáætlun fyrir alla herferðina
Skref 4: Sláðu inn fjárhagsáætlunarfjárhæð
td: 200.000 VNĐ/dag
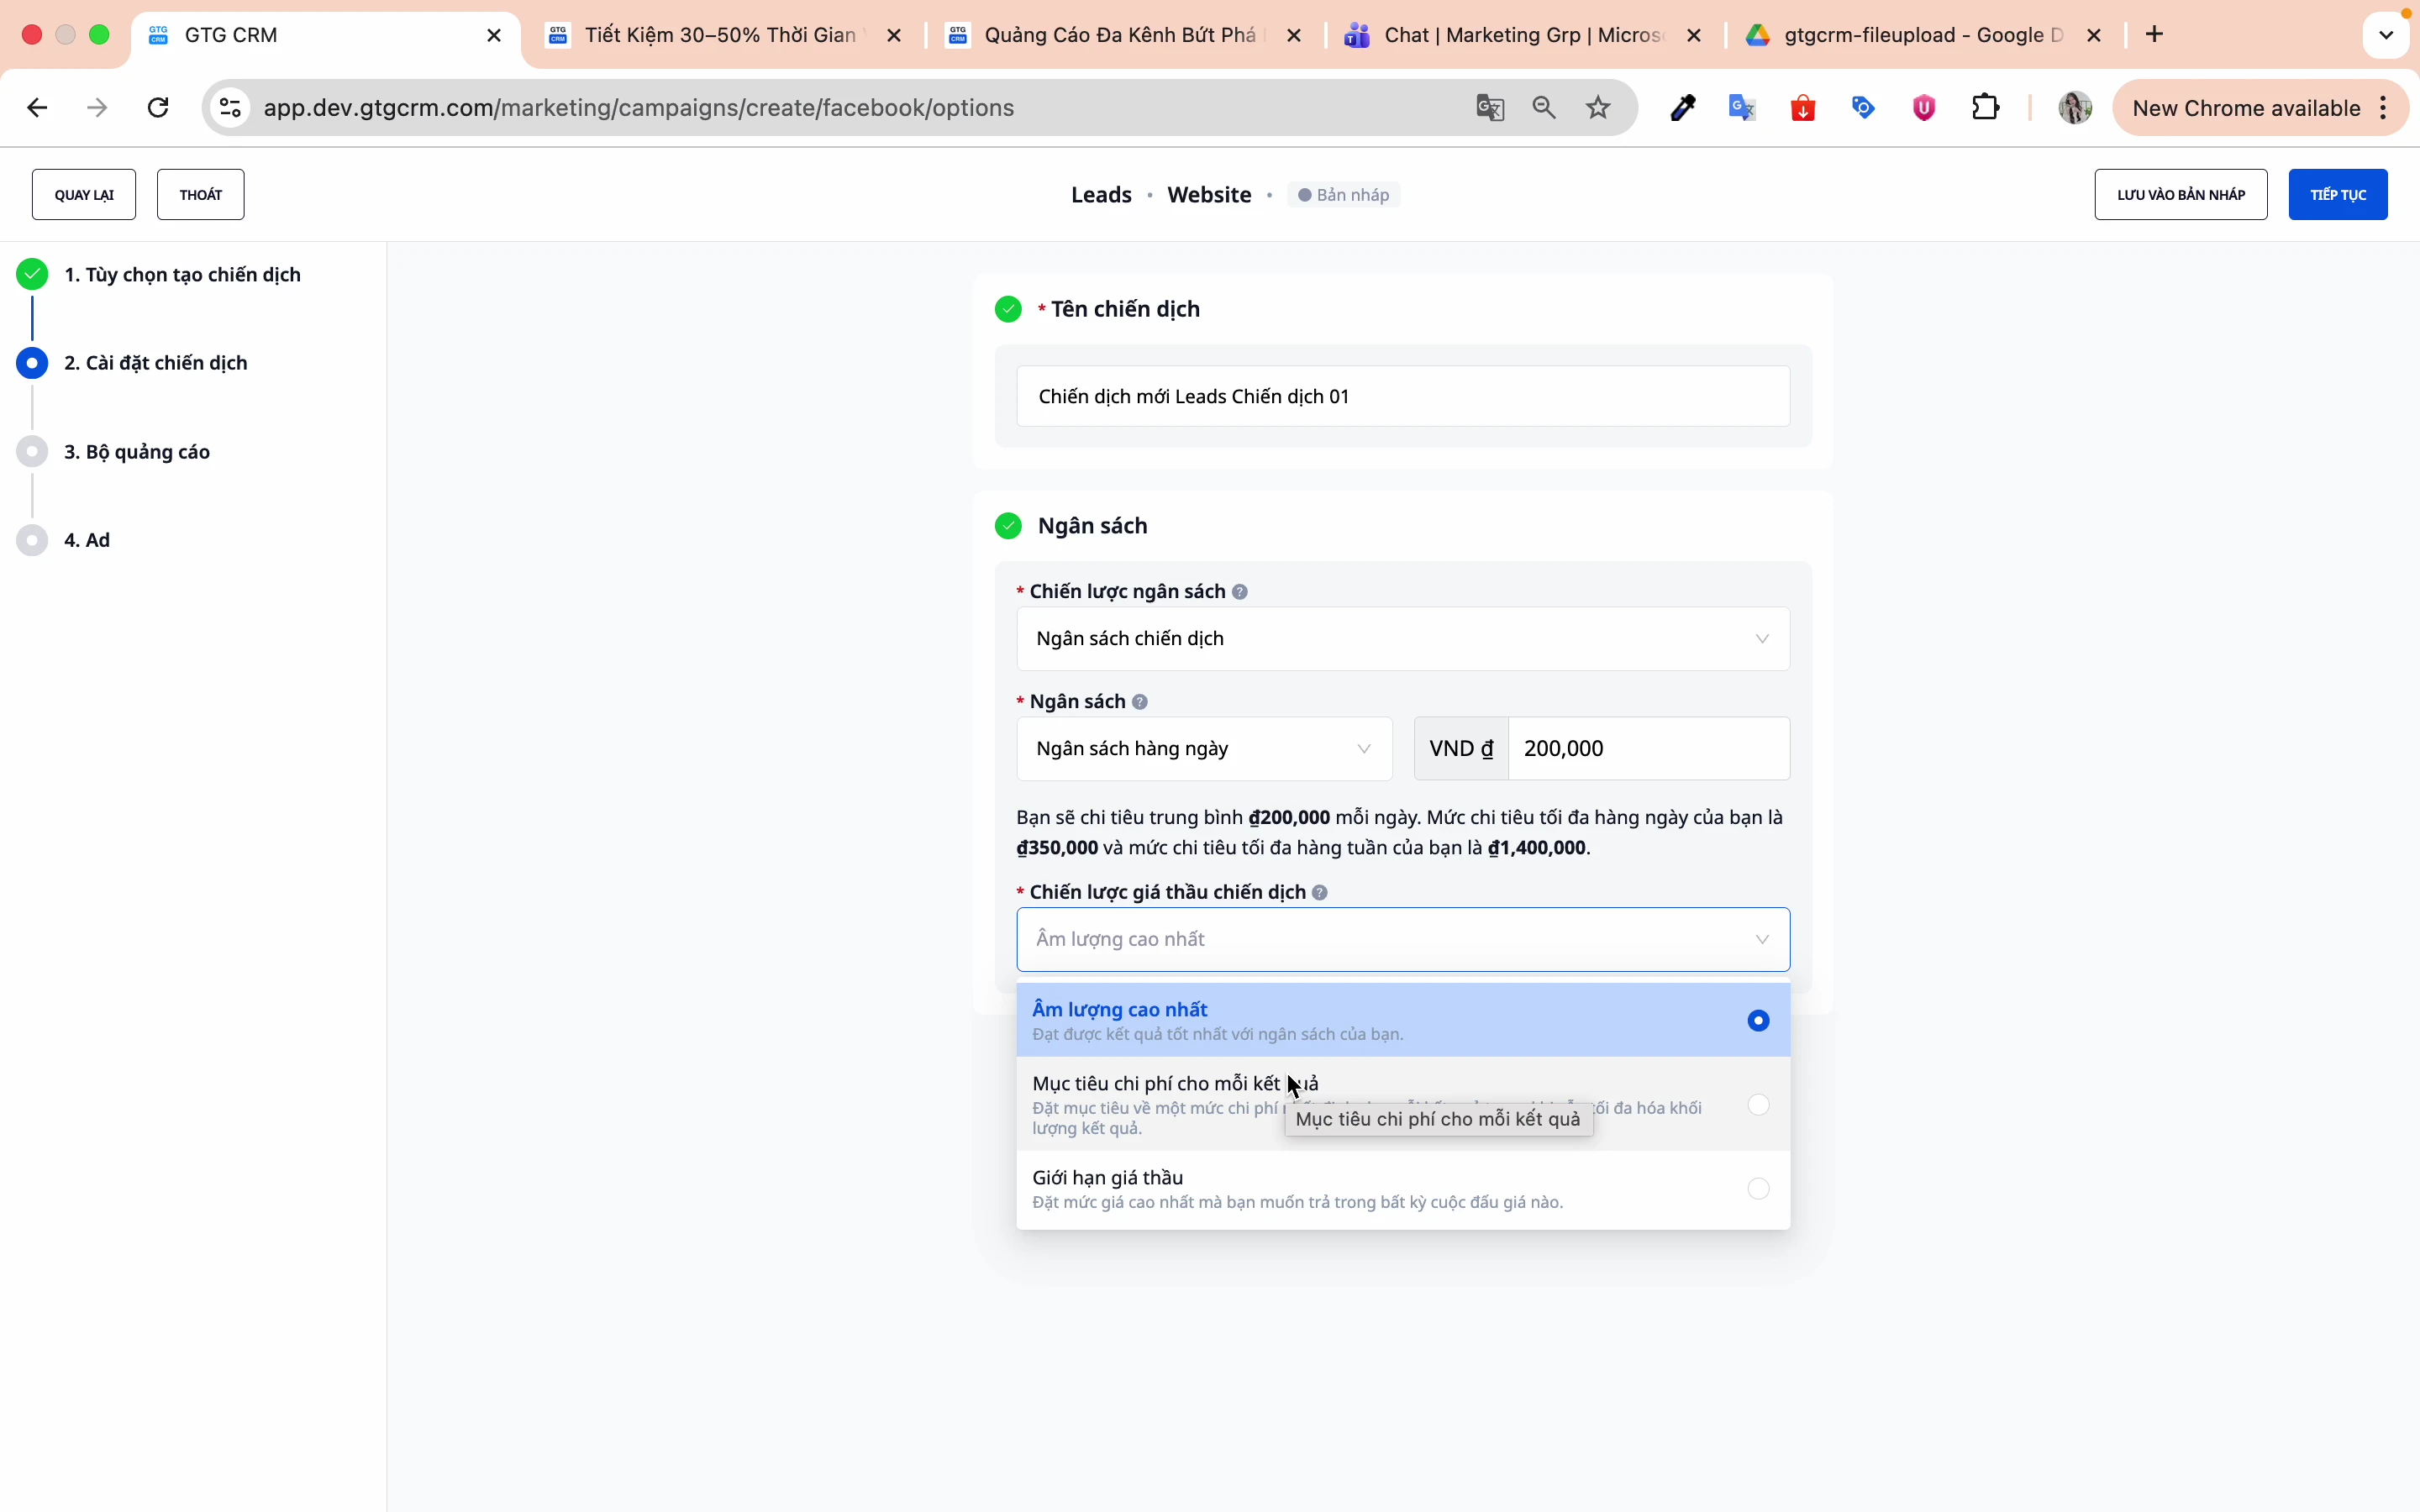
Skref 5: Veldu boðstefnu
Það eru 3 helstu stefnur:| Stefna | Lýsing | Hvenær á að nota |
|---|---|---|
| Bestu niðurstöður | Facebook hagræðir sjálfkrafa | Byrjendur |
| Kostnaður á niðurstöðu | Stilltu óskaðan CPA | Með söguleg gögn |
| Tilboðstakmörk | Stilltu tilboðshemli | Strangt kostnaðareftirlit |
4. Uppsetning auglýsingahóps (Ad Set)
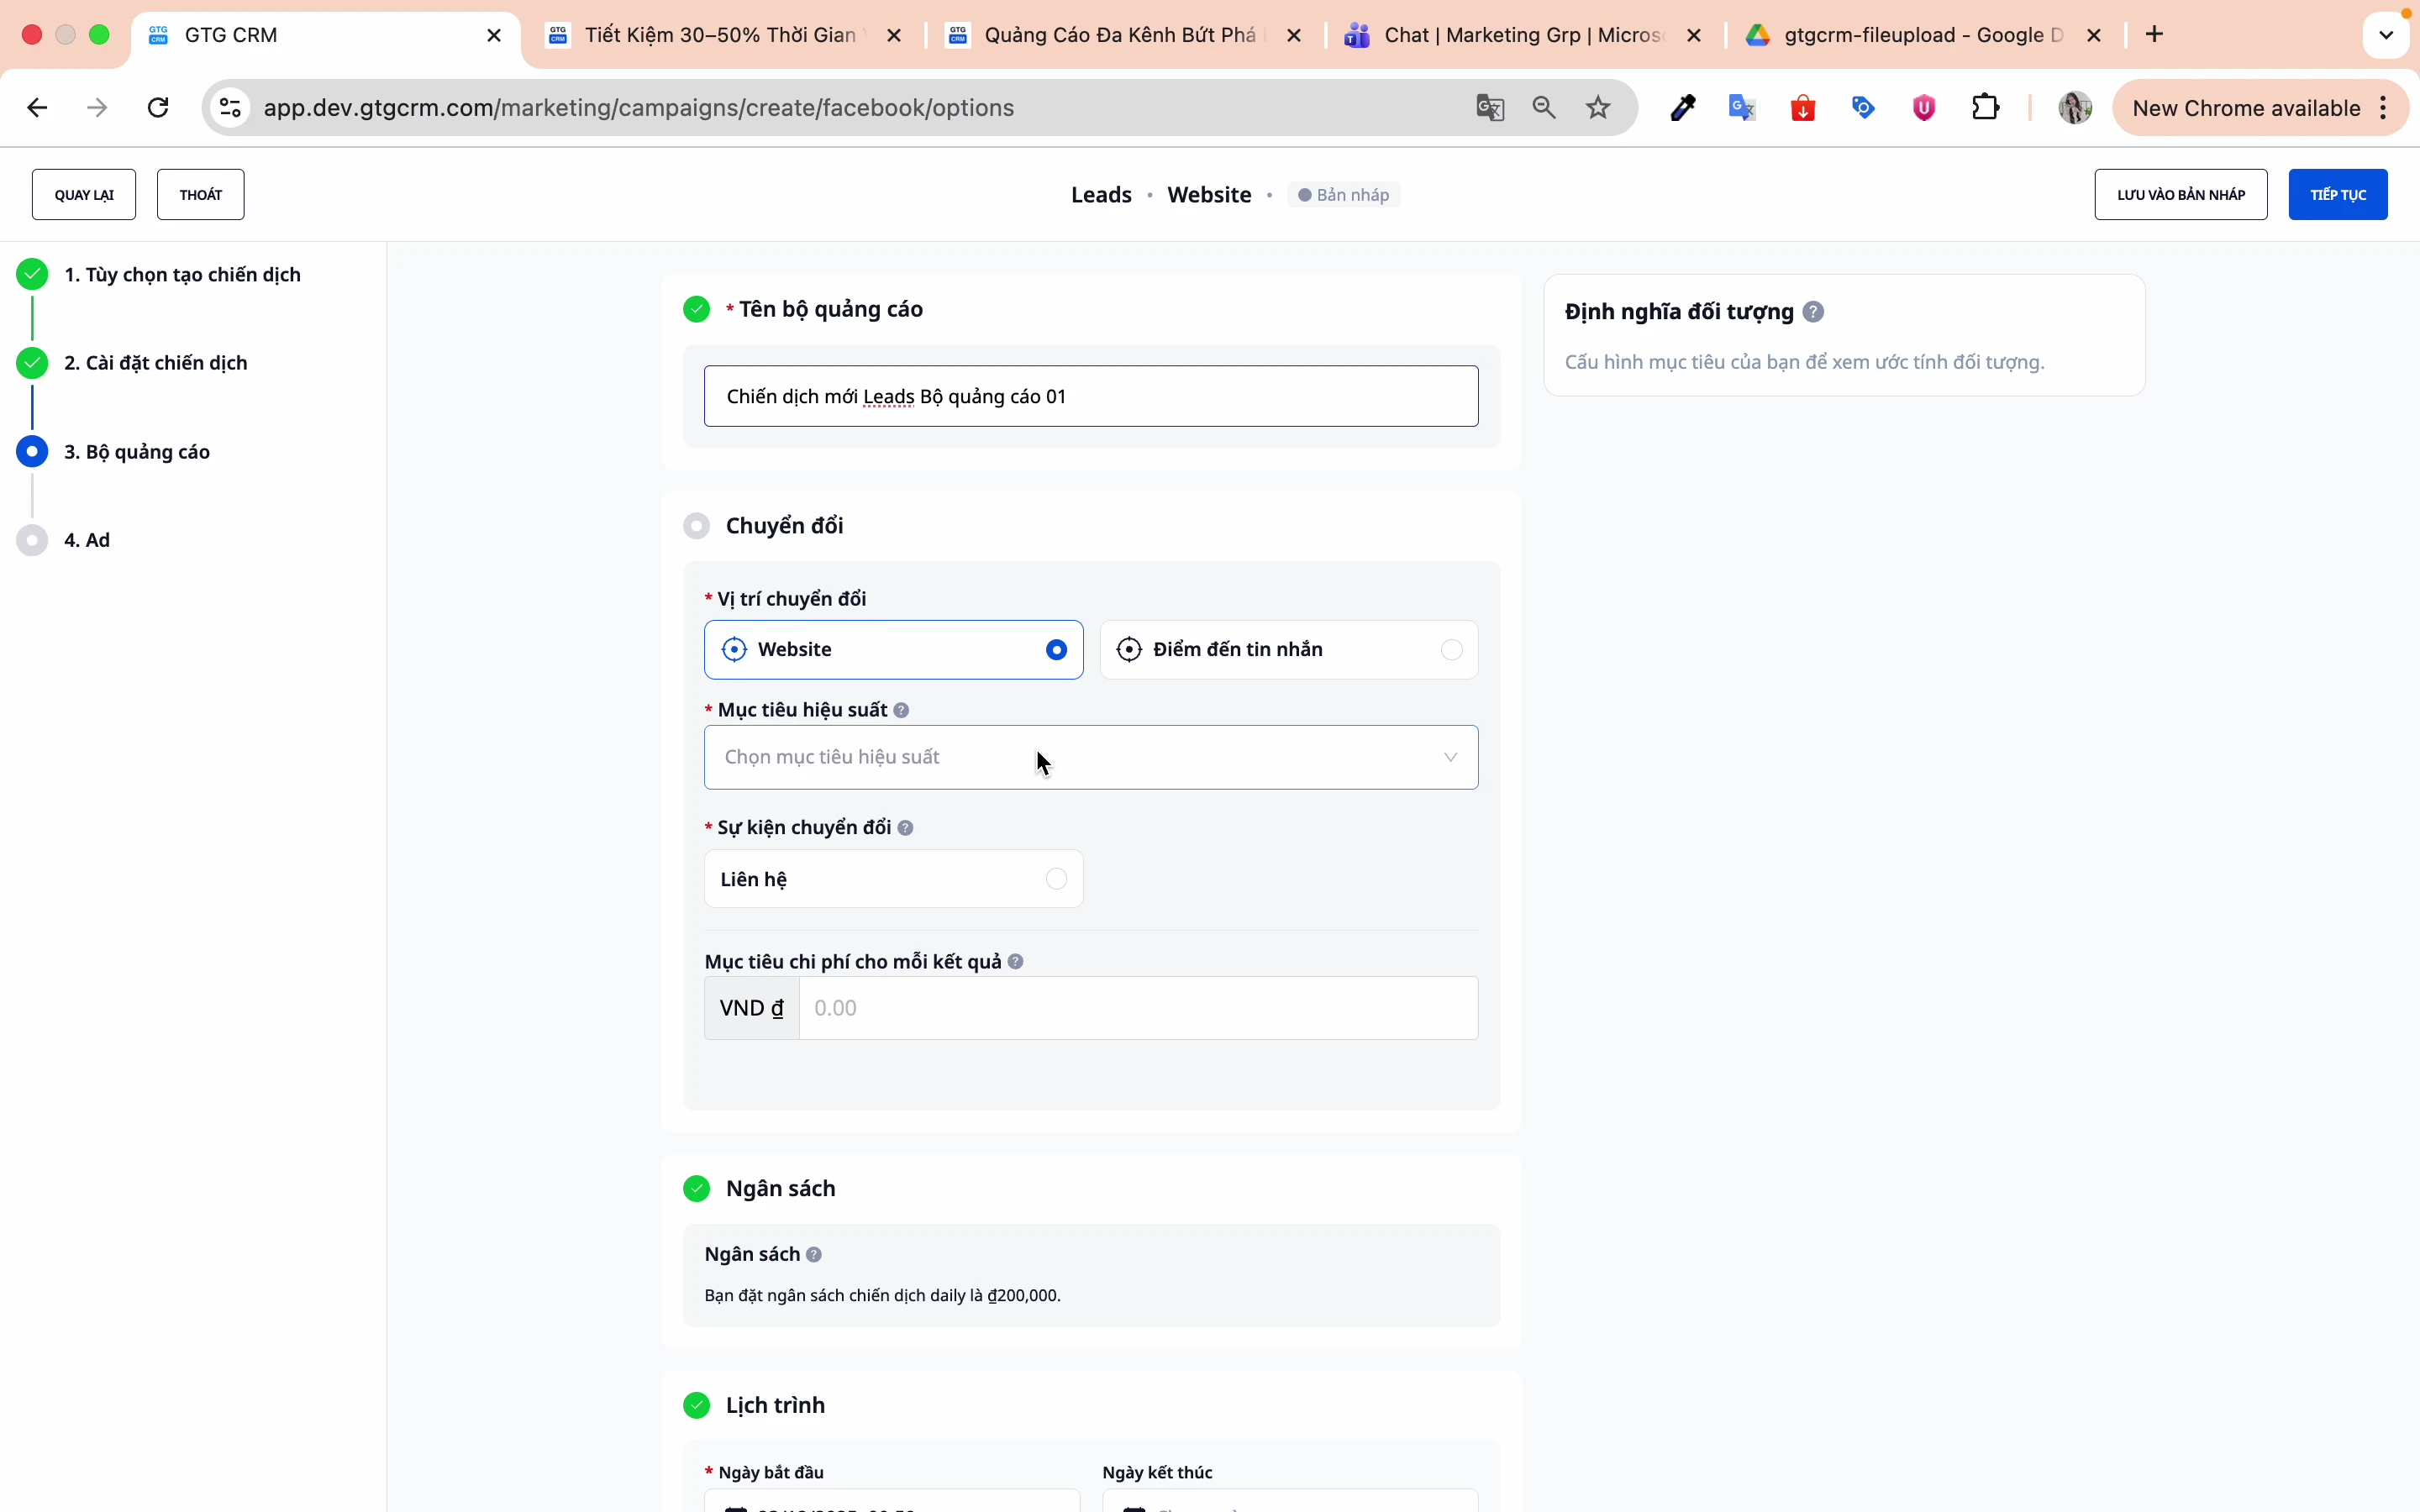
Skref 1: Nefndu auglýsingahópinn
Nefndu til að greina á milli auglýsingahópa. Rétt nafn frá upphafi hjálpar til við að draga úr ruglingi, spara rekstrartíma og styðja skilvirkari auglýsingakaup.
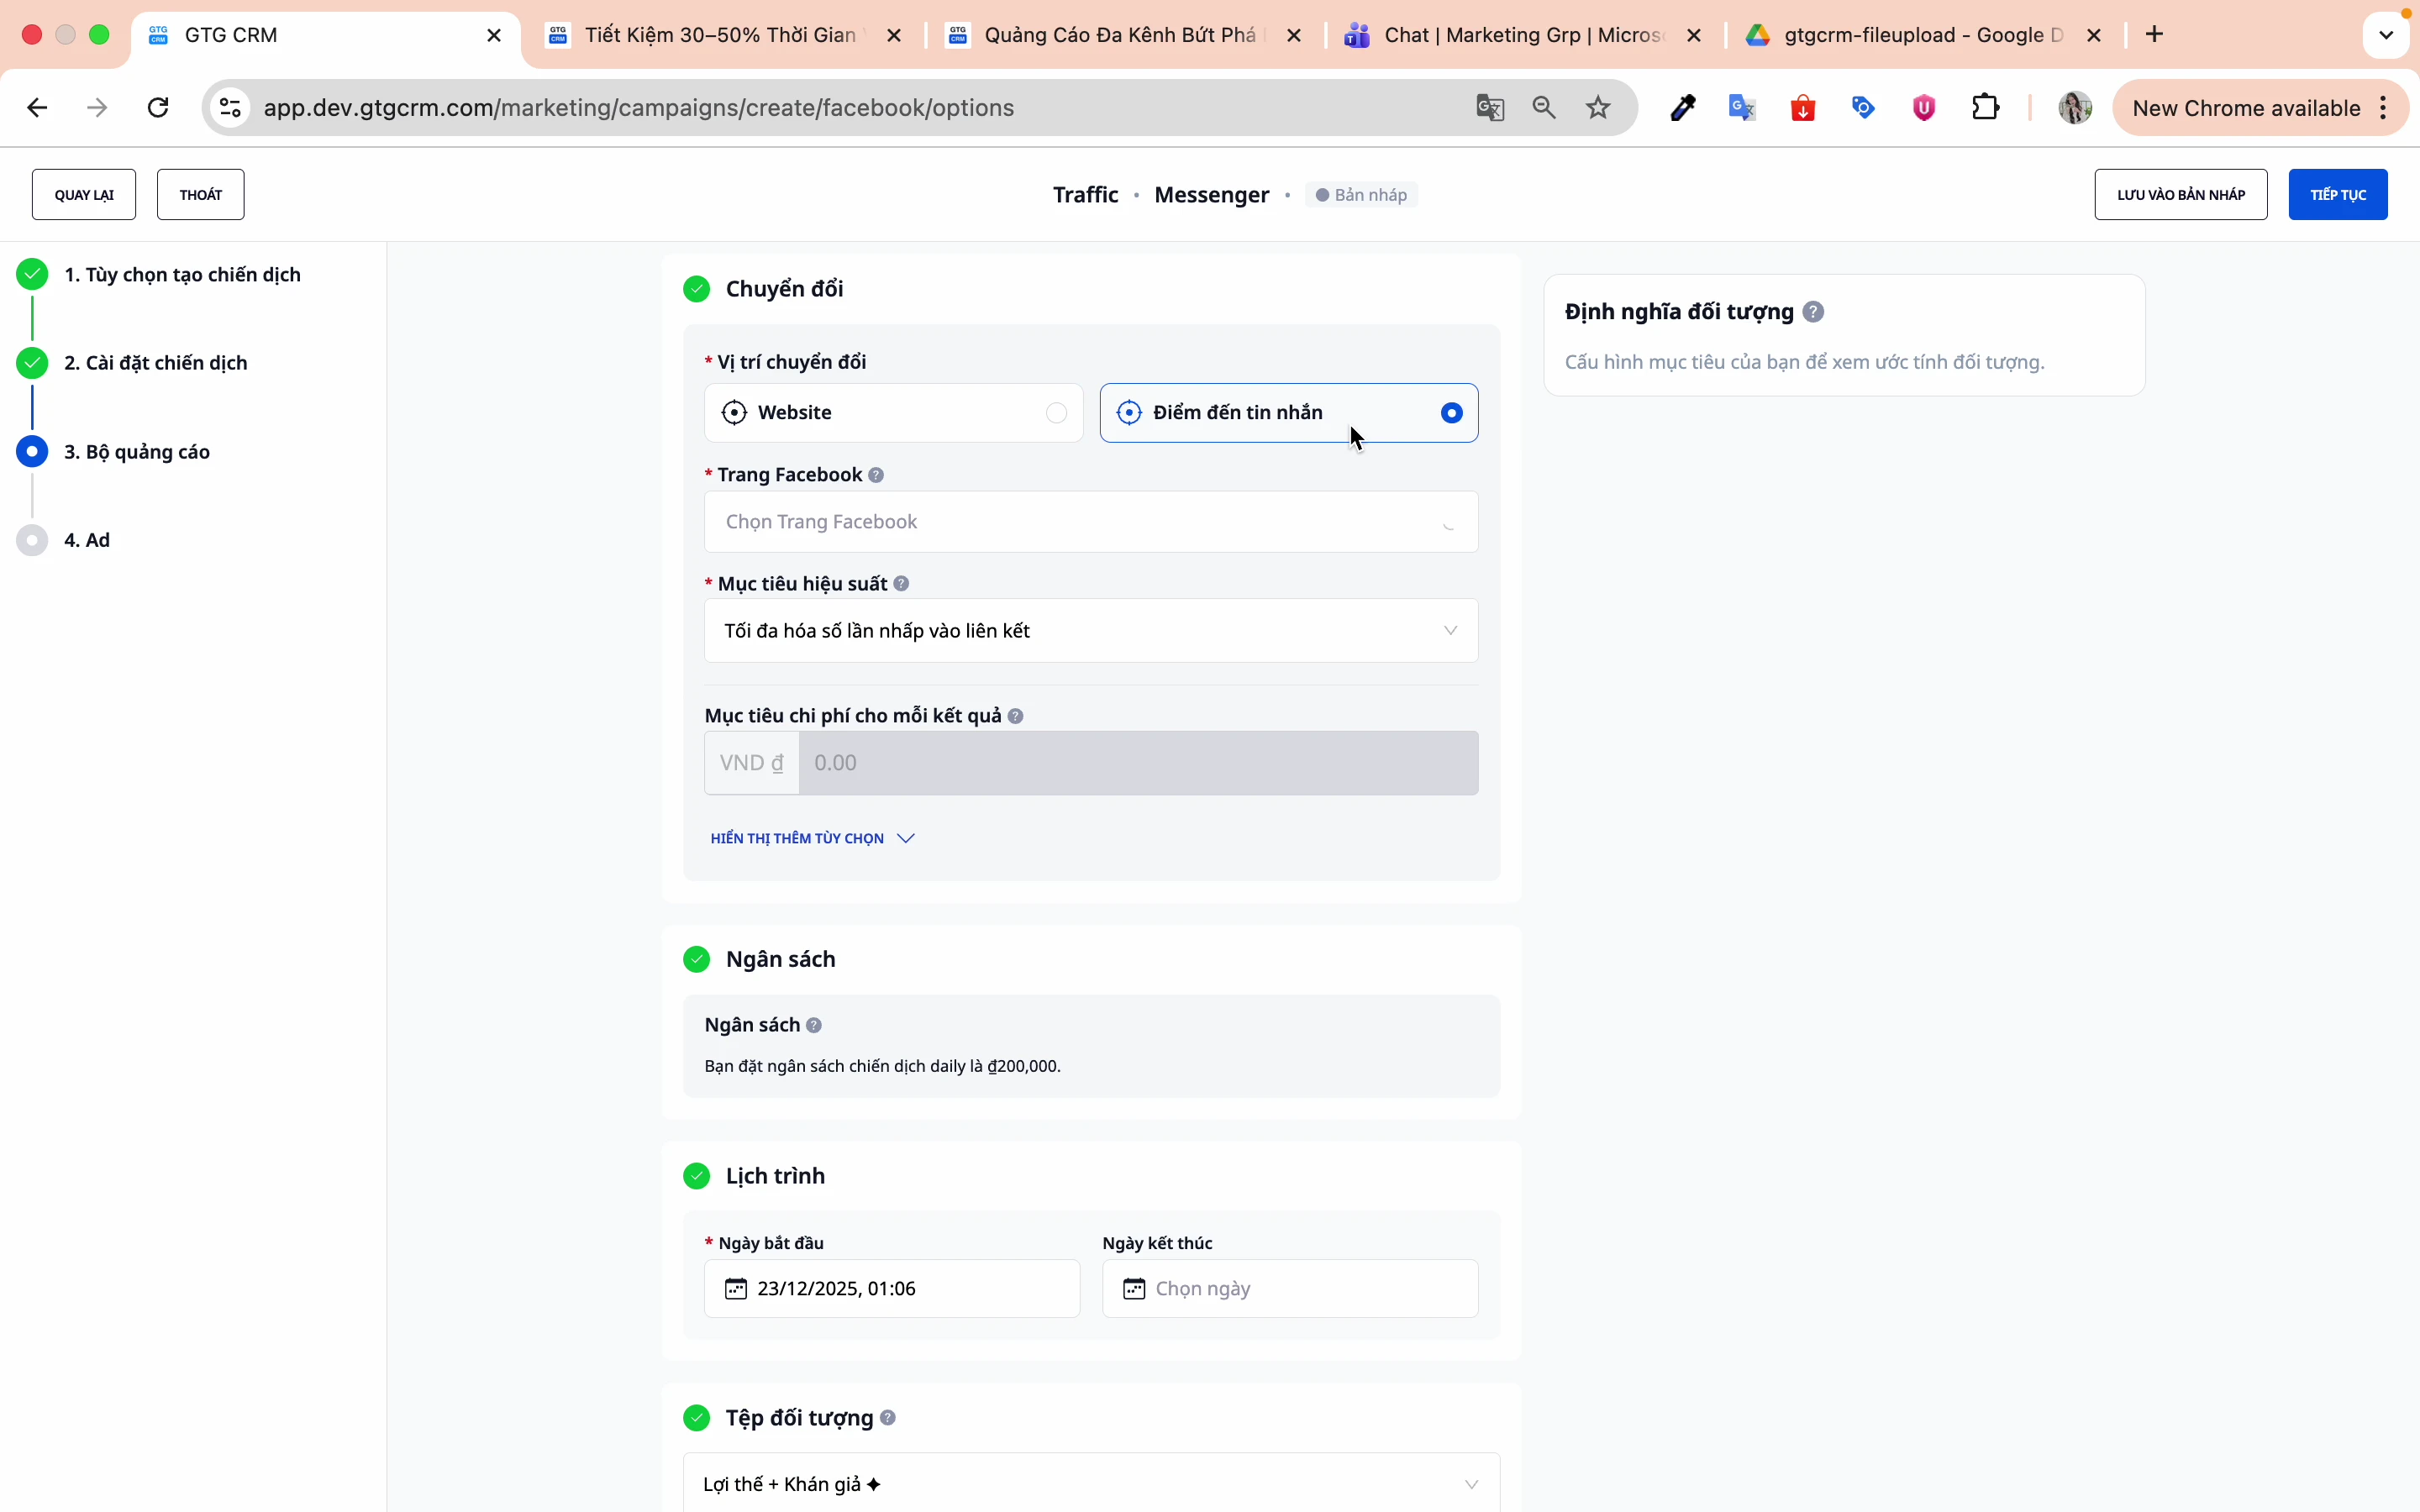
Skref 2: Veldu staðsetningu viðskipta
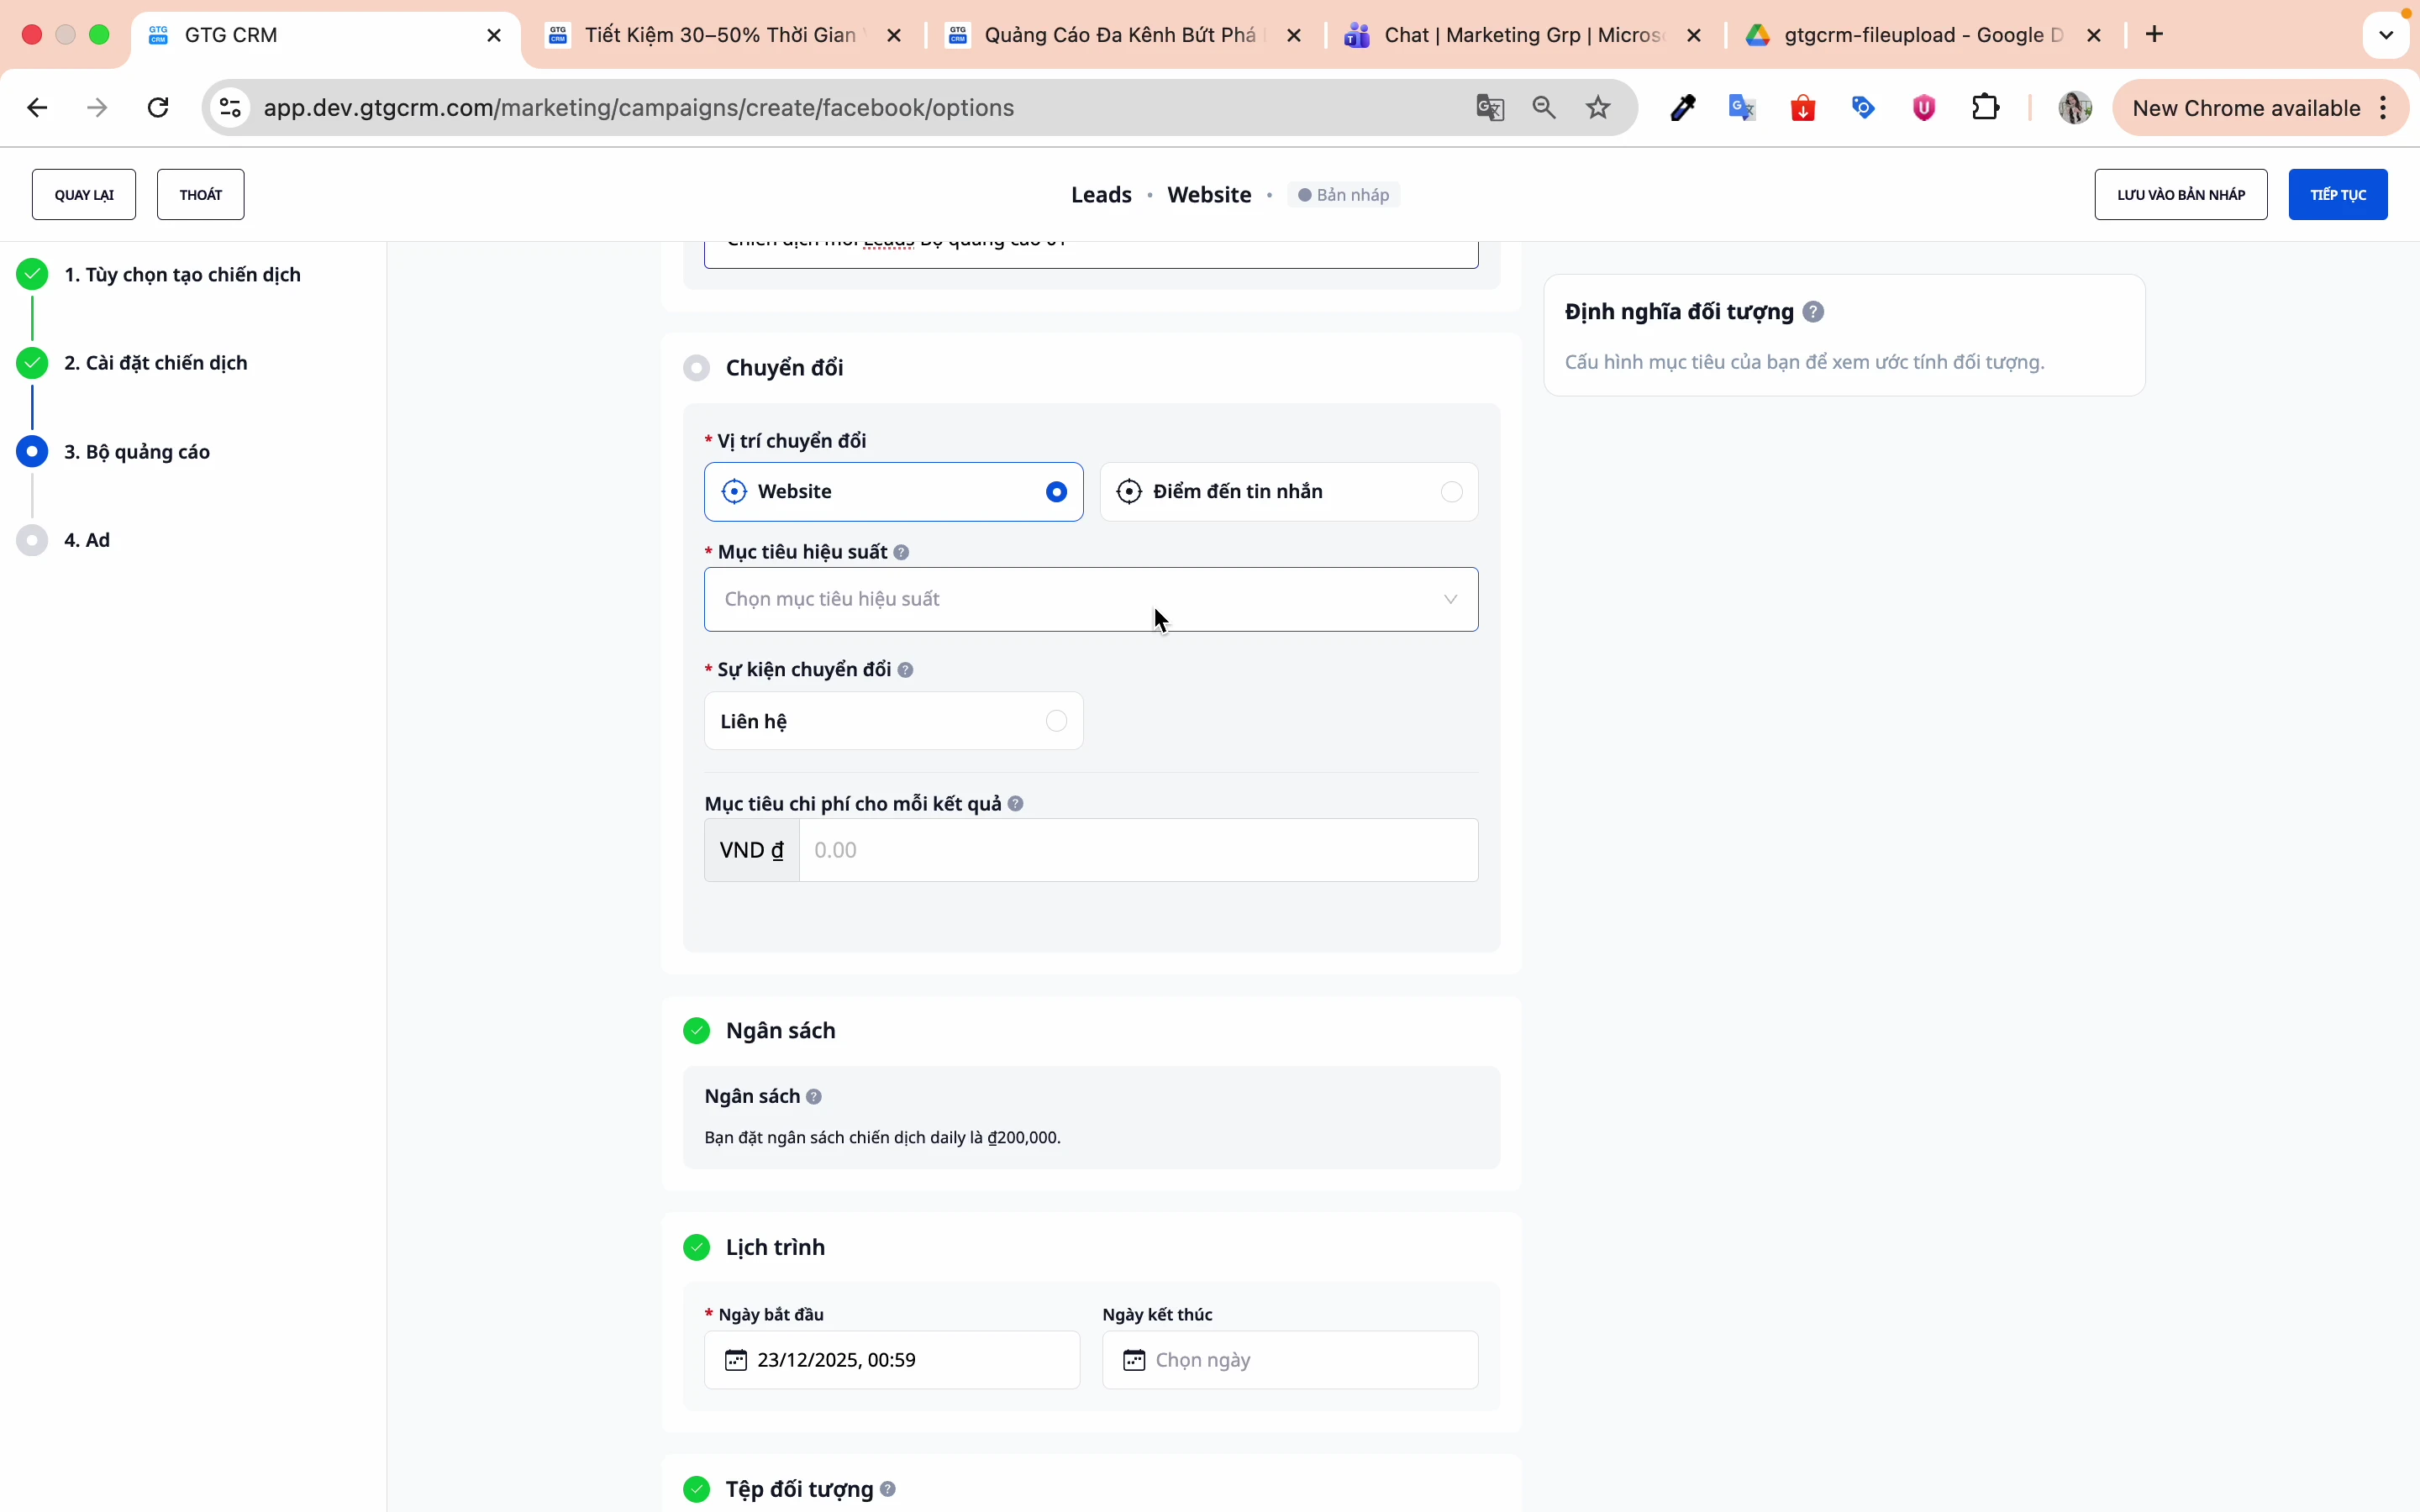
Það eru 2 helstu staðsetningar viðskipta:
Vefsvæðisviðskipti:
- Viðskipti eiga sér stað á vefsvæði
- Krefst uppsetningar á Facebook Pixel
- Hentar: Rafræn verslun, tengiliðaform á vefsvæði
Messenger viðskipti:
- Viðskipti í gegnum skilaboð
- Hentar: Ráðgjöf, þjónustudeild, söluspjall
Skref 3: Veldu Pixel (ef vefsvæðisviðskipti)
Veldu Pixel sem hefur verið settur upp á vefsvæðinu þínu.
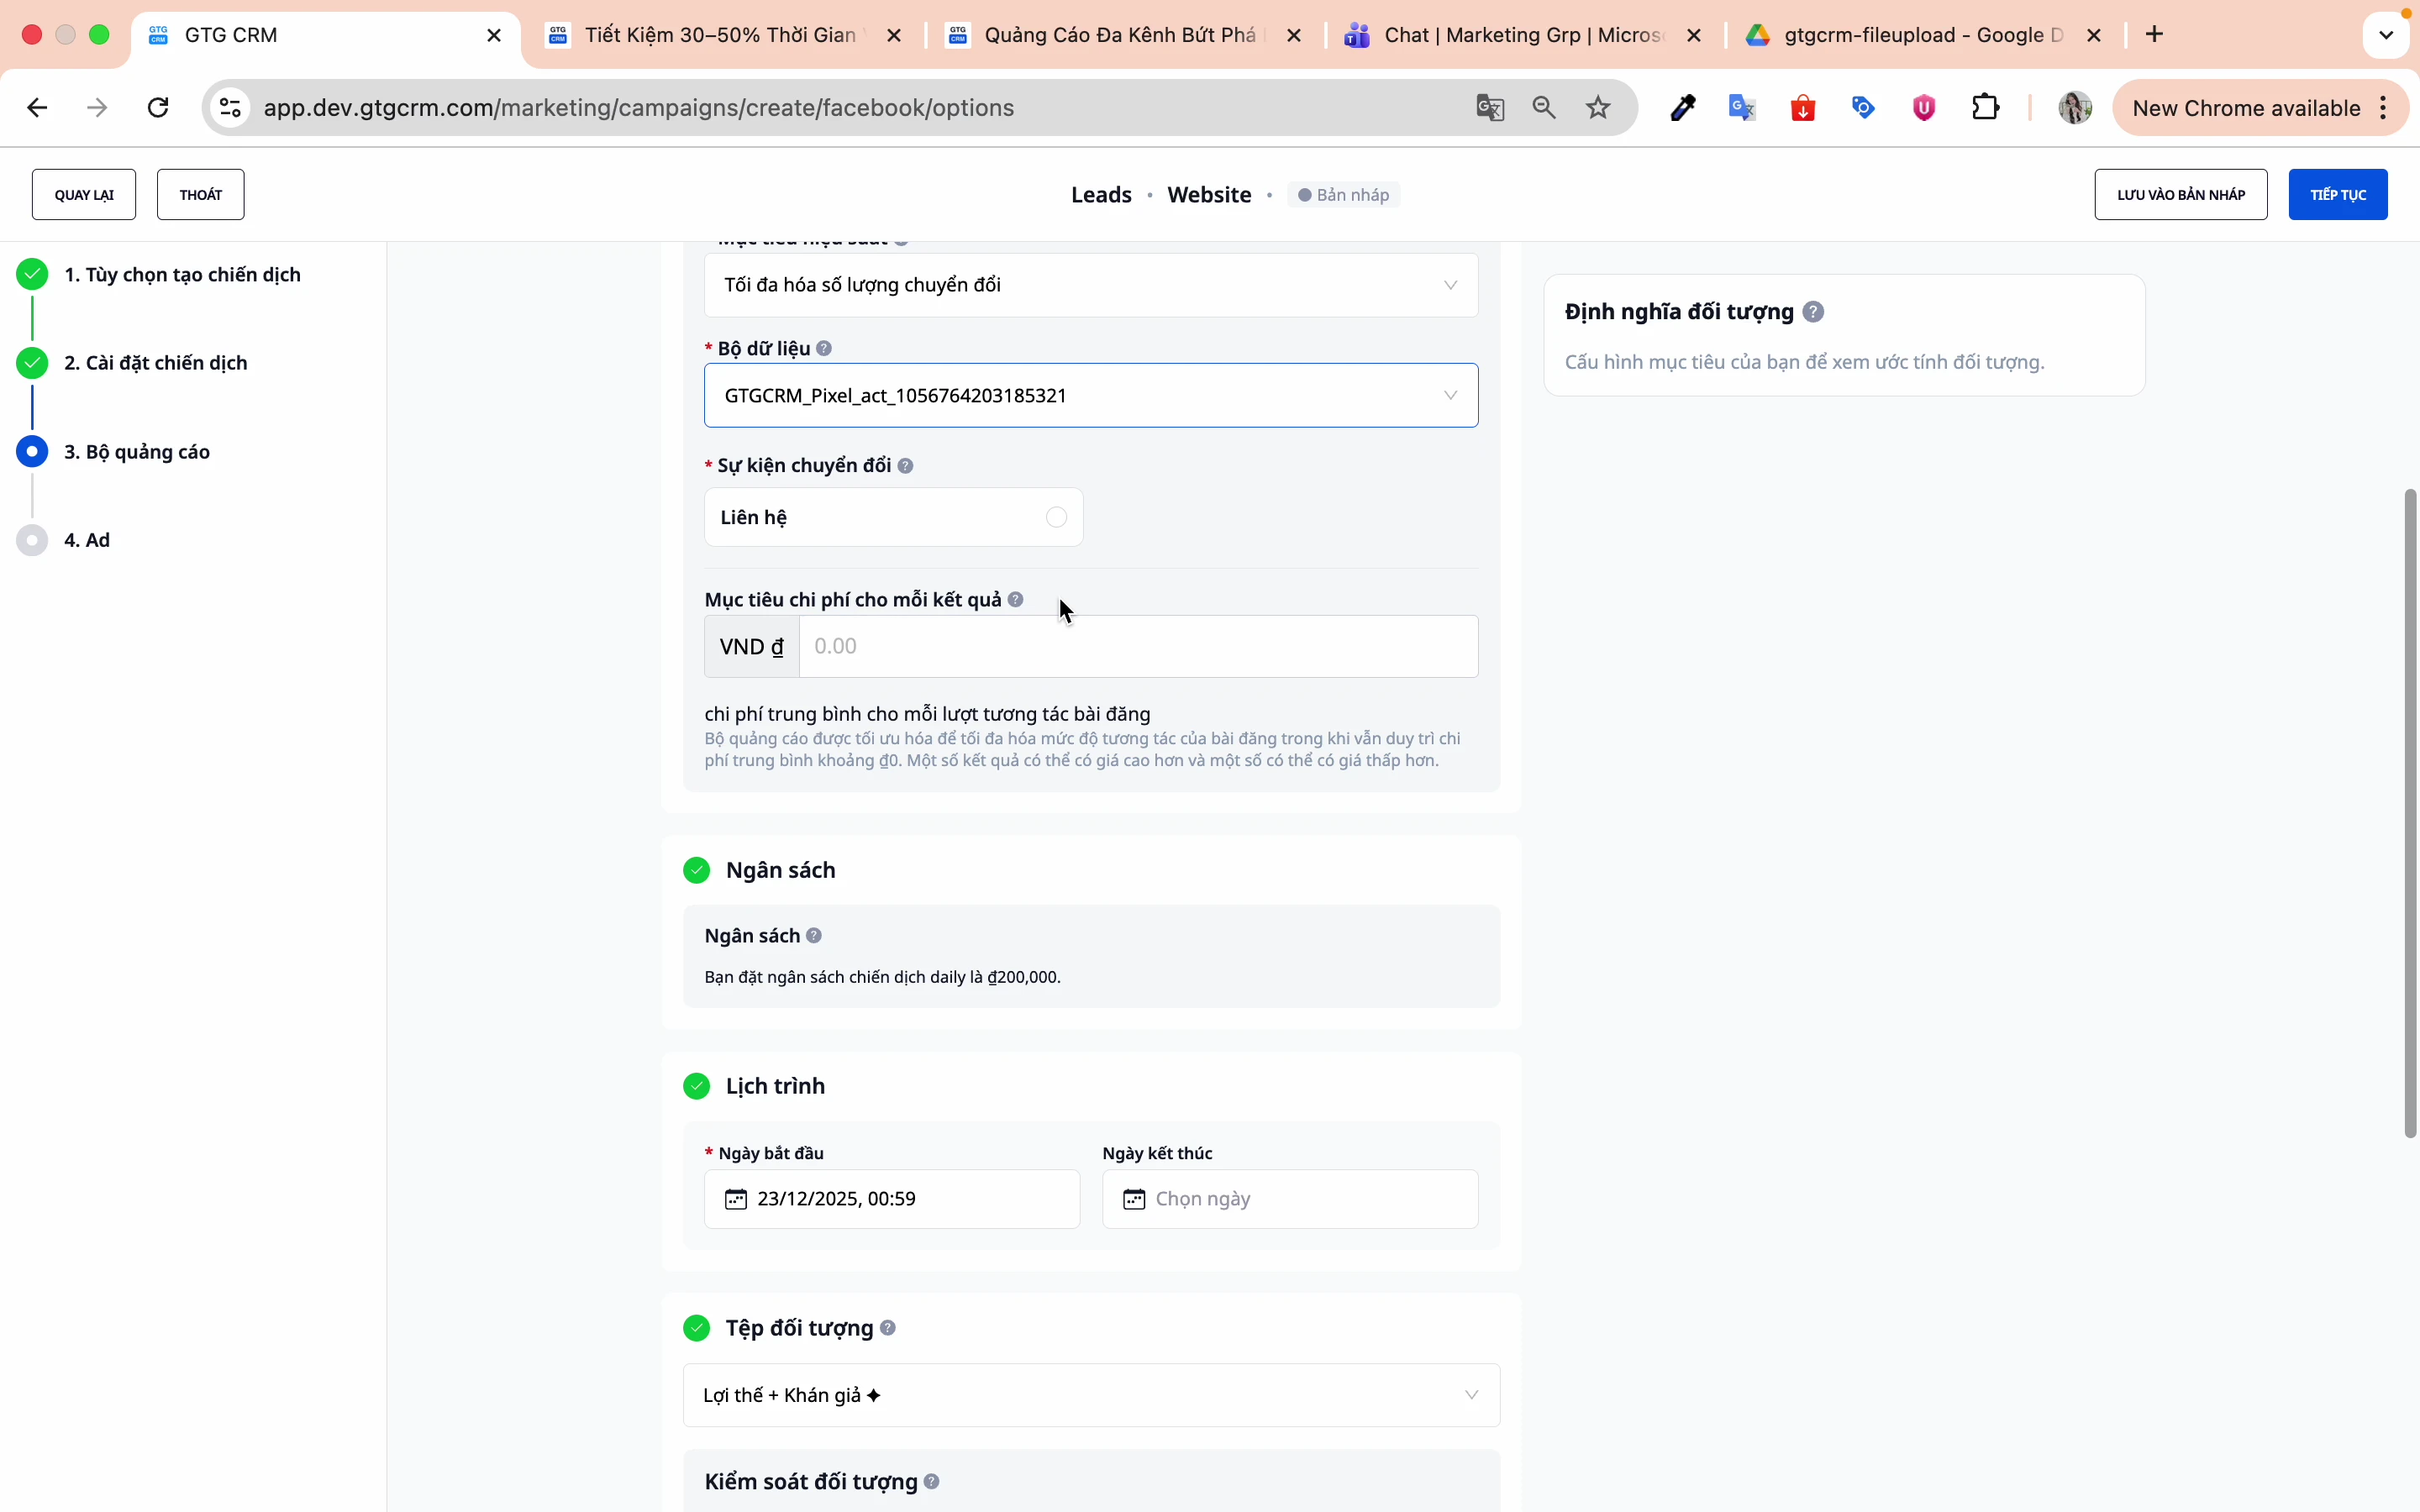
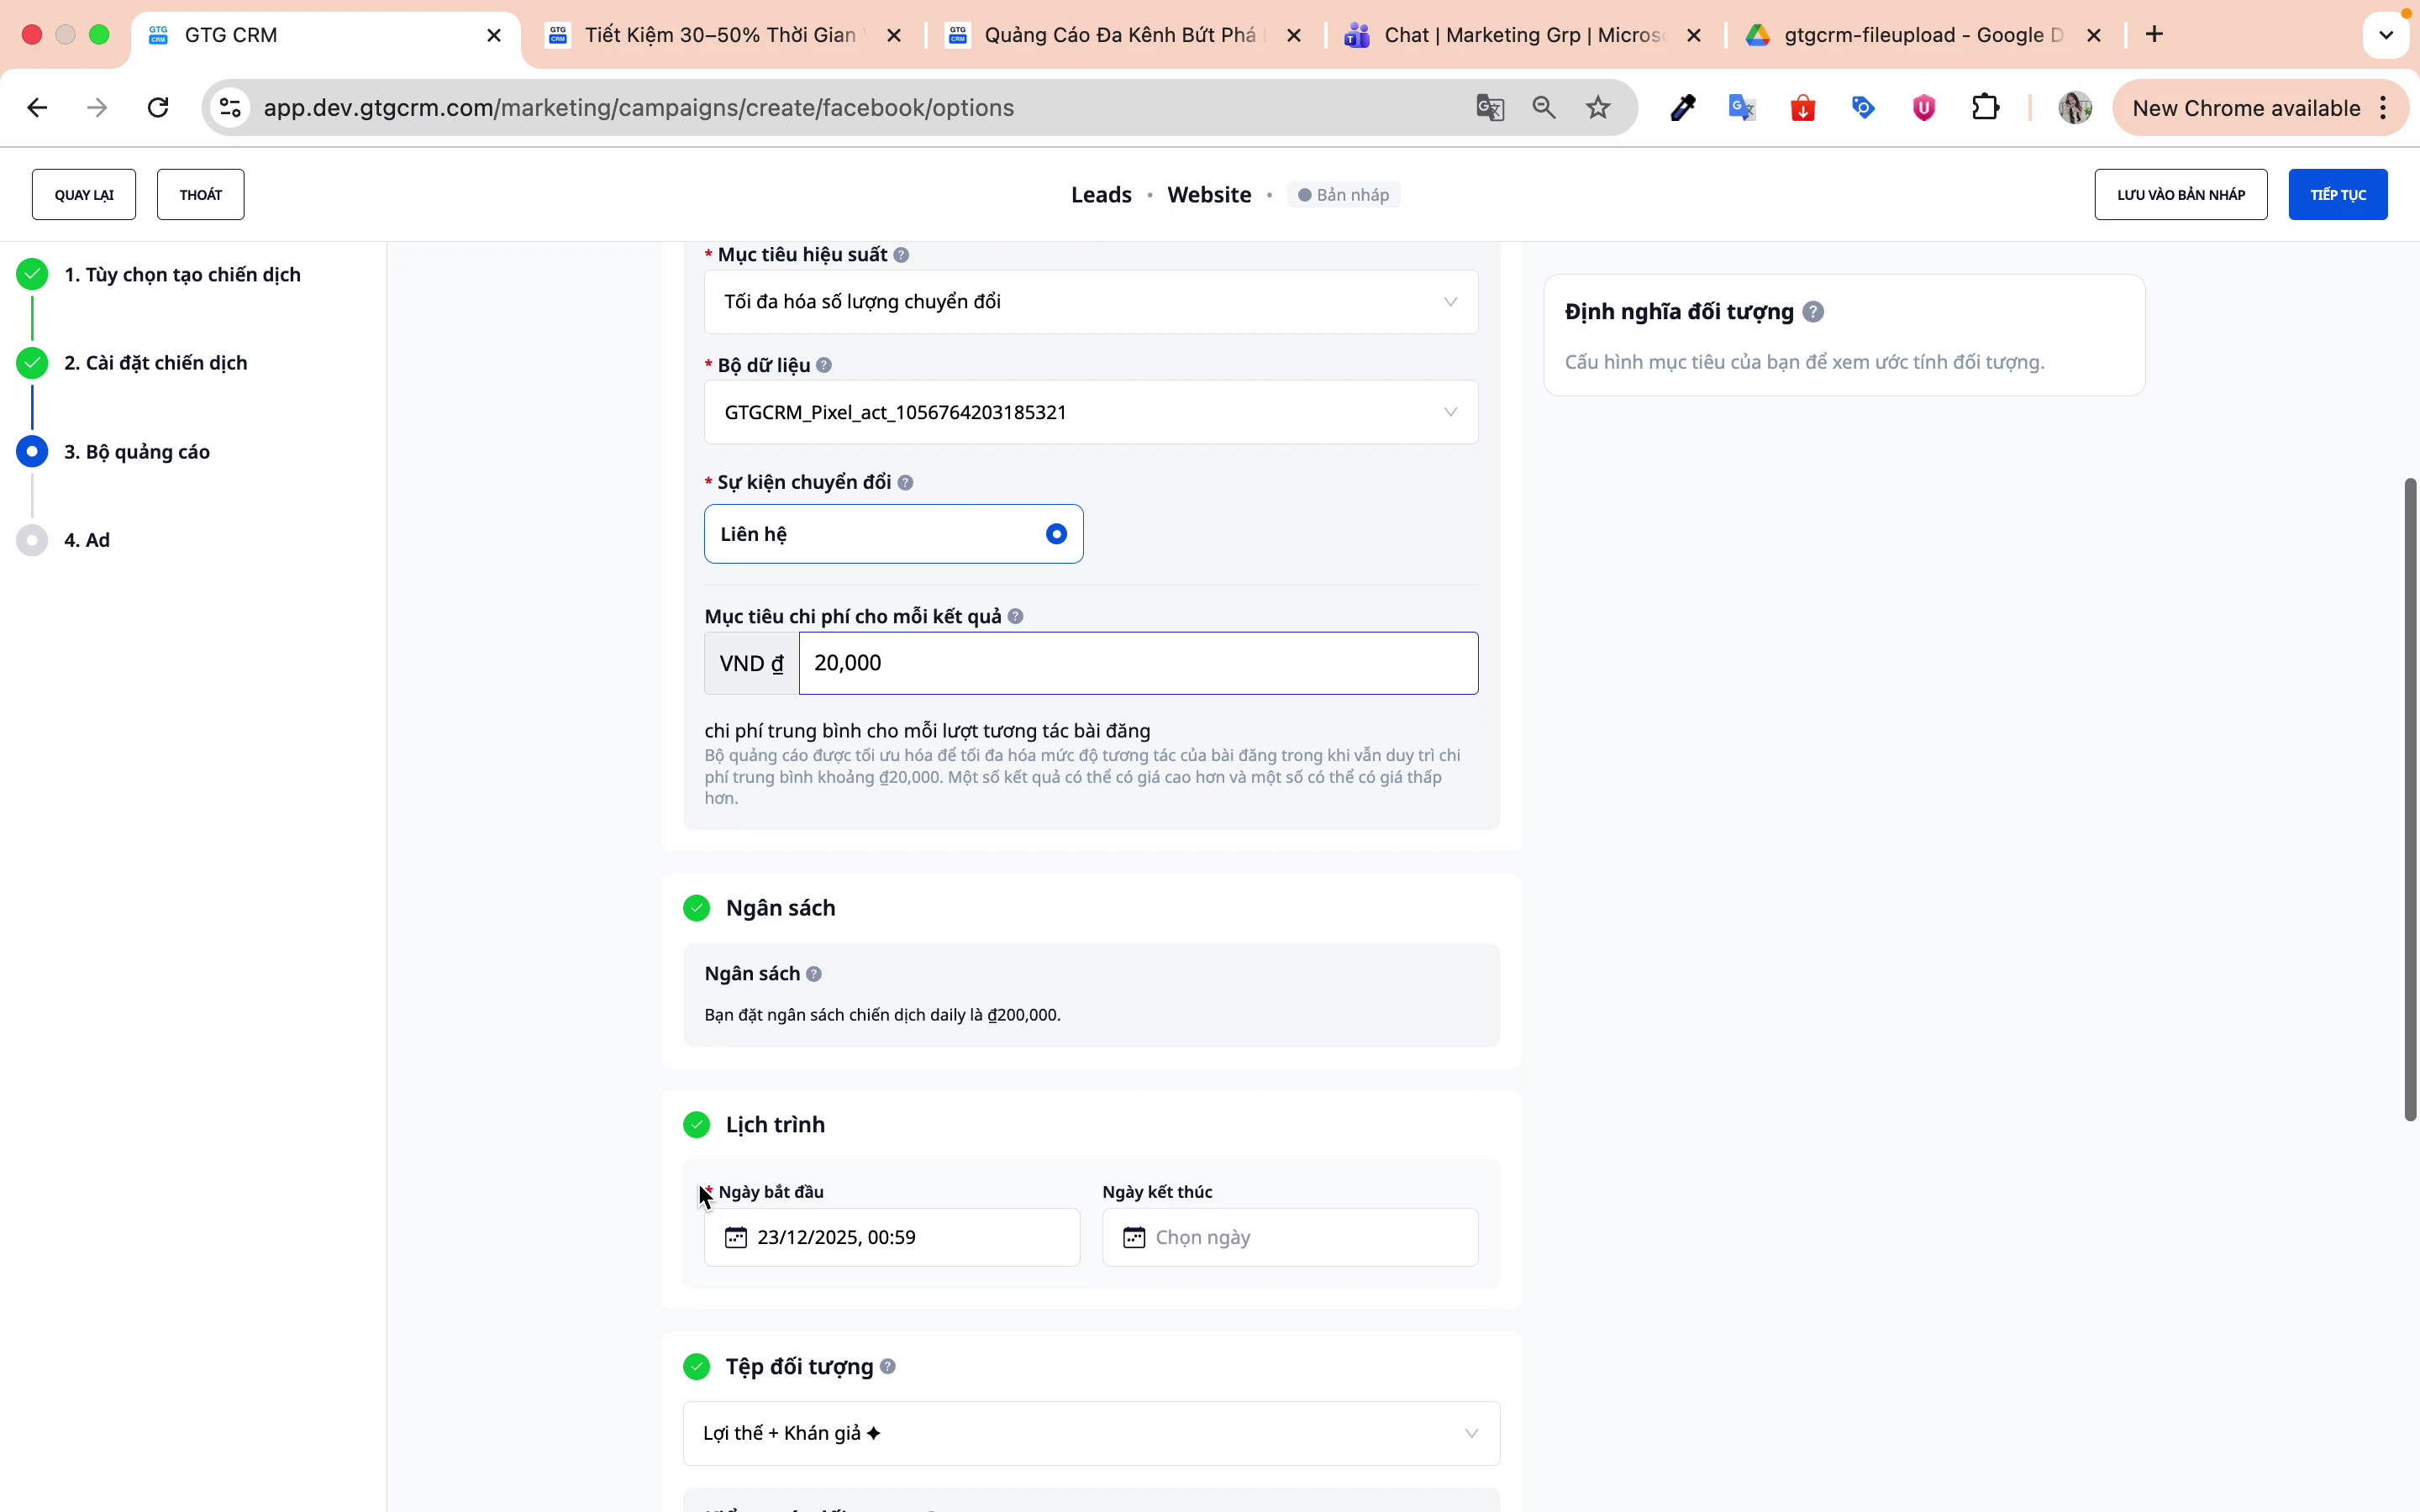
Skref 4: Veldu viðskiptaviðburð
T.d.: Tengiliður, Kaup, Skráning...
GTG CRM Facebook auglýsingaeiginleikinn mun sjálfkrafa læra og dreifa auglýsingum til þeirra sem líklegastir eru til að framkvæma þá aðgerð, byggt á hegðunargögnum, samskiptasögu og vísbendingum í Facebook vistkerfinu.
Skref 5: Stilltu kostnaðarmarkmið (Valfrjálst)
Í þessu skrefi geturðu stillt óskaðan kostnað fyrir hverja niðurstöðu (t.d. kostnað á tengilið, skráningu, pöntun). Þetta er valfrjálst, ekki skylda, og ætti aðeins að nota þegar þú hefur nægilega áreiðanleg gögn frá fyrri herferðum.
Þegar þú slærð inn markmiðskostnað mun Facebook reyna að dreifa auglýsingum til að ná sem flestum niðurstöðum innan þeirrar kostnaðar, frekar en að hámarka fjölda viðskipta.
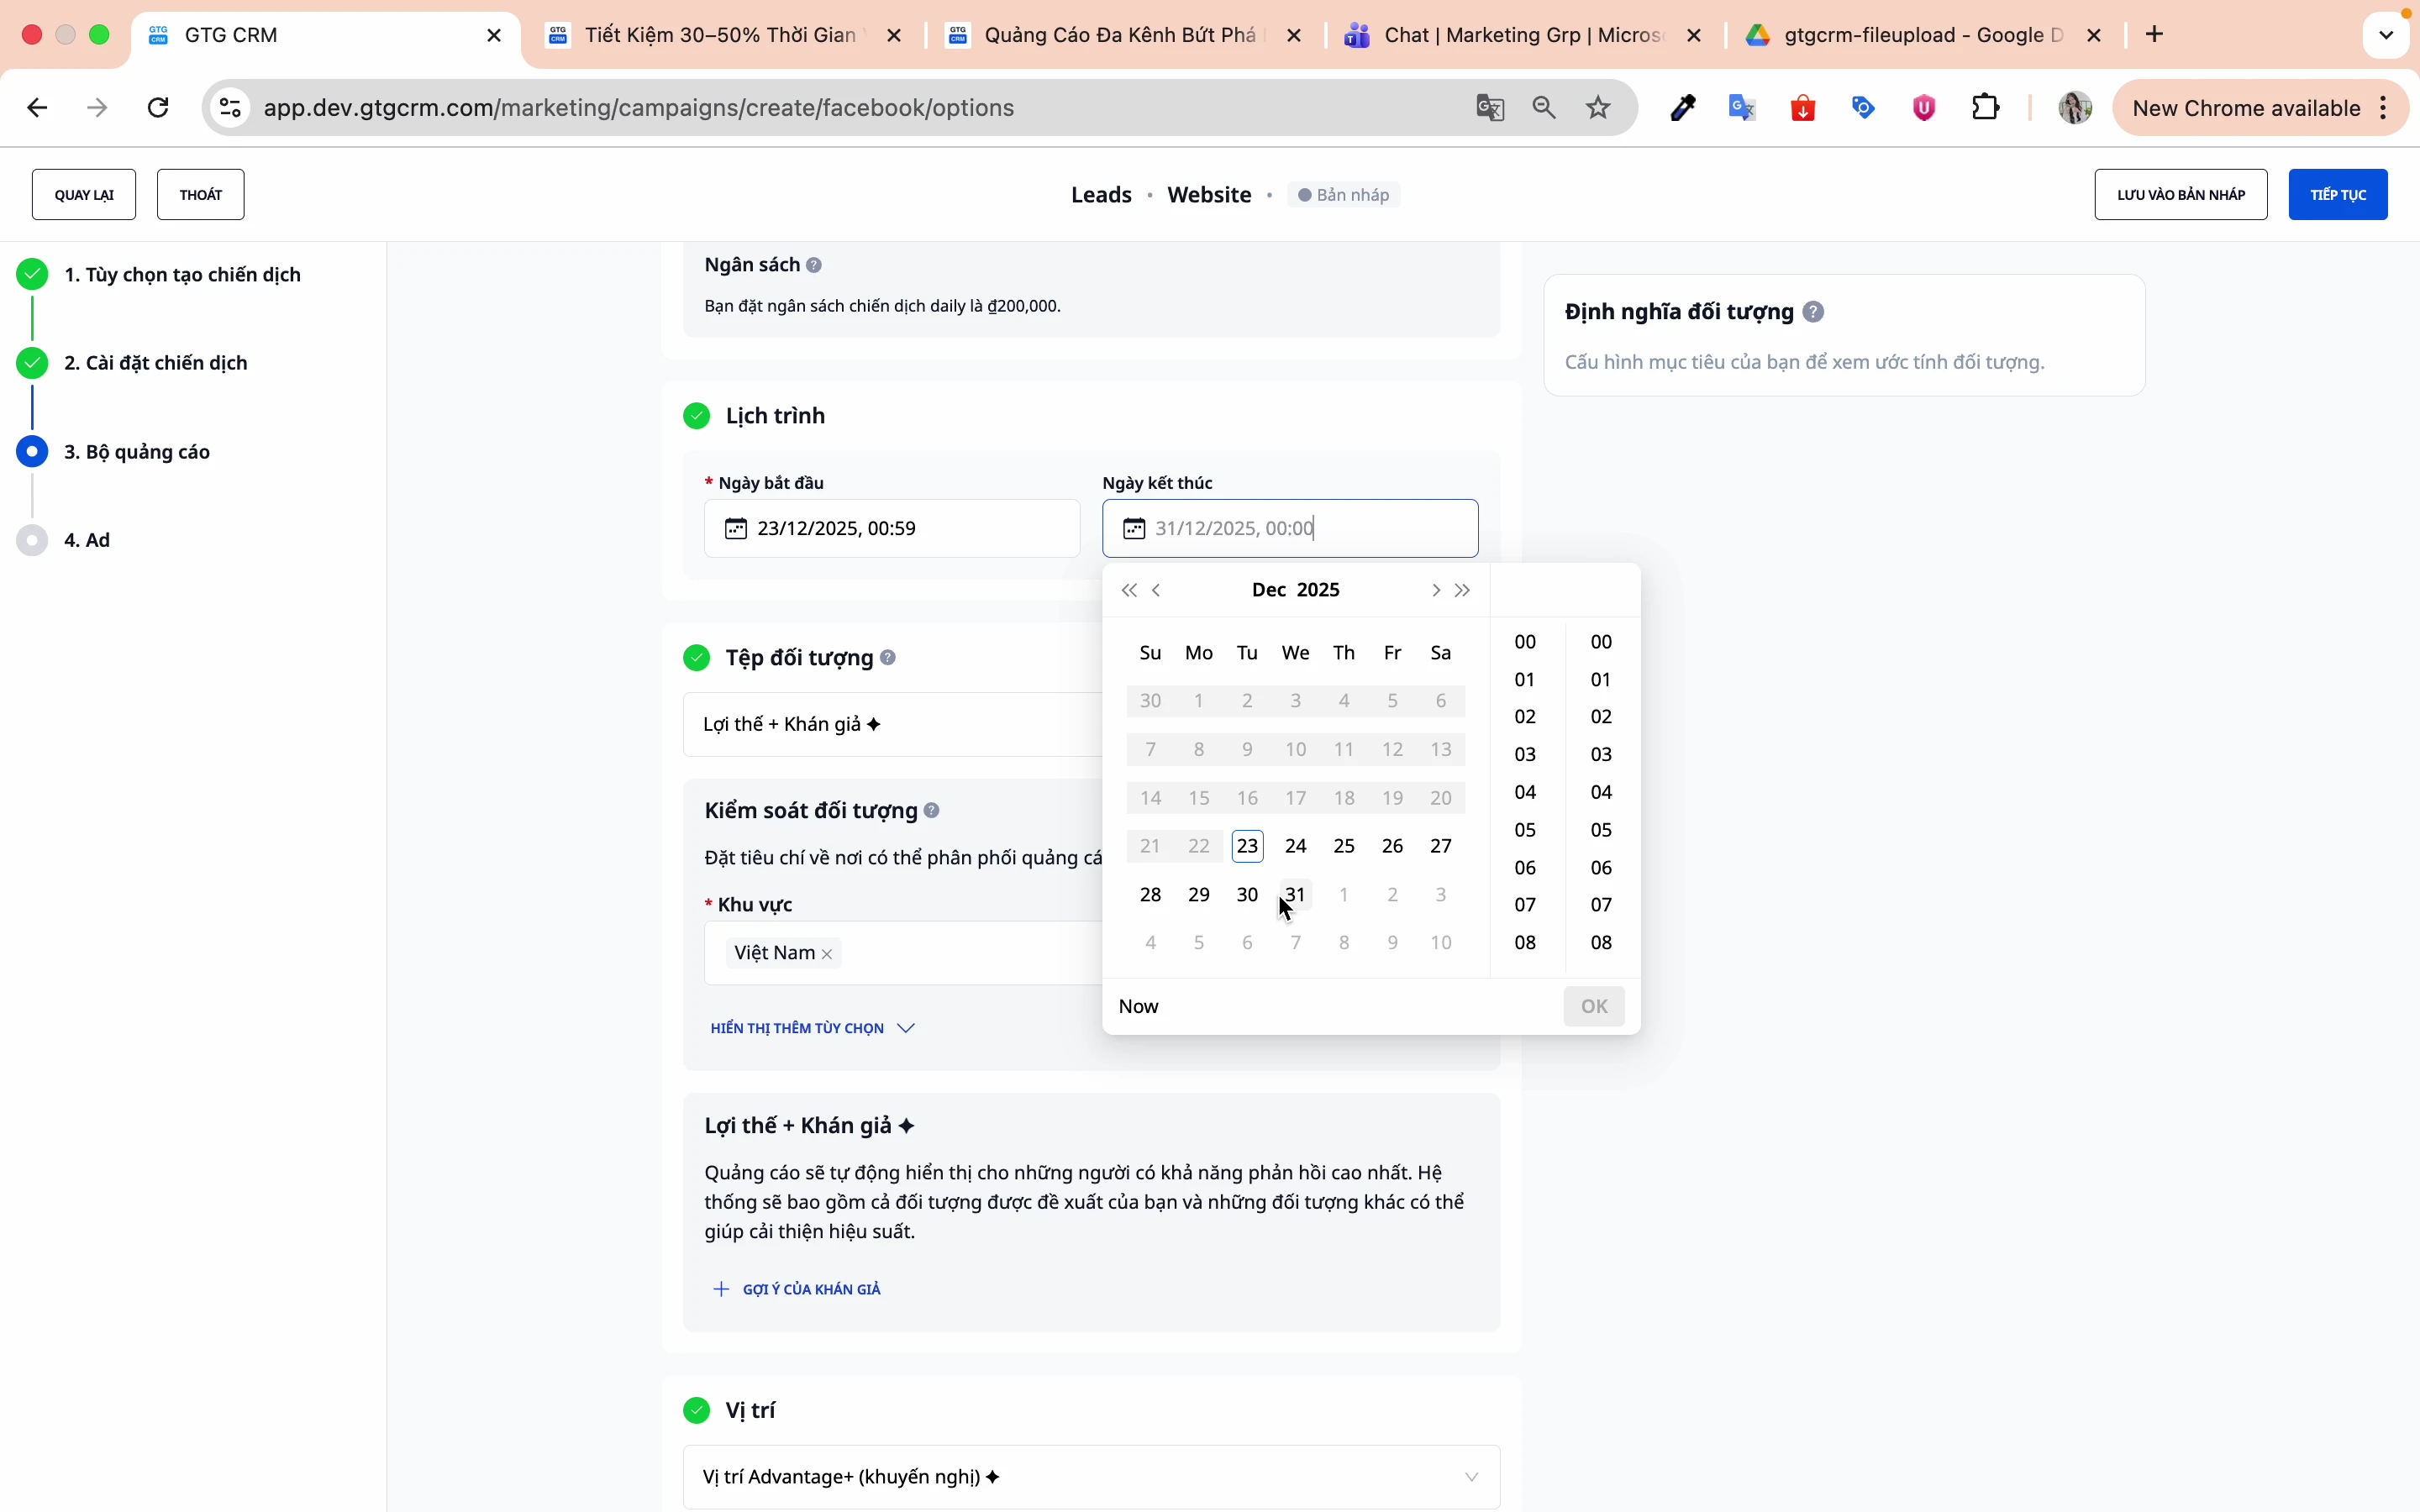
Skref 6: Stilltu tímaáætlun
- Byrjunardagur: Veldu dagsetningu til að byrja að keyra
- Lokadagur: Veldu lokadagsetningu herferðar
5. Uppsetning áhorfenda (Audience Targeting)
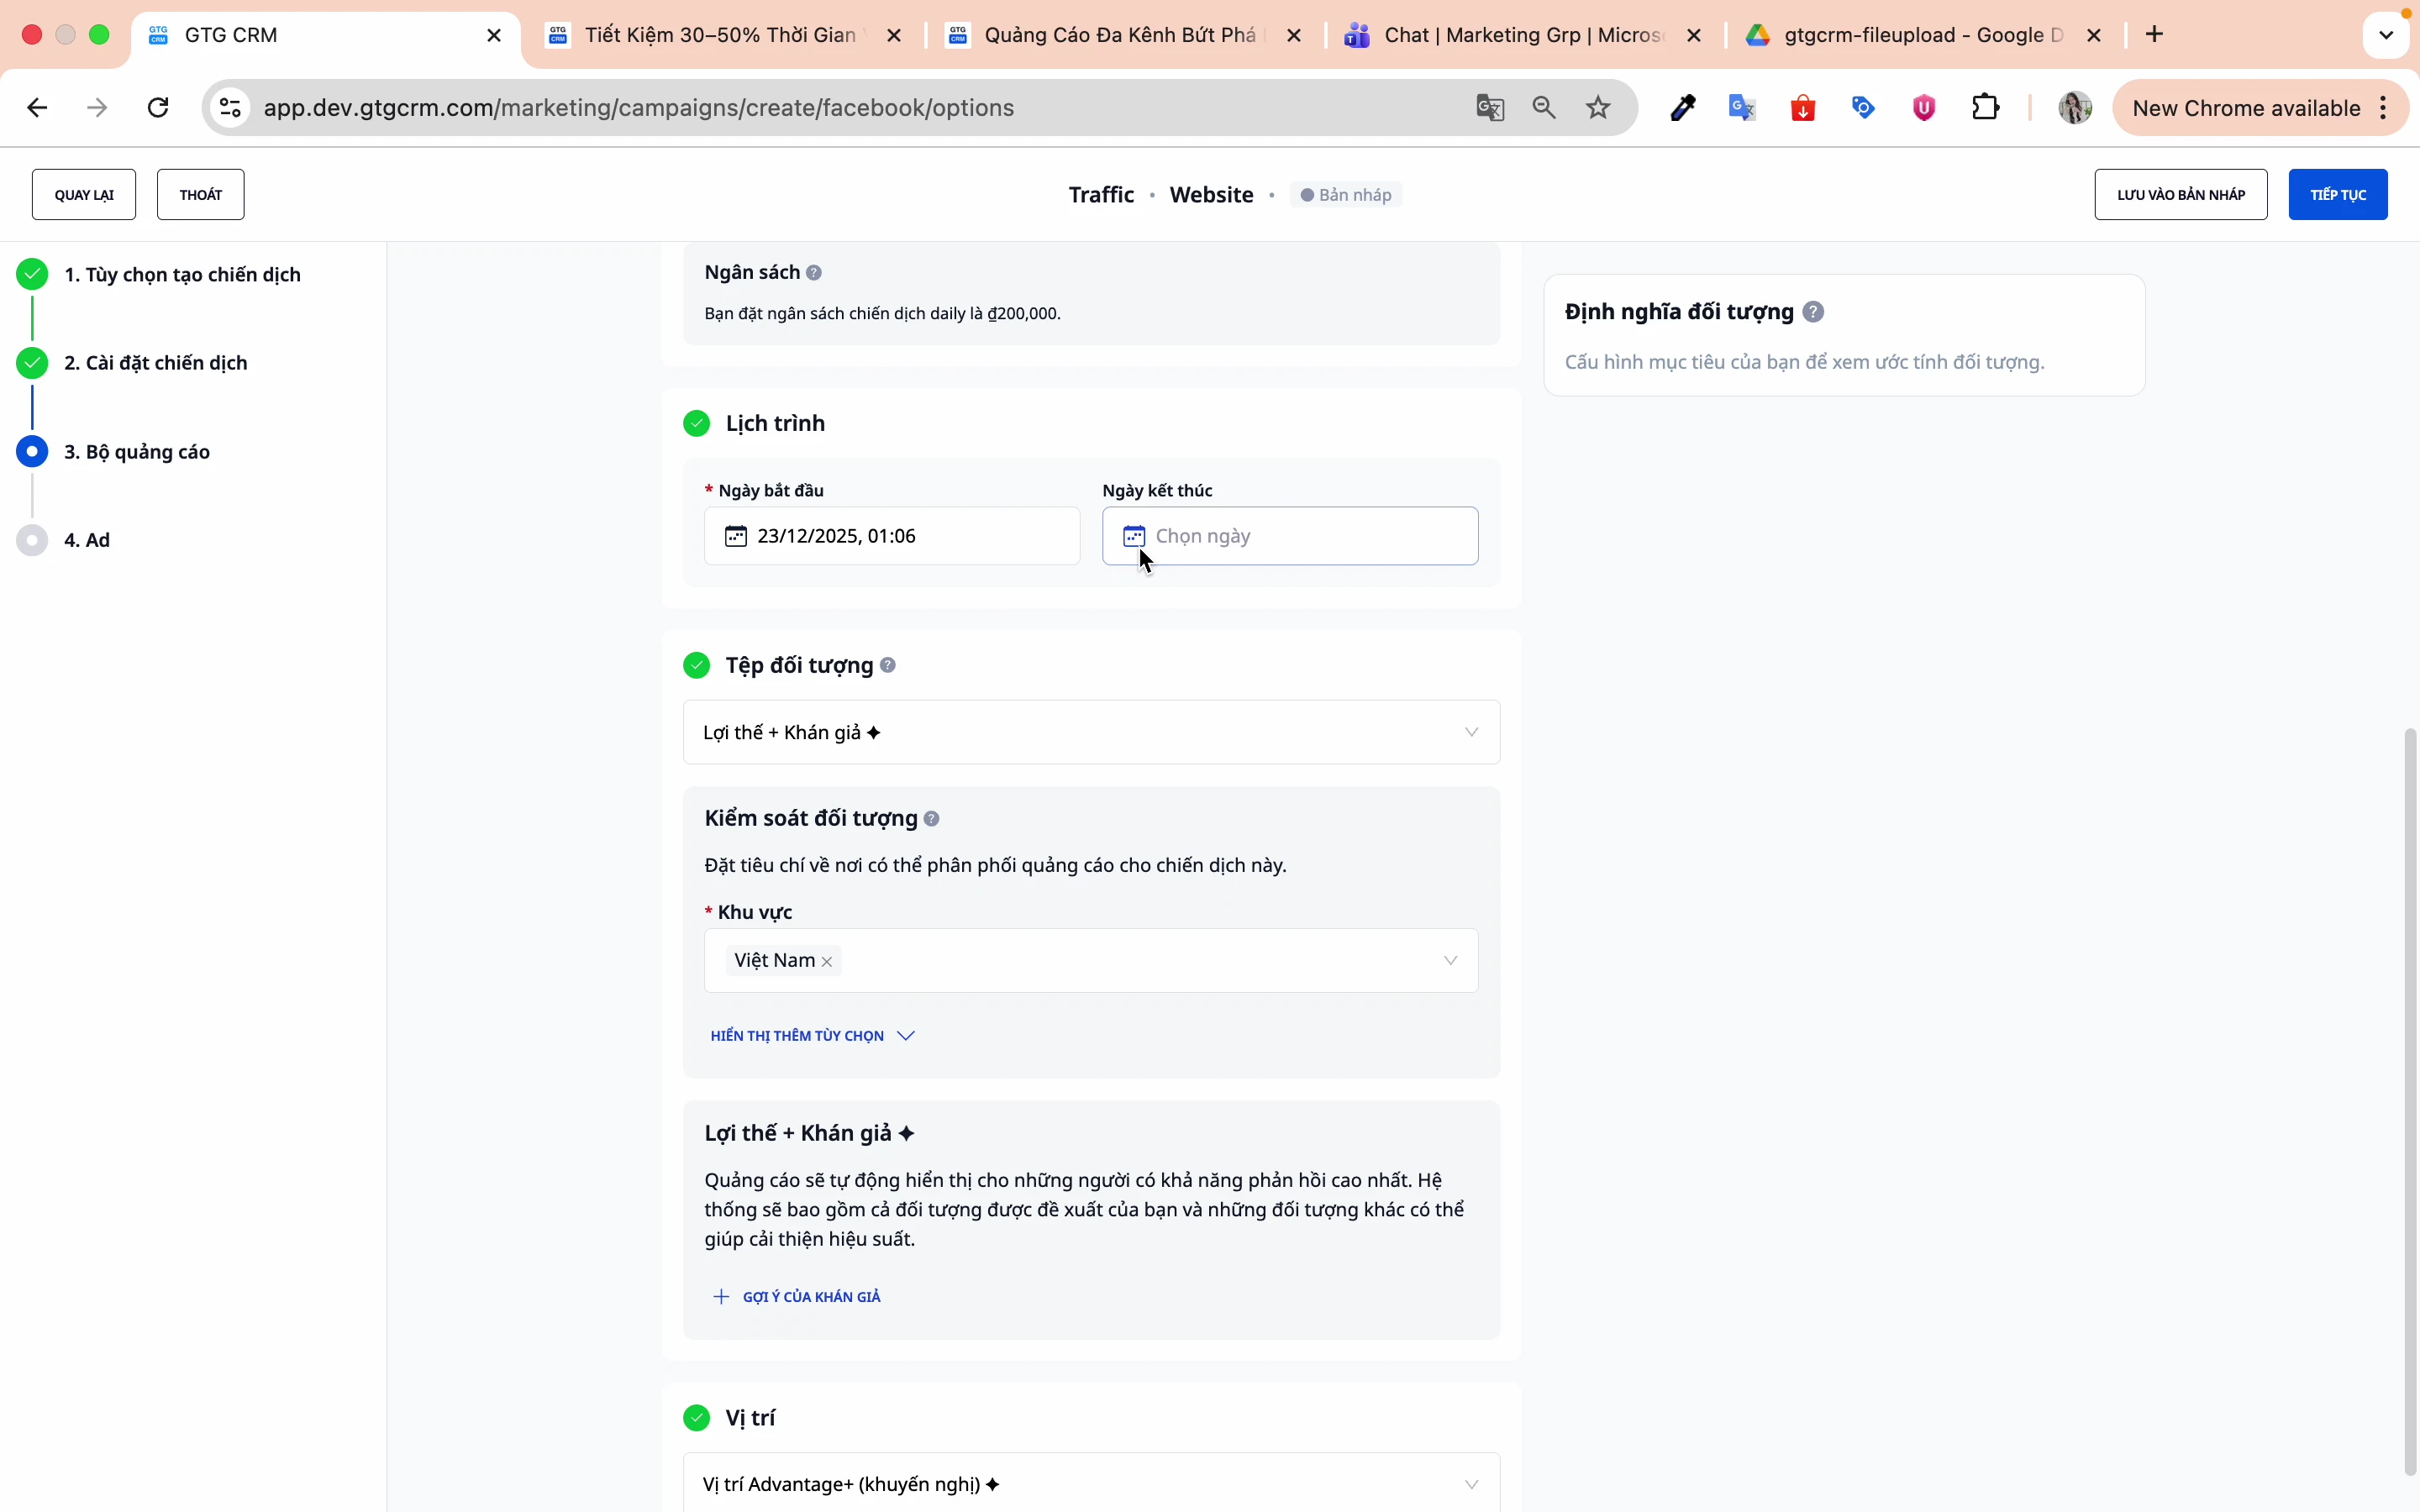
Aðferð 1: AI áhorfendur (Mælt með fyrir byrjendur)
Leyfðu Facebook AI að finna viðeigandi markhóp út frá vélanámi.
Aðferð 2: Búðu til eigin áhorfendur (Sérsniðnir)
Skref 1: Veldu "Upphaflegi áhorfendahópurinn"
Smelltu á þennan valkost til að búa til þinn eigin áhorfendahóp.
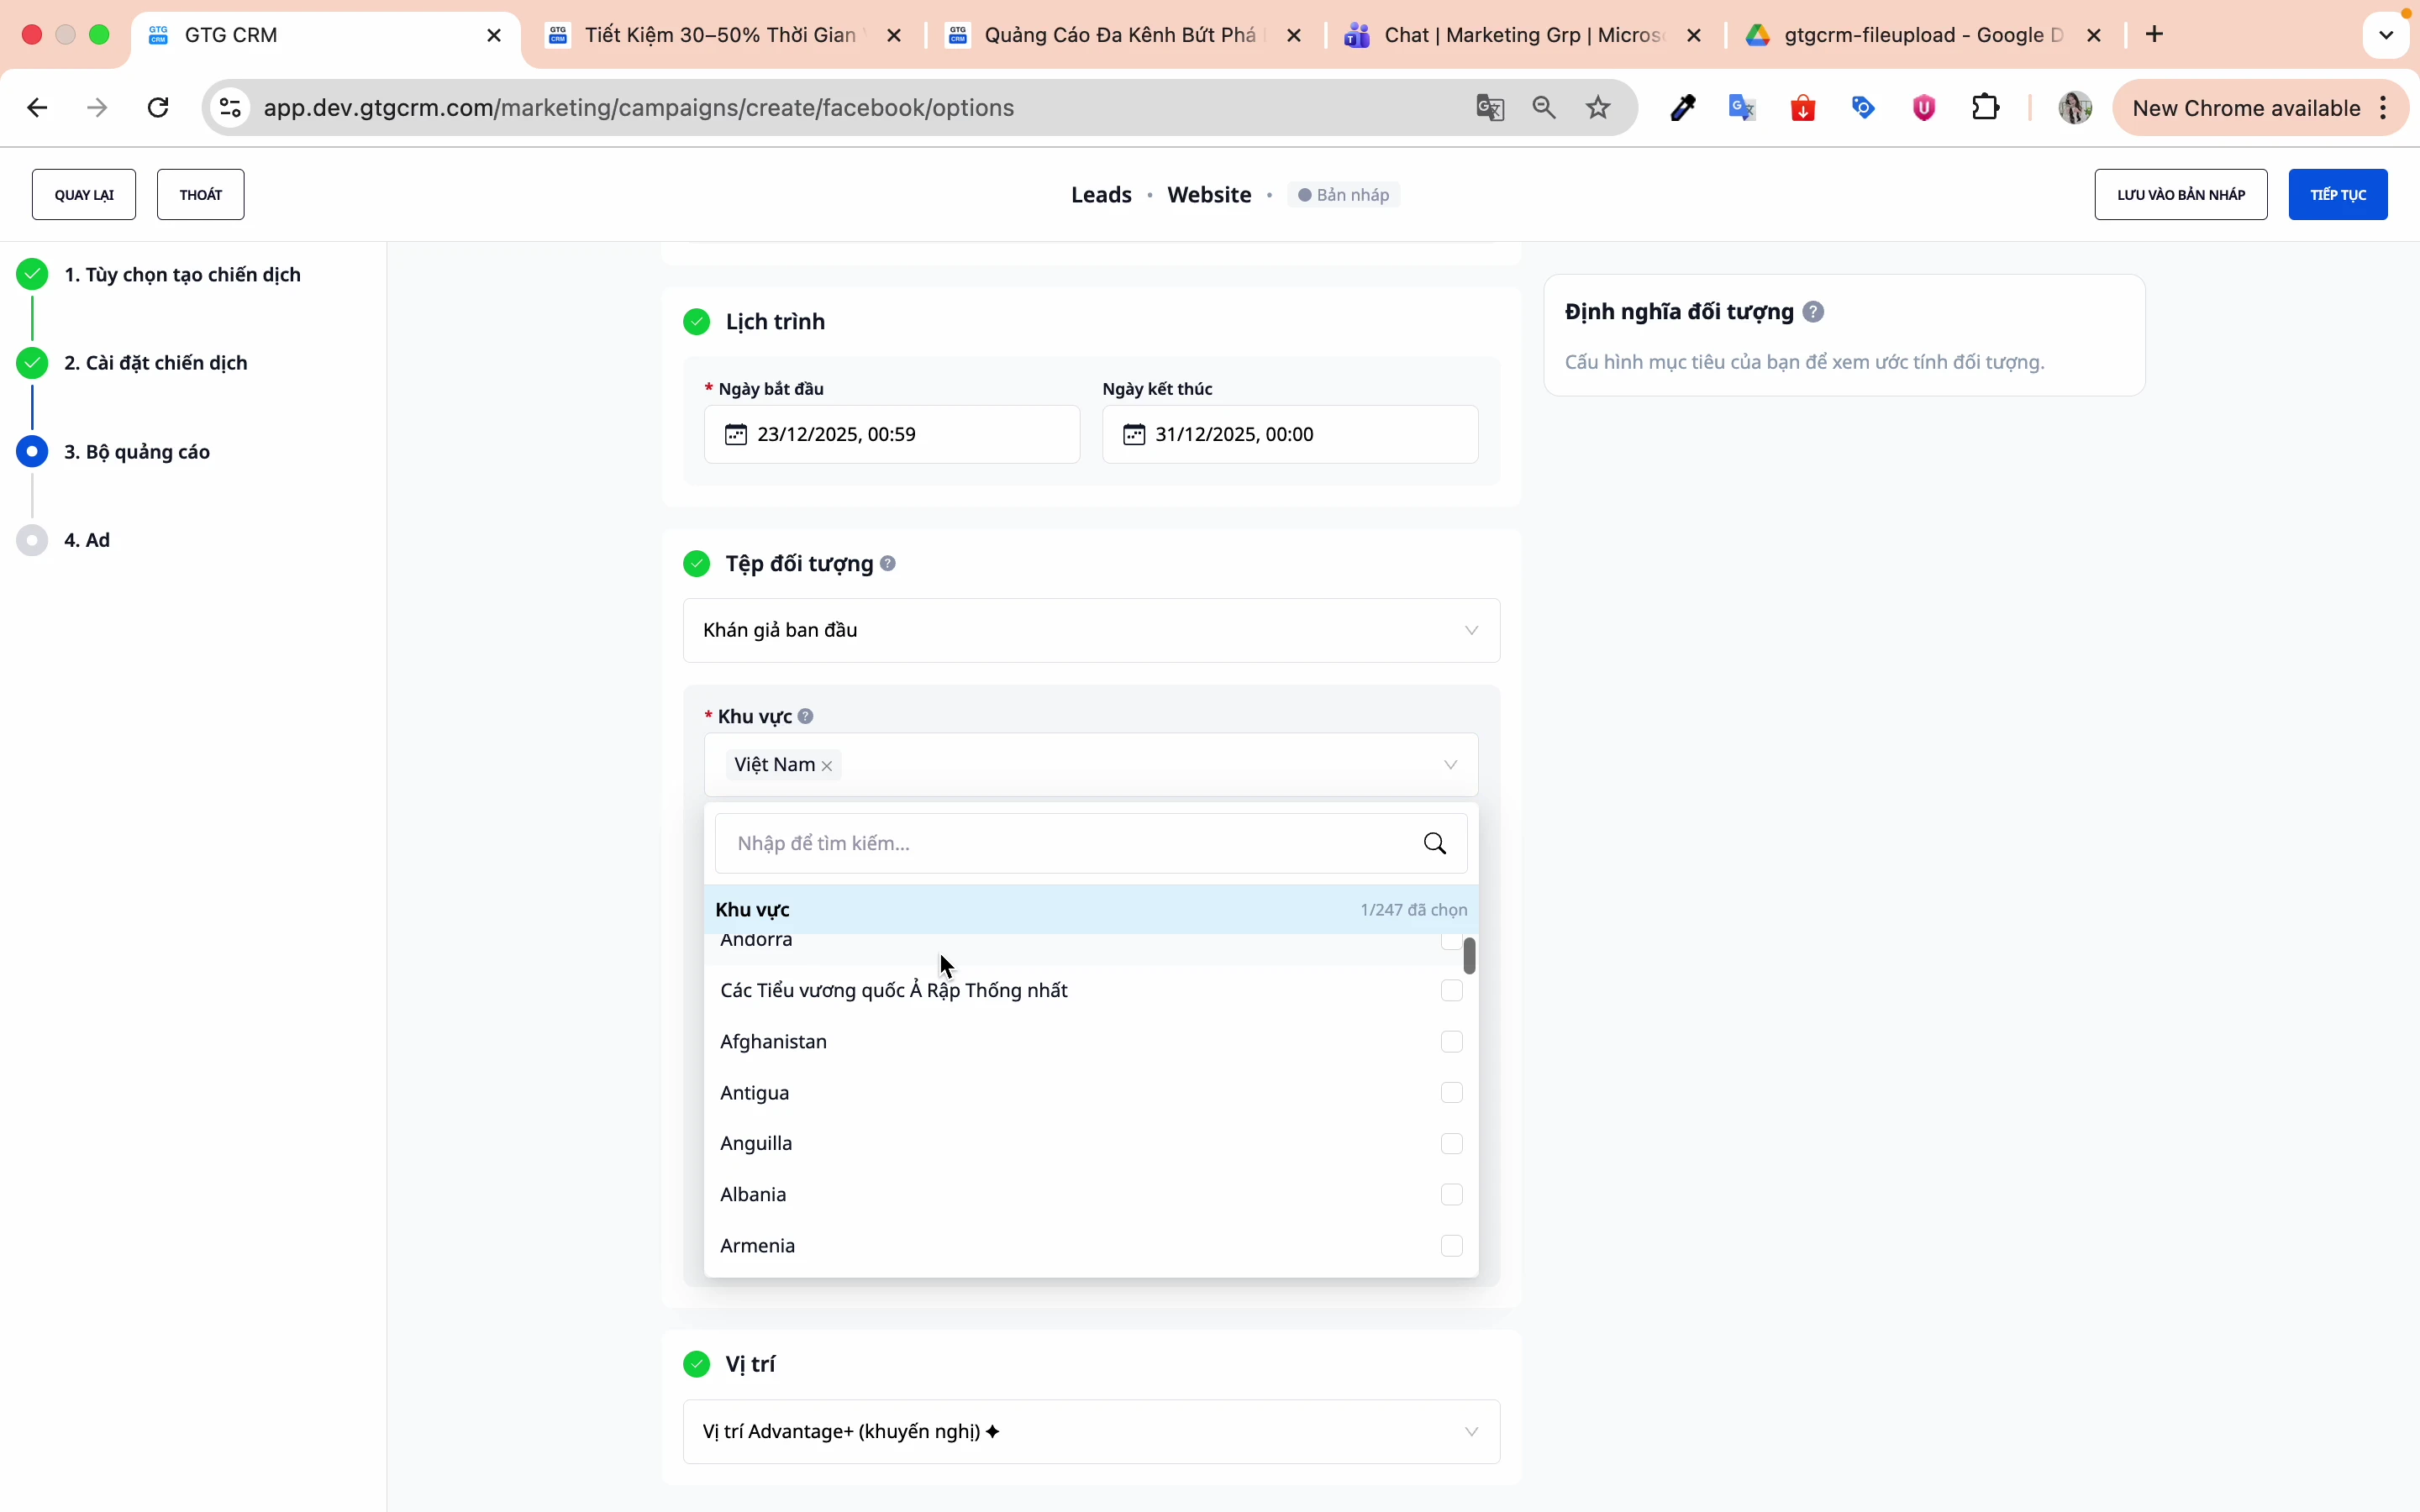
Skref 2: Stilltu landfræðilega staðsetningu
- Veldu land: Víetnam
- Hægt að miða á einstakar sýslur/borgir
Skref 3: Stilltu aldur
Veldu aldurshóp sem hentar vörunni/þjónustunni. Til dæmis: 25-55 ára
Skref 4: Stilltu kyn
- Karl
- Kona
- Allir
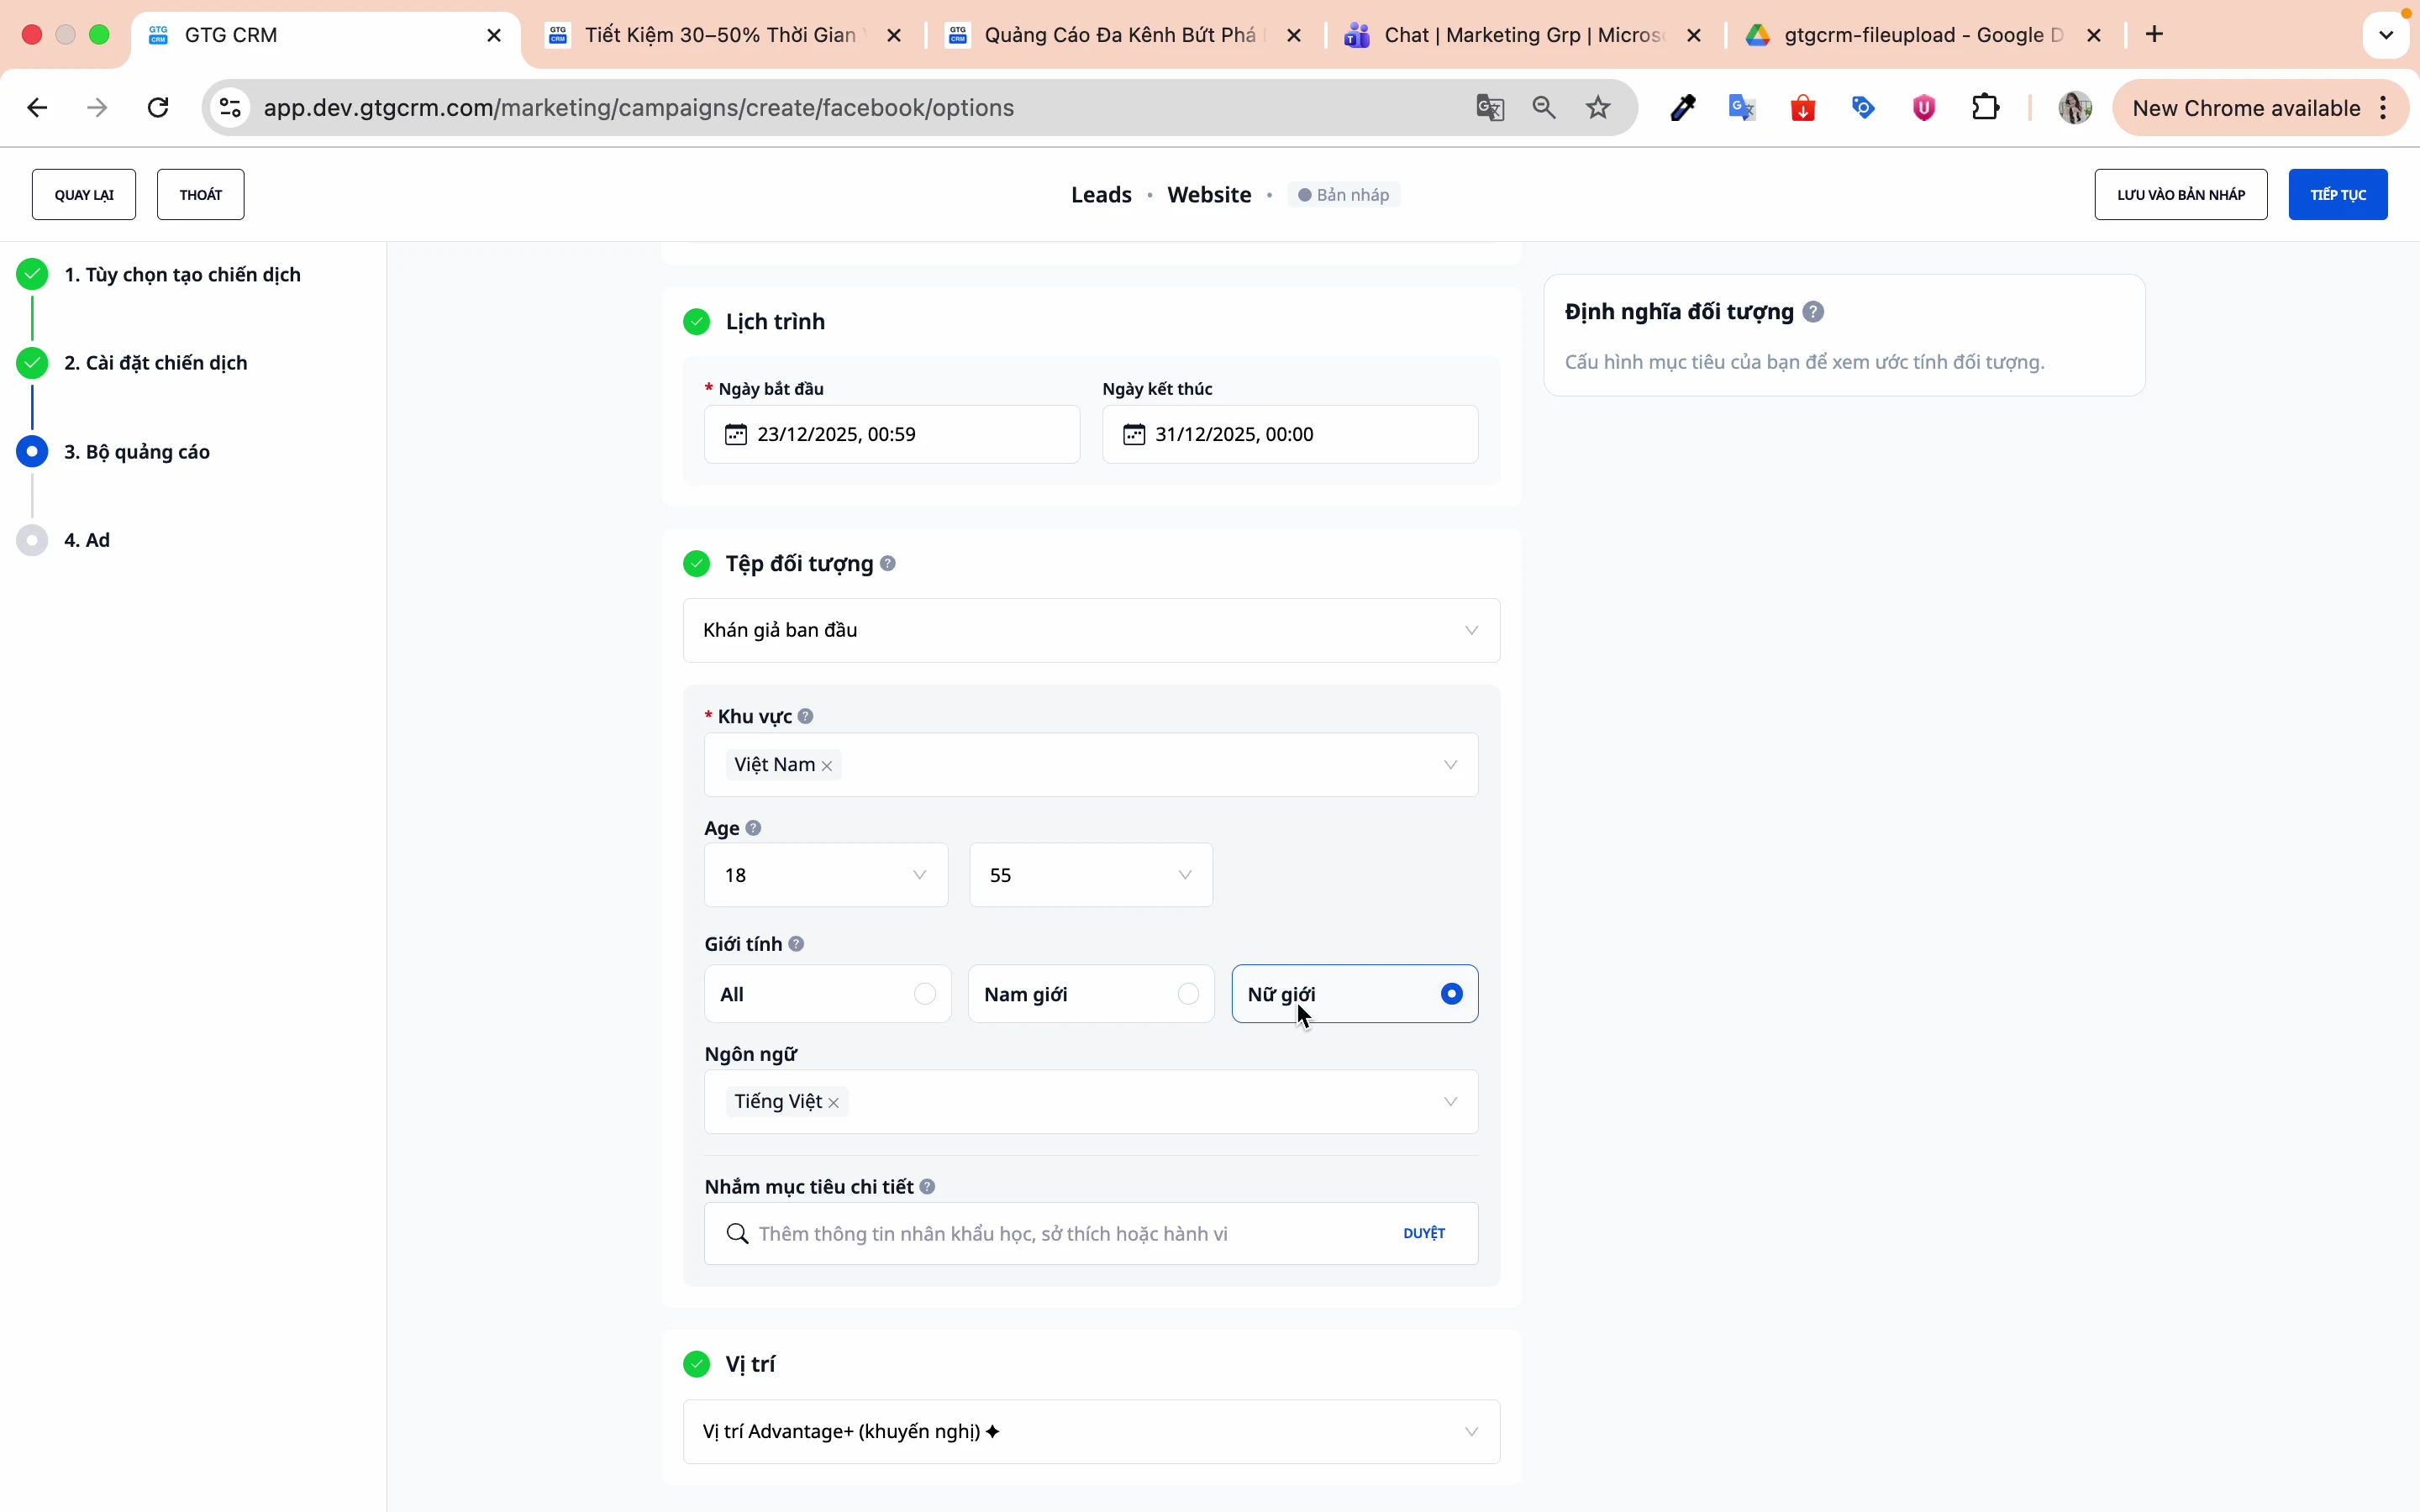
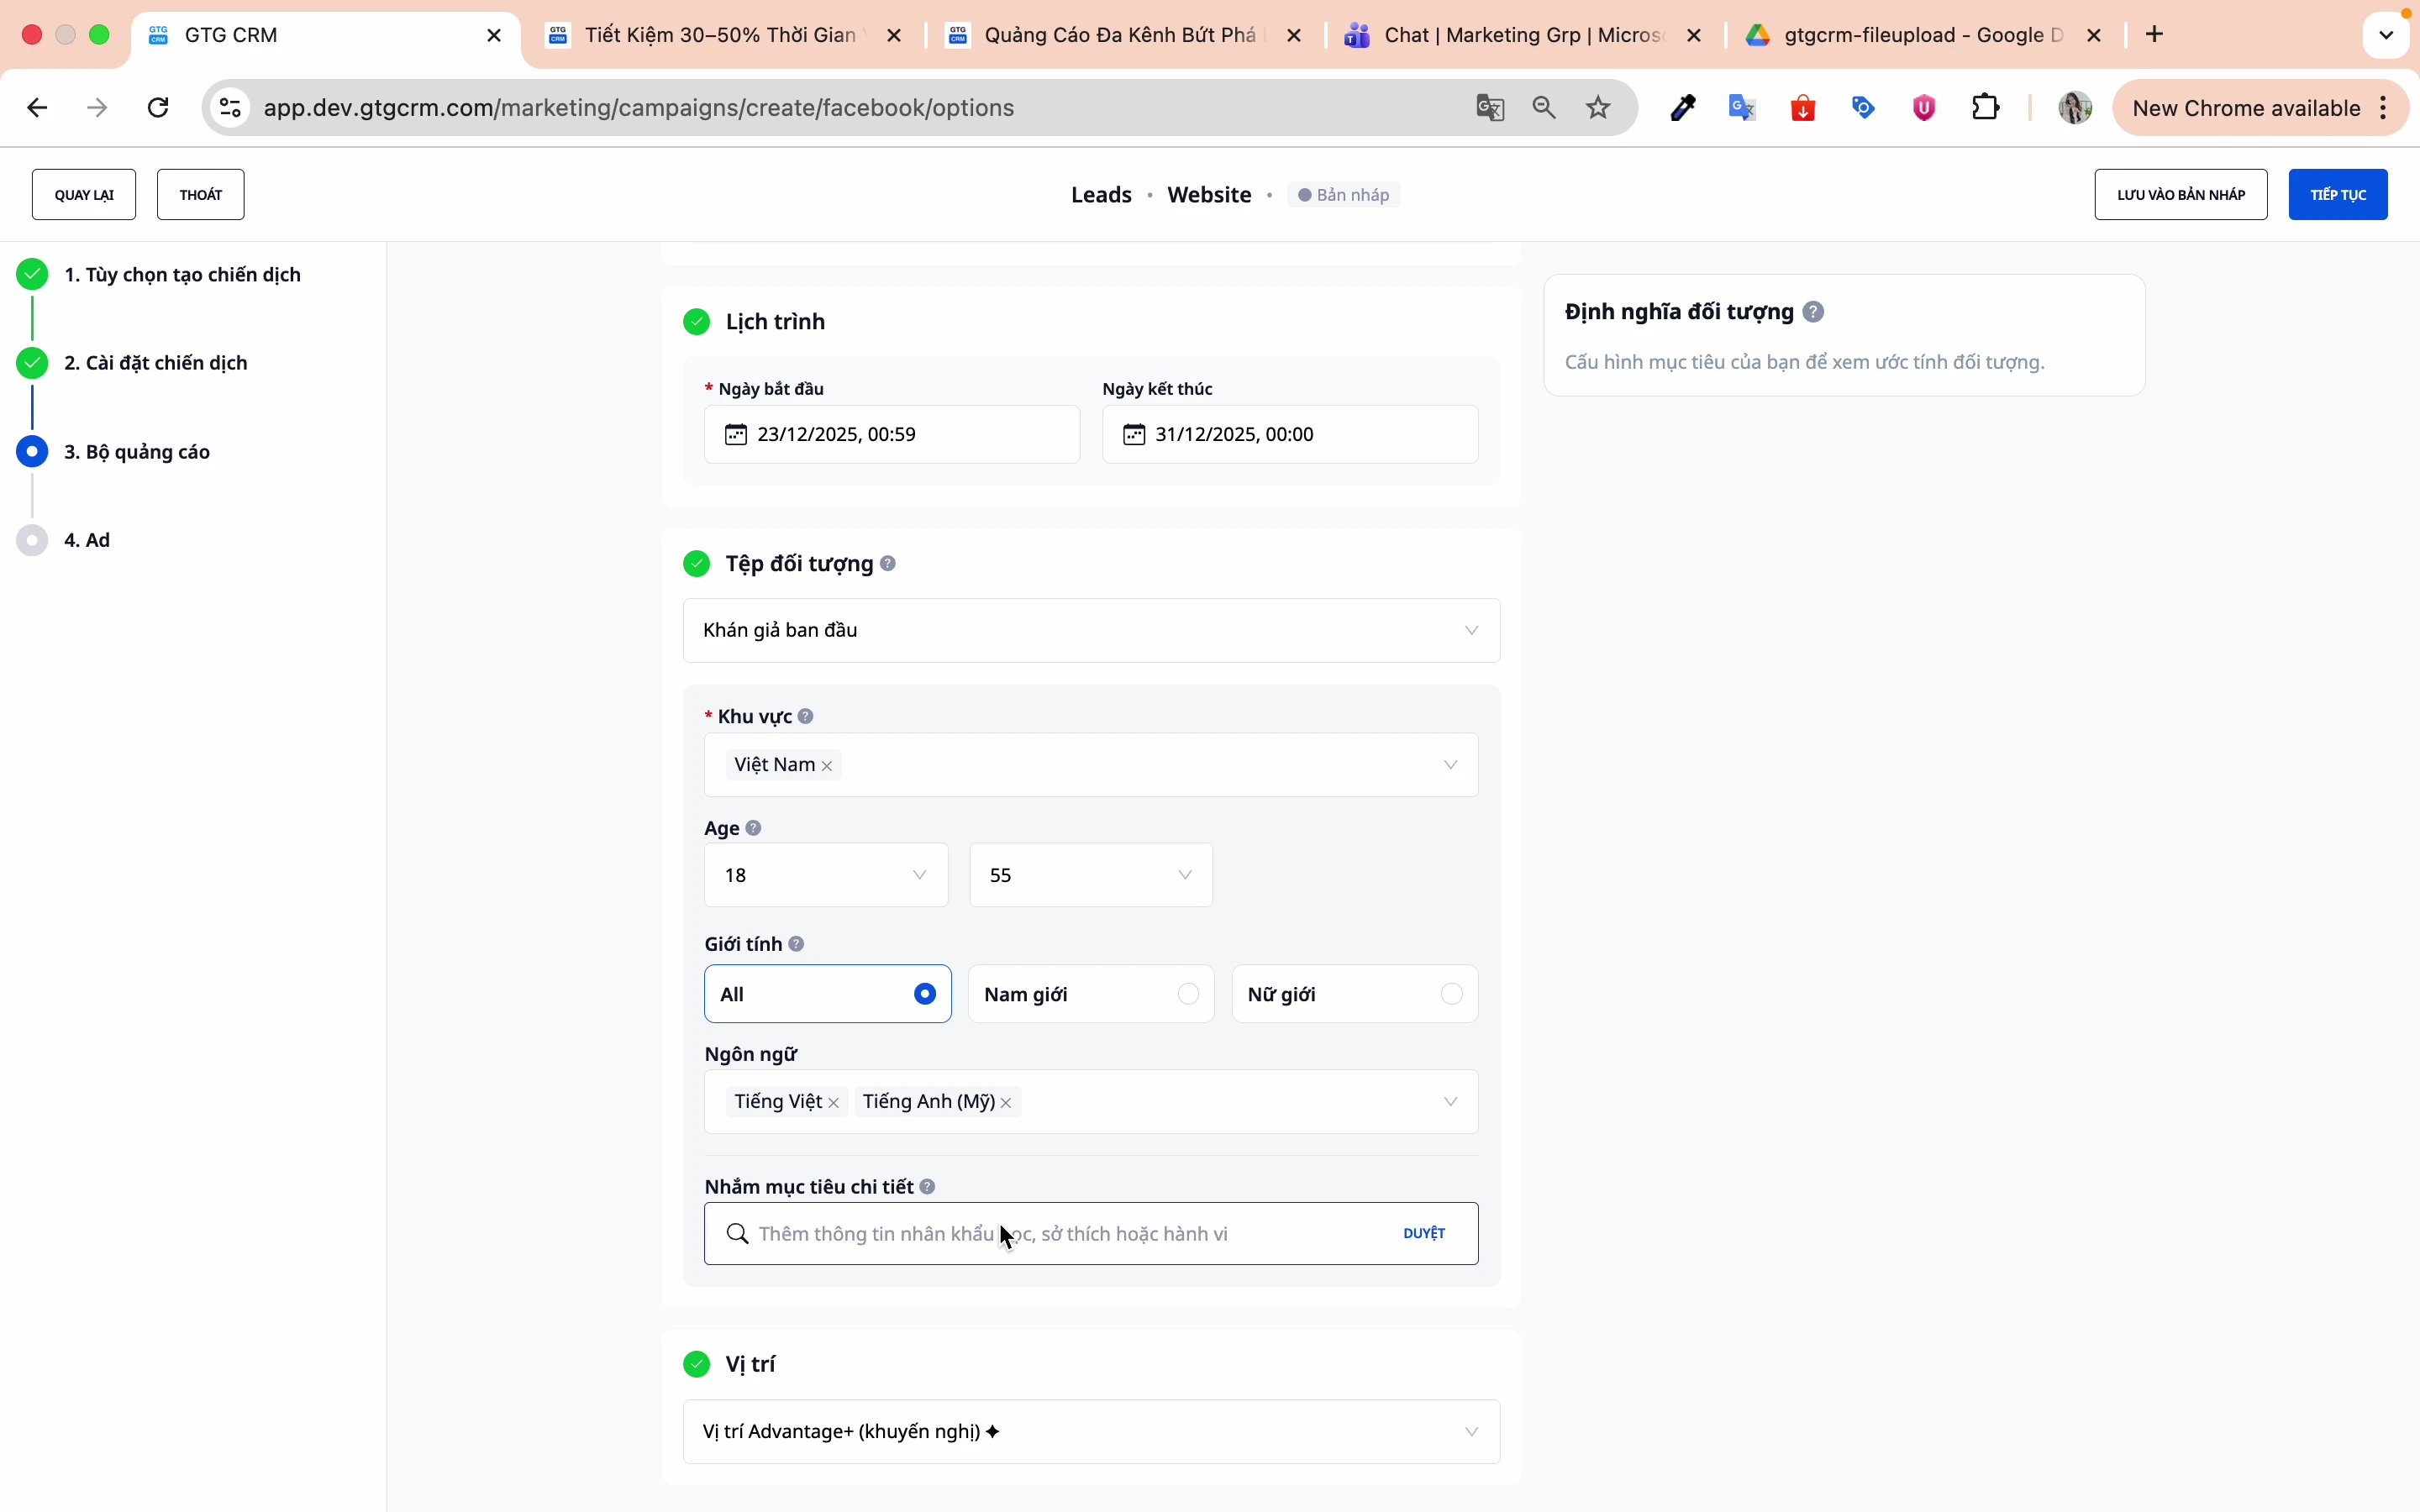
Skref 5: Stilltu tungumál
- Víetnamska
- Enska
- Eða tungumál sem hentar markhópnum
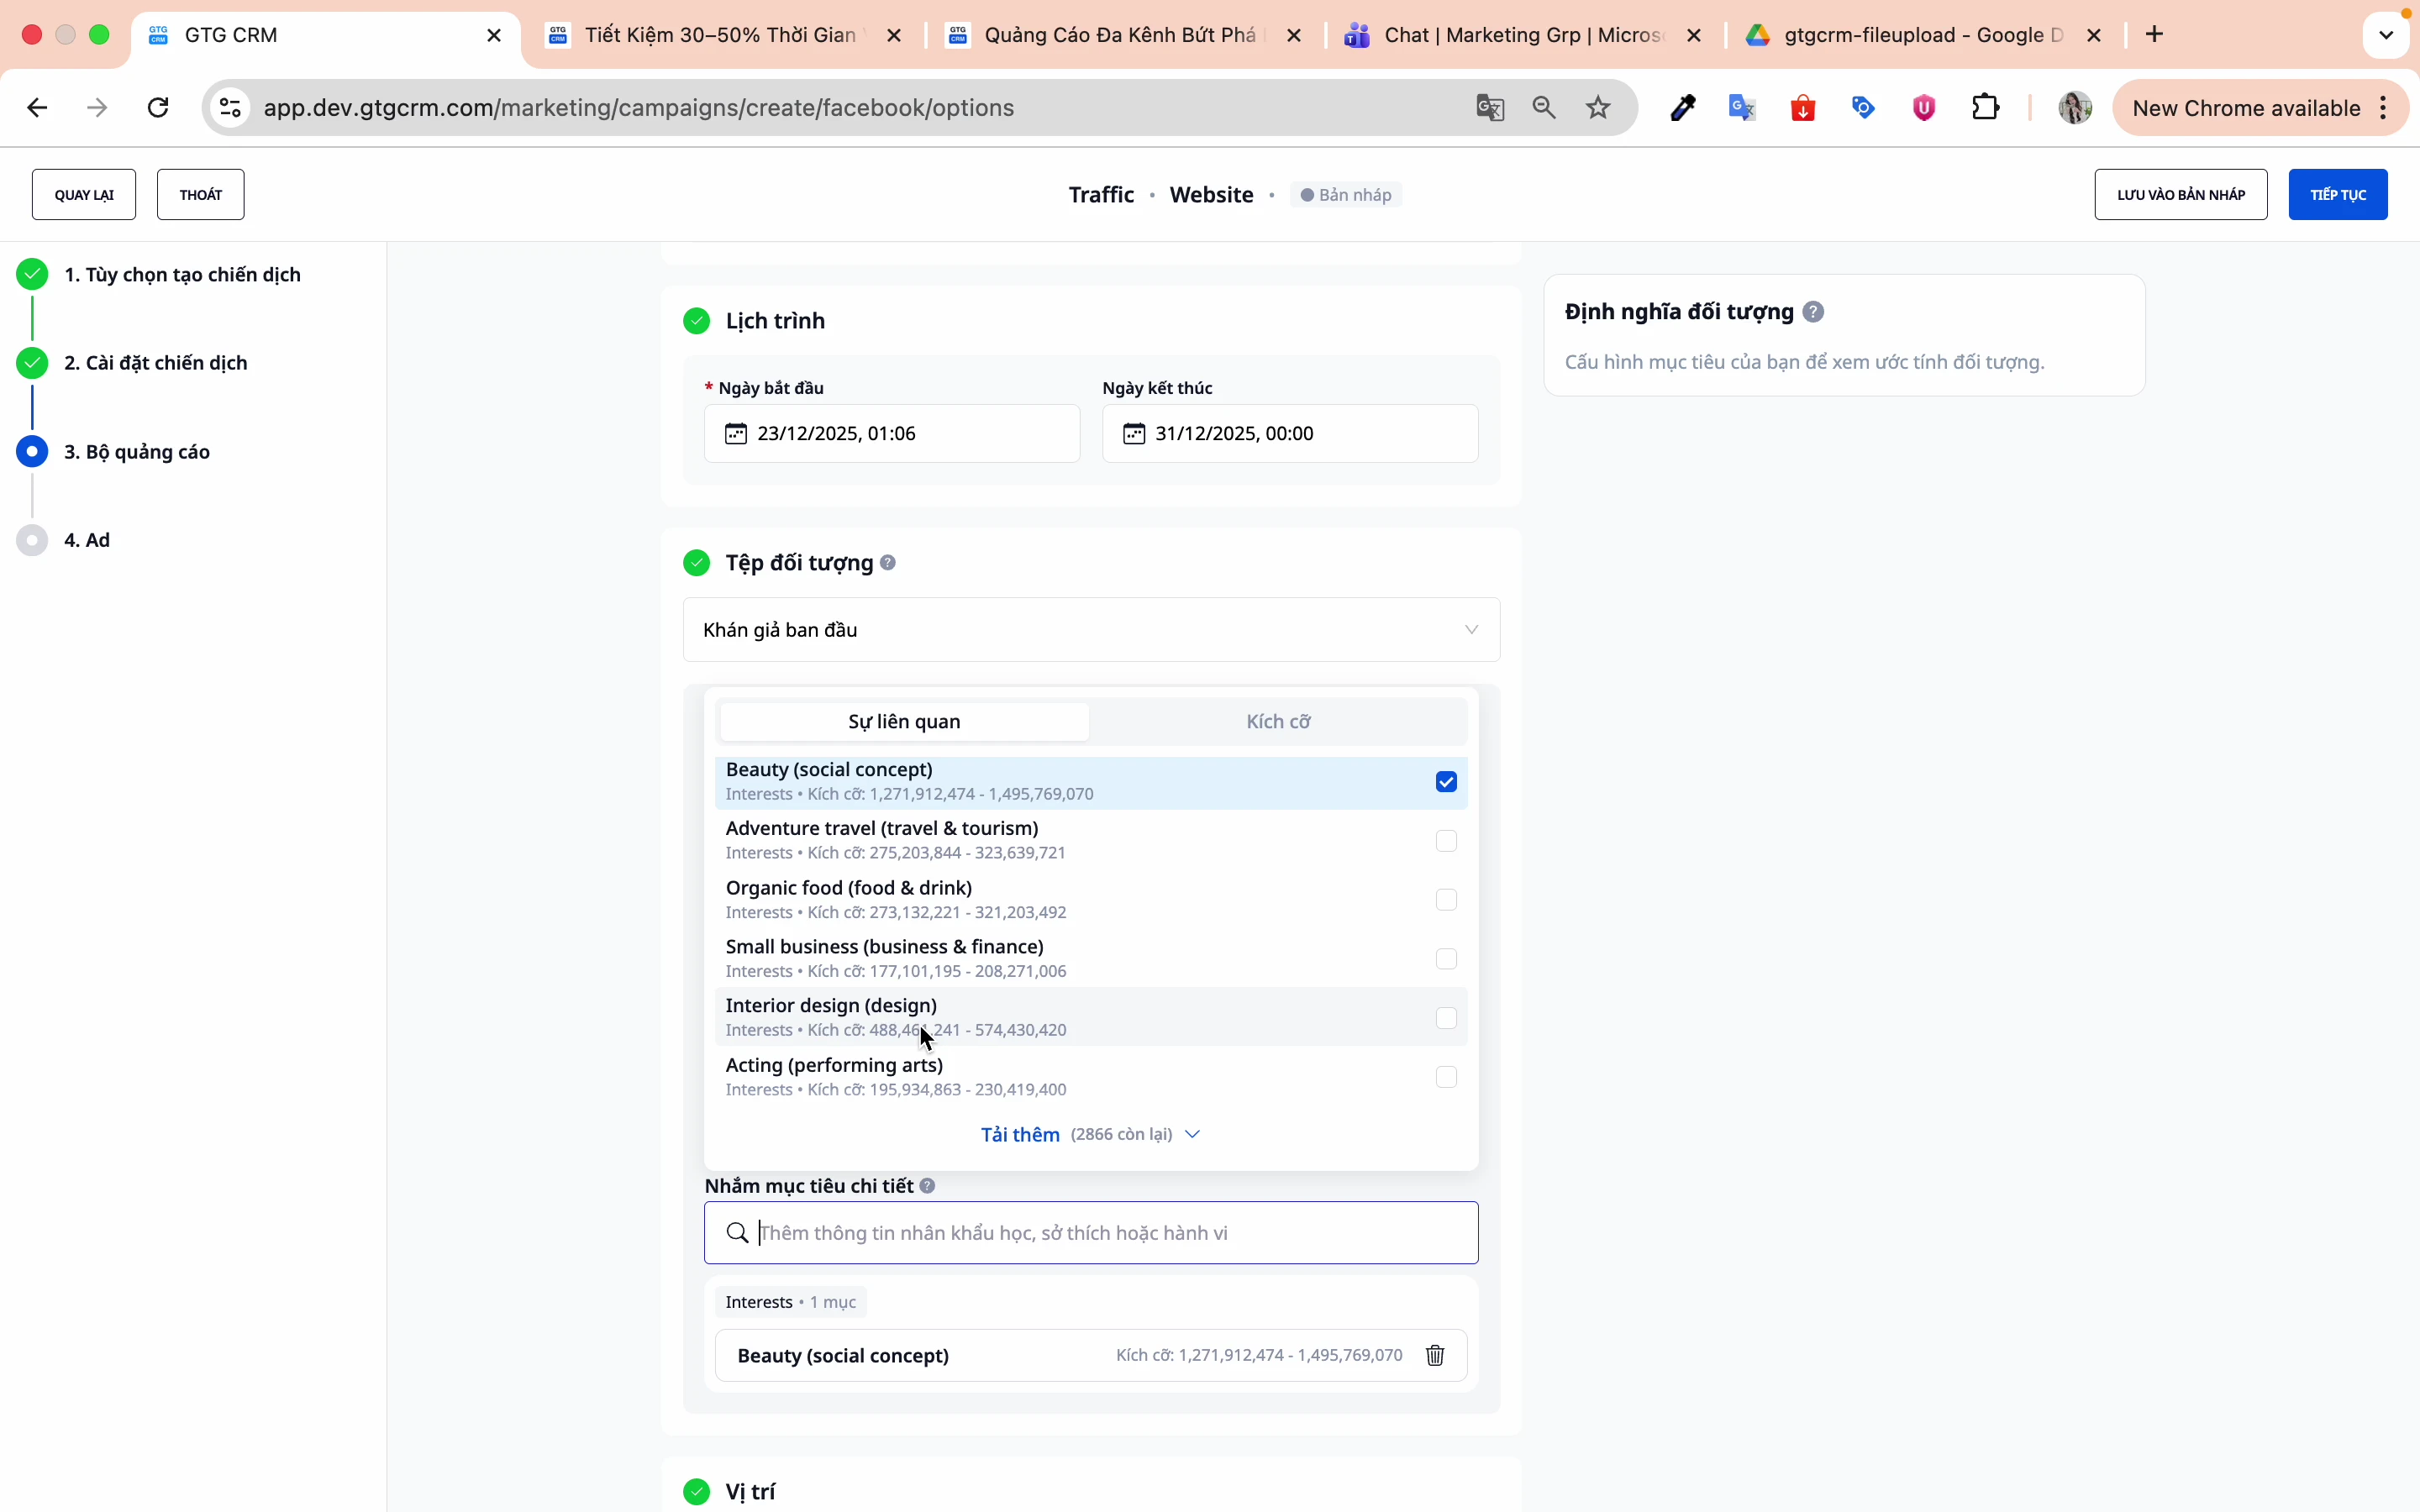
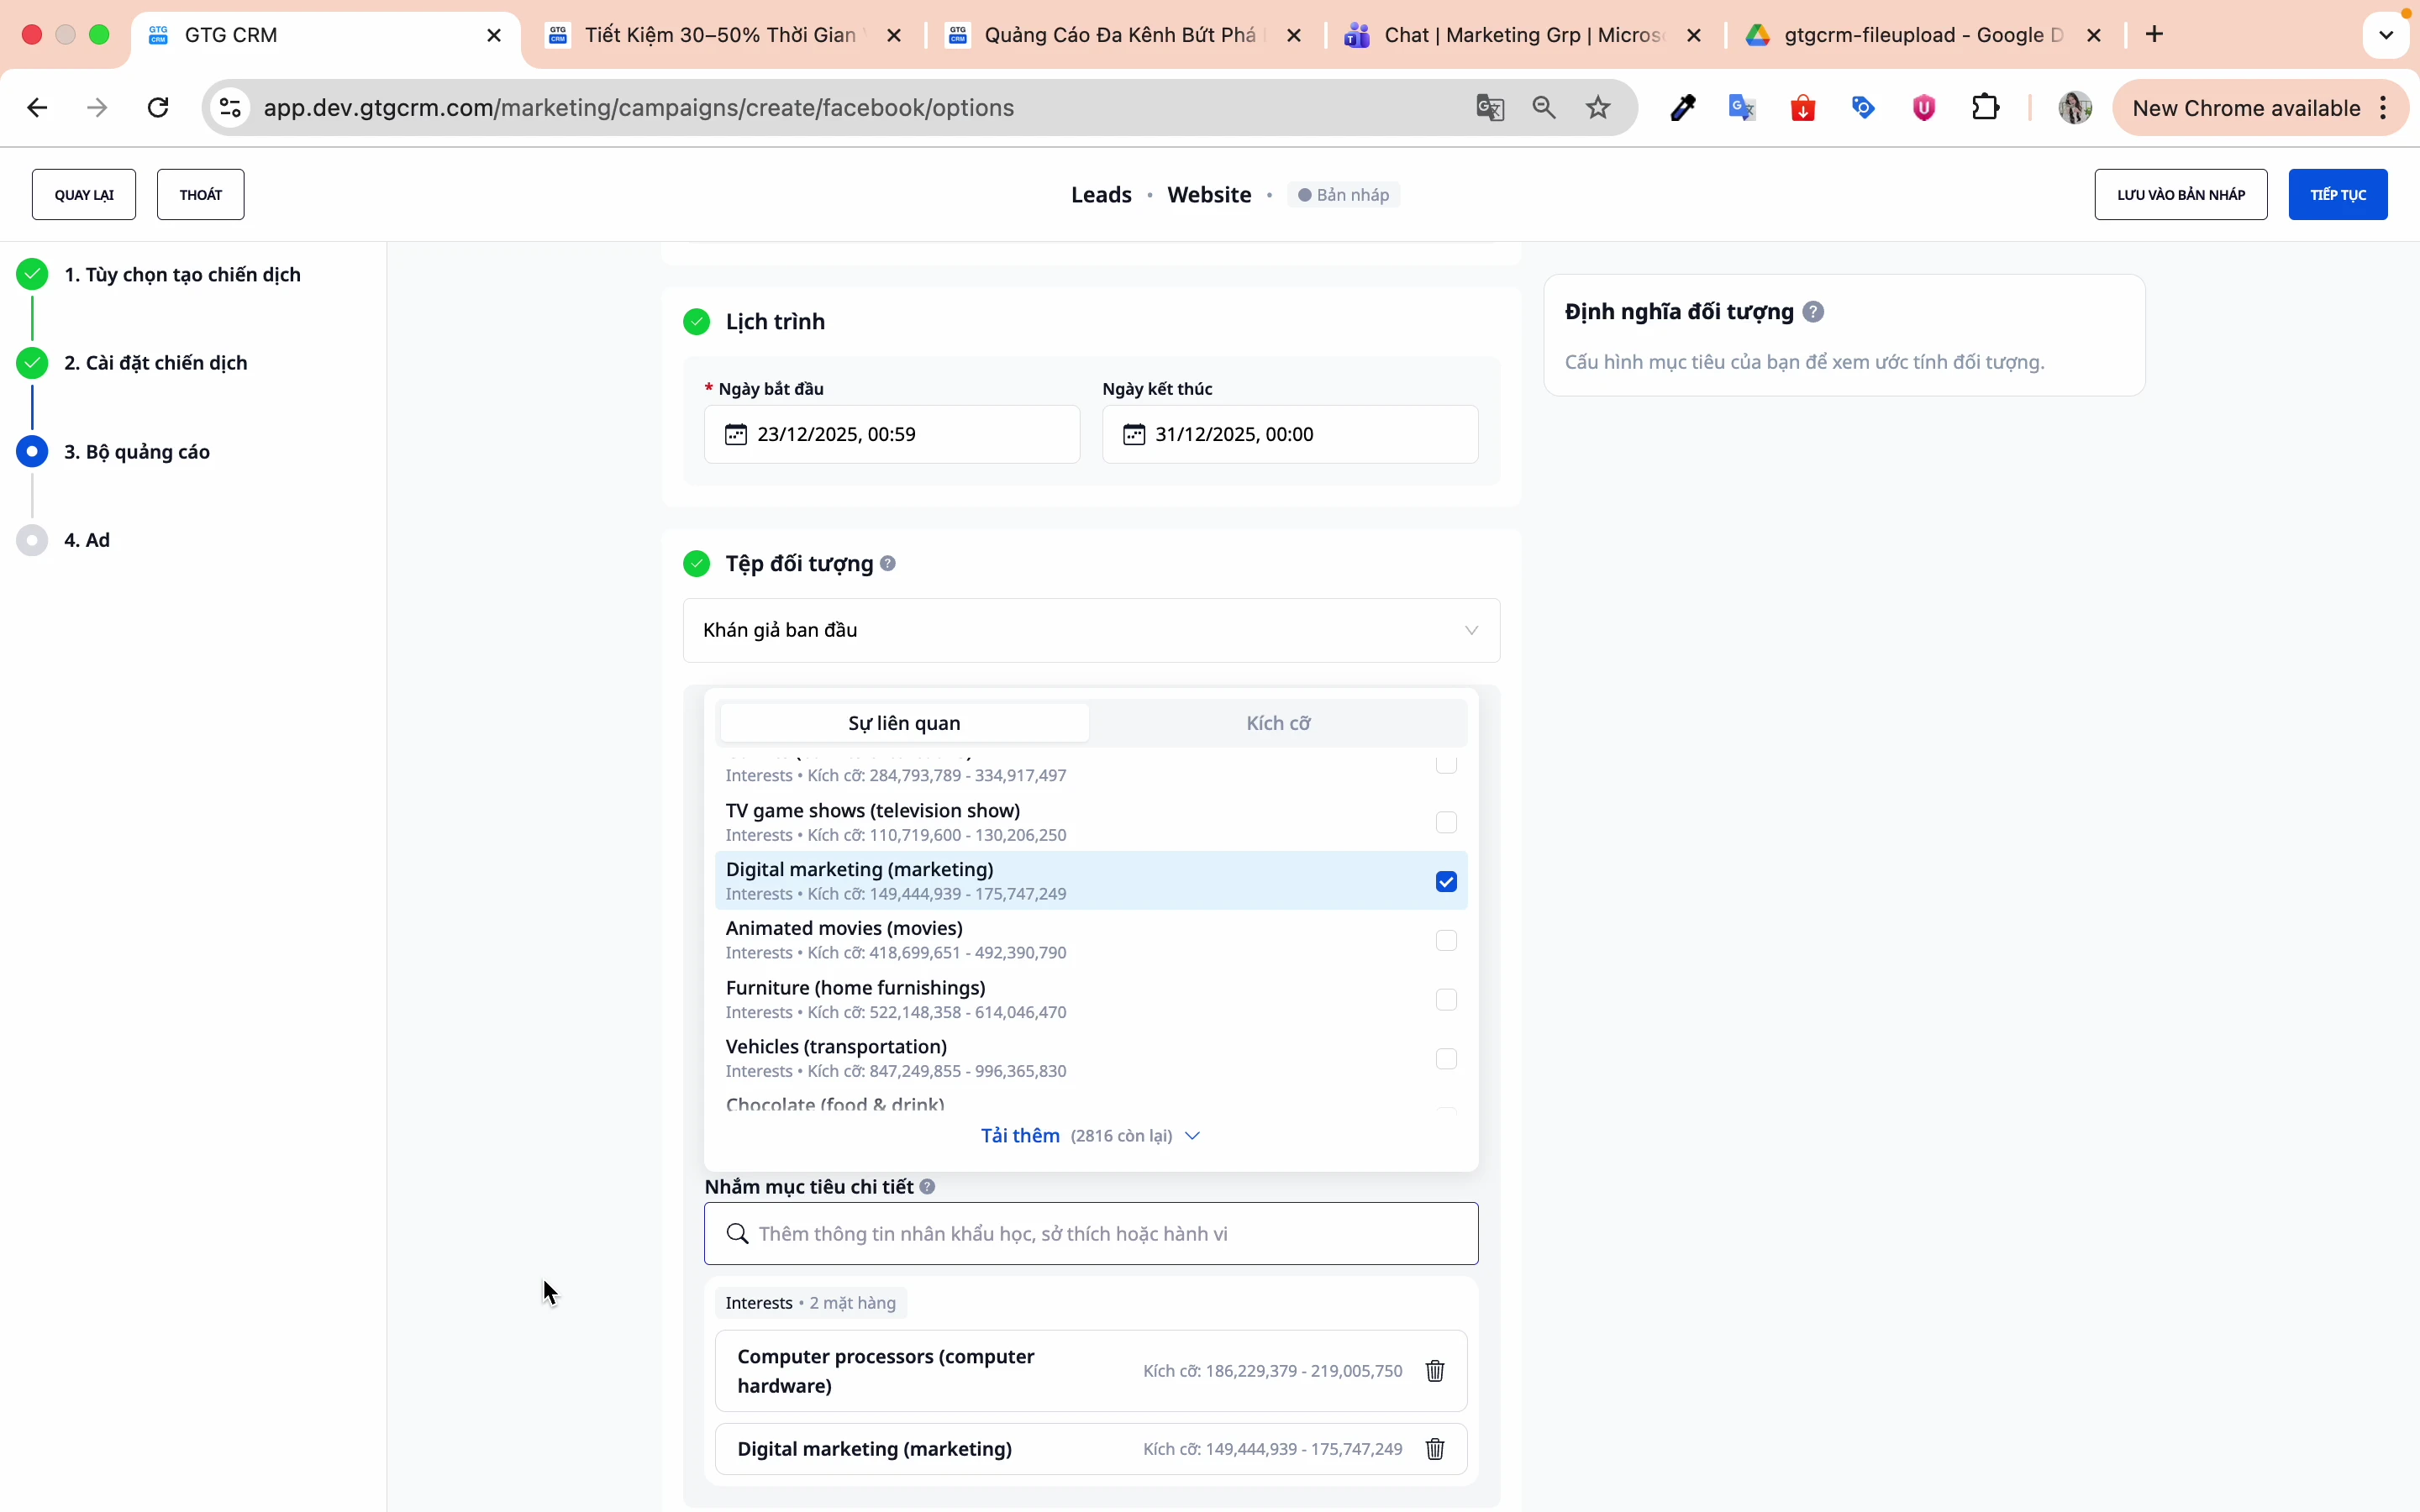
Skref 6: Nákvæm markmiðasetning
Veldu áhugamál, hegðun og lýðfræði sem tengjast:
Dæmi:
- Fegurðariðnaður: Snyrting, Spa, snyrtivörur
- F&B iðnaður: Veitingastaðir, matur, matarsendingar
- Tækniiðnaður: Startup, kaupsýslumenn, lítil og meðalstór fyrirtæki
Smelltu á Áfram til að fara áfram í sköpun auglýsingar.
6. Skapa auglýsingu
Skref 1: Nefndu auglýsinguna
Nefndu auglýsinguna til að greina á milli auglýsinga í sömu auglýsingahópi.
Skref 2: Veldu Facebook síðu
Veldu Facebook síðu sem þú vilt auglýsa.
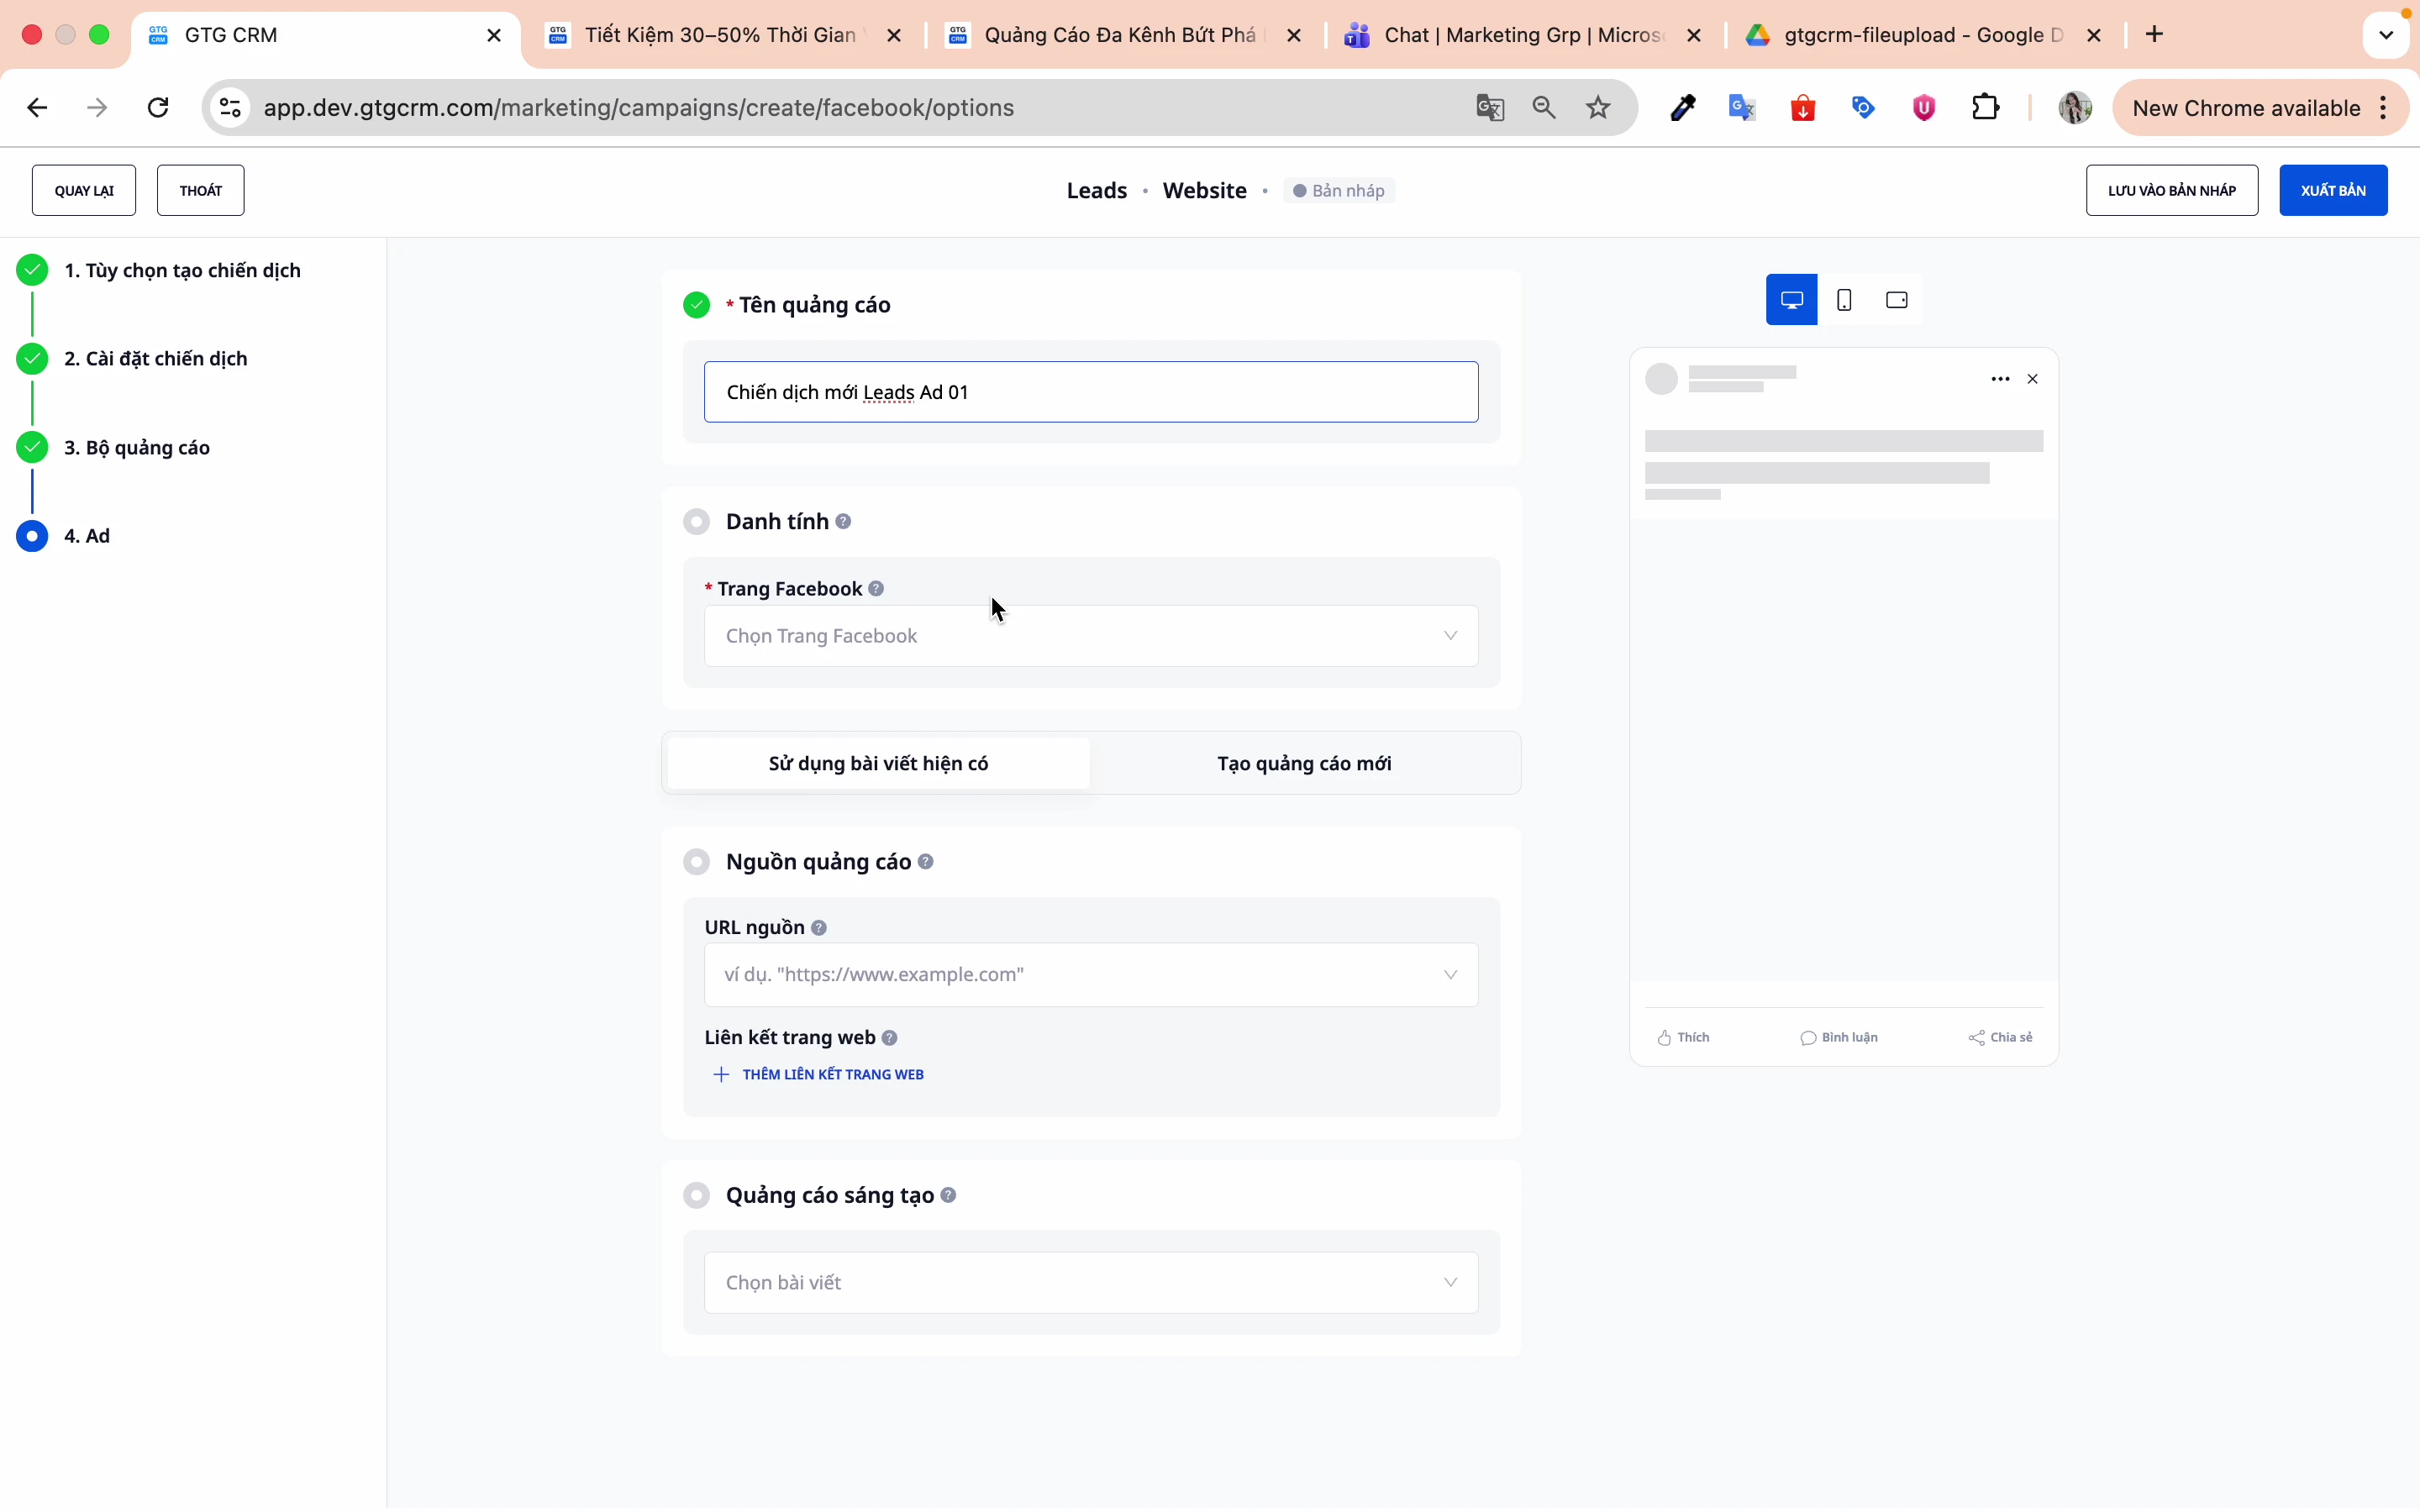
Skref 3: Veldu tegund færslu
Það eru 2 valkostir:
Valkostur 1: Notaðu núverandi færslu
- Veldu færslu sem þegar er á síðunni
- Nýttu þér félagsleg sönnunargögn (likes, ummæli, deilingar)
- Hraðvirk og einfalt
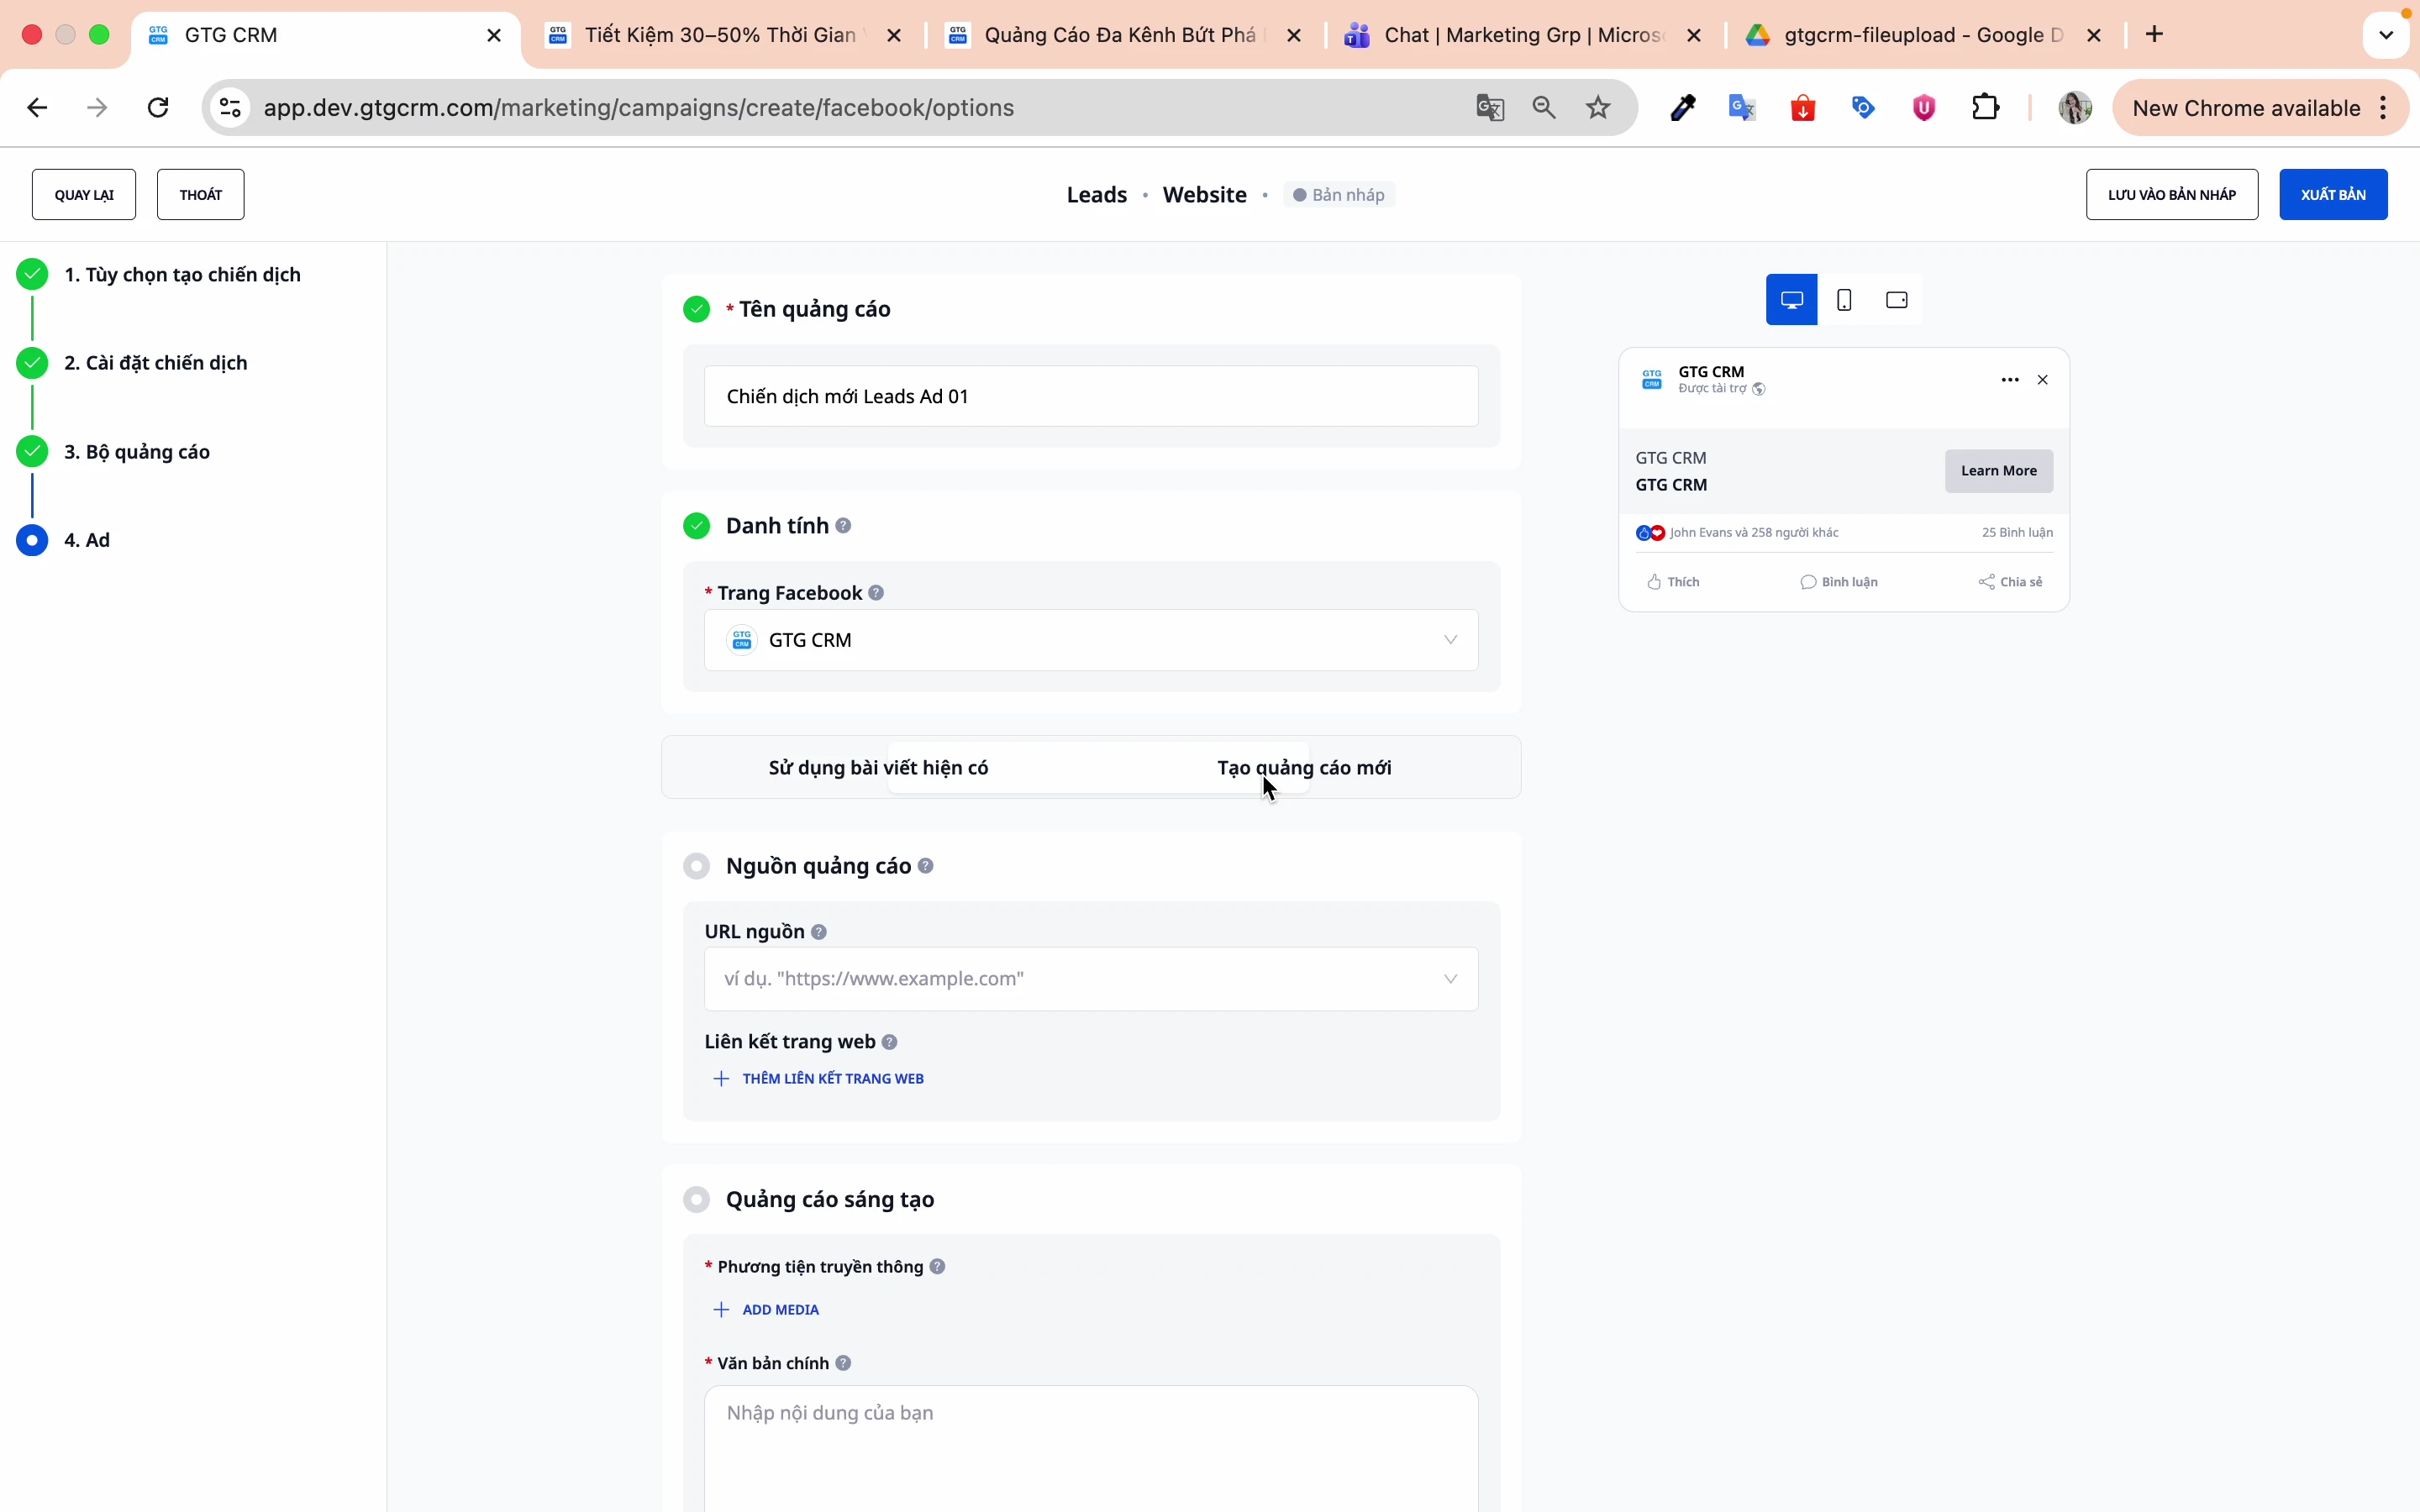
Hvernig á að gera:
- Smelltu á Notaðu núverandi færslu
- Veldu færslu af listanum
- Forskoða og staðfesta
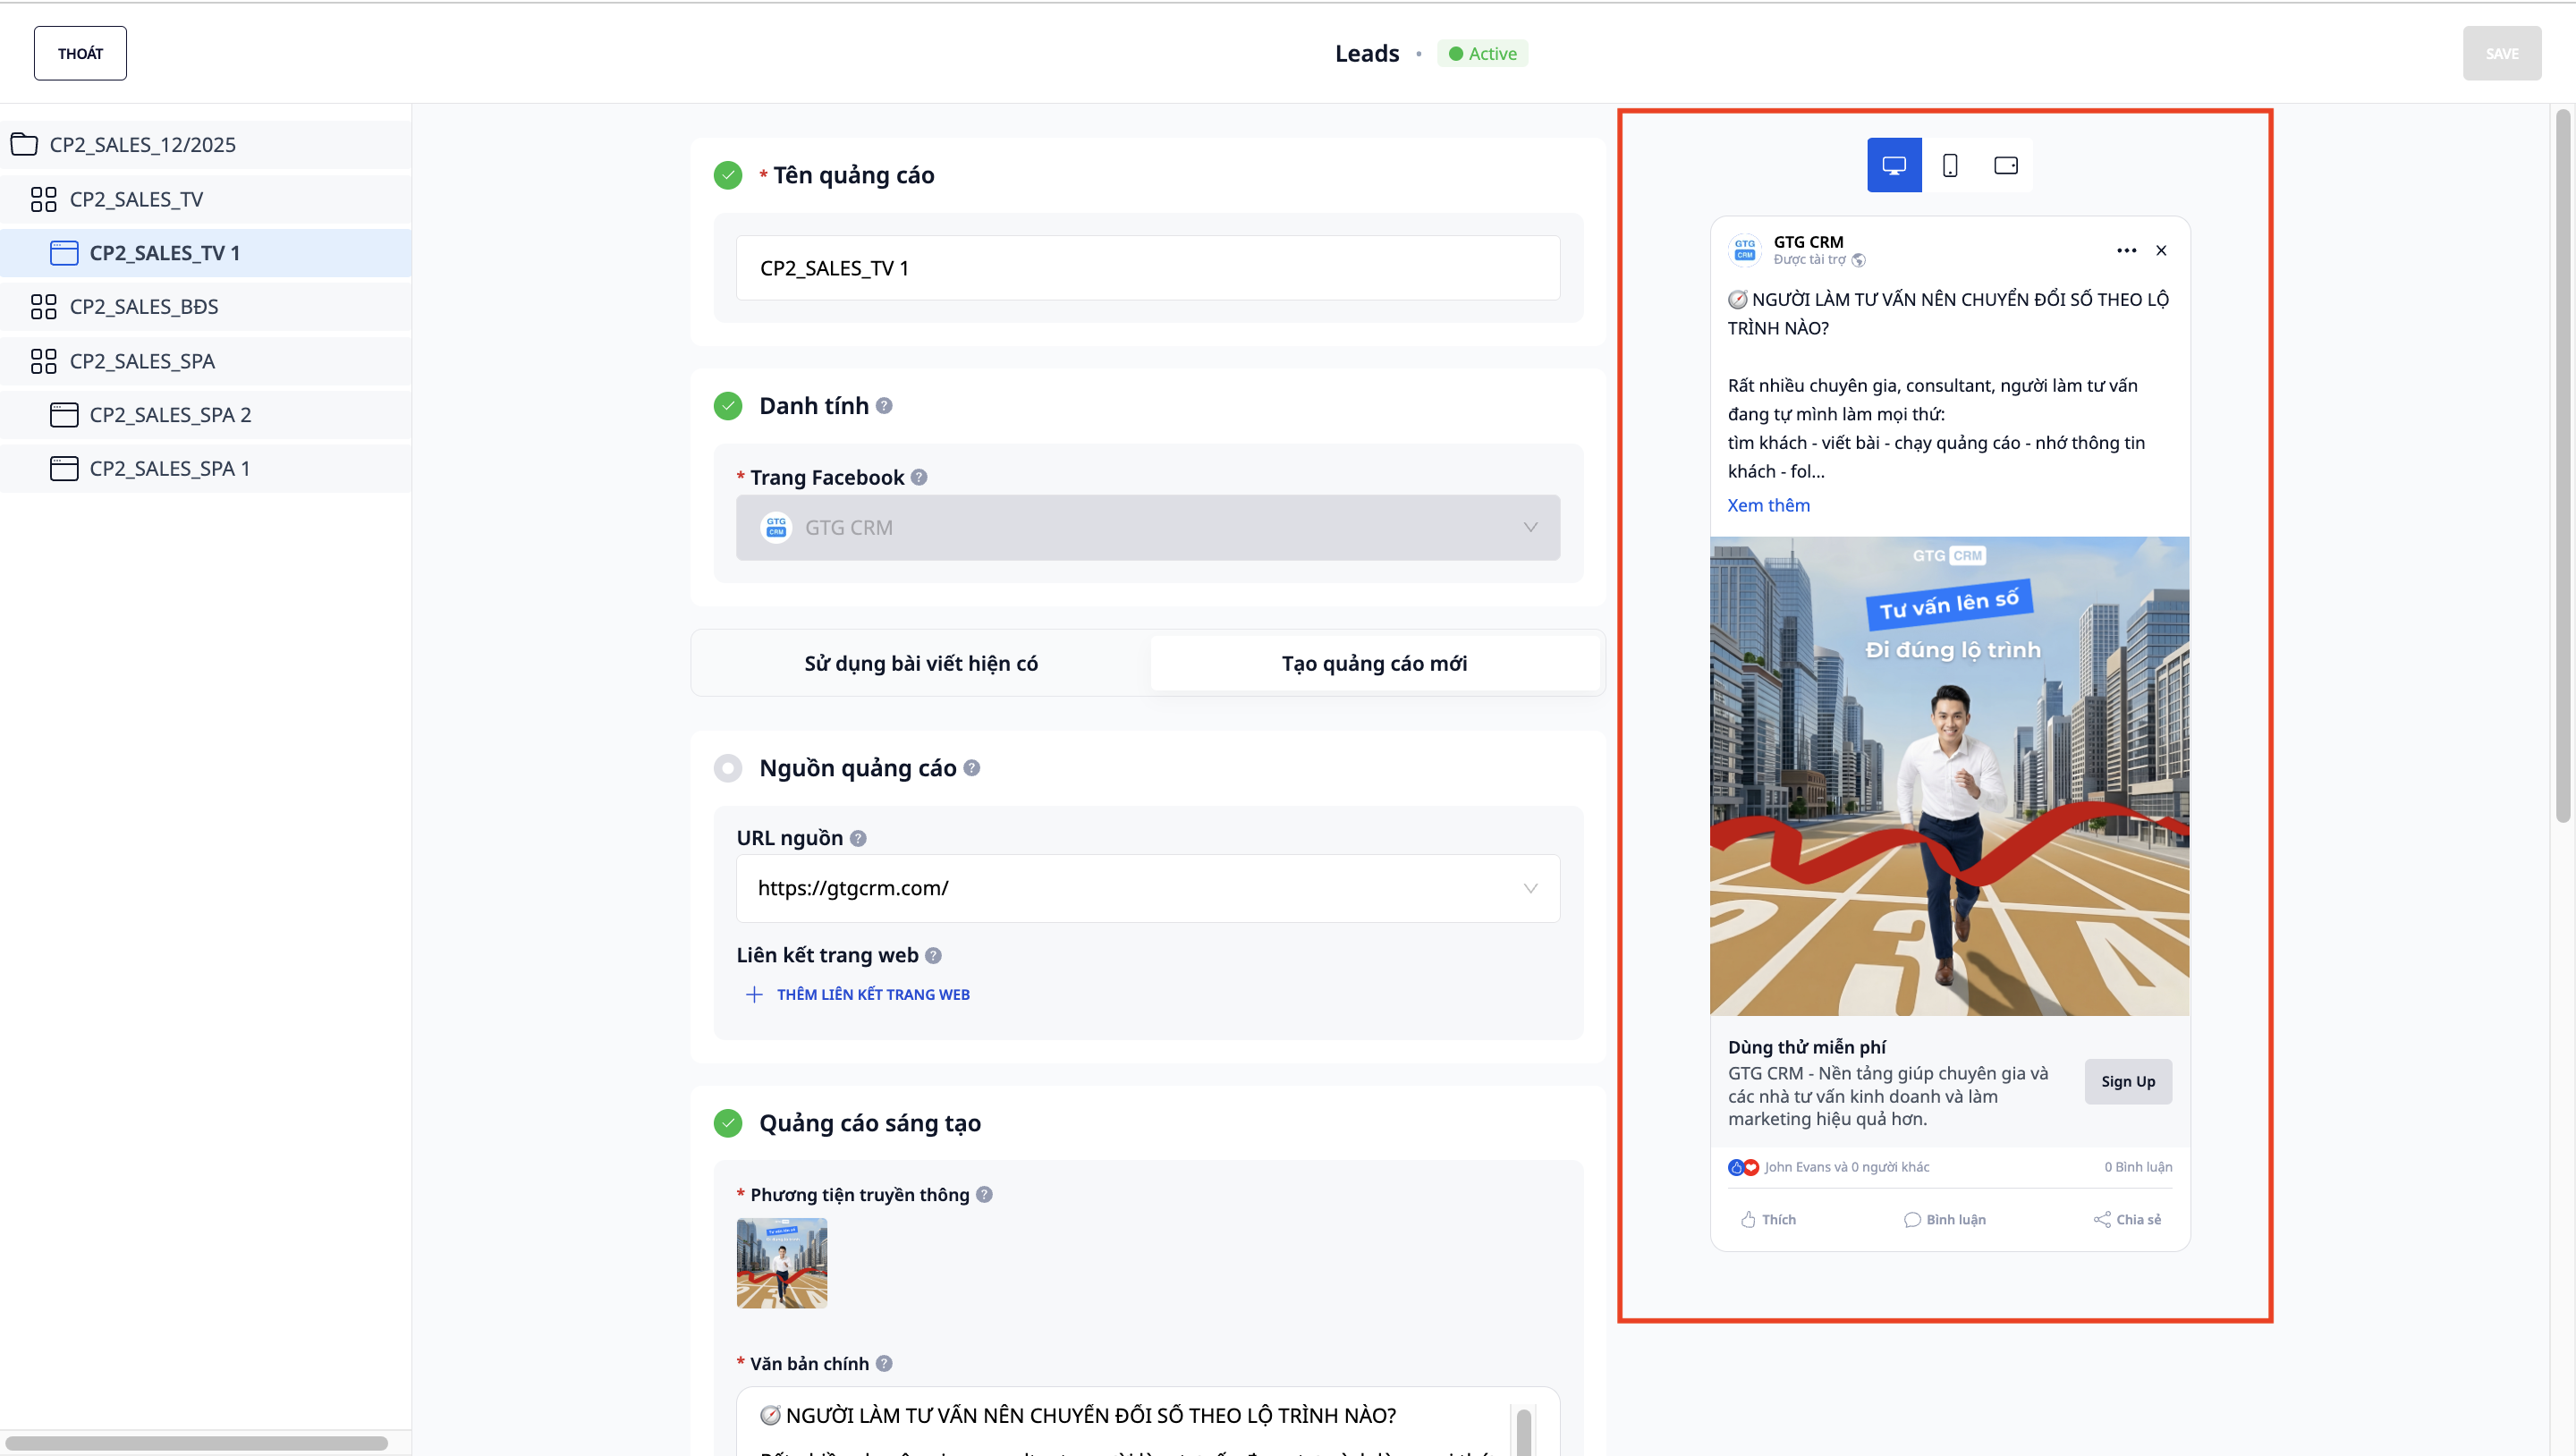
Valkostur 2: Búa til nýja auglýsingu
- Búðu til algjörlega nýtt efni
- Sérsníða myndir, myndbönd, texta
- Meira sveigjanlegt í hönnun
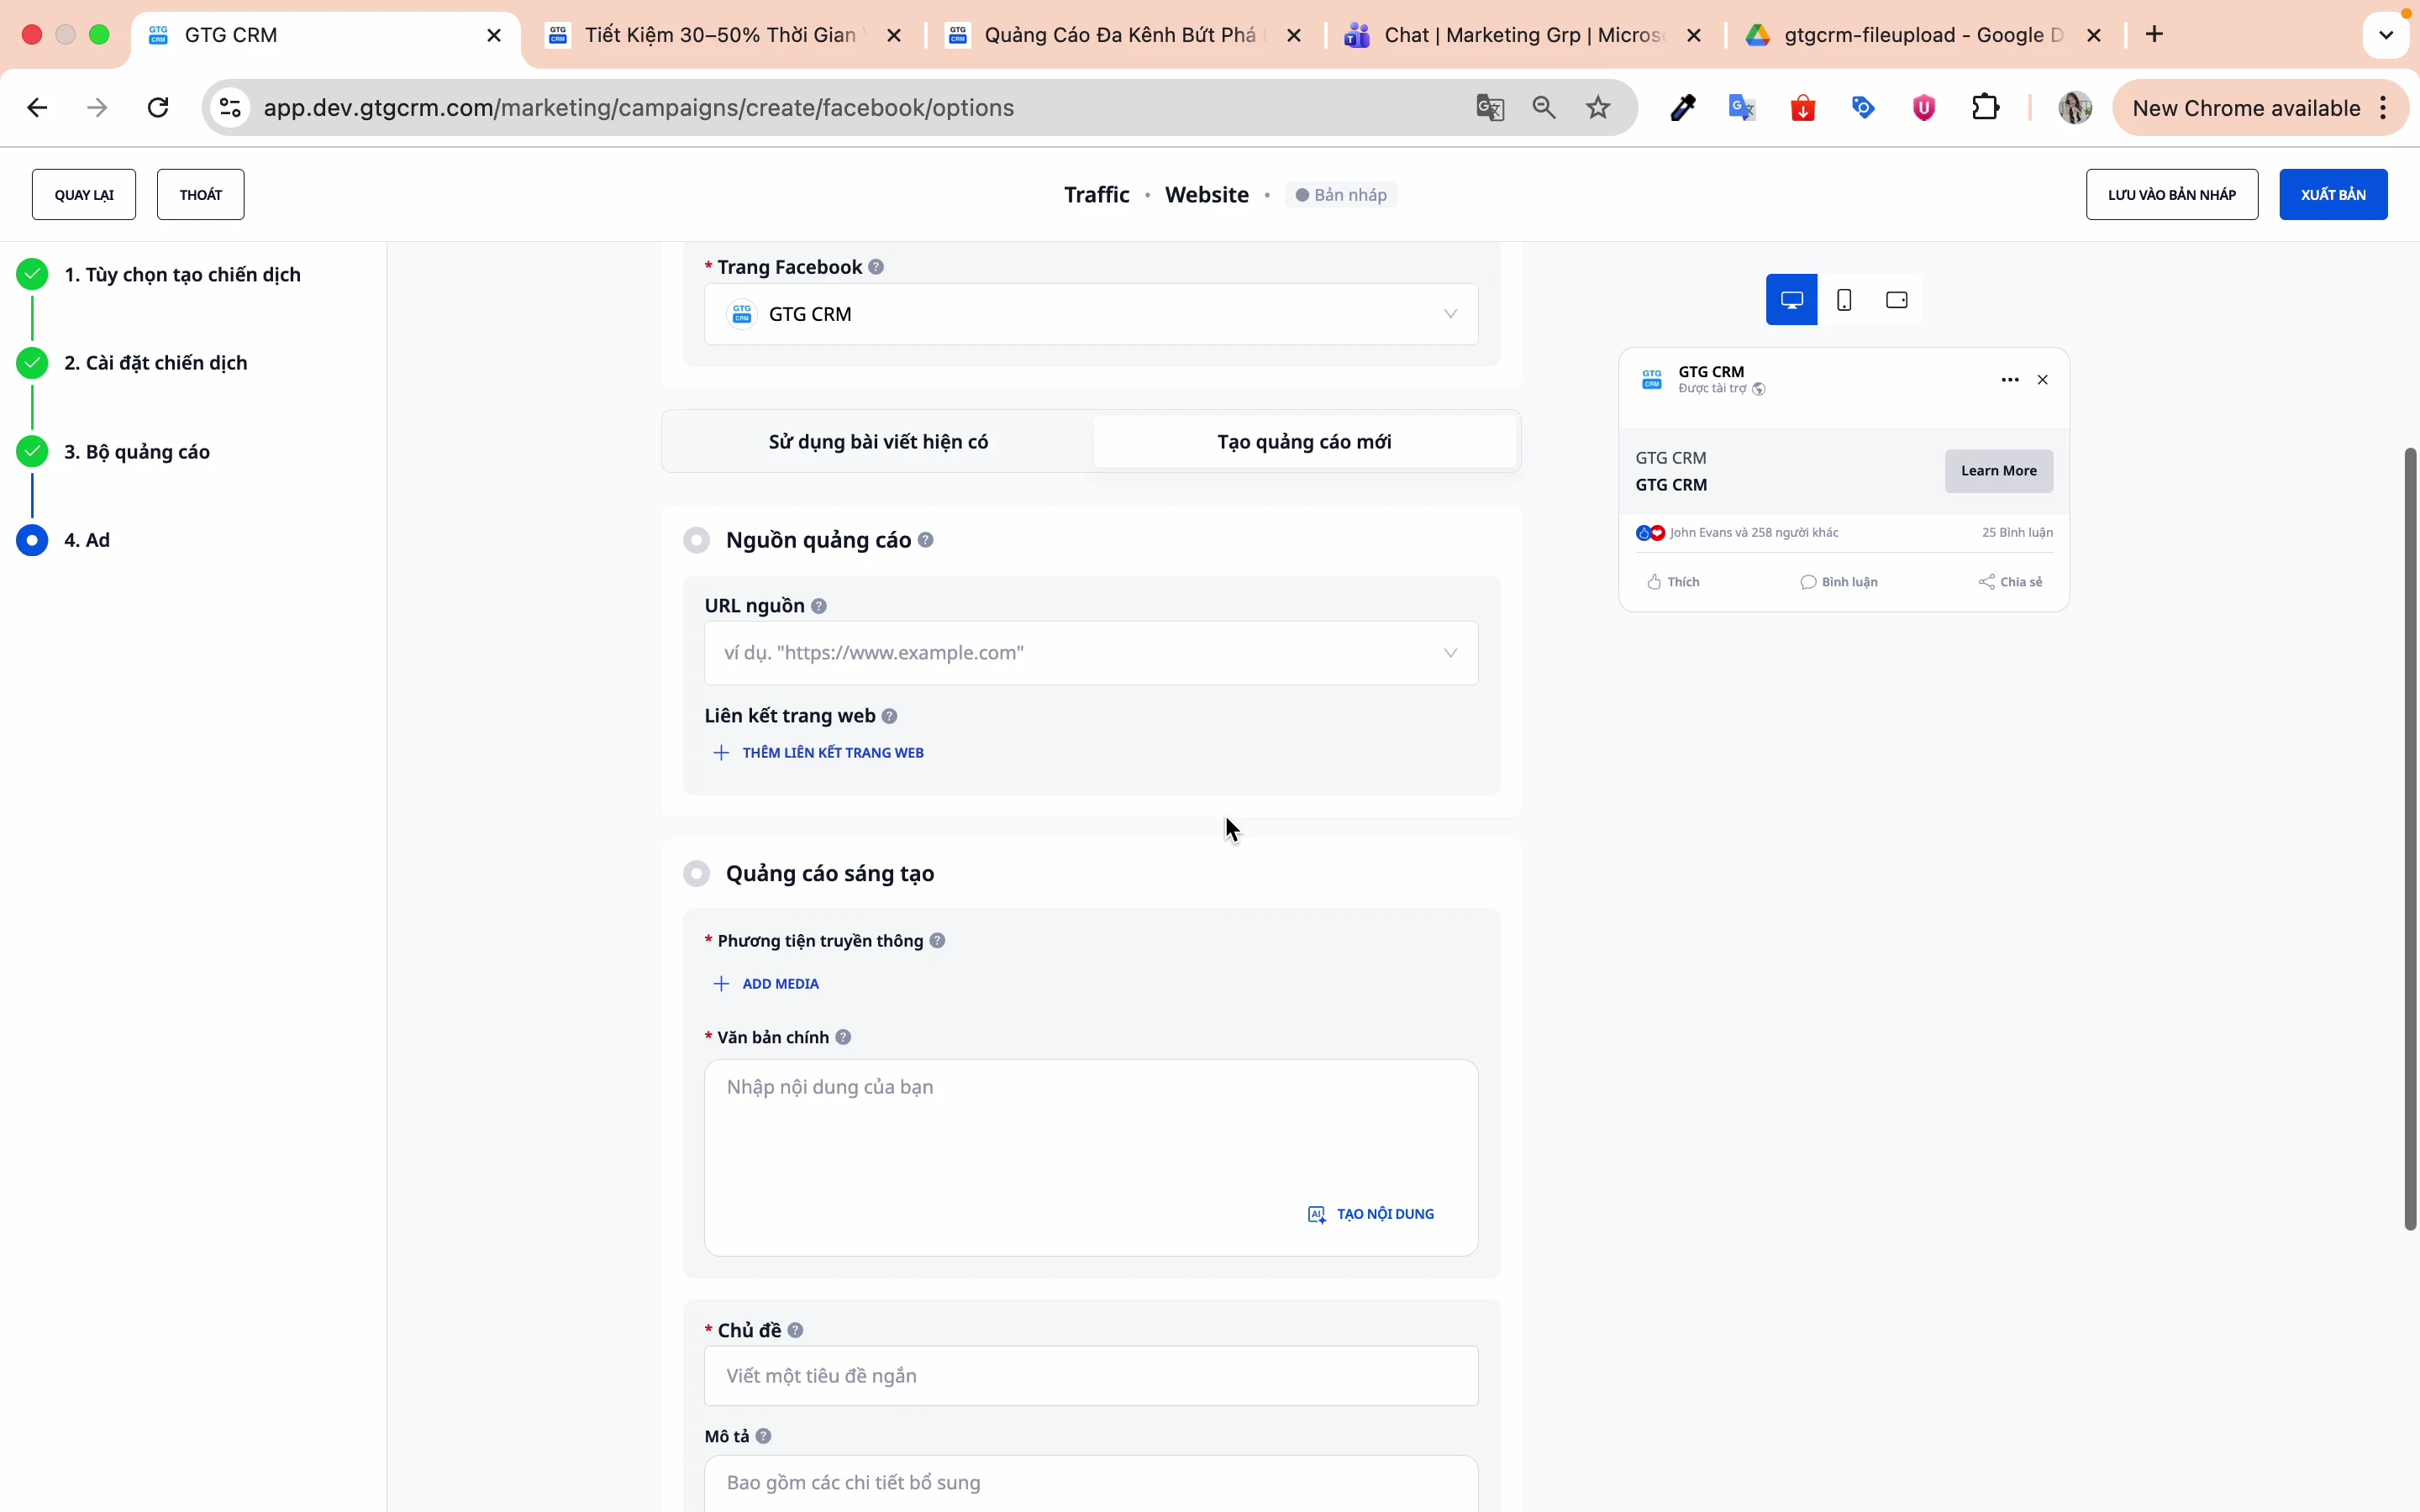
Hlutar sem þarf að fylla út:
- Efni: Texti auglýsingarinnar
- Fjölmiðlar: Mynd eða myndband
- Titill: Letur fyrir titil
- Lýsing: Lýsing tengils
Skref 4: Sláðu inn tengil á áfangasíðu
Sláðu inn slóðina sem notendur verða sendir á þegar þeir smella á auglýsinguna.
Skref 5: Forskoða auglýsingu
GTG CRM býður upp á forsýningarskjá til að athuga auglýsinguna áður en hún er gefin út.
7. Gefa út herferð
Skref 1: Athugaðu allar stillingar
Athugaðu aftur:
- Markmið herferðar
- Fjárhagsáætlun og tilboð
- Markmiðunar áhorfenda
- Efni auglýsingar
Skref 2: Smelltu á "Gefa út"
Smelltu á Gefa út hnappinn til að búa til herferð.
Skref 3: Bíð eftir endurskoðun Facebook
Facebook munni skoða auglýsingar áður en þær eru birtar (venjulega 15-60 mínútur).
8. Aðrir markmið herferðar
Umferðarherferð
Markmið: Auka smelli á vefsíðu
Sérstakar stillingar:
- Viðskiptastaðsetning: Vefsíða
- Árangursmarkmið: Hámarka fjölda landunarsíðna sem skoðaðir eru
Messenger herferð
Markmið: Auka skilaboð í Messenger
Sérstakar stillingar:
- Viðskiptastaðsetning: Skilaboðastaður
- Árangursmarkmið: Hámarka fjölda smella á tengla
Ábendingar til skilvirkrar notkunar
Um markhópastýringu
- Byrjaðu með breiðan markhóp, síðan þrengdu byggt á gögnum
- Notaðu AI markhóp fyrir fyrstu herferðina
- Búðu til mörg auglýsingasett með mismunandi markhópum til að prófa
Um auglýsingaefni
- Forgangsraðaðu að nota færslur sem hafa þegar mikla þátttöku
- Búðu til mörg auglýsingarafbrigði til að A/B prófa
- Myndbönd hafa oft betri árangur en myndir
Um fjárhagsáætlun
- Byrjaðu með lítið fjárhagsáætlun (100-200k á dag)
- Látið keyra í 3-7 daga áður en metið er
- Aukið fjárhagsáætlun smám saman þegar árangur sést (20-30%/skipti)
Um mælingar
- Settu alltaf upp Facebook Pixel á vefsíðunni
- Settu upp viðskipta API fyrir nákvæmari mælingar
- Athugaðu árangur reglulega í GTG CRM
Algengar spurningar
Sp.: Ætti ég að velja fjárhagsáætlun herferðar eða fjárhagsáætlun auglýsingasett? S.: Ef þú ert að byrja, veldu fjárhagsáætlun herferðar (CBO) svo Facebook geti hagrætt sjálfkrafa. Þegar þú hefur reynslu, notaðu fjárhagsáætlun auglýsingasett til að hafa nánari stjórn.
Sp.: Hversu hátt á að setja kostnaðarmarkmið? S.: Byggt á sögulegum gögnum þínum. Ef þú hefur engin, skildu það autt og keyrðu í 1-2 vikur til að safna gögnum fyrst.
Sp.: Ætti ég að nota núverandi færslur eða búa til nýjar? S.: Ef færslan hefur þegar mörg lík/umsagnir, notaðu núverandi færslu til að nýta félagslega sönnun. Ef þú vilt prófa nýtt skapandi efni, búðu til nýja auglýsingu.
Sp.: Á markhópurinn að vera breiður eða þröngur? S.: Byrjaðu breitt (1-5 milljónir manna) svo Facebook hafi nóg af gögnum til hagræðingar. Síðan þrengdu byggt á niðurstöðum.
Stuðningur
Ef þú þarft frekari aðstoð, vinsamlegast hafðu samband:
- 📧 Netfang: support@gtgcrm.com
- 💬 Spjall: Í GTG CRM appinu
- 📞 Sími: 1900-xxxx
GTG CRM - Stjórnaðu Facebook Ads auglýsingum einfaldlega og skilvirkt! 🚀