You run ads for two or three shops, or for several brands, and they all sit under one account. At the weekend you want to know which campaigns should have their budget cut and which should be paused, but the report mixes one shop's numbers with another's, and you end up filtering by campaign name one by one.
The Weekly review of my ads does that reading once a week, only on the ads you choose. On Monday morning, if there are suggestions, you open a short list containing only, say, the bakery's campaigns; each suggestion has a Why line in plain language and the measured numbers, for example "reduce the budget for this campaign because it spent a lot without any conversions". You tick the ones you agree with, the shoe shop's numbers don't get mixed in, and your ads don't change until you approve. This guide walks through the two decisions you make: which ads the review reads, and where and how you approve the suggestions.
The review is available for workspaces that have connected at least one Facebook, Google or LinkedIn ad account. This guide follows two people: the person who sets it up (chooses the ads, saves) and the approver (ticks the suggestions they agree with).
What you'll be able to do after this guide
Turn on the review → choose the ads it reads (all of them, selected by name, or matched by a word in the campaign name) → check the count line → run a test without changing anything → receive suggestions under Tasks ▸ Pending approval → tick the suggestions you agree with → review what you decided under Pending approval ▸ Approval history.
Before you start
| # | Requirement | Why it's needed |
|---|---|---|
| 1 | At least one ad account connected (Facebook, Google or LinkedIn) | Without an account, the review card doesn't appear, and the ad selection step shows "No ad accounts connected." |
| 2 | The person setting it up can view ad campaigns, and can create and edit automation workflows | The ad selection step reads your list of campaigns; saving the selection requires permission to edit workflows |
| 3 | The approver can approve marketing proposals | Only people with this permission can click Approve or Reject |
| 4 | Optional: the workspace's Brand identity has been filled in and approved | So the suggestions reflect your industry and target customers (Step 9). The review still runs without it |
Step 1 — Turn on the weekly review
- Open Marketing ▸ Social & Marketing ▸ Campaigns (hereafter the Campaigns page).
- Just above the tabs, find the card Weekly review of my ads, with the description "Once a week, it reads the ads you choose and suggests changes for you to approve. Nothing changes until you approve."
- Click Turn on, then click Open workflow.
✅ Expected result: a notification "Weekly review has been turned on", the card's label changes to On, and Open workflow takes you to the diagram of the review's steps. If the card only says "Ask your administrator to turn on this feature.", your account isn't allowed to turn it on; ask an administrator to do so.

The card when it is off: the Off label and the Turn on button.
Step 2 — Choose the ads the review reads
- On the diagram, click the first step after the timer step: Select ads to review.
- In the Which ads should this review cover? section, choose one of three options:
| Option | Best when | What you do |
|---|---|---|
| All my connected ads | You want to see everything, or you don't need to narrow it down yet | Nothing to do. This is the default option and isn't filtered by any campaign |
| Select by name | You want one or a few specific campaigns | Check the platforms (leave blank for all connected platforms), choose ad accounts, then pick campaigns from the name list. You don't need to type or look up any IDs |
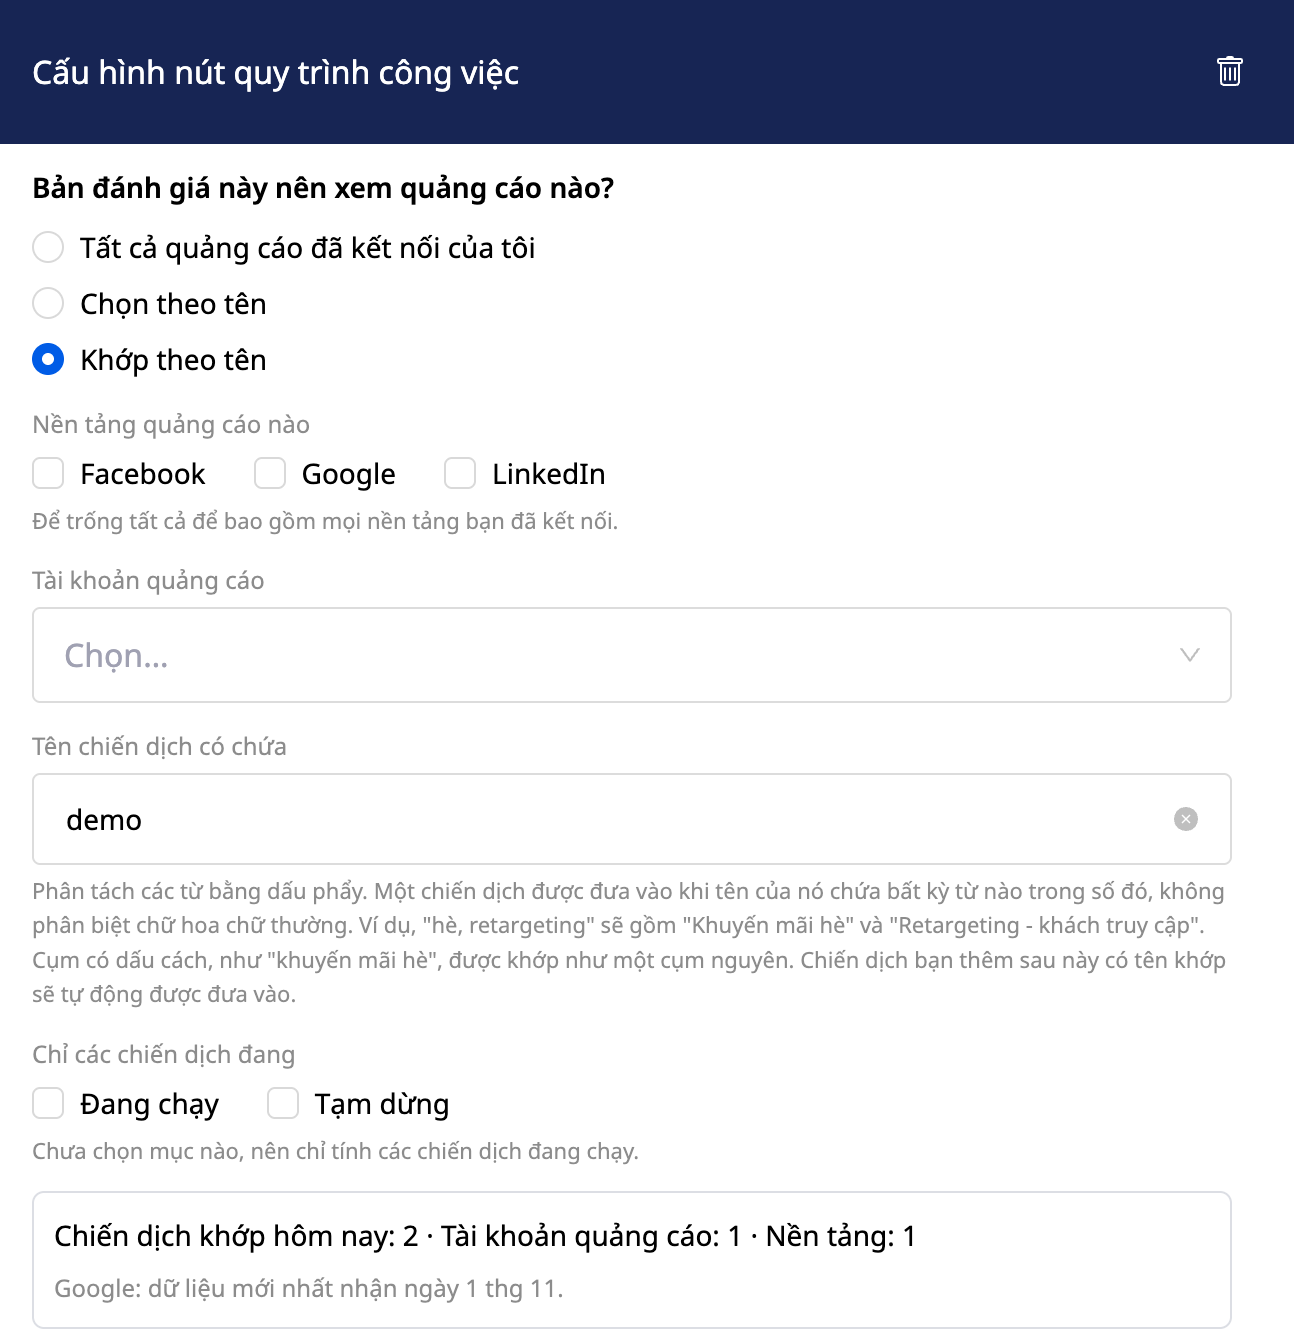
| Match by name | Your campaign names follow a convention, for example including a store name or a promotion name | In the Campaign name contains field, type one or more words separated by commas, for example summer, remarketing. You can further narrow by platform, ad account, and status. Any campaign whose name contains one of these words will be included, including campaigns you create later, as long as they are running. Uppercase and lowercase letters are treated the same |
✅ Expected result: the list shows the names of campaigns and ad accounts, with no strings of IDs. With Select by name, a line below the list shows how many campaigns in the selected ad accounts are not yet in your list.
💡 A phrase with spaces, such as "summer sale", is matched as a single unit. With Match by name, you can only keep Active or Paused campaigns; if you don't tick any option, only active campaigns are counted.
Example of Match by name using the word demo: today there are 2 matching campaigns, across 1 ad account and 1 platform.
Step 3 — Check the count line before saving
Right below your selection, a line shows what the review will read today, for example "Campaigns this review reads today: 5 · Ad accounts: 2 · Platforms: 2" (sample figures). With Match by name, this line begins with "Matching campaigns today". Below it is the most recent data date for each platform, for example "Facebook: latest data received on …". If a platform has not sent data for a long time, you'll see it here instead of waiting until the review runs.
- A selected campaign that was later deleted on Facebook, Google, or LinkedIn appears under the line "No longer found, so skipped:", with its old name. That campaign is still listed here.
- No campaign matches: you see "No campaigns match this selection today." along with a suggestion to try a shorter part of the name, or to remove the platform or status filter. Until you adjust the selection, the review has nothing to read.
- Leaving the name field empty under Match by name: this box reminds you to enter a word to search for in campaign names, or to choose a different selection method.
- LinkedIn not connected: LinkedIn is left out, and the Choose ads to review step states this clearly instead of showing an error. Facebook and Google are still read as usual. If LinkedIn is connected but temporarily can't be read (for example, LinkedIn is not responding), this step still reports that it couldn't be checked under both Choose by name and Match by name, and you should try again in a moment. It will not show a count that is missing LinkedIn.
✅ Expected result: the number on the count line equals the number of campaigns (not deleted) that you count yourself on the Campaigns page. If they differ, go back to Step 2, change the selection method, and check the count line again. Nothing has been affected yet. If the numbers still differ, contact the person in charge.
Example (the campaign names are made up to make this easier to picture). Your account has three campaigns:
TiemBanh_he,TiemBanh_khuyenmai, andShopGiay_he. You choose Match by name and typeTiemBanh. The count line shows 2 campaigns, andShopGiay_heis not read. On Monday morning, if there are suggestions, under Pending approval you will only see proposals for the two bakery campaigns, each with a Why line and the measured figures. The shoe shop's figures do not get mixed in, and aTiemBanhcampaign you create next month will also be read automatically if it is running.
Step 4 — Choose the report language and save
- Scroll to the bottom of this box, to the Report language section. This field starts out as Workspace language.
- To change it, open the list and choose a language. Each entry shows the language name in that language, followed by its English name. The review and approval requests are written in this language. Buttons and labels still follow each person's screen language.
- Click Save.
✅ Expected result: the save succeeds. The later steps (the weekly metrics and the step that applies approved changes) use the same list as the Choose ads to review step, except for older reviews that were created before the ad selection step was added (see Step 6).
Step 5 — Test run, no changes
- Click the next step on the diagram: Weekly marketing metrics (self-calculated).
- In the Latest result card, click Check now.
✅ Expected result: the card reports that the run has finished, makes clear that this was only a check and nothing was changed, and includes a few lines describing what this metrics step can read from your real data. Your ads are not changed, nothing is sent to anyone, and the check does not use any credits.
💡 The check runs on the version you saved most recently, so click Save first. To protect your ad accounts, the whole workspace can only run the check about once every 30 seconds. If you click again sooner, you will see a short waiting message. This is not an error. Check now does not create an approval request and does not send notifications. To see those, let the review run on its schedule.
Step 6 — The apply step only touches the ads you selected
- Click the Apply approved changes step at the bottom of the review branch, then look at the last line of this panel.
✅ Expected result: a line reading "Only changes ads selected in step 1 · Campaigns: N". The "step 1" on screen refers to the Select ads to review step in the diagram, not Step 1 of this guide. N is the number shown on the count line in Step 3 of this guide. This means that even if a suggestion has been approved, if its campaign falls outside your list, this apply step rejects it and changes nothing.
ℹ️ A review run that was enabled before the ad selection step existed will show "No limit to selected ads" and a Add "Select ads" step button. Click that button, then click Save: nothing is deleted, and the review will keep reading all of your ads until you make a selection.
Step 7 — Approve suggestions in Tasks ▸ Pending approval
By default, at 9:00 AM every Monday, in the time zone you chose (you can change this in the scheduling step at the top of the diagram), the review reads the ads you selected and sends an approval request to the marketing approver. The approver does the following:
- Open Sales & CRM ▸ CRM ▸ Tasks, the Pending approval tab, then the Pending approval sub-tab, or click the notification in the bell icon. The weekly review's requests appear on this tab.
- Each card shows the title, who requested it (or "From workflow: …"), the creation time, how much time remains before the approval deadline, and a label describing what happens if approved. You can sort by Newest first, Oldest first, Nearest deadline first, or Highest risk first. Click View & approve.
- In the approval box, each suggestion is its own card: a short reference code (just for reading and reference, you don't need to type it), the channel, the campaign name, the Why line (the reason in plain language), the measured figures (Metrics), and a color strip after the words If approved: that describes what will happen:
| Label on the color strip | If you approve |
|---|---|
| no change | The system only records a review request. The budget, on/off status, and keywords on the ad account stay the same |
| budget change | The actual budget on the ad account changes. To revert it, you must do it manually |
| campaign change | The campaign or keywords change, and delivery is affected immediately |
| no action | It hasn't been determined what this suggestion will change; check on the advertising platform before approving |
- Tick the suggestions you agree with: each card has a checkbox. You can write a few words in the Your notes box (optional when approving).
- Click Approve. Only the suggestions you ticked will be carried out; the rest are skipped. Clicking Approve without ticking any suggestion means nothing will be carried out.
- To disagree with all suggestions: write your reason in the Your notes box, then click Reject. The notes box is required when rejecting; if left empty, the screen will prompt you to enter a note. Nothing changes in the ad account. If the deadline shown on the request passes without a decision, the workflow follows the no-approval branch: nothing changes, and the request shows a EXPIRED label in Approval History. A request also closes this way if the run that comes after it finishes first.
- Two people open the same request: the first decision counts; the person who clicks afterward sees the message "This request is no longer valid, so your decision has not been applied" and nothing further is carried out.
✅ Expected result: only the suggestions you ticked are carried out, the rest are skipped, and all changes stay within the list of ad accounts you selected in Step 2.
💡 Items that the review considered but did not suggest are at the end, with the reason (Considered but not suggested), so you can see it was reviewed and deliberately not recommended.
Step 8 — Review past decisions
- Under Tasks, open the Pending Approval tab, then click the sub-tab Approval History. This sub-tab lists requests that have been decided or have expired, newest first; each request shows a risk label, a status (REJECTED, EXPIRED, etc.) and, if someone has made a decision, a Approved by line.
- Click View details on a request.
✅ Expected result: you can see again, in read-only form, the suggestions, risk classification, who decided, when, the outcome, and the approver's notes; for requests from the weekly review, the suggestion cards also reappear, each marked Approved or Not approved.
Step 9 — Let suggestions reflect your business (optional)
If your workspace has filled in Brand Identity (approved and set as default), the review reads it to phrase suggestions for your industry and target customers: the same "click-through rate drop" figure may be explained differently for a bakery and for a software company. For how to fill in Brand Identity, see the Brand Identity guide.
- It's fine if you haven't filled it in. The review still runs and still makes suggestions; it simply stays neutral, does not make assumptions about your business, and notes that no business information is available.
- The figures still come only from the ad account. The business description changes how a figure is explained, not the figure itself taken from the ad account.
- Only the descriptive parts are used: company name, legal form and industry, target customer age group and gender, vision, mission, core values. Bank details, tax code, representative's name, phone number and email are not included in this list.
Quick reference table for expected results
| Action | Result you'll see |
|---|---|
| Click Turn on on the card on the Campaigns page | "Weekly review is turned on", a On label, and an Open workflow button |
| Select Select by name and tick one campaign | The count line changes to 1 campaign; the list shows only names |
| Select Match by name and type a word | The count line equals the number of campaigns that have that word in their name; campaigns created later with that word are also included automatically |
| Type a word that no campaign contains | "No campaigns match this selection today." along with a suggestion |
| Click Check now | The card shows the run has finished. It was only a check, and nothing changed. Clicking again within 30 seconds prompts you to wait |
| Open the Apply approved changes step | "Only change the ad selected in step 1 · Campaigns: N" ("step 1" refers to the Select ads to review step, not Step 1 of the guide) |
| Tick a suggestion under Pending approval, then click Approve | Only the ticked suggestion is carried out; the other suggestions are skipped |
| Enter a reason and click Reject | Nothing changes in the ad account; the request moves to Approval history. If the note is left blank, you will be prompted to enter one |
What to do now
There is only one thing to do: turn on the review on the Campaigns page, select the ads of one store at the Select ads to review step in the diagram, click Save, open the Weekly marketing metrics (auto-calculated) step, then click Check now on the Latest result card to see whether it reads the right campaigns. The check changes nothing on the ads, sends nothing to anyone, and uses no credits.
- Correct count: leave it as is. Monday at 9:00 AM (in your chosen time zone), if there are suggestions, the first list appears under Tasks ▸ Pending approval, and the ads only change when you tick them and click Approve.
- Incorrect count: go back to Step 2, change how you select campaigns, then click Check now again. Nothing has been affected.
Notes
- Viewers can see the workflow but not the ads. At the ad selection step, they see "You can't view ads in this workspace" and can only see the ads that were already selected. People with view-only access to the workflow see a view-only label and cannot save, but they can still click Check now.
- Amount fields, such as Spend required before concluding, are automatic when left blank: the review chooses a reasonable level based on the ad account's currency. If a saved amount appears to be set for a different currency, a reminder appears with a Use automatic button.
- Time zones are chosen from a list. If a time zone isn't recognized, the review stops and explains why, and it does not switch to a different time zone on its own.
- Credits: Check now uses no credits, but each scheduled run of the review does. Like all scheduled workflows, it is charged per run, and that price appears at the scheduling step, where you change the schedule. If you don't have enough credits at the scheduled time, that run is skipped with no charge, and the review tries again at the next scheduled time.
- The review only makes suggestions. Changes to the ad account are made only for suggestions that someone with approval rights has ticked and clicked Approve.