Overview
This guide walks you through putting Google ads on your website in GTG CRM, step by step: turning on ads, adding codes, choosing placements, uploading the ads.txt file, and understanding what your visitors see. It is intended for business owners and website editors. You need a published website with a web address, your own Google AdSense or Google Ad Manager account (the ad code and ads.txt line both come from that account), and your website must run on your own custom domain for the ads.txt file to take effect. When you finish this guide, your ad will show the status Running, and visitors who accept ads will see the Advertisement label. Don't have an account yet? See the "What you need to know before you start" section in the introduction Website Ads.
- The ad network is your provider: the contract and earnings belong to you, and you are responsible for their policies, the ads.txt file, the cookie and privacy information visitors see, and the ads displayed. GTG does not sell, place, or approve ads, and does not take a percentage of earnings.
- Google only, for now: codes from other networks are rejected with the message "This ad network is not yet supported."
- Ads are off by default on every website until you turn them on.
- Websites only: landing pages do not have this feature yet.
Step 1: Open the Ads screen
- Go to Marketing ▸ Brand Assets ▸ Websites.
- In the website list, click the Ads link in your website's row. Don't click the website name: that opens the editor, not the ads screen.
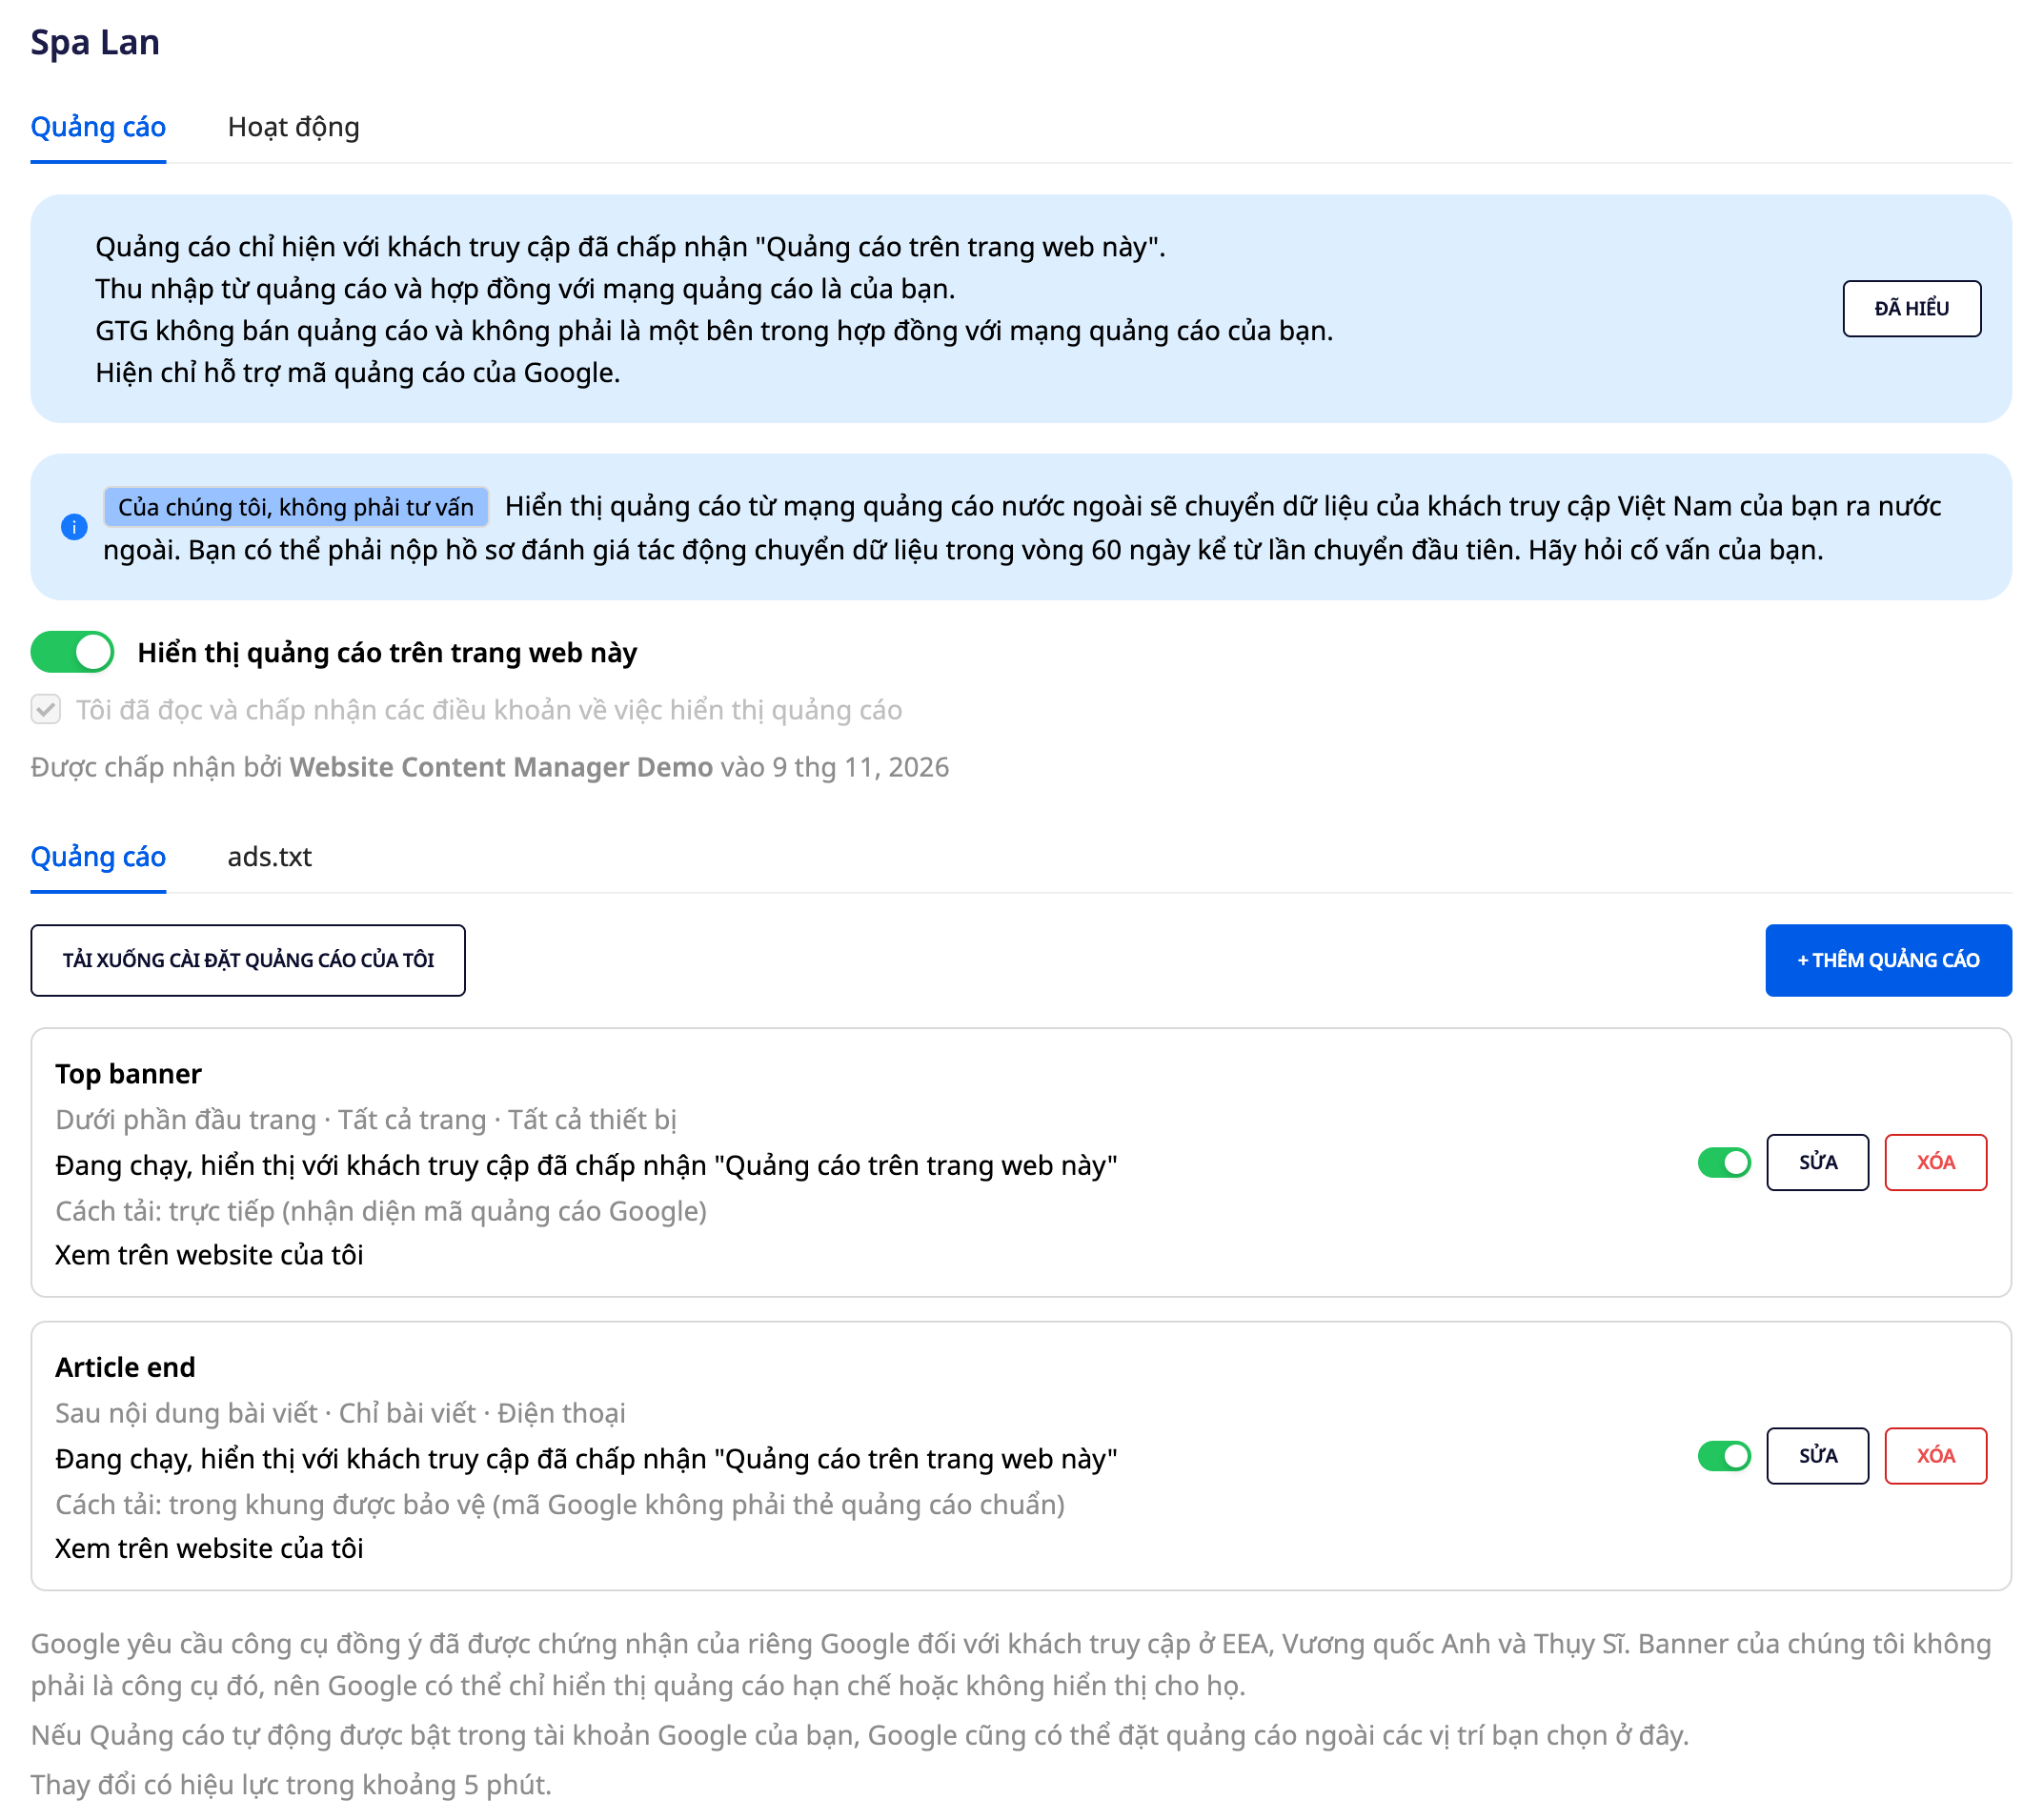
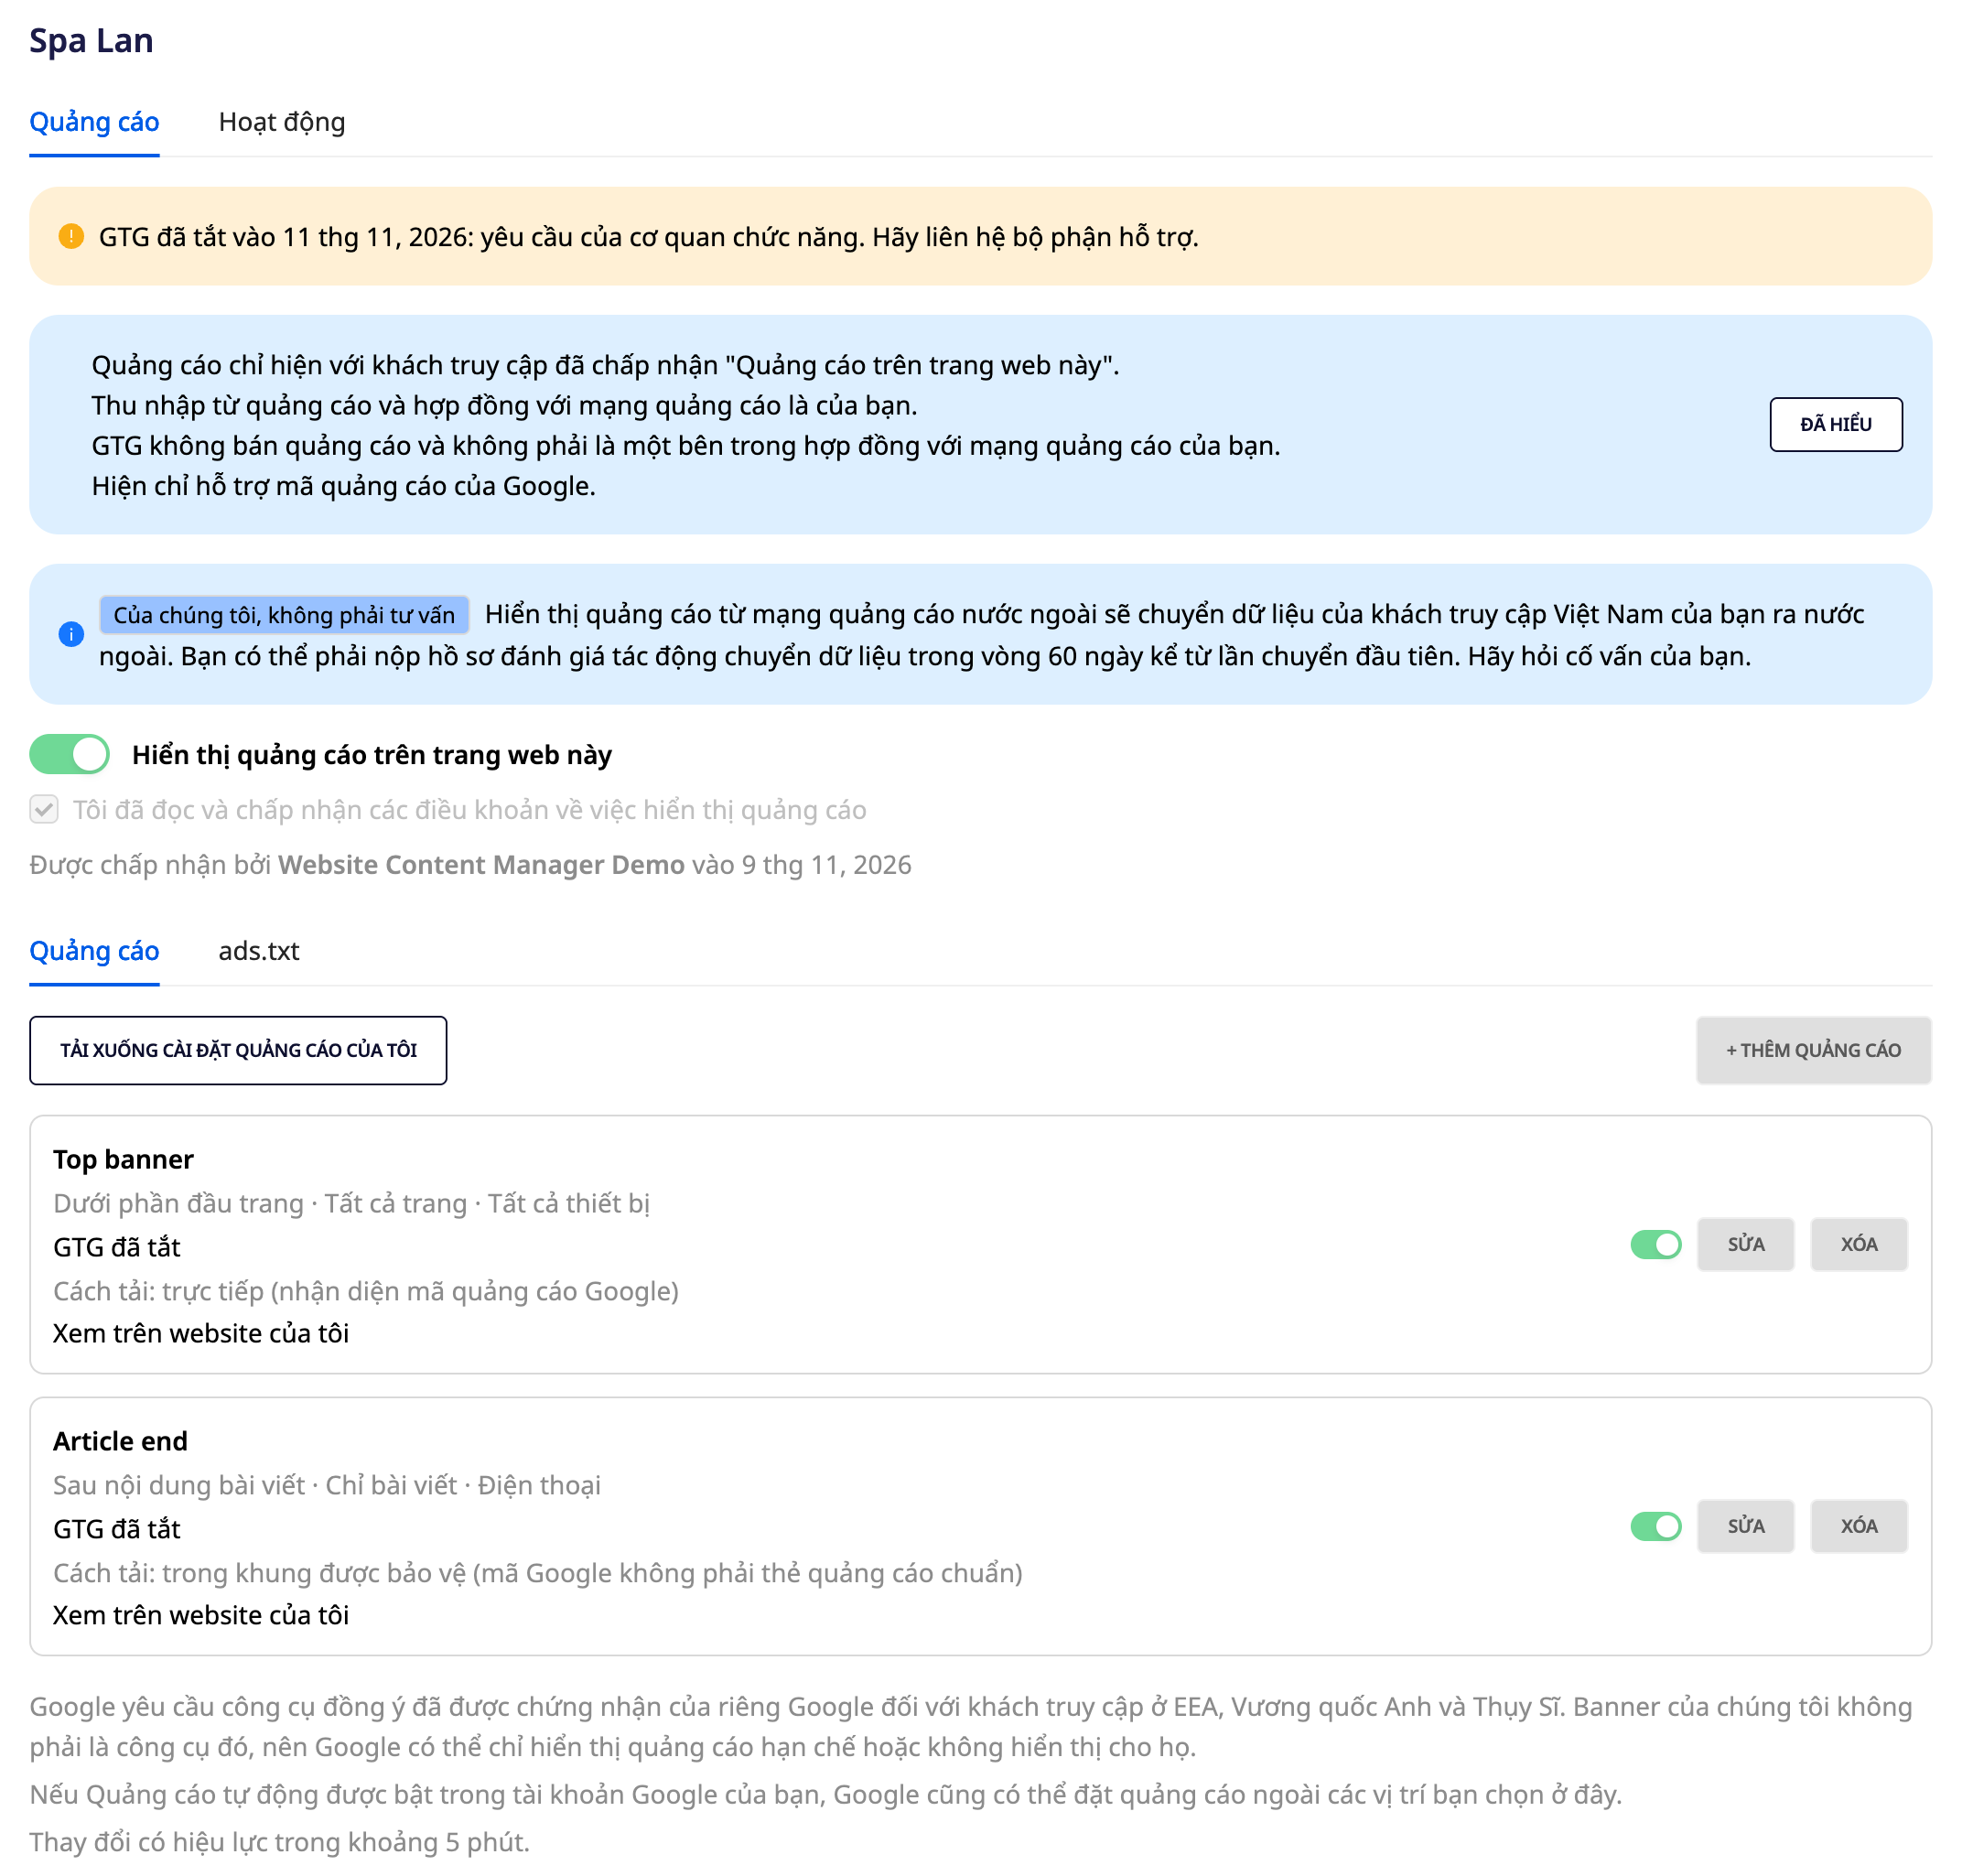
The screen has two tabs, Ads and Activity. The Ads tab has two sections: the list of ads and ads.txt. At the top is a four-line panel: ads only appear to visitors who have accepted Ads on this website; earnings and contracts with the ad network belong to you; GTG does not sell ads and is not a party to that contract; currently only Google codes are supported. Click Got it to close the panel.
People who only have view access to the website won't see the Ads link; if they type the screen's address directly, they get an access denied message ("Access denied"). Saving ads requires website edit permission.
Two messages may appear in place of the form:
- Publish your website and connect your web address first. Publish your website, then reopen the Ads screen. Ads only appear on published websites.
- Your website is using an older version of the page editor. The website needs at least one page with content, published from the editor. Click Open website in editor, check the pages that already have content, then publish. If you add content while the editor is open, close and reopen it before publishing. Publishing sends everything you've saved to the live website, so check your pages first. Until then your ad stays saved, but its status reads Pending: website needs to be updated before this ad can show, not Running.
Step 2: Turn on ads
- Open the Ads tab.
- Check the box I have read and accept the terms for displaying ads. Until you check it, the toggle won't turn on, and the screen shows Please check the box below before turning on ads.
- Turn on Show ads on this website.
After you accept, the box is grayed out and shows Accepted by your name on the acceptance date. You won't be asked again on that website, even if you turn the setting off and back on, unless the terms are updated. To stop, turn off the toggle. Changes take effect within about 5 minutes, and your ads are kept.
Step 3: Add an ad
- Click + Add ad.
- Name: a name only you can see, for example "Header banner", up to 80 characters.
- Paste the ad code from your ad network: get the code from your AdSense or Ad Manager account and paste it exactly as the network provided it. Below the field, you'll see Valid code or a sentence explaining the problem. "Valid code" only means the screen hasn't found a problem. The screen won't know which network the code belongs to until you save.
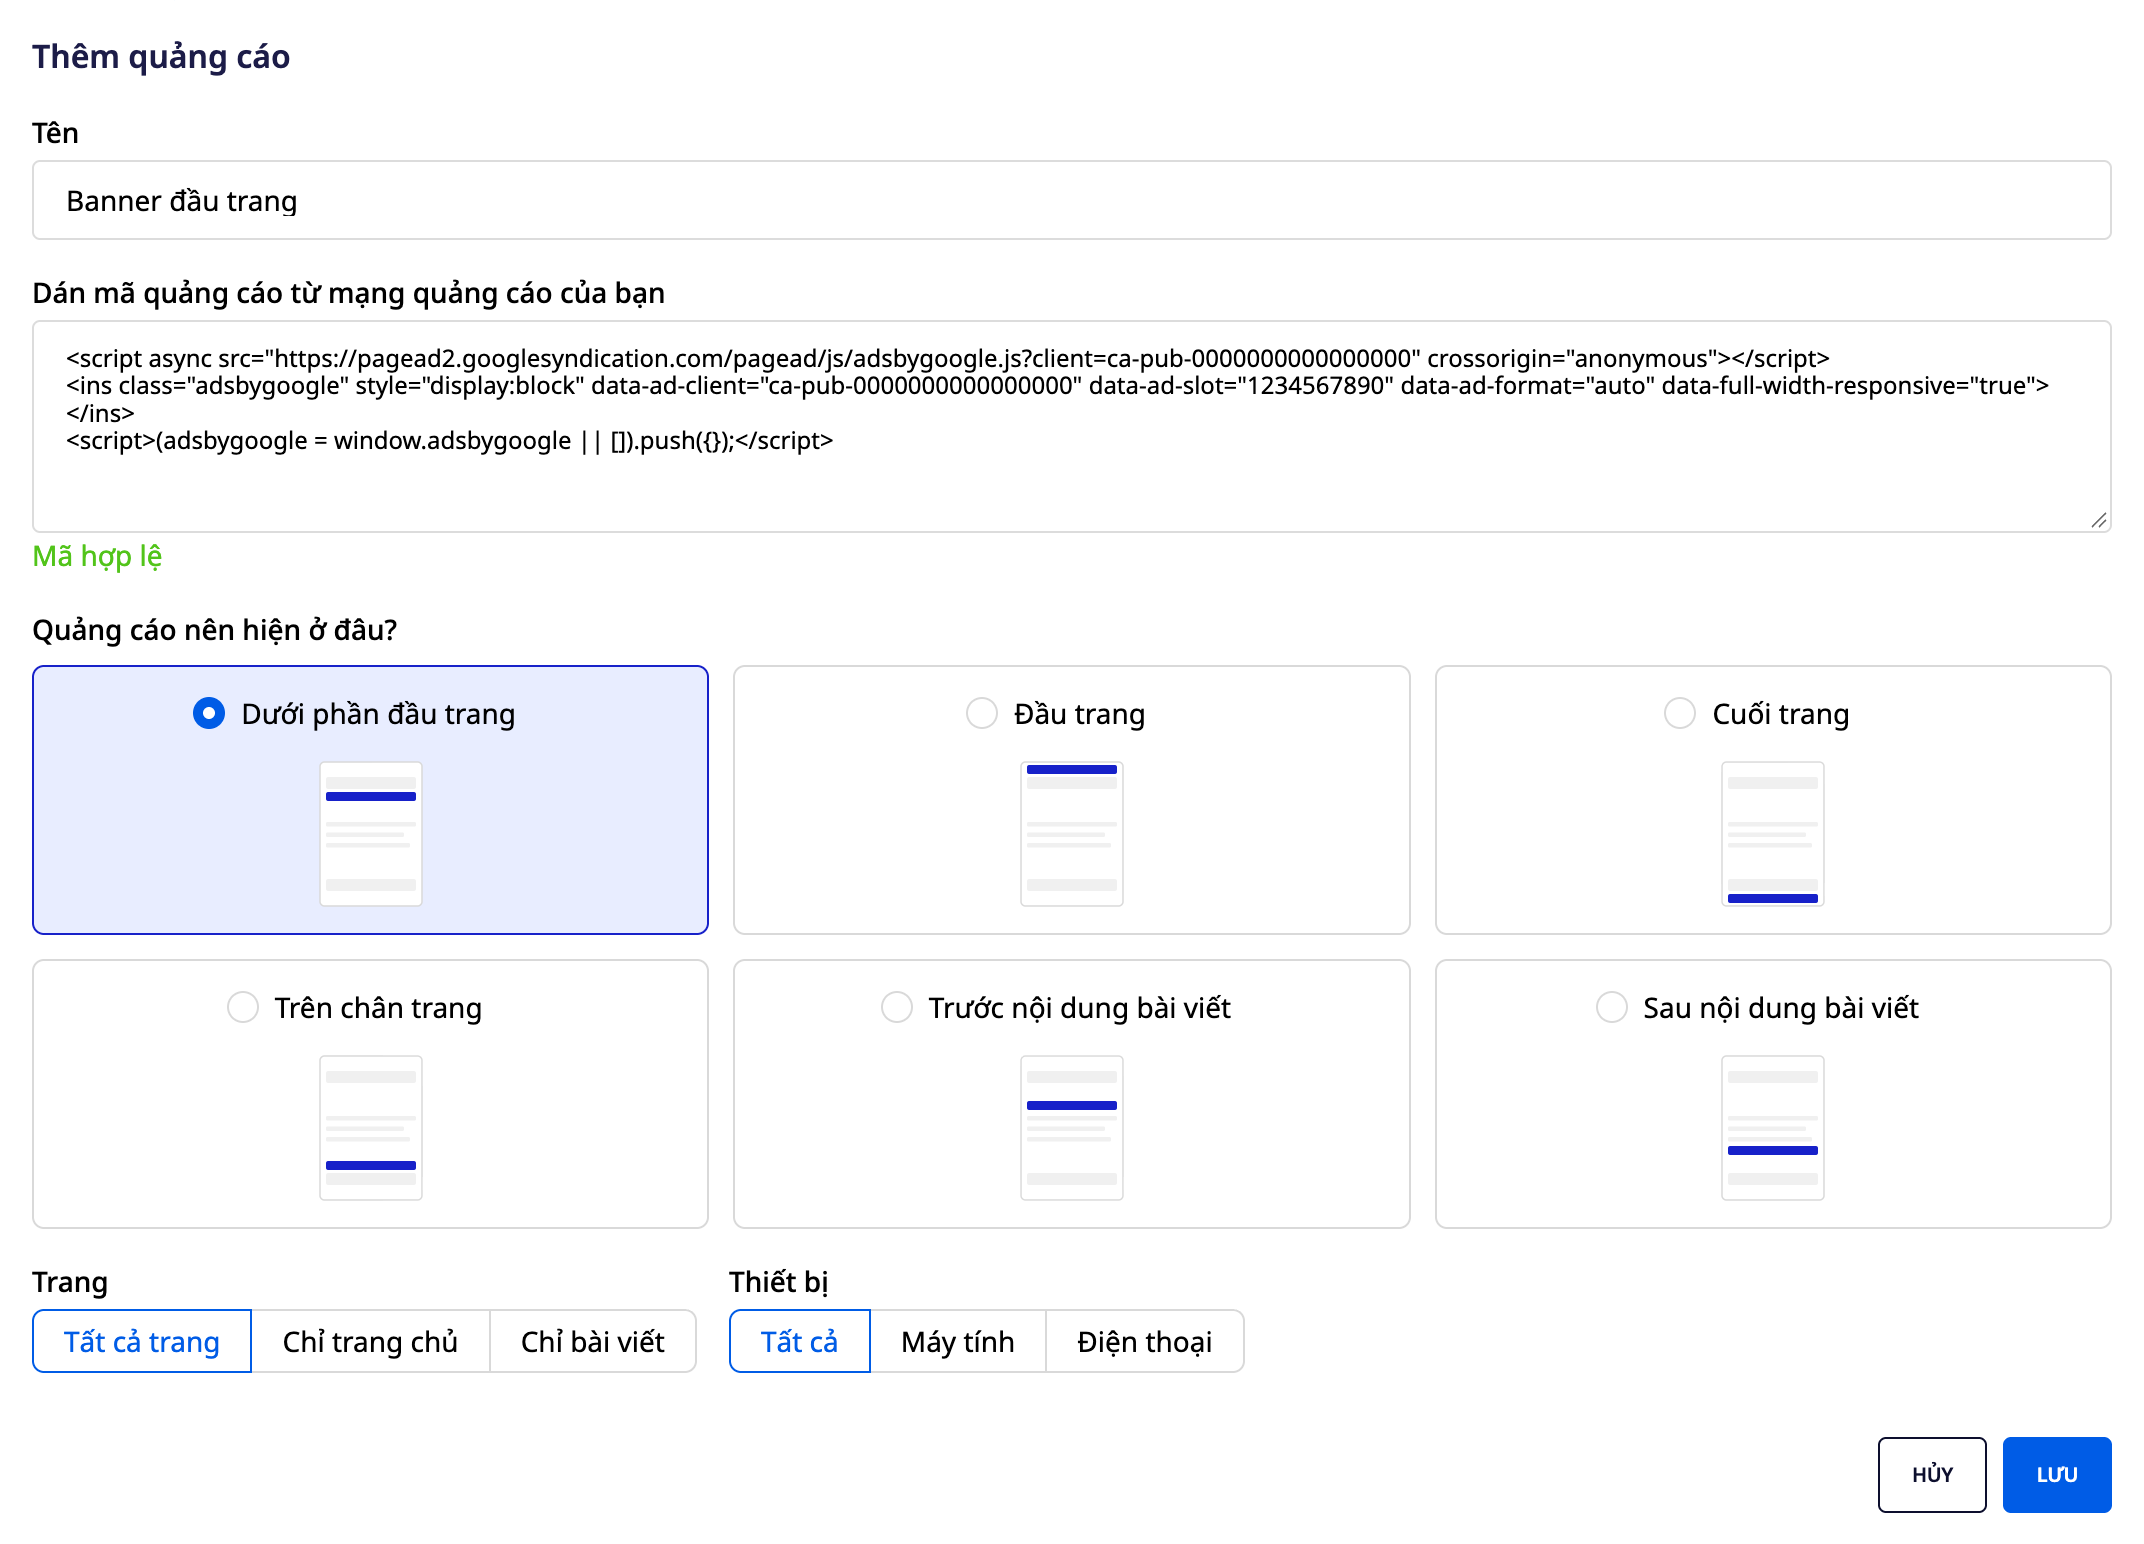
- Where should the ad appear? Choose one of the six positions shown in the diagrams (see the Six positions table just below; if you're not sure, try Before post content). A selection is required. Otherwise, clicking Save will give you "Please select where the ad should appear."
- Page: All pages, Home page only, or Posts only. When you choose one of the two positions inside a post, this field automatically switches to Posts only and is locked ("This position is inside posts, so it only appears on posts.").
- Device: All, Desktop, or Mobile.
- Click Save.
Six positions
| Position | Where the ad appears |
|---|---|
| Below header | Right below the website's header |
| Top of content | At the top of the page content |
| Bottom of content | At the bottom of the page content |
| Above footer | Right above the footer |
| Before post content | Inside the post, before the text |
| After post content | Inside the post, after the text |
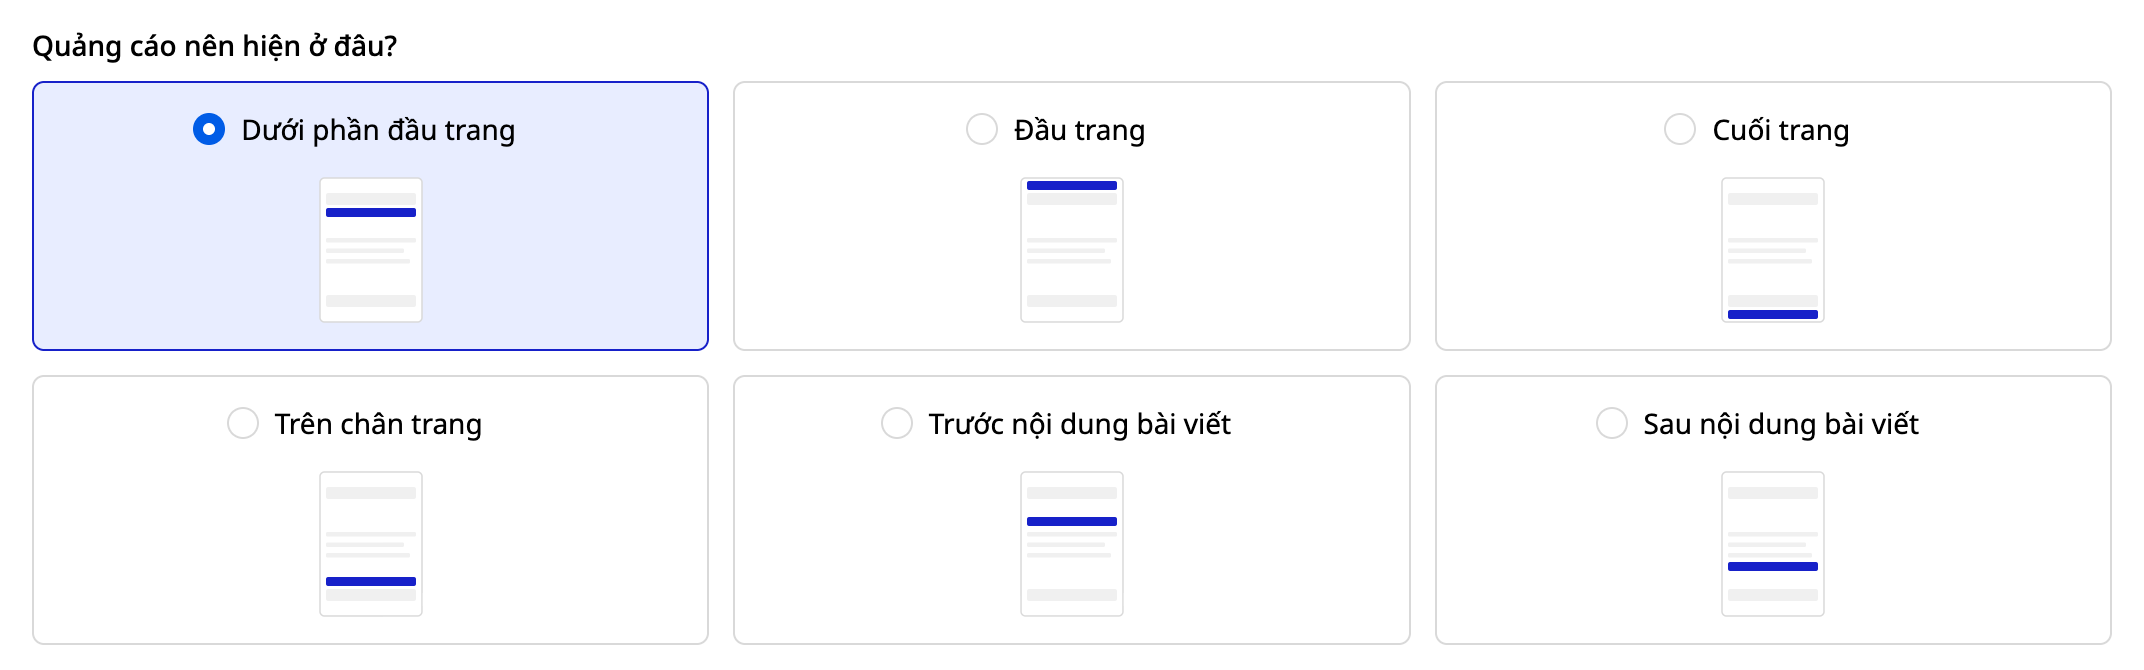
You don't need to type any technical position values. Just choose from the list.
Reading the status line
Each saved ad has a line such as Header banner · Below header · All pages · All devices, a plain-language status, and the buttons View on my website, Edit, and Delete (Delete first asks "Delete this ad?"). Each ad has its own Show this ad toggle.
| What you see | What it means |
|---|---|
| Running, showing to visitors who accepted "Show ads on this website" | Everything is ready. Visitors see the ad after choosing Show ads on this website |
| Pending: website not published | The ad is saved and will run once the website is published and has a web address |
| Pending: website needs to be updated before this ad can show | The website is published but still uses the old page editor. Follow the instructions in Step 1 |
| Disabled | The toggle for the website or for the ad is turned off |
| Disabled by GTG | A GTG staff member has turned off ads for the website. See Step 7 |
| Loading method: direct (Google ad code recognized) | Standard Google ad tag |
| Loading method: inside a protected frame (Google code is not a standard ad tag) | Other Google code, such as an Ad Manager placement, runs in a separate frame isolated from the website's login |
Limits: up to 12 ads per website, up to 20 KB per code, and names up to 80 characters.
Rejected code
The system reads your code and rejects code containing the following. The message names the ad and the part that must be removed:
- contains a form or input field ("This code contains a form, which is not allowed in an ad"): ads cannot have fields where visitors type;
- contains code that runs when a visitor clicks (for example
onclick); - contains a address that does not start with
https; - ad network code that is not yet supported;
- code that is too long, or more than 12 ads.
When an ad is rejected, nothing is saved. The rejection message may stay on the form until the next Save: fix the code and save again.
Notes that may appear on screen
- Google requires its own certified consent tool for visitors in the EEA, the United Kingdom, and Switzerland. The GTG banner is not that tool, so Google may show them only non-personalized or limited ads.
- If Automatic ads is turned on in your Google account, Google may also place ads outside the locations you choose here. This is a Google setting, not a GTG setting.
- For websites in Vietnam, the screen adds a short note, marked Our note, not legal advice, about visitor data being sent to foreign ad networks. Please read it and consult your advisor.
- Changes take effect within about 5 minutes.
Step 4: Test as a visitor
Open the website in a private window (or click View on my website on the ad), click Accept ads on this website in the cookie banner, then look for the Ad label. The status on screen should say Running. Your visitors will see it like this:
- On a visitor's first visit to the website, the cookie banner has a separate button, Accept ads on this website, alongside the other buttons. The accept-all button also counts as consent to ads. In Manage options, there is a separate checkbox, Ads on this website, apart from Analytics and Advertising. This option only appears on websites where ads are enabled and at least one ad is active. The banner states that the visitor's choice is recorded (a random receipt code, the time, and the version of the content the visitor read) and explains how to withdraw it.
- Before the visitor chooses, no requests are sent from the Ads screen to the ad network, and no ads appear.
- After the visitor chooses, the Ad label appears above each ad, followed by the ad. GTG CRM adds this label so that ads are not mistaken for page content. For sample or unapproved ad network accounts, the ad frame may be left empty. The label appearing and the request being sent show that the ad has been connected to the page.
- If the visitor withdraws consent (unchecking Ads on this website in Cookie options and then saving), the page reloads once and the ad disappears.
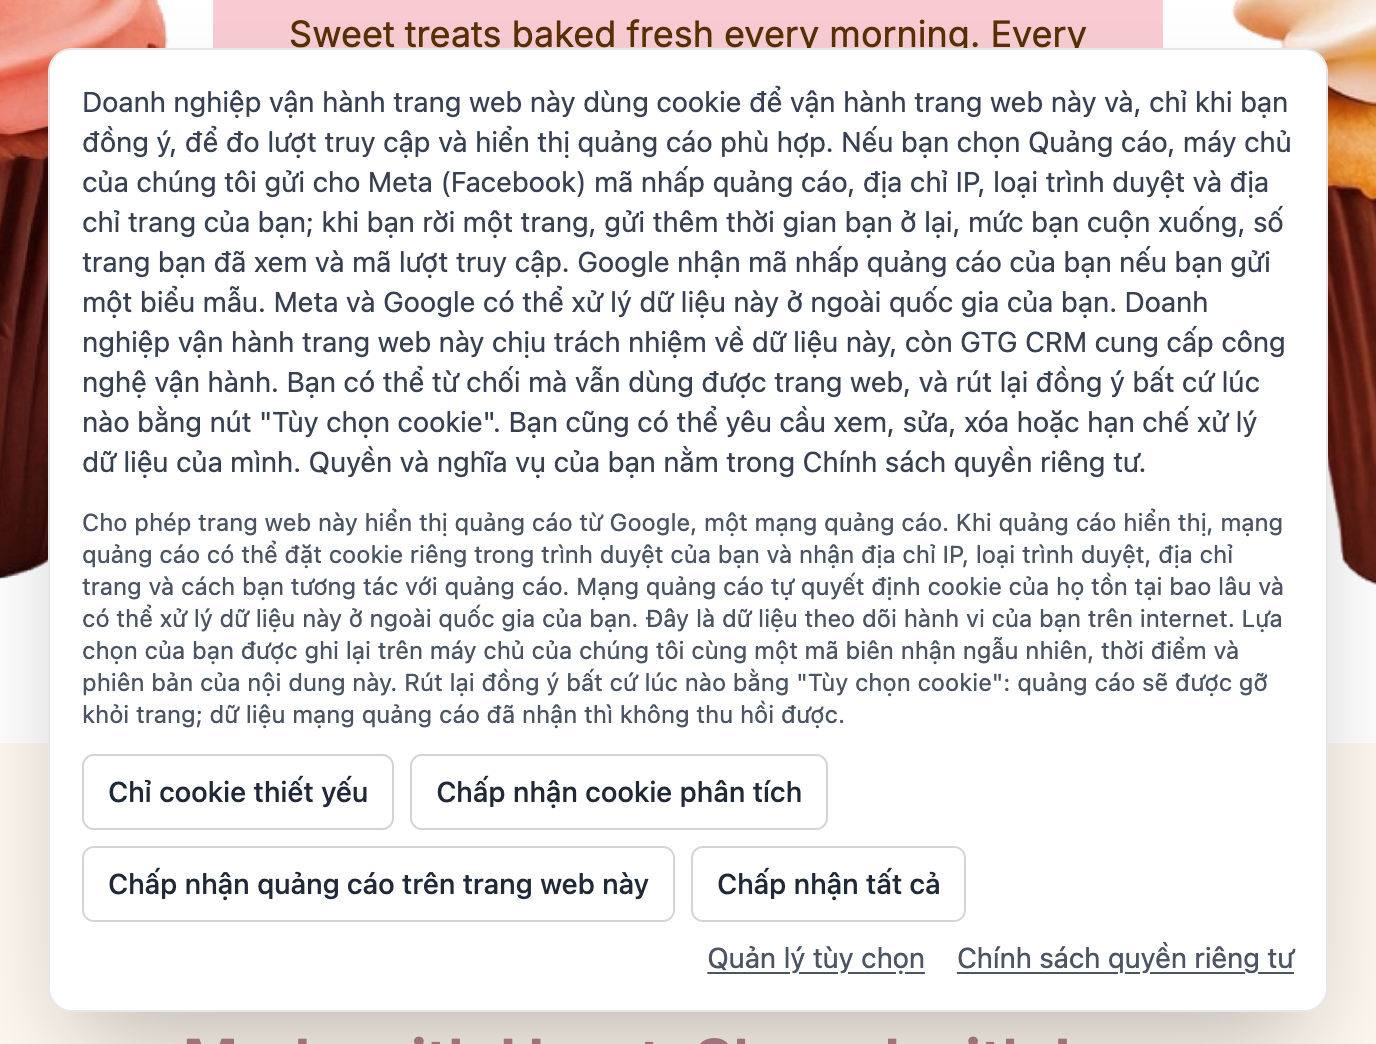
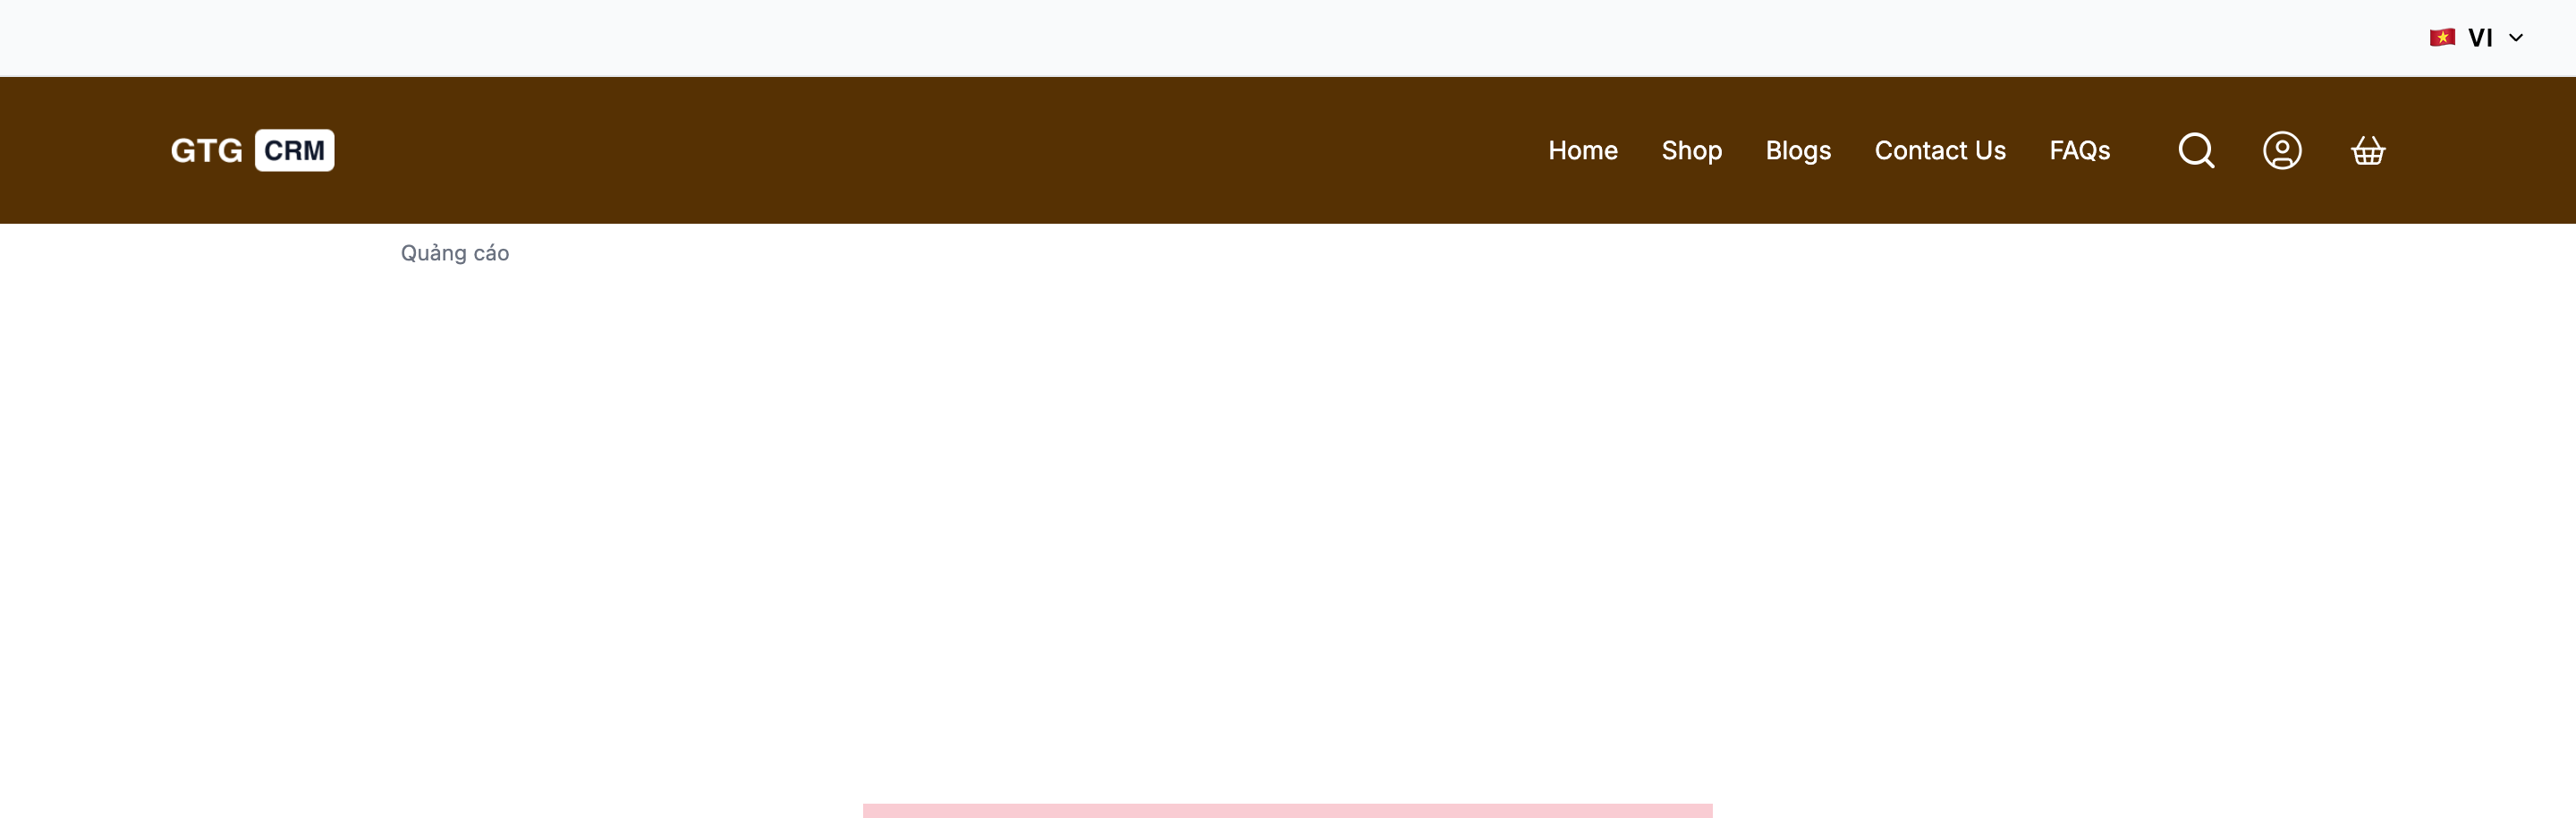
Don't see the Ad label? See the section "Ads Not Showing? Check These Things" at the end of this article. If the problem persists, contact GTG support.
Ads added on this screen do not appear on: the store, product pages, cart, checkout, account, login, order pages, the referral program page, and invoices. The store, products, cart, checkout, account, and login were tested on GTG's test environment; the other pages are excluded according to the system's list. Custom pages you build that include a form, checkout, booking, or login are also excluded.
When a visitor is logged in to the store, or has items in their cart, they do not receive standard Google ad units on any page; ads running in the protected frame still appear. When they log out, standard units return.
Step 5: Publish the ads.txt File
The ad network may restrict or stop serving ads if your website has not published a file listing your account. The file is located at https://your-website-address/ads.txt.
- In the Ads tab, open the ads.txt section.
- Paste the line provided by your AdSense or Ad Manager account. The example below only shows the format of the line: replace
pub-0000000000000000with your own ID.google.com, pub-0000000000000000, DIRECT, f08c47fec0942fa0. - Click Save ads.txt. You will see Valid: 1 line and the file's address.
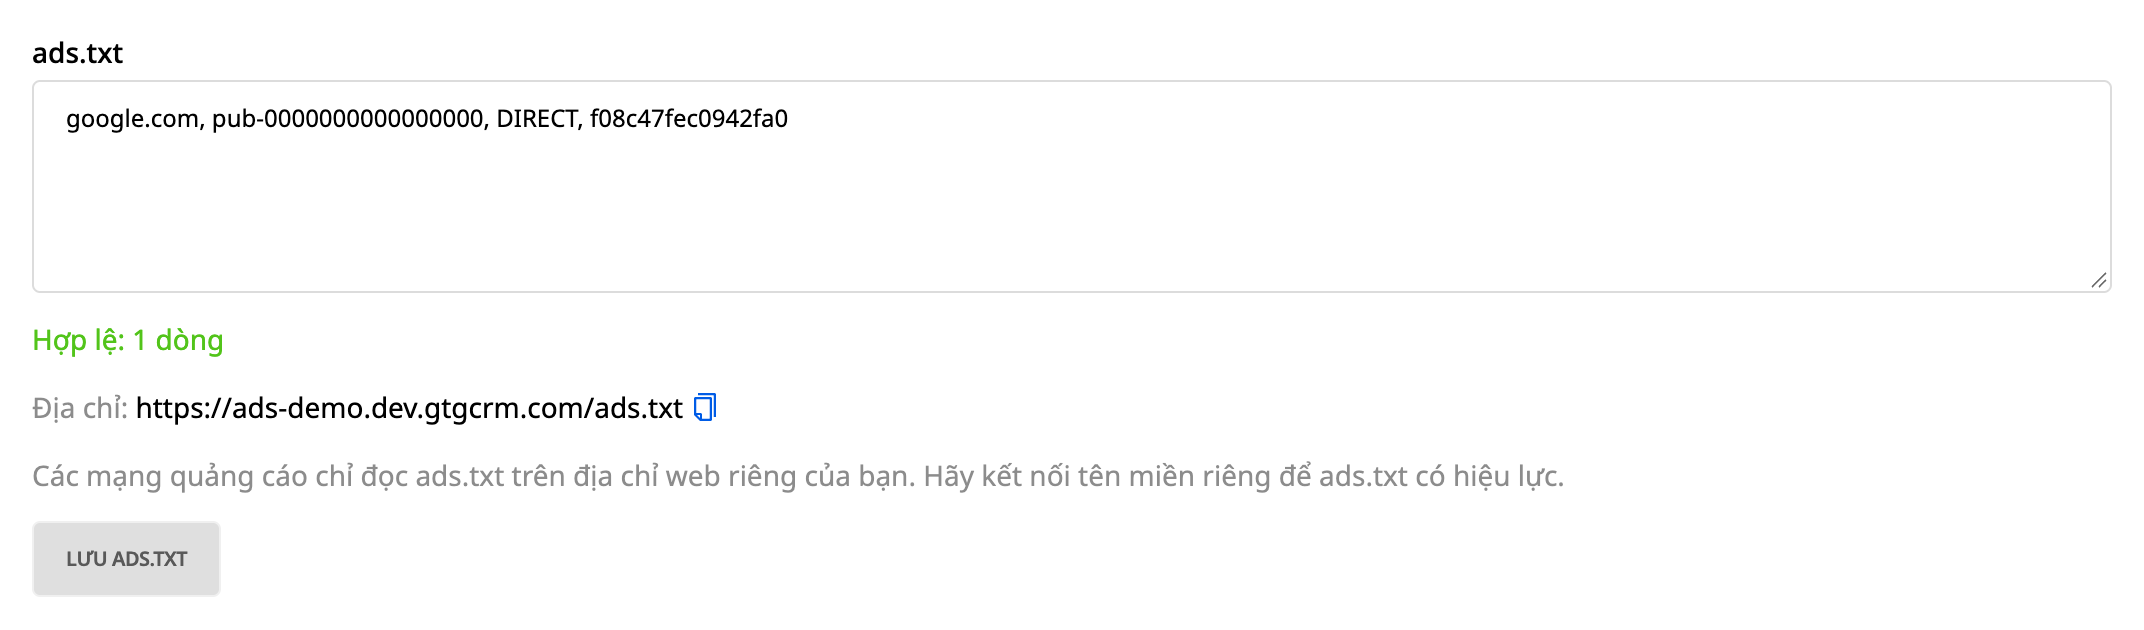
If a line is invalid, the message states the line number (for example, Line 2 is invalid), and the saved file remains unchanged. To remove the file, delete all the content and save; the address will then show "not found" again.
- Ad networks read the file from your own website address (the domain you connected). With an address like tenban.gtgcrm.com, the file still appears, but networks will not accept it. The tab has a note: "Ad networks only read ads.txt at your own website address. Connect your own domain for ads.txt to take effect."
- A "not found" page at
/ads.txtmeans the field is empty, not that the system is broken. - The public file is cached for up to 5 minutes, both after you save a line and after you remove one.
Done when: the ad shows Running, ads.txt shows Valid at your own website address, and you see the Ad label after accepting in a private window. Running does not mean ads.txt is finished. The following two steps are optional.
Step 6 (optional): Export your settings
Click Download my ad settings in the Ads tab. You receive a file (JSON, named after the website address) containing the website, whether ads are on or off, each ad (name, position, page, device, whether it is active, ad code), and the ads.txt content. Positions, pages and devices are written as short codes such as HEADER_BELOW and ALL.
Step 7 (only if it happens): When GTG turns off your ads
GTG only uses the right to turn off a website's ads when a regulatory authority or an ad network requests it, or when you violate the advertising terms. You cannot turn them back on yourself.
- The Ads tab shows a line GTG turned off on that date, with the reason (a request from a regulatory authority, a request from an ad network, or a terms violation) and Contact support.
- The website toggle, + Add ad, Edit, Delete and the toggle for each ad are locked. A toggle may still look switched on: read the notice line and the GTG turned off status on each ad.
- Visitors do not see ads or the label, and the cookie banner stops offering the Accept ads on this website button during this time (other buttons remain). Visitors who already made a choice also do not see ads.
- The Activity tab records that GTG turned off ads with the reason, and later records that GTG turned them back on. That entry names the GTG staff member who did it, by their login email.
- When GTG turns ads back on, they reappear for visitors who chose Ads on this website, within about 5 minutes.
Legacy script fields in the editor
In the website editor, the Settings ▸ Tracking & Analytics section still has two legacy script fields, Script Head and Script Body (under Custom scripts), and embed blocks. Each field now asks an additional question, When should this code load? (always, after the visitor accepts analytics, or after the visitor accepts ads). New fields are not preselected and show Choose load timing. Existing fields show Not selected: loads for everyone until you make a choice.
Codes in these boxes that name one of the roughly 25 ad networks the system recognizes wait for the visitor's ad choice, including boxes that were already filled in before. Other codes in these boxes run at the load timing you choose for that box, and a box marked Not selected loads for everyone. If you once used a script box to show ads from a recognized network, those ads now only run after the visitor accepts ads. This is intended behavior. For ads, use the Ads tab; this section says "Want to show ads? Use the Ads tab." Saving tracking codes (Save tracking configuration) does not affect your ads and does not remove the Accept all button from the cookie banner.
Who Can Do What
| Person | Can do |
|---|---|
| People with permission to edit the website (for example, website content managers or marketing staff) | Open Ads, turn ads on, add, edit, and delete ads, edit ads.txt, and load settings |
| View-only users | View the website list. No Ads link, the screen shows "Access denied," and saving is blocked |
| GTG staff | Only turn ads on or off for a website (Step 7). They cannot change your ads or ads.txt |
Ads Not Showing? Check These
| Check | Reason |
|---|---|
| Has the visitor selected Ads on this website (or accepted all) in the banner? | Without that choice, no ads appear. This is by design |
| Is the website published and does it have a web address? | If not, the tab shows Pending: website not published yet |
| Does the ad show Pending: website needs to be updated? | The website is still using the old editor. Open website in editor, check that the pages have content, then publish (if you added content while it was open, close and reopen it before publishing) |
| Is the page you're viewing allowed to show ads (Step 4)? Did you select the correct position, page, and device? | Post-only ads don't show on the home page; mobile-only ads don't show on desktop |
| Did you save within the last 5 minutes? | The page is cached briefly before it refreshes |
| Is the ad turned off, or turned off by GTG? | The status line shows Turned off or Disabled by GTG |
| Has the ad network account been approved, and has ads.txt been published on your own domain? | The network decides whether to serve ads; sample account IDs may produce empty frames |
| Are you testing while logged in as a store customer, or with items in the cart? | Google tags are hidden for logged-in customers, and a non-empty cart can also hide them |
Still not working? Contact GTG support and provide the website name, the ad name, and the exact message shown on screen.