What will you be able to do after following this guide?
Quickly view task lists by status/deadline color and "Today" board → create a task with checklist, start time, multiple reviewers, and stakeholders → attach files from the Library and insert internal links → divide into subtasks and view cumulative progress → link tasks to Deals/Orders → comment and mention teammates (@mention) → complete the task → view the Analytics tab and track Activity 360 → enable task automation.
Not yet familiar with the features? Check out the Task Management 2.0 preview.
Prepare in advance
1. Log in to GTG CRM, access the CRM module → Tasks. — This is where you create and manage tasks.
2. (Required) A Deal/Order/Invoice is already available to link to. — To use the related object linking feature.
3. (Recommended) Have a few teammates in the workspace. — To assign reviewers, relevant people, and mention names in comments.
Step 1 — Quickly scan the to-do list: status/deadline color + "Today" tab
- Go to CRM → Tasks .
- Observe the workflows: each status has a different color tone; tasks that are nearing their deadline are colored amber, while those that are overdue are colored red.
- At the top of the page, see the "Today" table : click on the groups "Overdue / Due Today / Soon Due / High Priority / My Tasks" to filter quickly.
✅ Expected result : The list displays colors according to status and deadline; clicking on a group in the "Today" table will filter the list to that specific group.
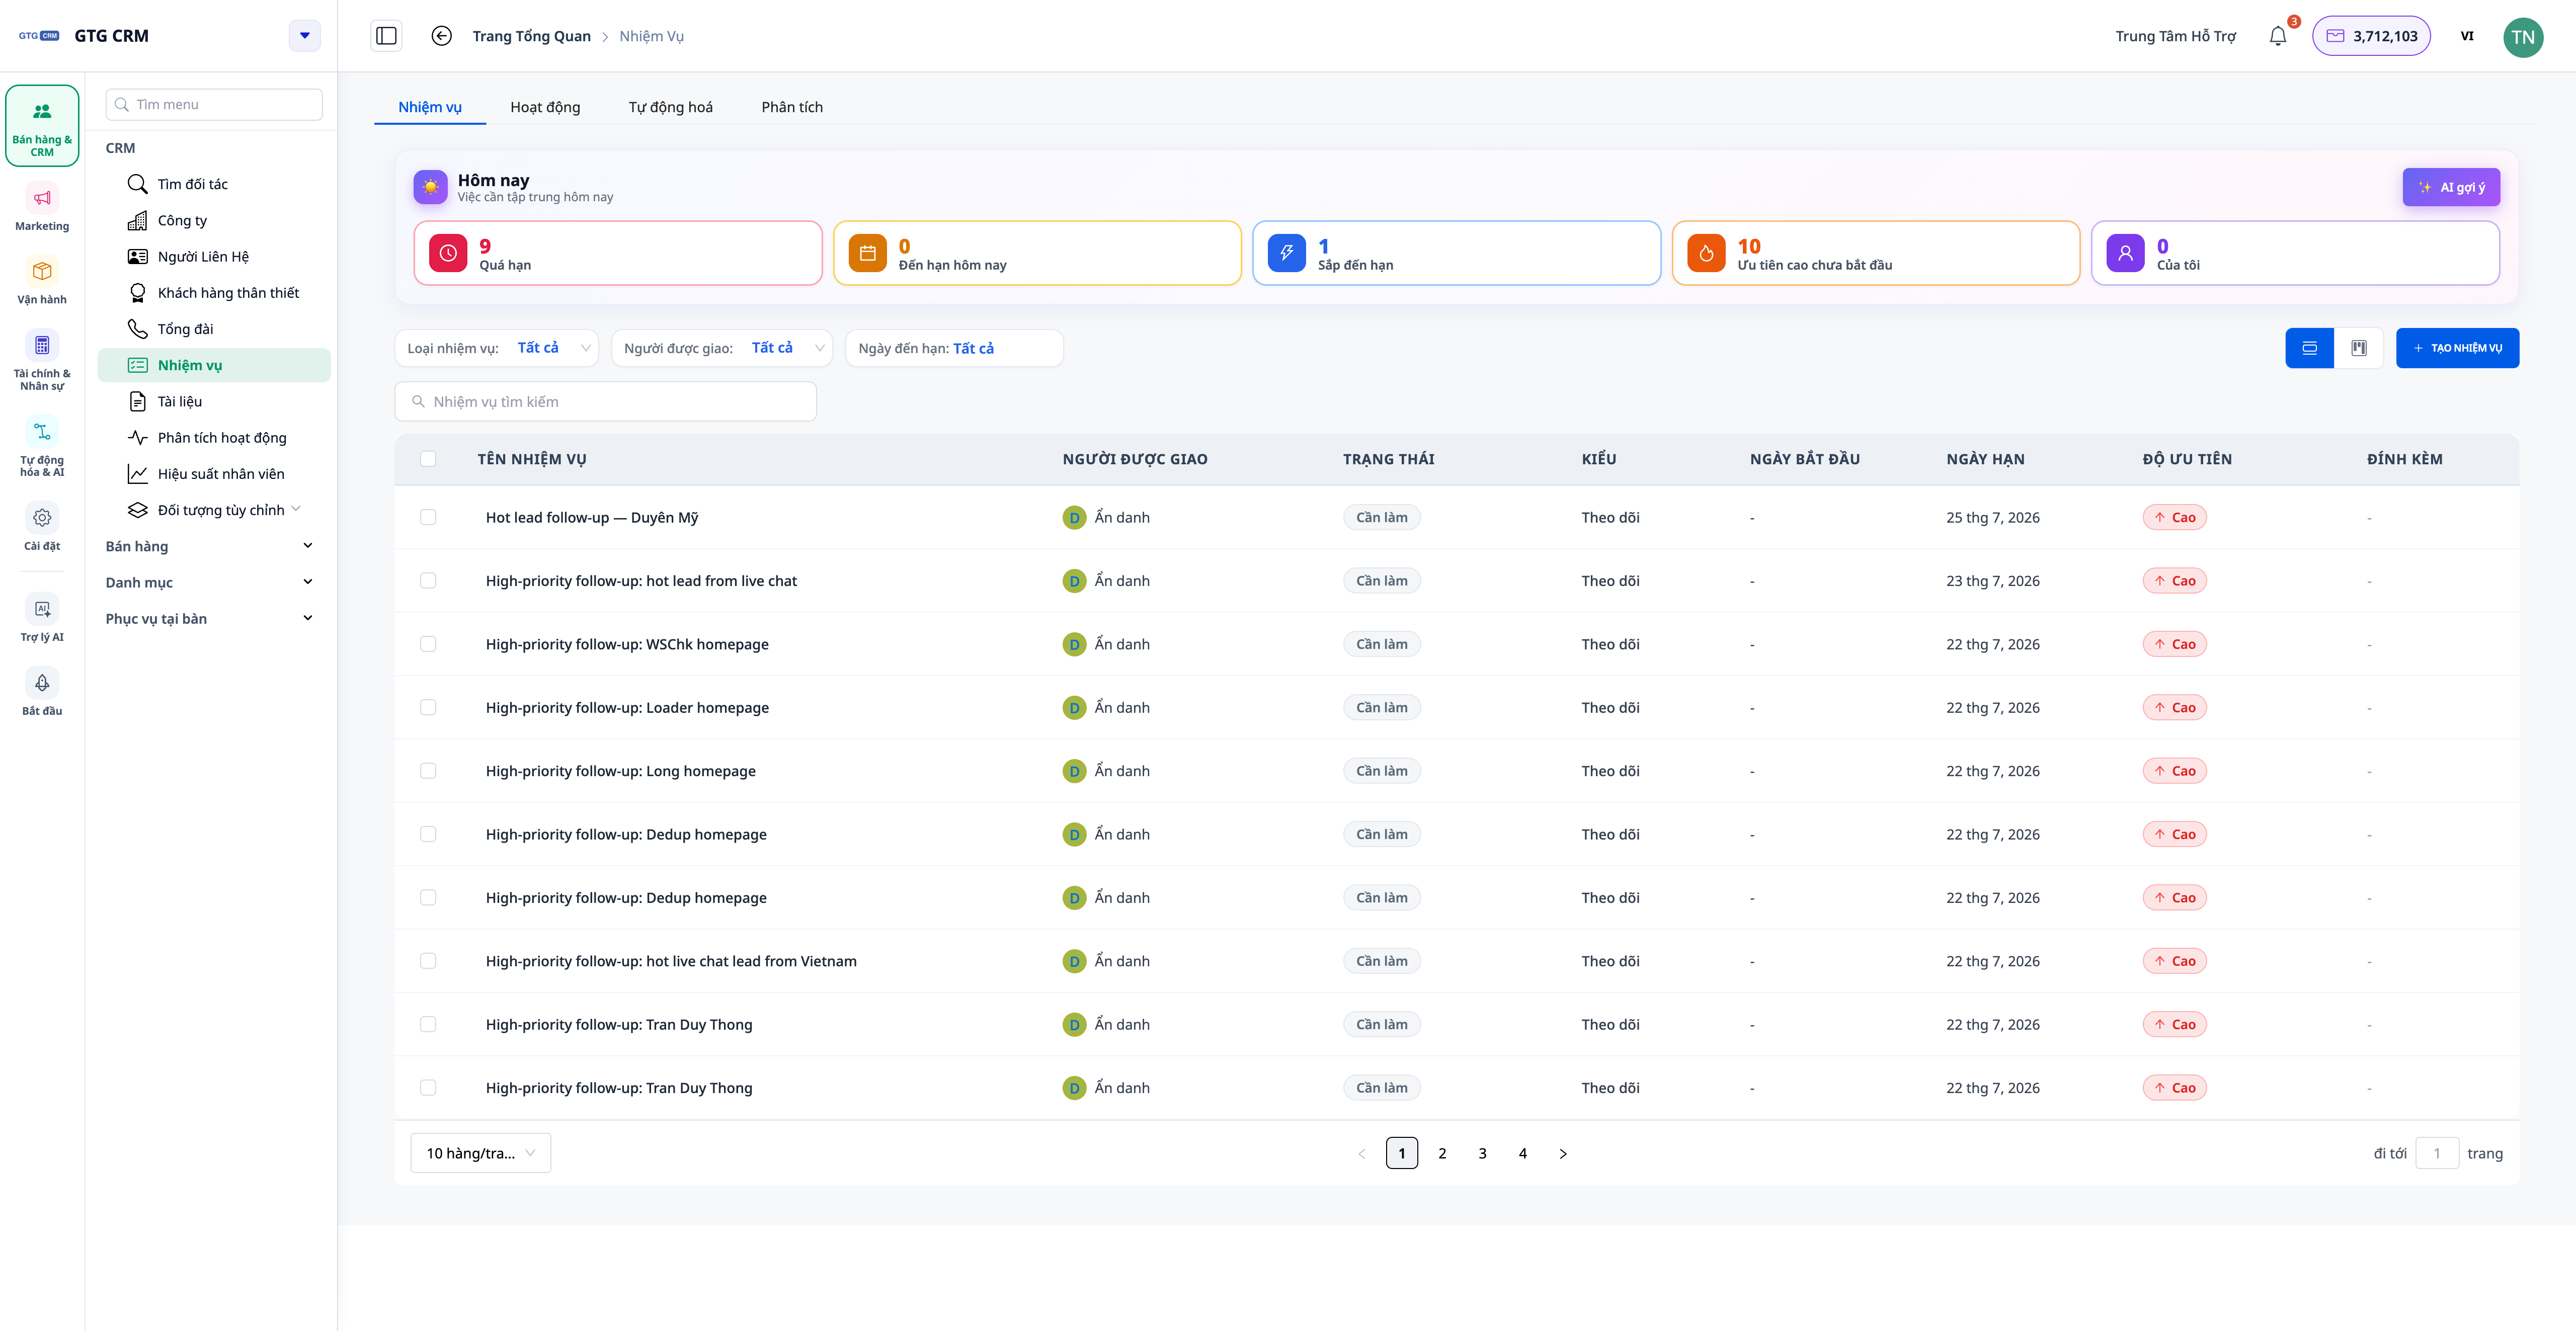
💡 Click "AI Suggestion" to receive a prioritized plan for the day (this feature uses credits).
Step 2 — Create tasks with checklists, start times, approvers, and relevant parties.
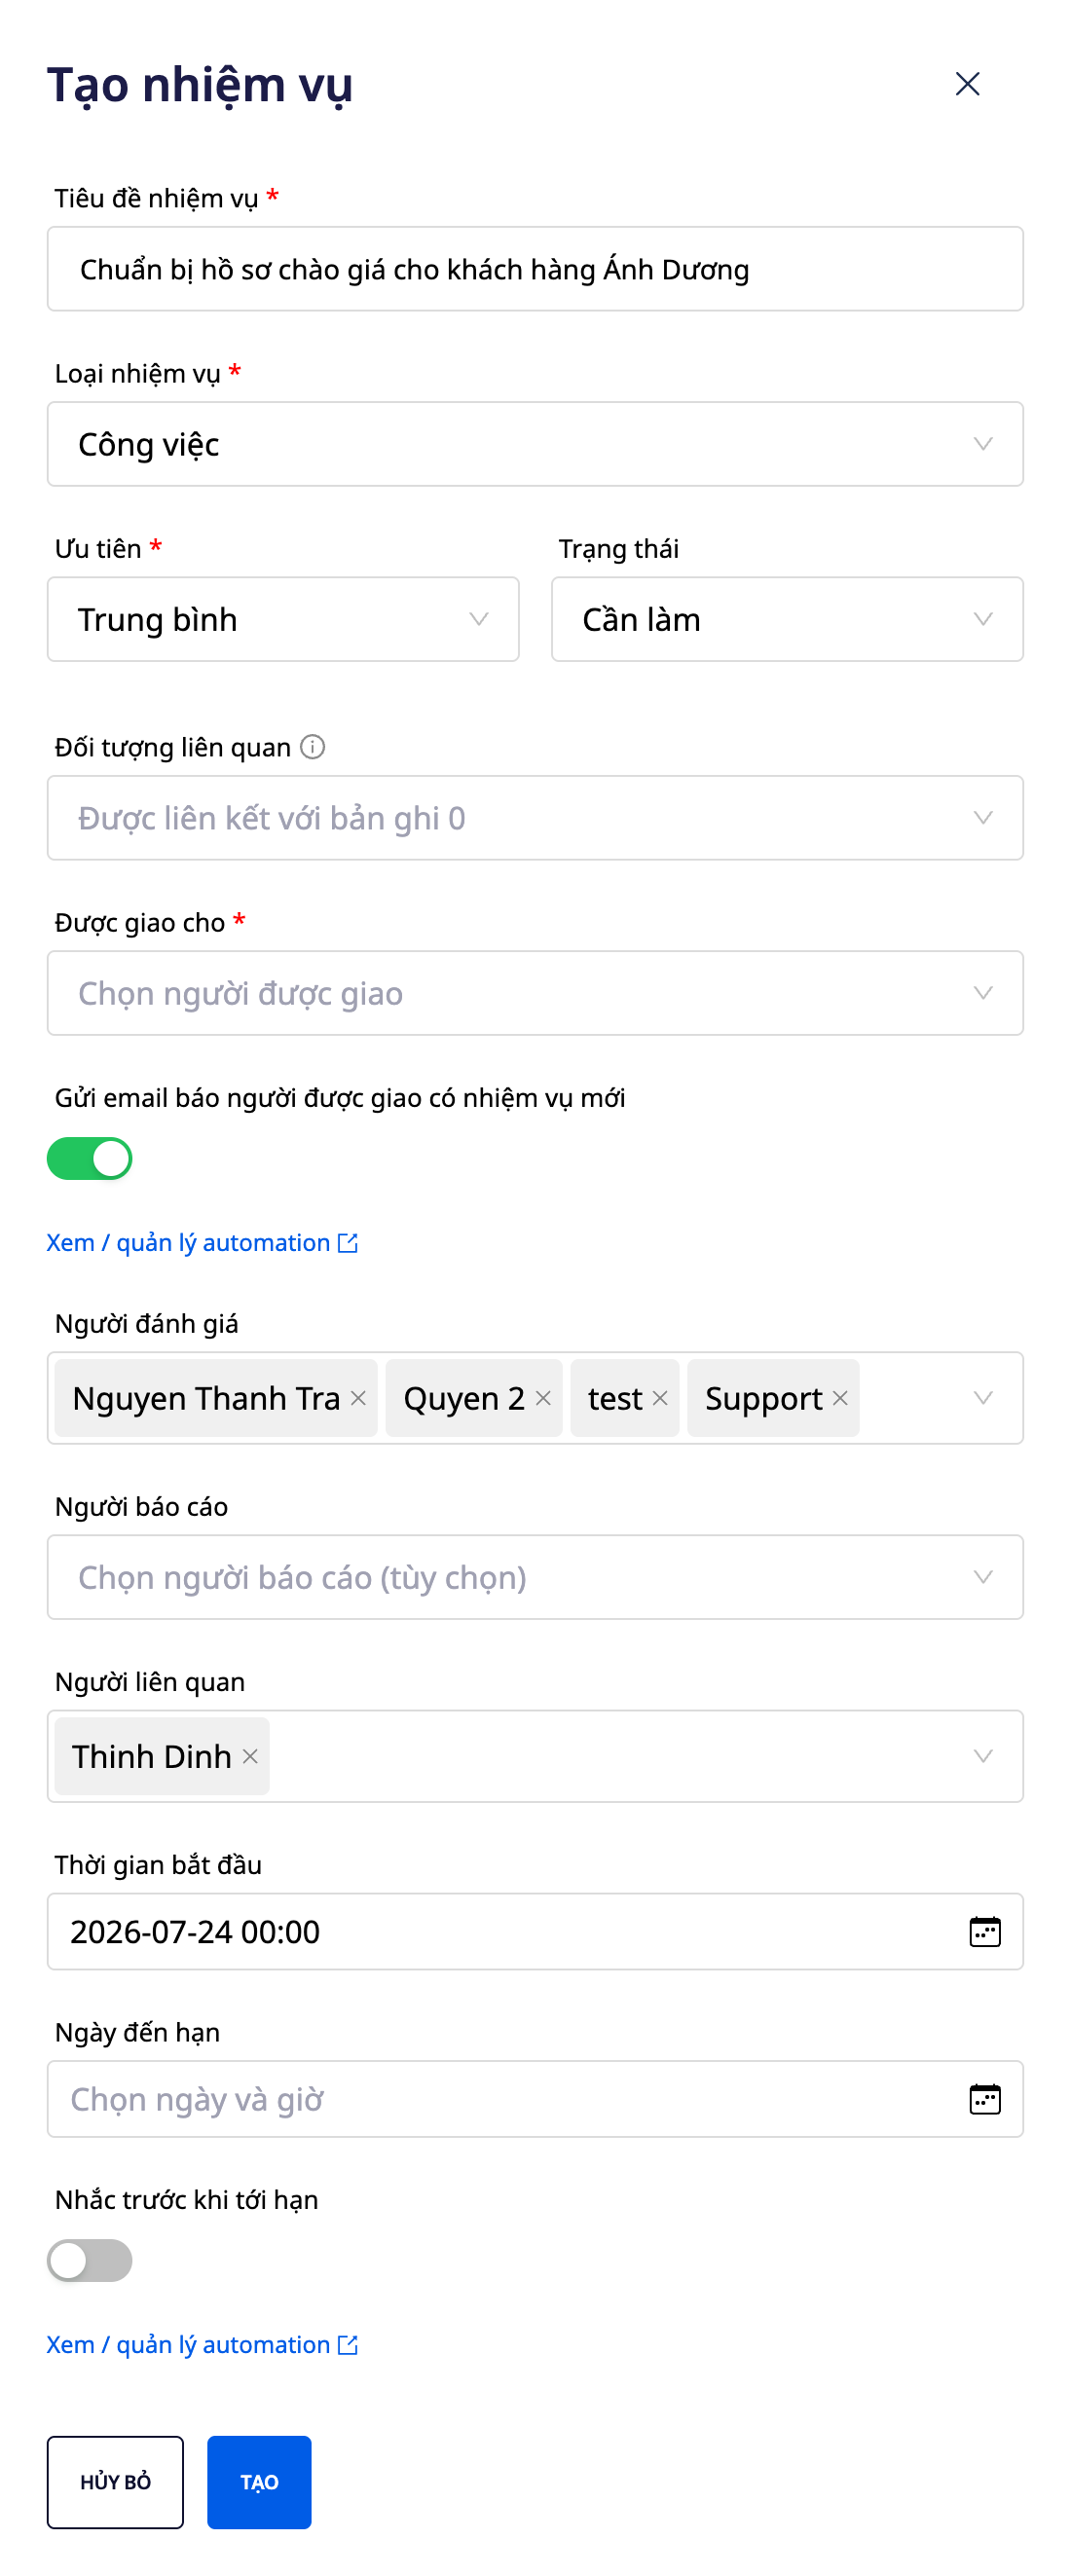
- Click to create a new job.
- Enter Title, Description, Deadline, Priority, and Responsible Person .
- Set the start time and add the relevant people (those who need to monitor the task).
- In the roles section, assign one or more Reviewers and Reporters if the process requires approval/monitoring.
- Add a checklist of steps to take during the creation process.
✅ Expected outcome : The task is created with a checklist, start time, a list of reviewers (multiple people), and relevant parties fully displayed.
Step 3 — Attach files from the Library & insert internal links
- In your workspace, open the Attachments section → select the "Choose from Library" tab to retrieve files/images already available in your workspace.
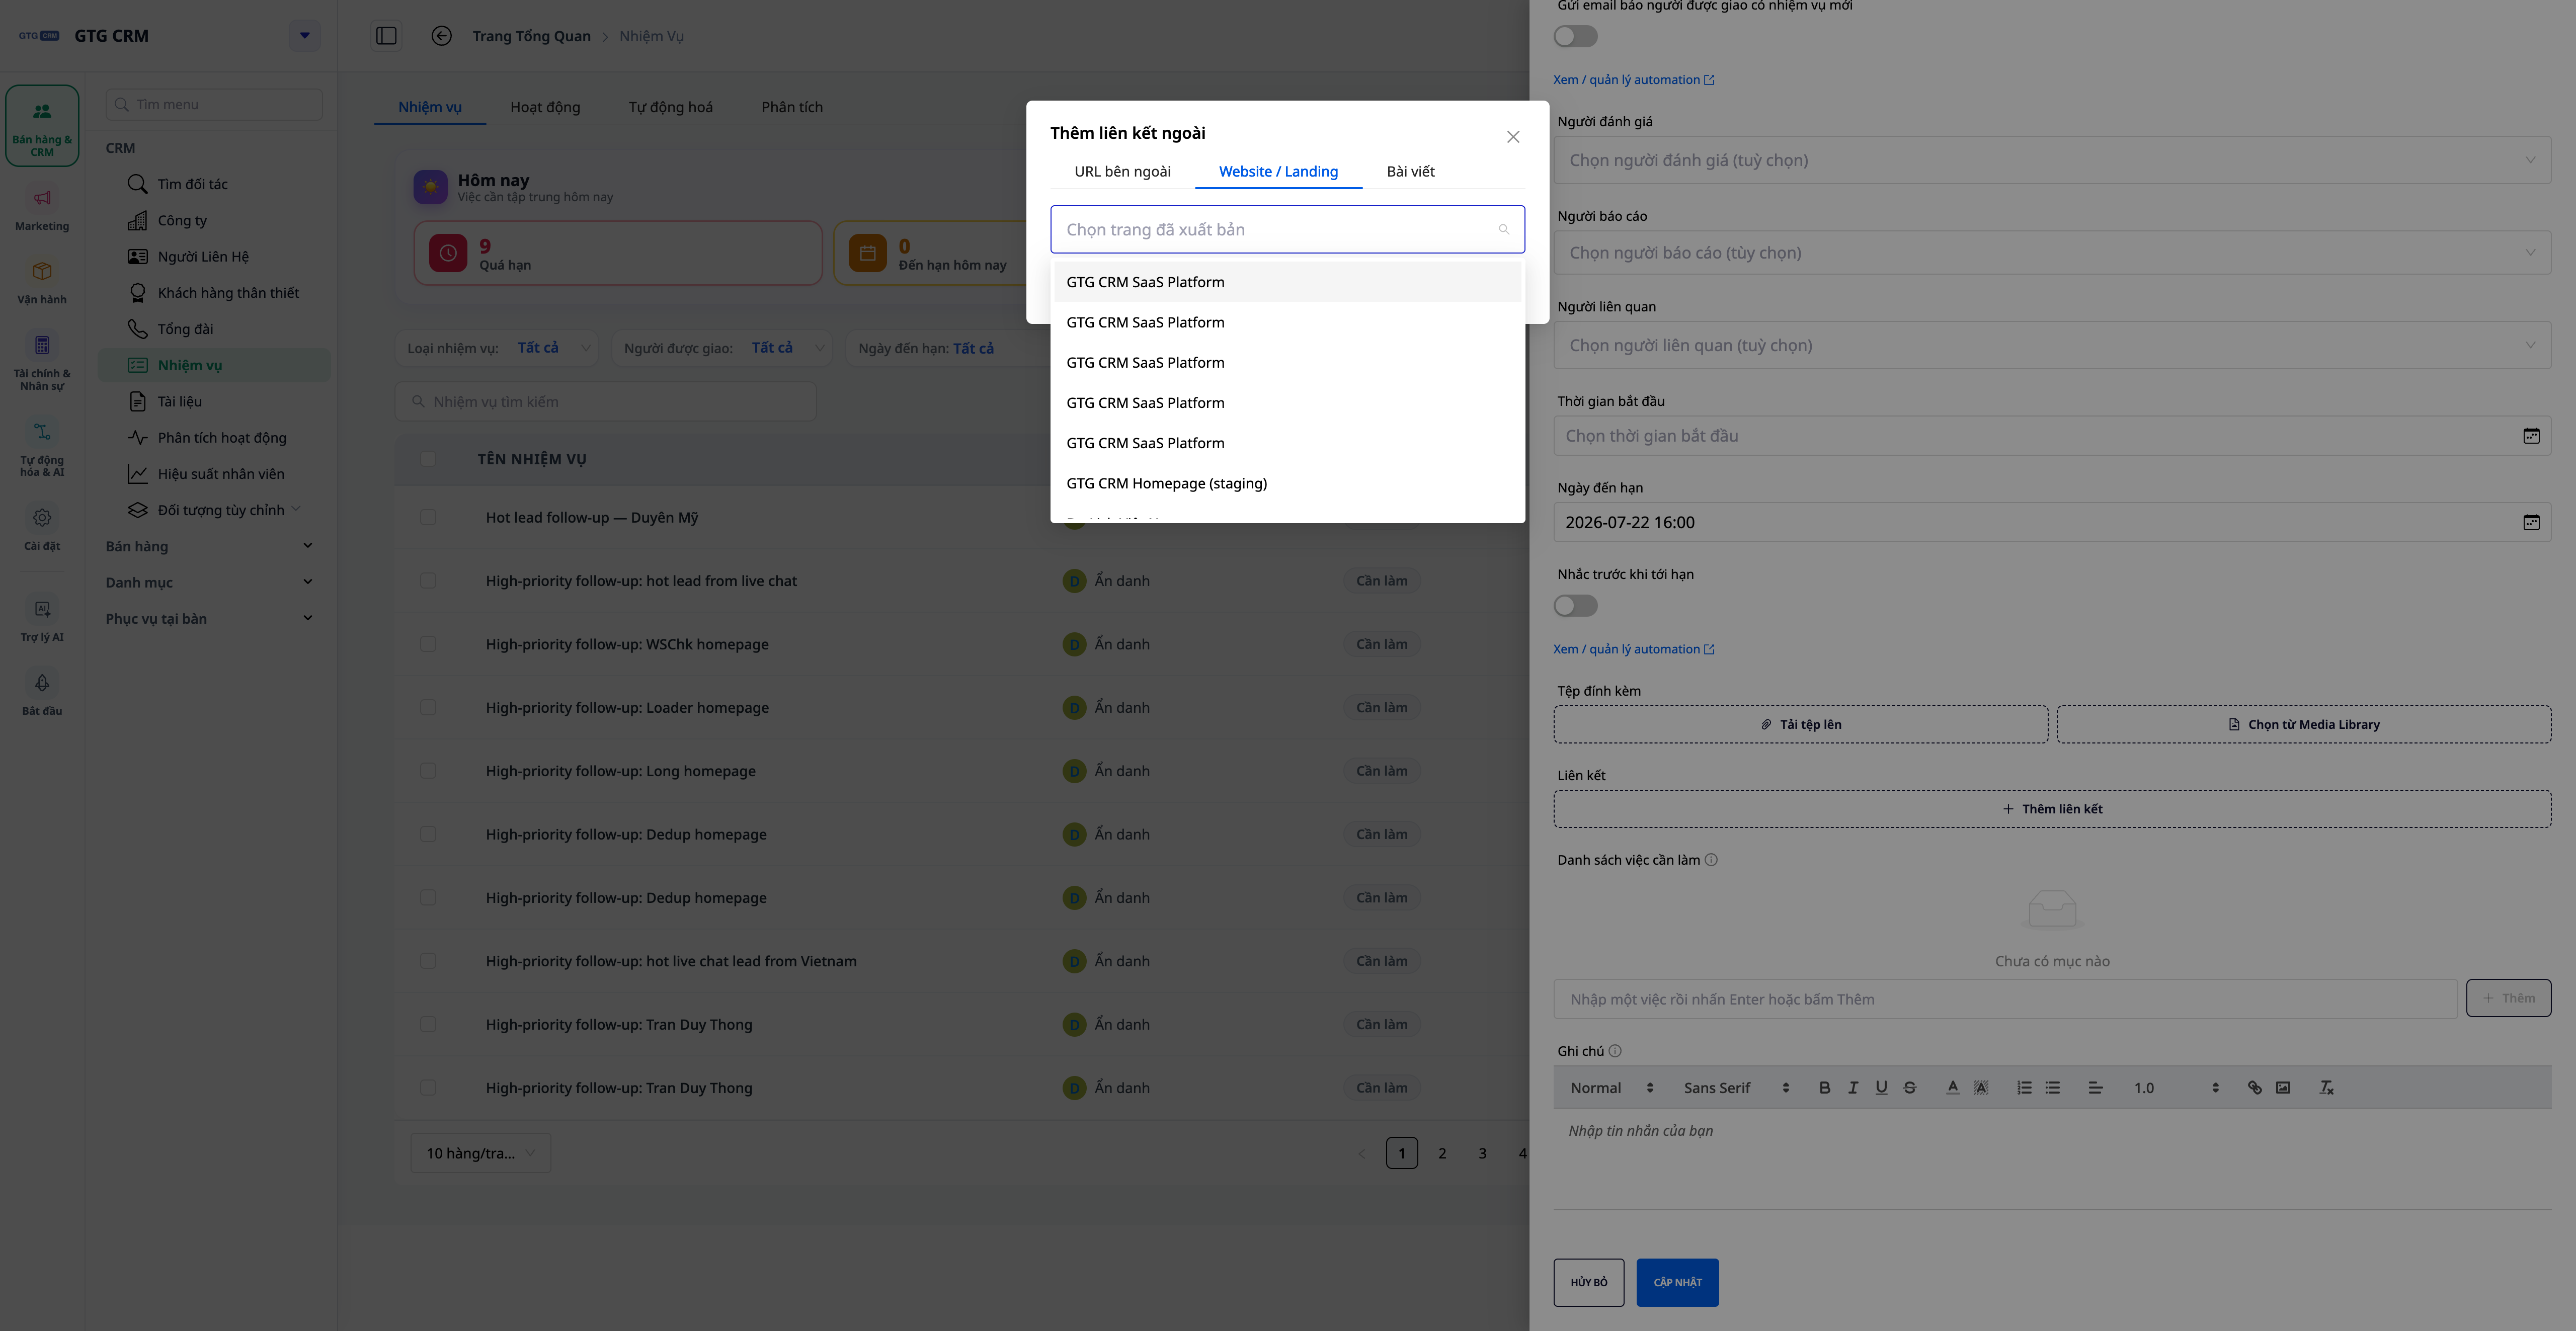
- Open the Links section → select "Insert internal link" to attach your workspace website, landing page, or post.
✅ Expected result : Files from the Library and internal links are attached to the job without having to re-upload or manually paste URLs.
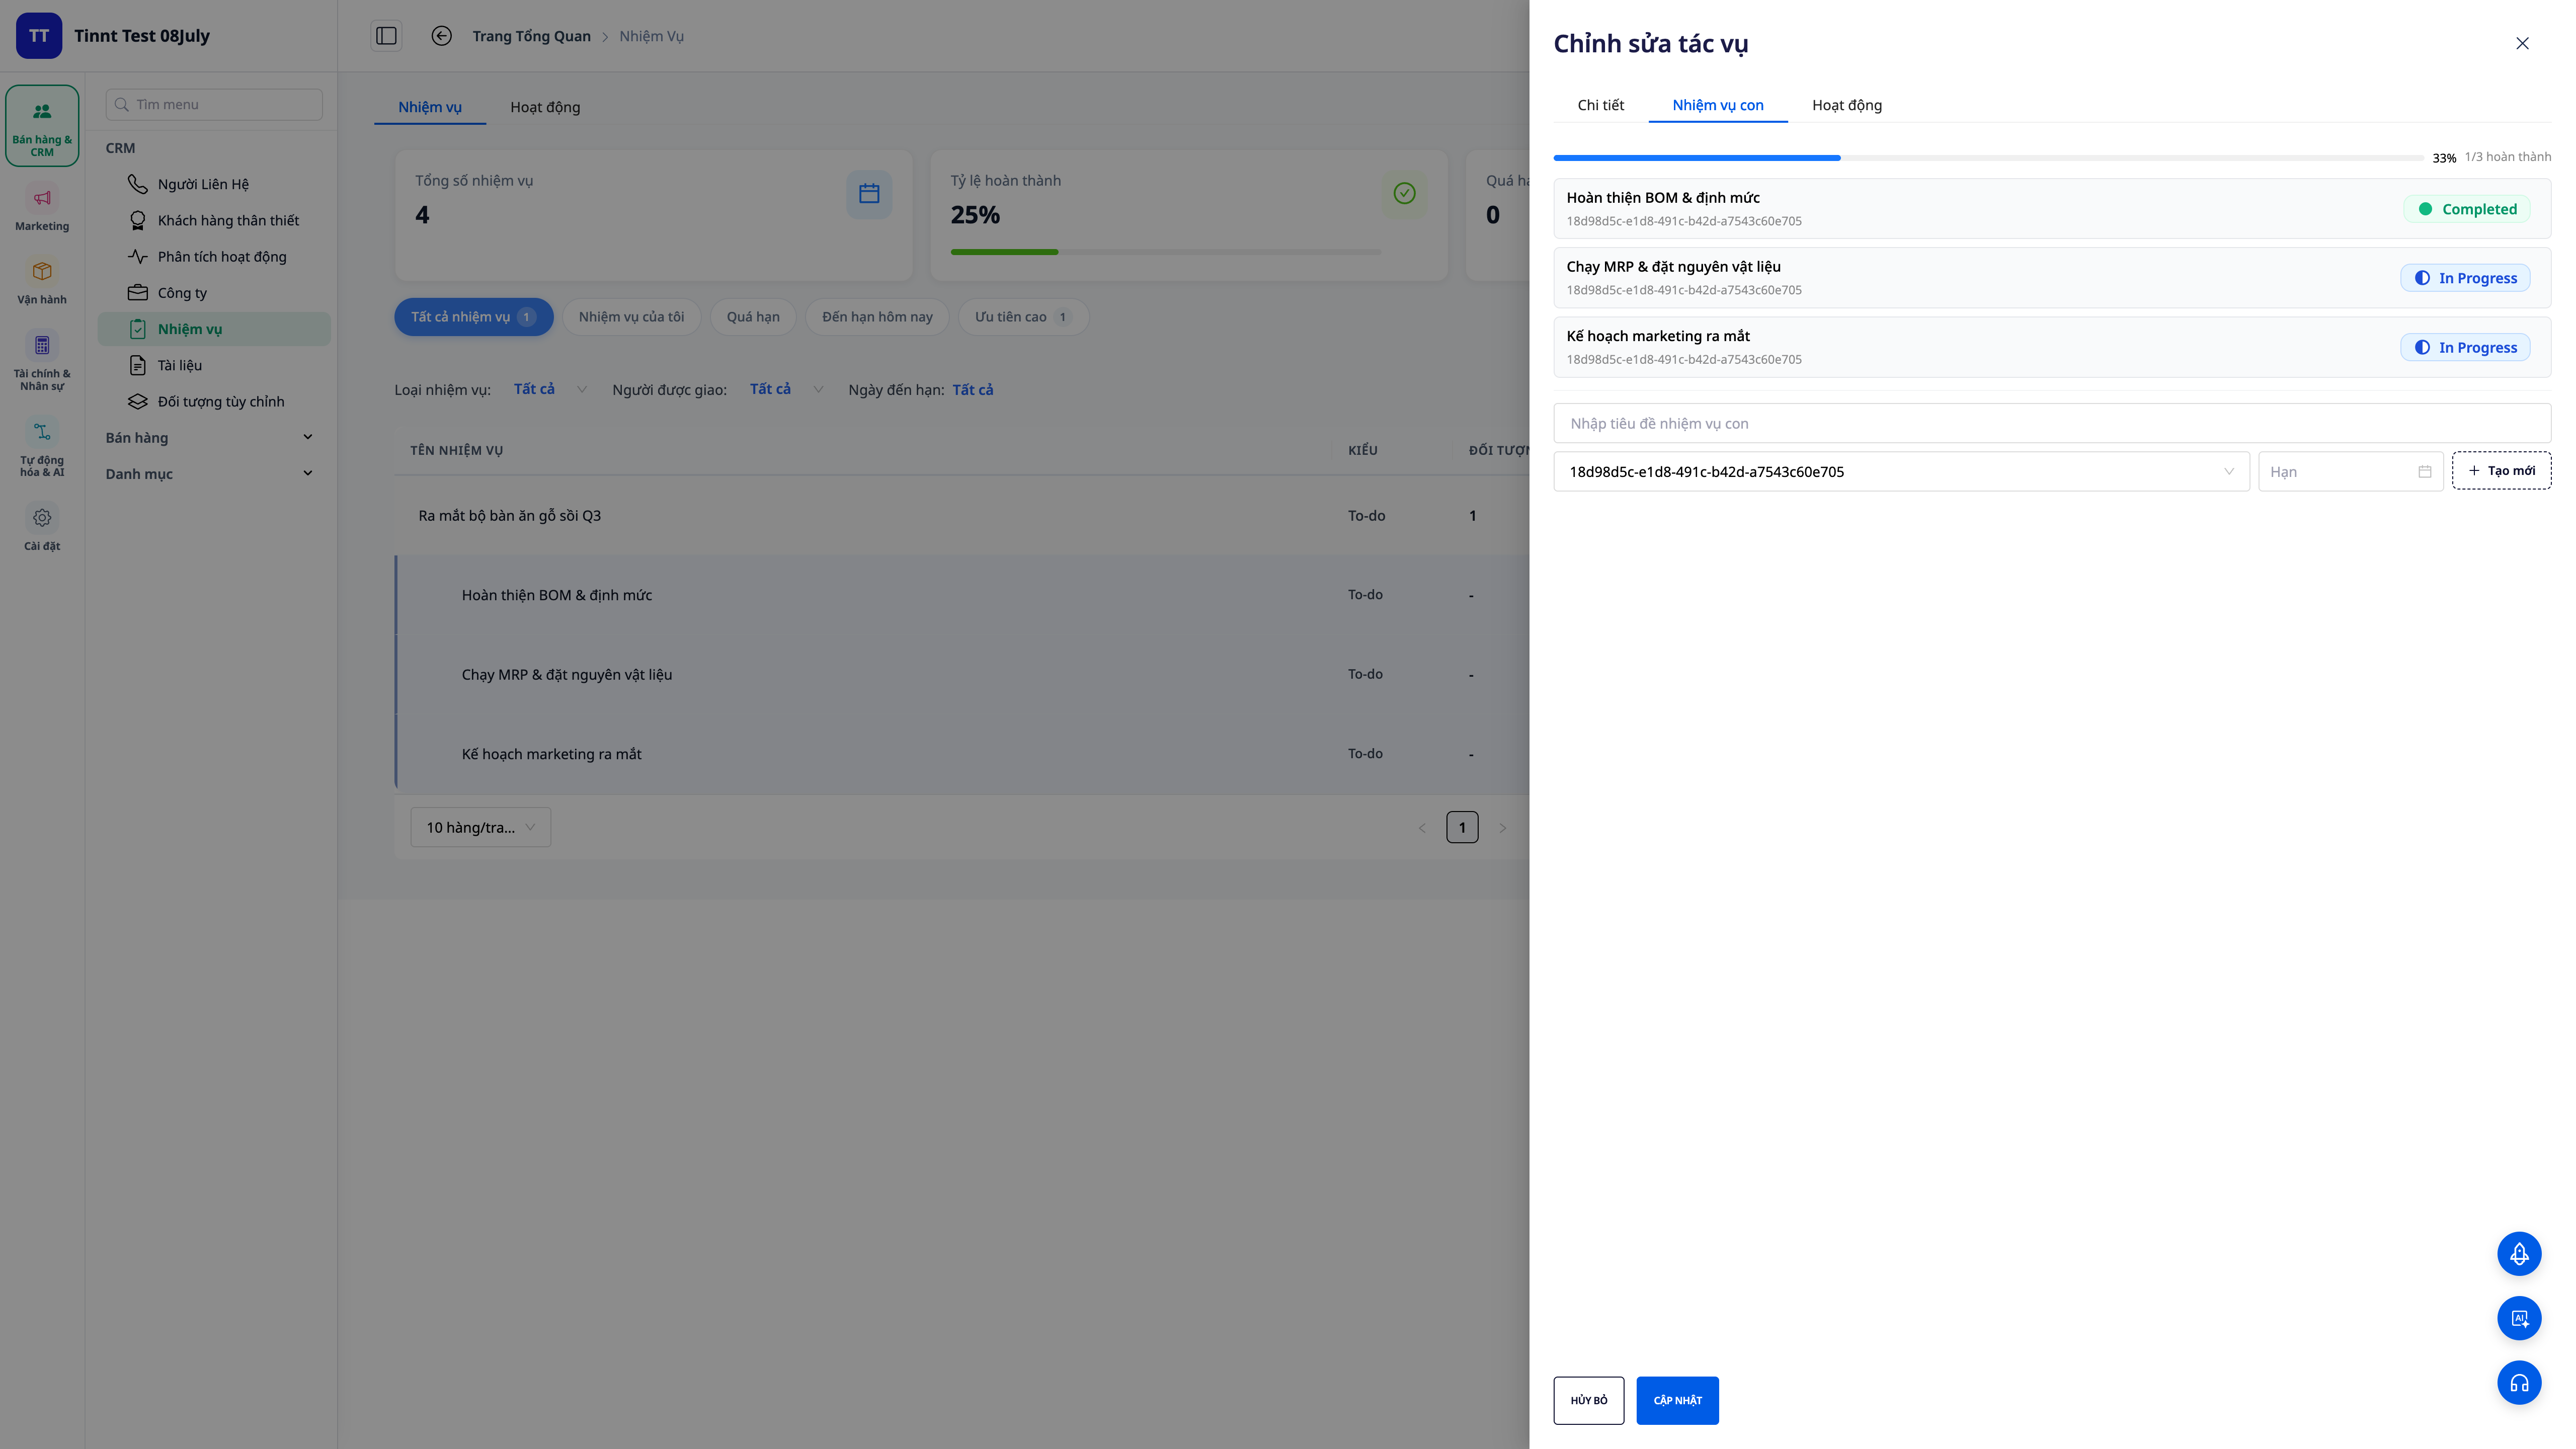
Step 4 — Divide into subtasks and watch the progress automatically accumulate.
- Open the newly created task and add sub-tasks —up to two levels can be created; each sub-task has its own person in charge, deadline, and status.
- Complete the sub-tasks gradually.
✅ Expected result : The progress bar of the parent task will automatically accumulate based on the number of completed child tasks — you don't need to manually enter the percentage.
Step 5 — Connect the task to the Deal, Product, Order, or Invoice
- In your work, open the related objects section.
- Attach the corresponding Deal / Product / Order / Invoice.
✅ Expected result : The task will display the linked objects; from that Deal/Order, you will also see the related tasks.
Step 6 — Comment & mention (@mention) your teammates
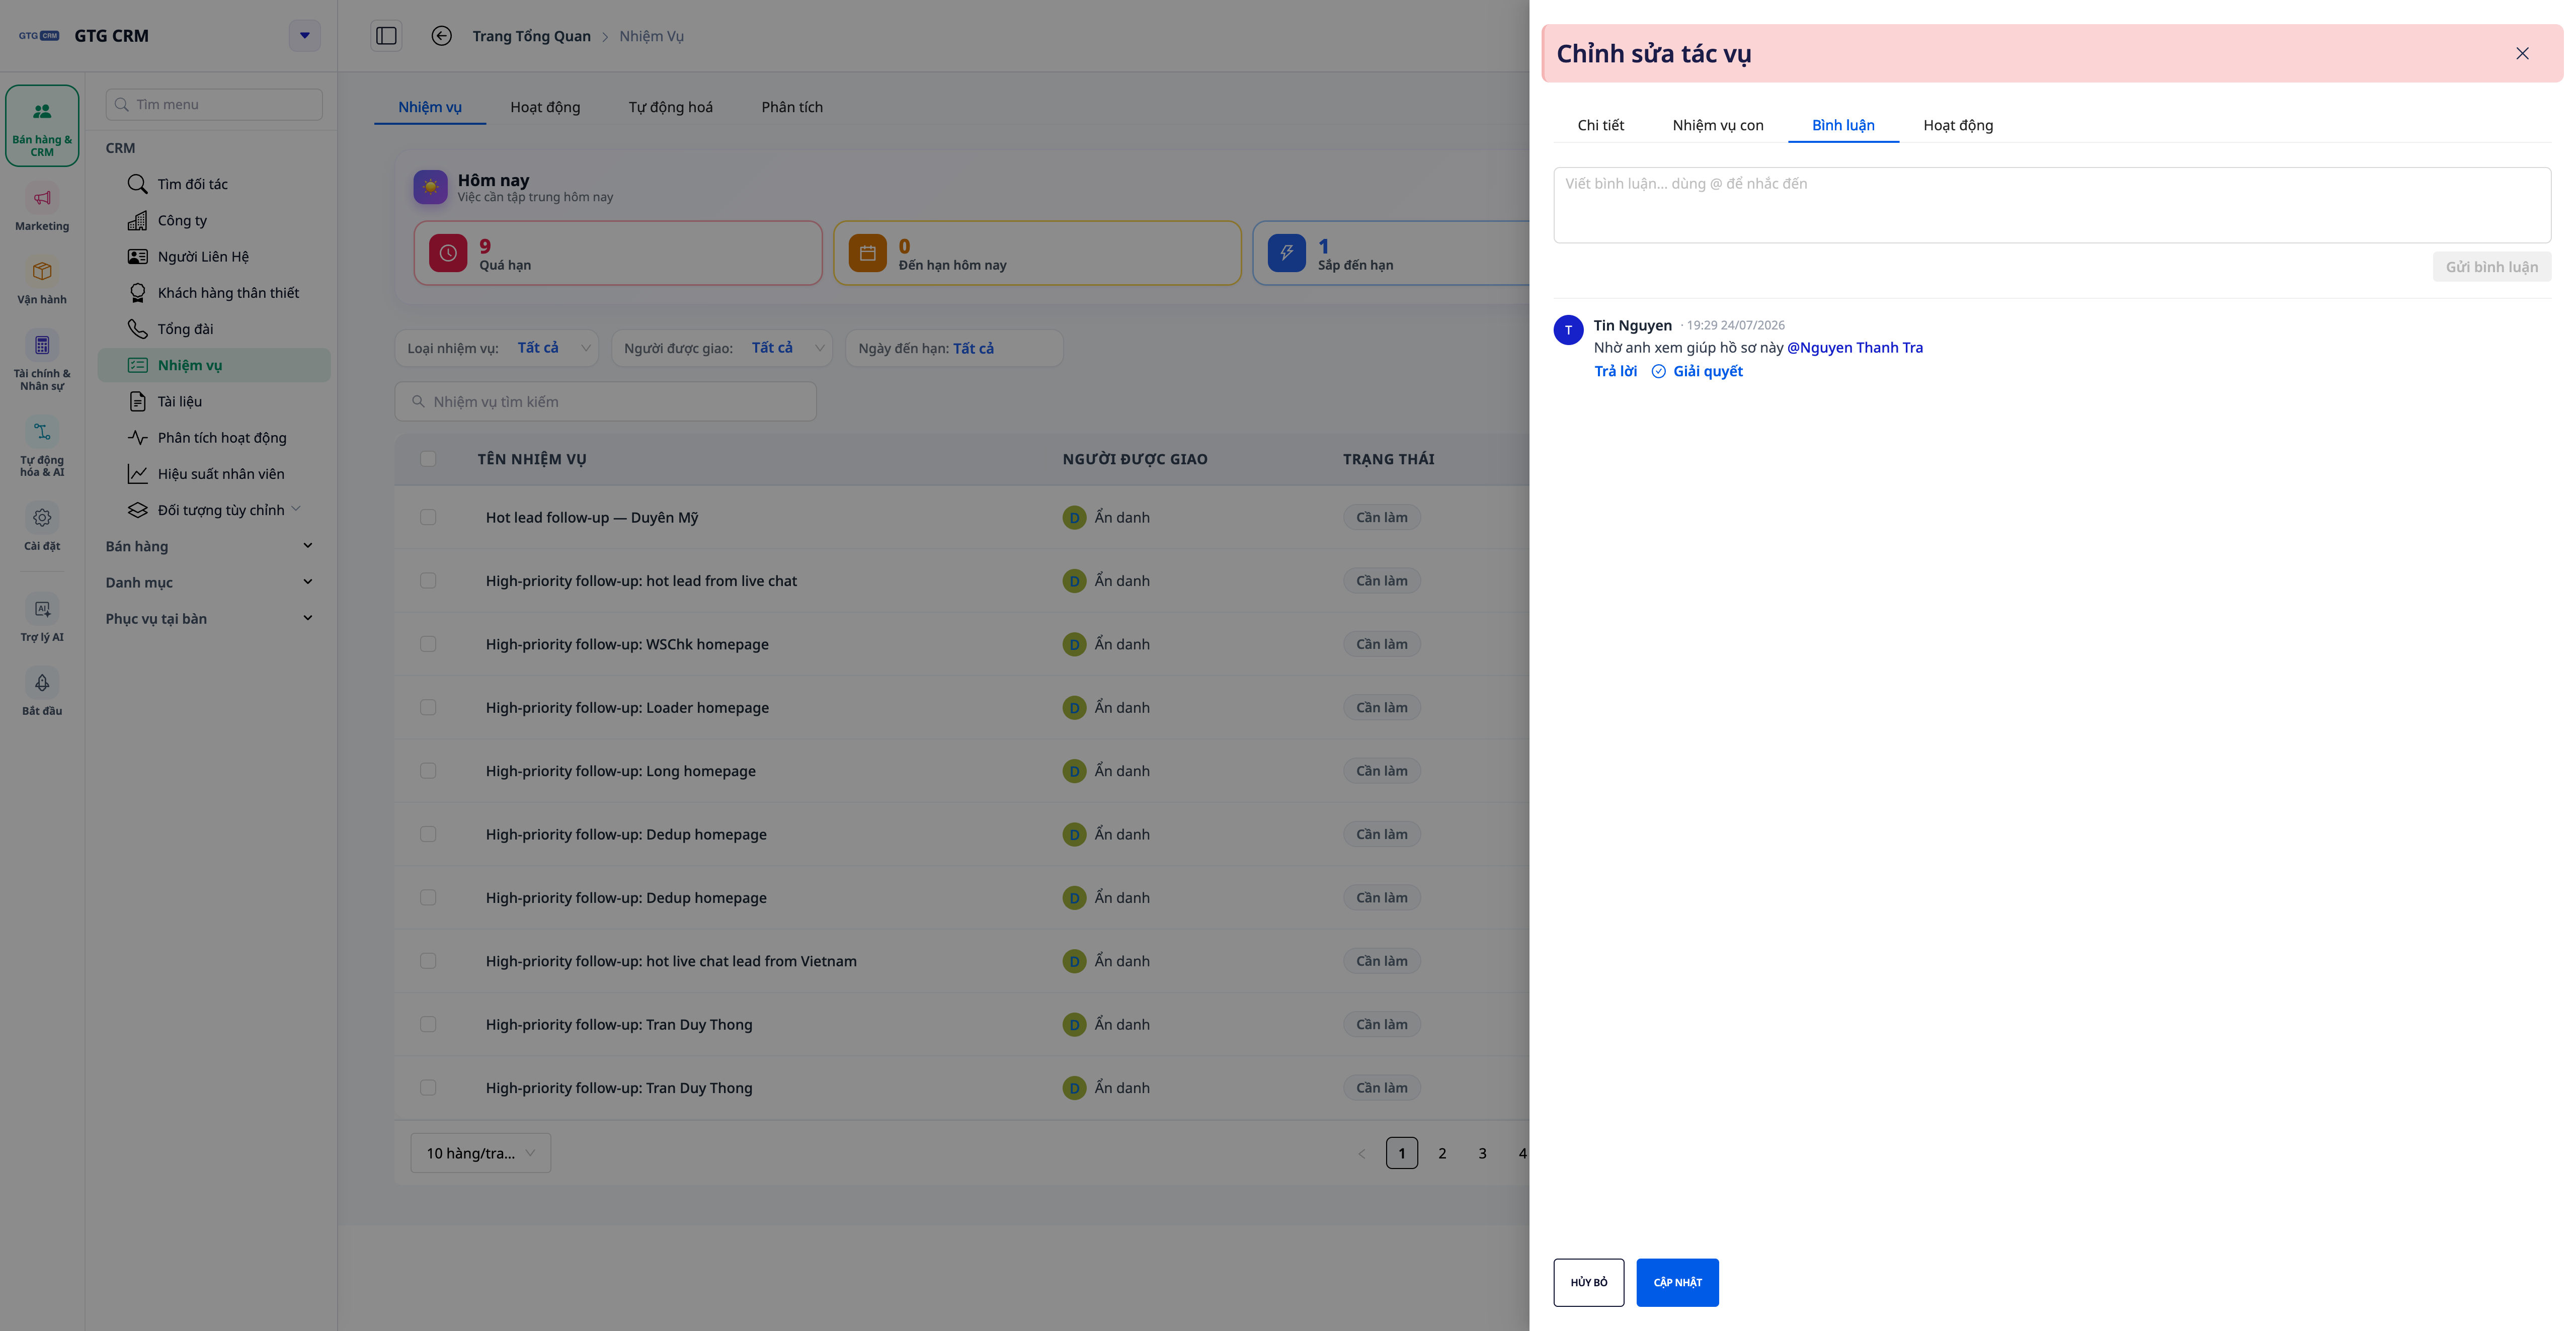
- Open the Job Comments tab and enter your comment.
- Type
@and then select a teammate's name to mention ; post a comment.
✅ Expected outcome : The name being mentioned is displayed in blue ; the person being mentioned receives a notification in the app (and email if email reminder automation is enabled — see Step 10).
Step 7 — Complete the task
- Mark the task as completed.
✅ Expected results : The status and completion time are recorded by the system (not based on personal clocks), ensuring consistent data for comparison and reporting.
Step 8 — View the Analysis tab: volume by individual
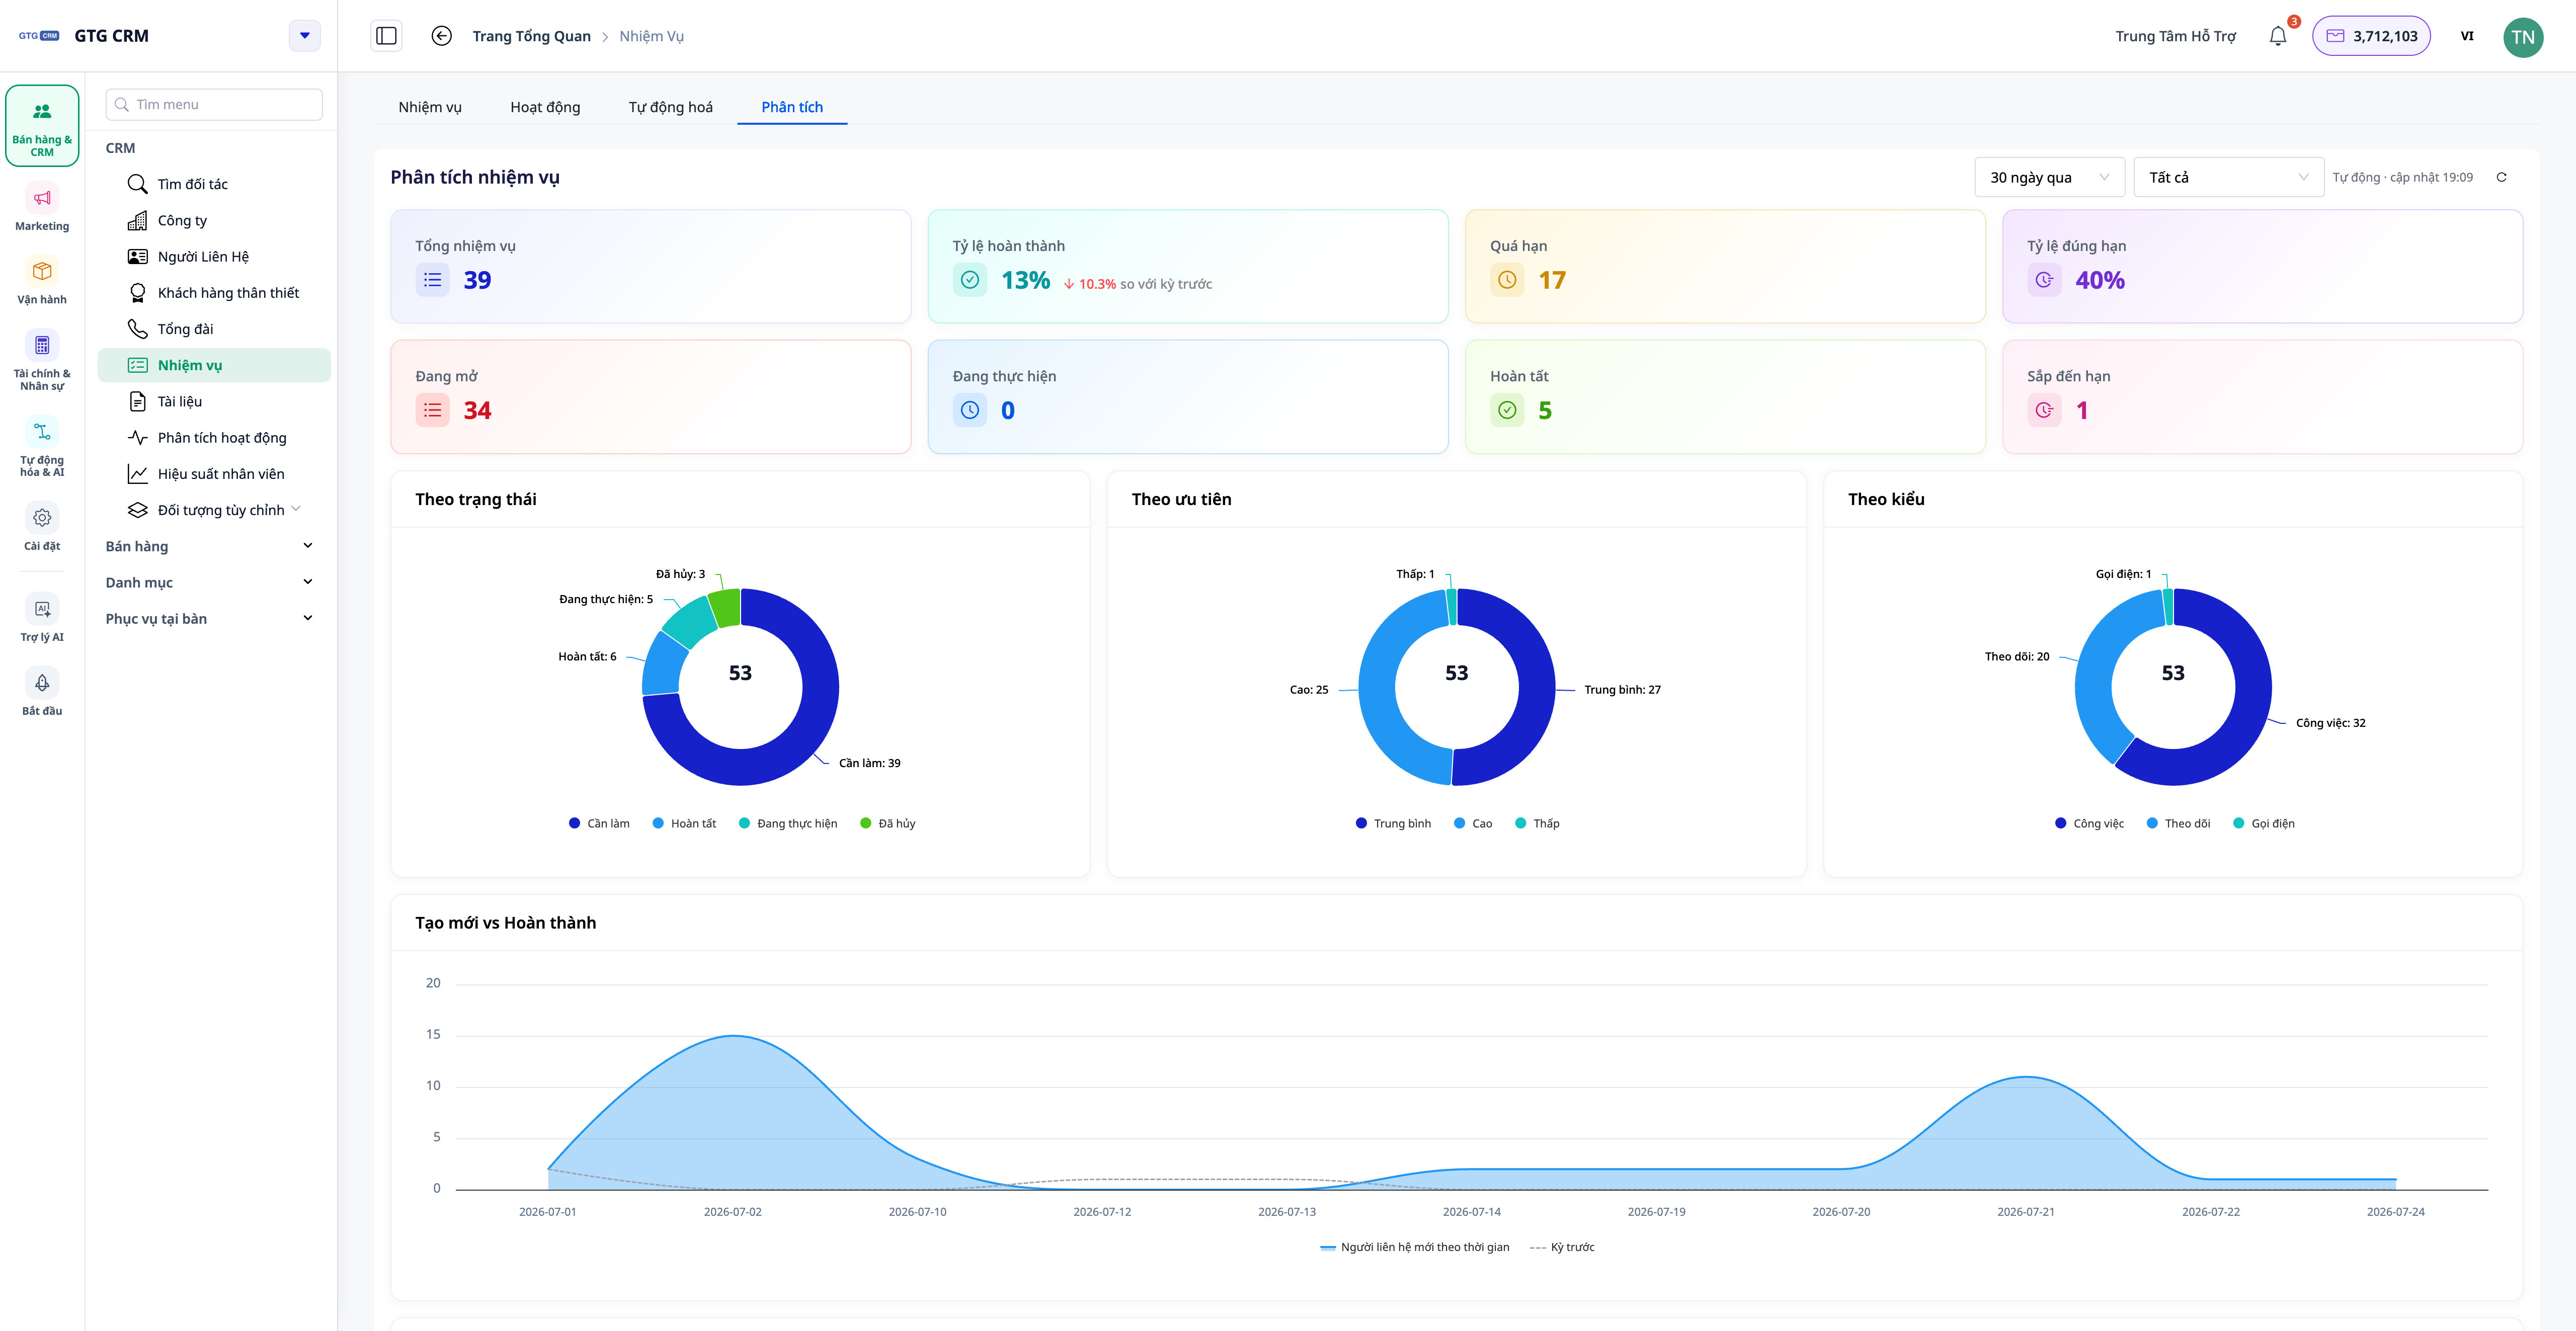
- In the Tasks menu, open the Analytics tab.
- View overview cards and charts; click on a member to see in detail what that person is doing.
✅ Expected results : The Analytics tab displays total tasks / ongoing tasks / completed tasks / overdue tasks / completion rate + trend, and a volume chart by individual .
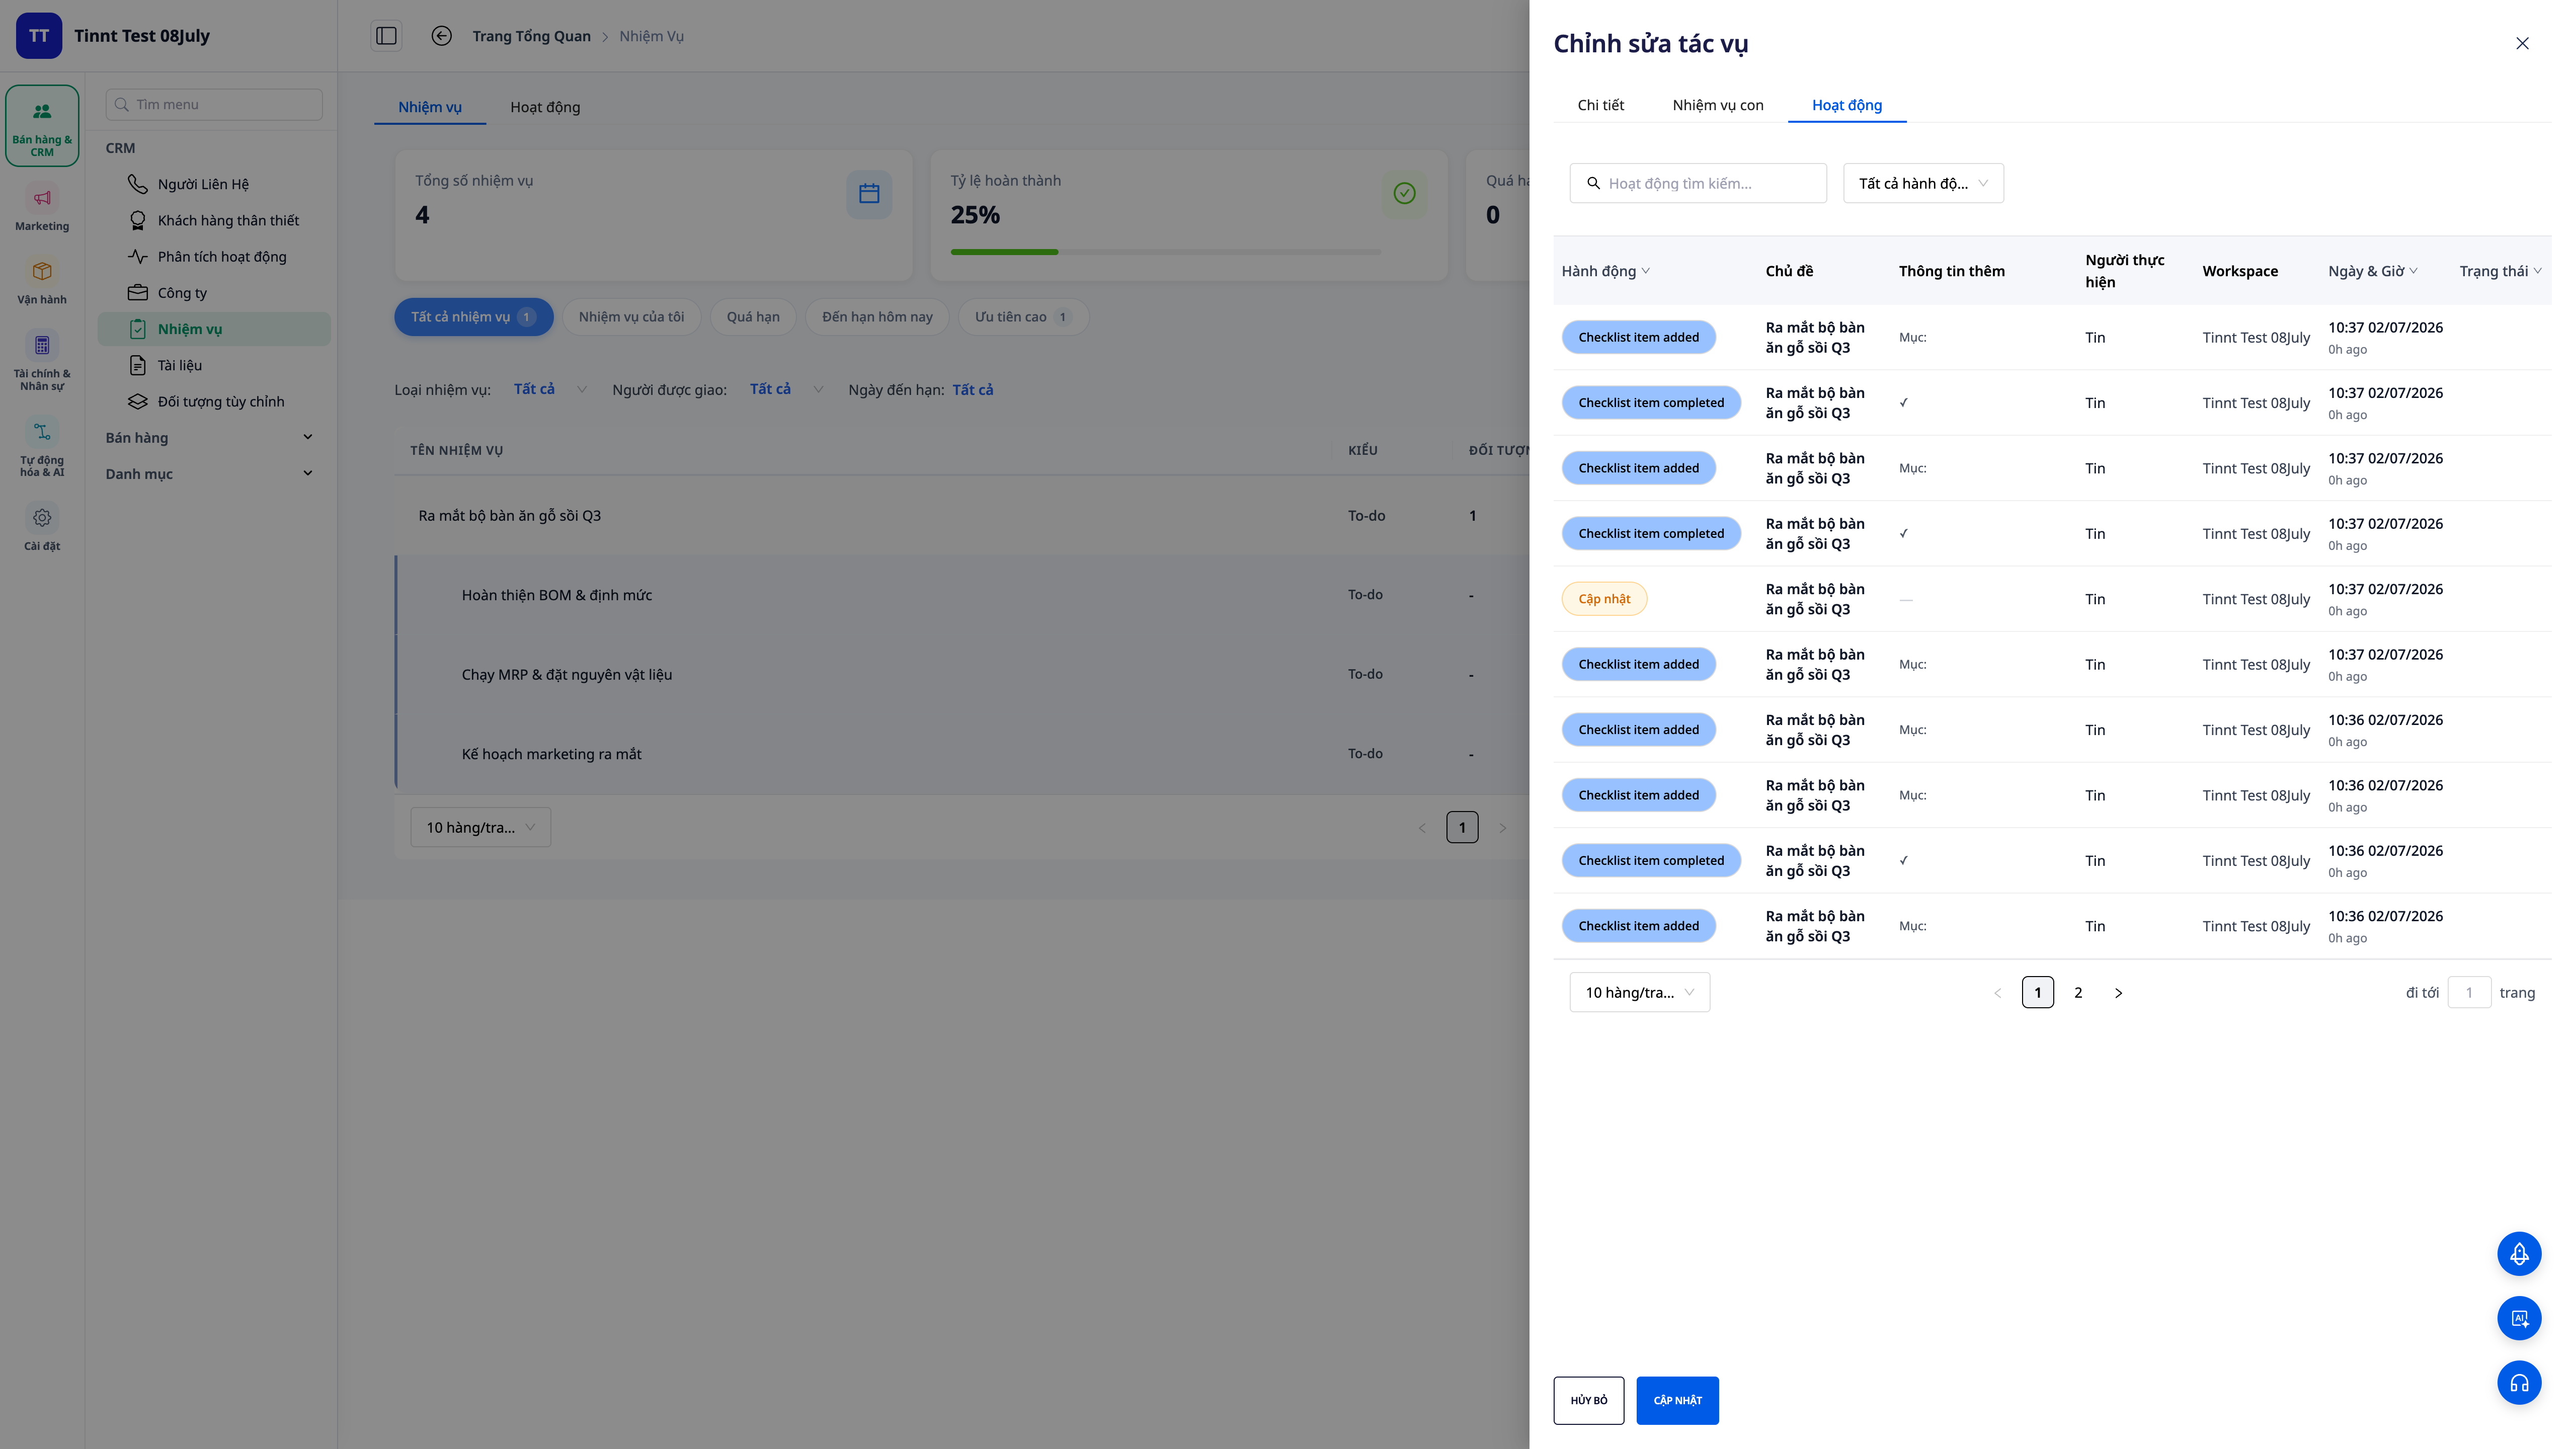
Step 9 — Monitor the developments in Activity 360
- Open the Activity 360 tab of the job.
✅ Expected outcome : An easy-to-read timeline showing everything that happened around the task (created, updated, completed, linked, commented on) — who did what, and when.
Step 10 — Enable task automation
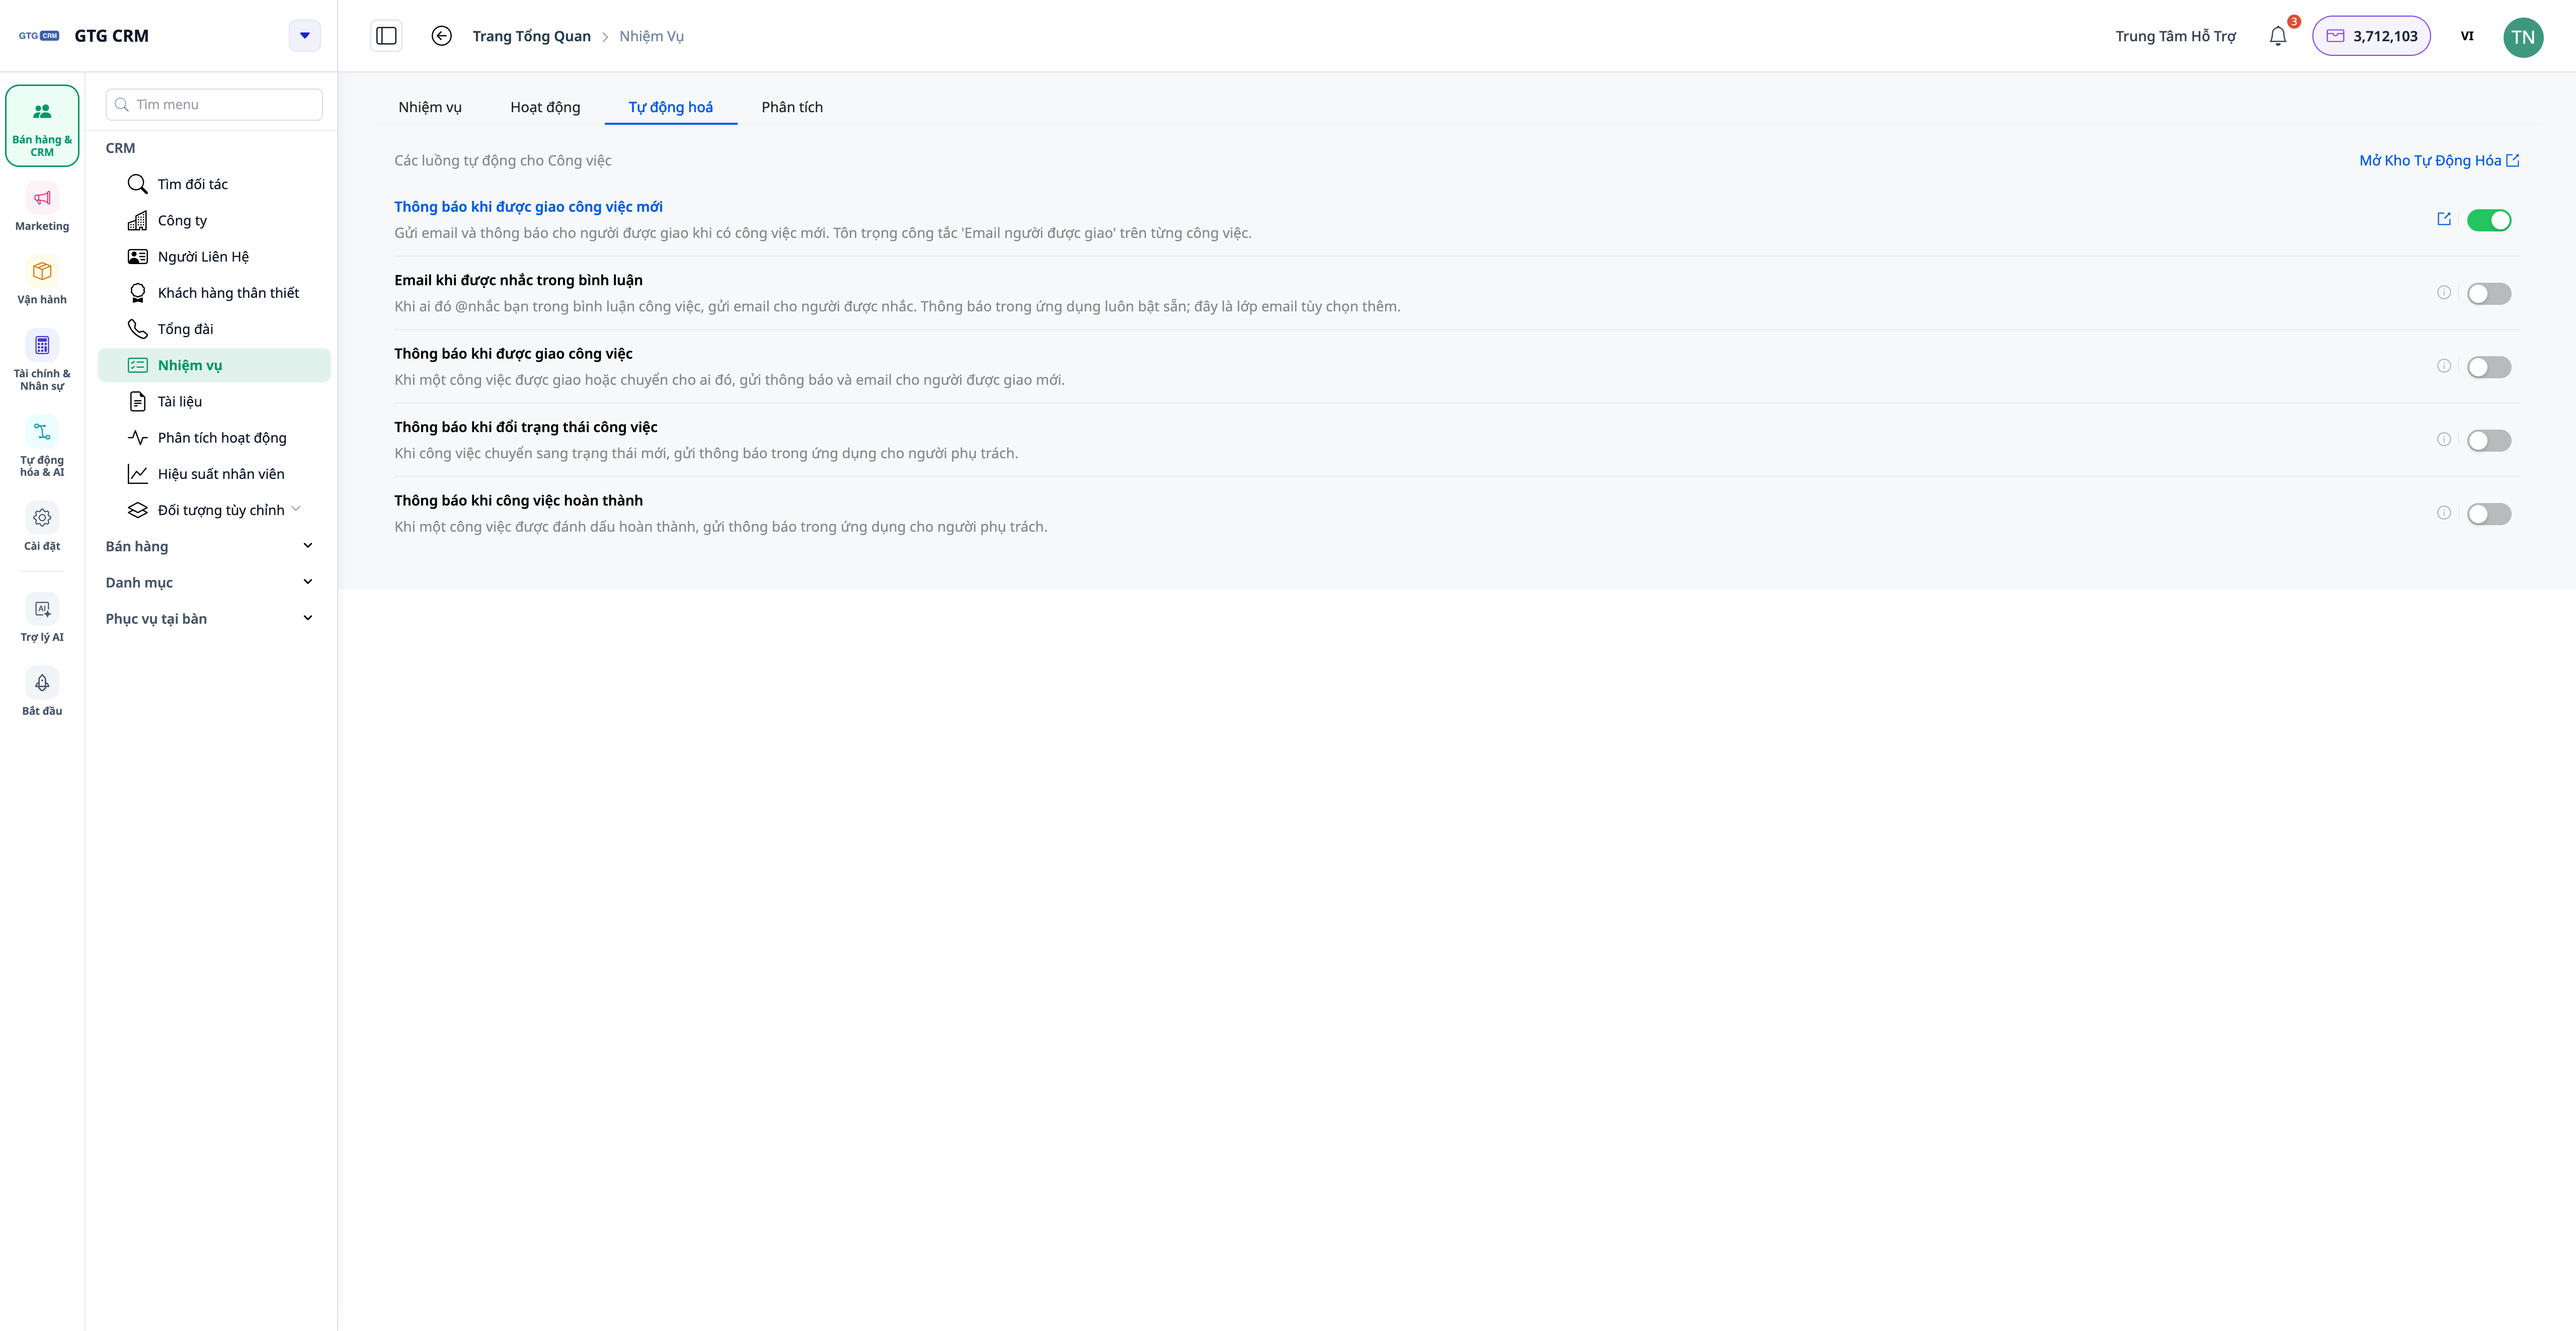
- In the Tasks menu, open the Automation tab (or go to the Automation repository , Tasks cluster).
- Enable appropriate scenarios: notifications when a new task is assigned , when the task changes status , when a task is completed , and emails when mentioned in comments .
✅ Expected outcome : Relevant notifications are sent automatically; when name-mentioning emails are enabled, the person being @mentioned receives additional emails beyond in-app notifications.
Quick lookup table for expected results
Open the Tasks list — Tasks are color-coded by status/deadline; the "Today" tab groups tasks that need to be processed.
Create task + checklist + approvers — Task with checklist, multiple approvers, start time, involved people
Attach from Library / Internal Links — Attach files and internal links without uploading/pasting URLs.
Add subtasks — Progress of parent tasks accumulates automatically.
Attach related objects — Deals/Products/Orders/Invoices linked in both directions
Comment + @mention — Name highlighted in blue; the person being reminded receives notifications (and email if enabled).
Task completed — Completion time recorded by the system
Open the Analysis tab — Volume by individual + completed trend
Open Activity 360 — Timeline of task progress
Enable automation — Task assignment/status change/completion notifications + email reminders
Note
- The sub-tasks support a maximum of two levels — enough to break them down without getting complicated.
- The progress of the parent task is automatically accumulated from the child tasks — adjust the status of the child tasks, do not manually adjust the percentage of the parent task.
- The reviewer may be multiple people ; the person making the report remains the same.
- Email when mentioned is an on/off option for the entire workspace; in-app notifications are always sent to the person @mentioned.
- Attachments from the Library retrieve files within the entire workspace; internal links only suggest published websites/landing pages/articles.
- Automation can still create/assign tasks to you as before (for example, when a deal transitions to a new phase).