What you'll be able to do after this guide
Someone asks you: Which goods issue slip is this invoice sold against? Which goods receipt does this purchase receipt match? Which invoice did this bank payment settle? The Link Documents screen gathers the answers into one list. Each row is two documents that belong together, for example: a goods receipt and its purchase order, a goods issue and the invoice sold against it, or a bank transaction and the invoice it paid. Instead of opening purchase orders, stock slips, and bank transactions one by one to find the matching pair, you open this one screen.
This guide starts with your first visit, when the list is empty and the screen only tells you what to do first. It then covers what the list looks like once it has rows, how to find a document, and what to do when the screen won't load or you don't have permission to view it. The steps are: open the screen → read and click the suggested first action → read the list → search and filter → know what to do if it won't load.
Good to know before you start
- This screen used to be called Document Reconciliation. It is now called Link Documents, so it isn't confused with matching bank statement lines against your books, which is still called reconciliation under Bank Payments. The page address hasn't changed, so any bookmark you saved still works.
- You read the list here. Links are created by work you do in other screens: receiving goods against a purchase order, issuing goods against a sales order, and matching bank transactions to invoices.
Before you start
| # | Requirement | Why it matters |
|---|---|---|
| 1 | Your account has the View Journal Entries or View Financial Reports permission. | These two permissions open the list. If you have neither, you see You don't have access to this page (step 5). |
| 2 | At least one action that creates a first link: receiving goods against a purchase order, issuing goods against a sales order, or matching a bank transaction to an invoice. | The list has rows once these actions, or similar ones, have happened. The screen only shows buttons for the actions you have permission to do (step 2). |
| 3 | To match bank transactions: a bank account connected under Bank Payments. | Without a connected account, the Bank Payments screen shows Connect your bank with a Connect Bank button. |
Step 1: Open the screen and read it when there are no links yet
- Go to Finance & HR → Accounting → Link Documents.
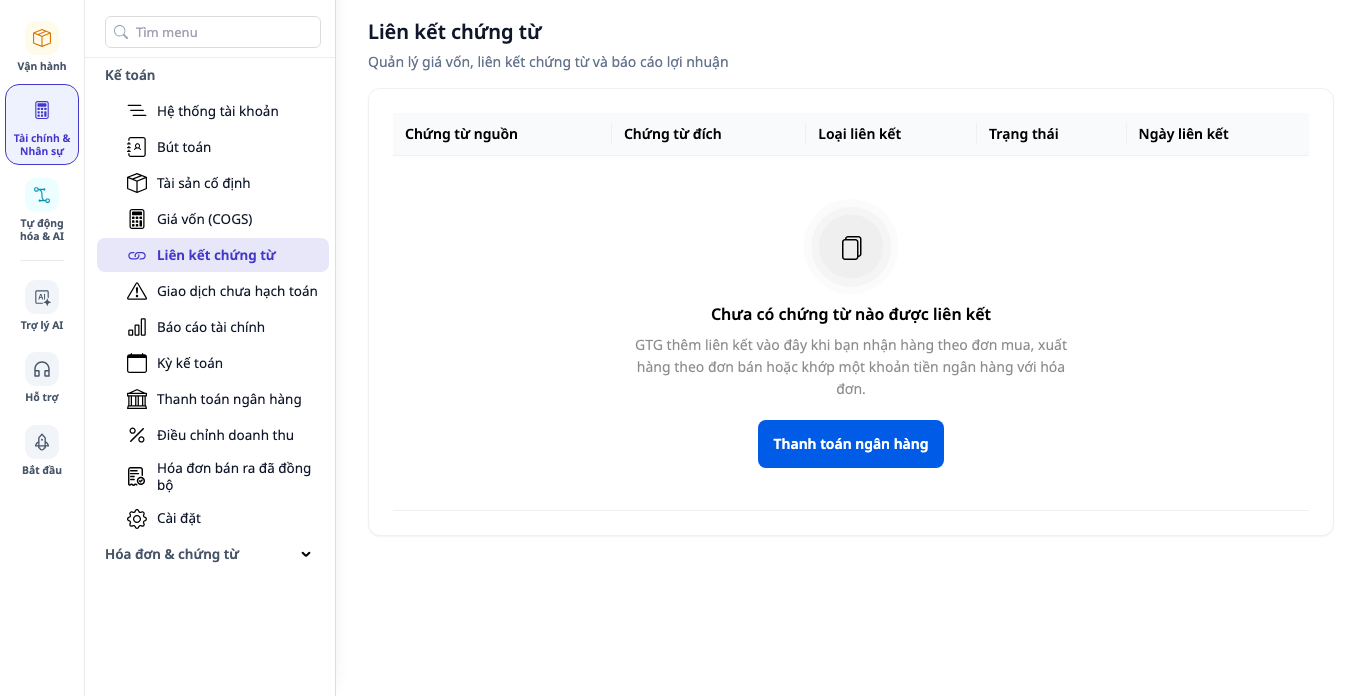
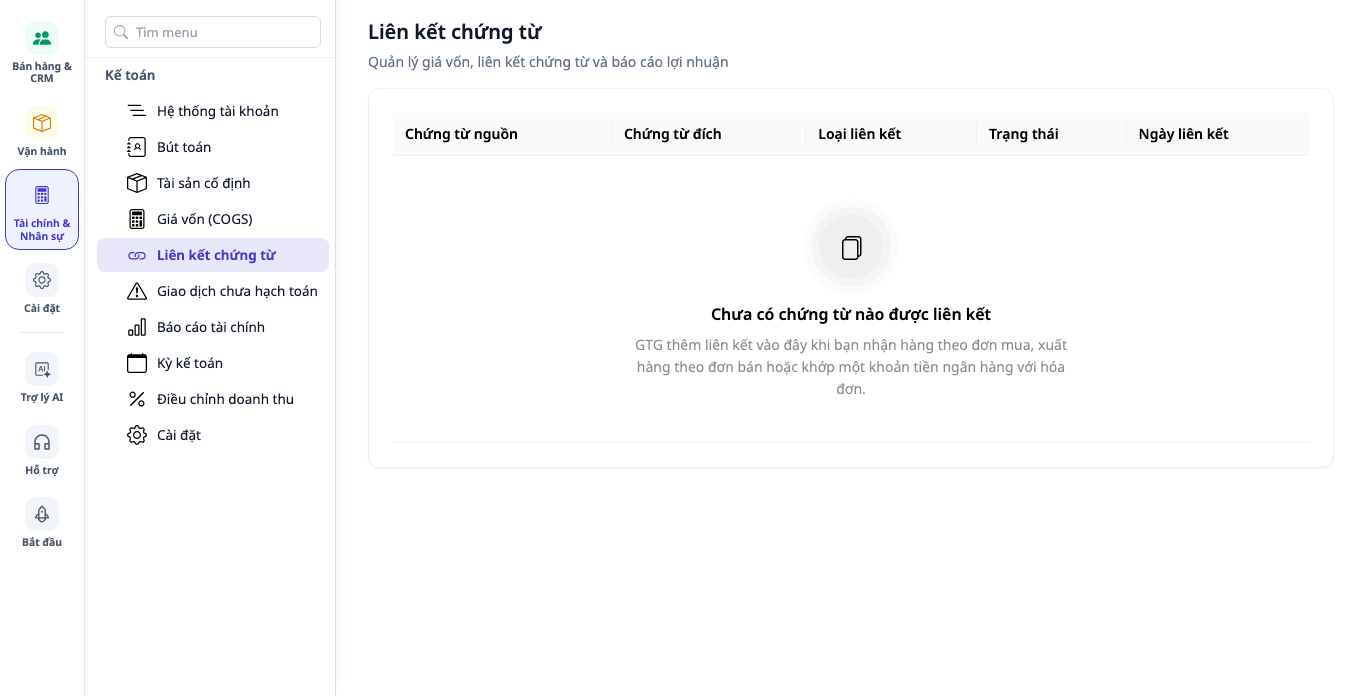
- Wait for the list to finish loading. While it loads, you see a spinner. The message No documents have been linked yet appears only after loading is complete, not while the list is still loading.
- Read from top to bottom: the column headers (Source Document, Target Document, Link Type, Status, Link Date), then the heading No documents have been linked yet and a sentence: GTG adds links here when you receive goods against a purchase order, issue goods against a sales order, or match a bank payment to an invoice.
✅ Expected result: the page title and the menu both say Link Documents. There is no search box, no filter, and no three count boxes yet, because there is nothing to search or count. Below the explanation is a suggested first action button. The screenshot below shows what an Accounting user sees by default: only one button, Bank Payments. The button you see depends on what you have permission to do (step 2).
Step 2: Click the suggested first action
Buttons you don't have permission to use are hidden, not greyed out.
| You can | Primary button | Row Also starts from: |
|---|---|---|
| Create goods receipts | Goods Receipt | Links to Goods Issue and Bank Payment, if you also have access to them |
| Create goods issues, but not goods receipts | Goods Issue | Links to Bank Payment, if you have access to it |
| Have View Payment Orders and Reconcile Bank Transactions permissions, but no warehouse permissions | Bank Payment | None |
| Have none of the above permissions (for example, view-only) | No button, only an explanatory message | None |
Workspace owners see all three paths. Users in the Accounting group see only one button by default, Bank Payment (see image in step 1). View-only users see the same explanatory message but no buttons, as shown below.
- Click the primary button. To use another path, go back and click the link in the Also starts from: row.
- Work on the screen that opens. For example, in Operations → Commerce → Warehouse Management → Goods Receipt, open a draft from a confirmed purchase order, click Confirm Receipt, then answer Confirm in the confirmation dialog.
- Return to Document Links.
✅ Expected result: each button opens the screen named on it. If the workspace has not connected a bank, the Bank Payment screen opens with Connect your bank and a Connect Bank button. That is handled on that screen; complete it and then return.
Step 3: Reading the list once links exist
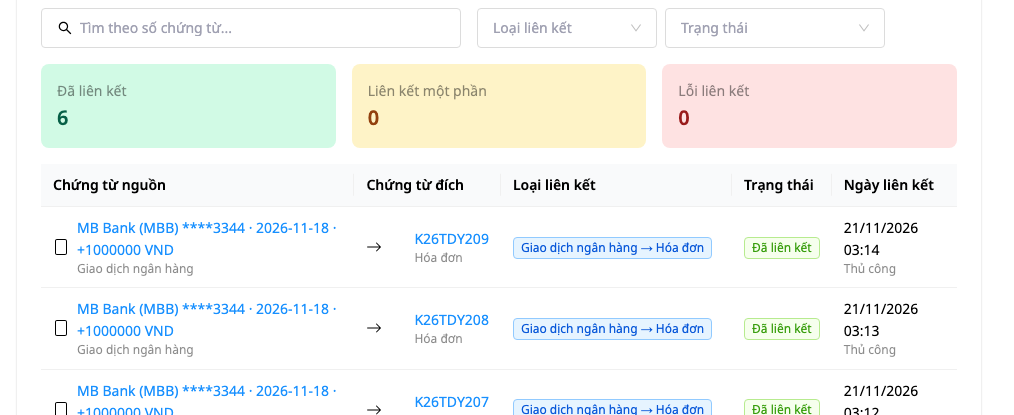
- Reopen Document Links once links exist. For example, after a warehouse clerk confirms a goods receipt that received only part of a purchase order's items, the table shows a row PO → Receipt with status Partially Linked, marked Automatic (if the full quantity of the purchase order is received, the status becomes Linked). In the image below, the workspace has matched 6 bank transactions with 6 invoices: each row is Bank Transaction → Invoice with status Linked, and below the link date is the word Manual.
- Read from top to bottom. On desktop, the header area at the top lists four questions this screen helps you answer: Which shipment does this invoice belong to? Which warehouse transaction does this cost come from? Where is the cost of goods sold calculated from? Is there a gap between purchase, receipt, and sale? (This panel is not shown on mobile.) The image at the end of this step and the image at the end of step 5 start from the search box, so that panel is not included in them.
- Next comes the search box Search by document number..., two filters Link Type and Status, three counters Linked, Partially Linked, and Link Error, and the table. At the bottom of the table is the total row count (the image below covers from the search box down to the first rows of the table, not to the end of the table).
✅ Expected result: in a new workspace that has only one just-confirmed goods receipt (not attached to a supplier invoice) and has received only part of a purchase order's items, the three counters show 0, 1, and 0, and the bottom of the table reads Total: 1. In the image below, the three counters show 6, 0, and 0. The empty screen from step 1 is gone.
Step 4: Search for one document, filter by type or status
- Type a document number into the Search by document number... box.
- Open the Link type box or the Status box (Linked, Partially linked, Link error) and select a value.
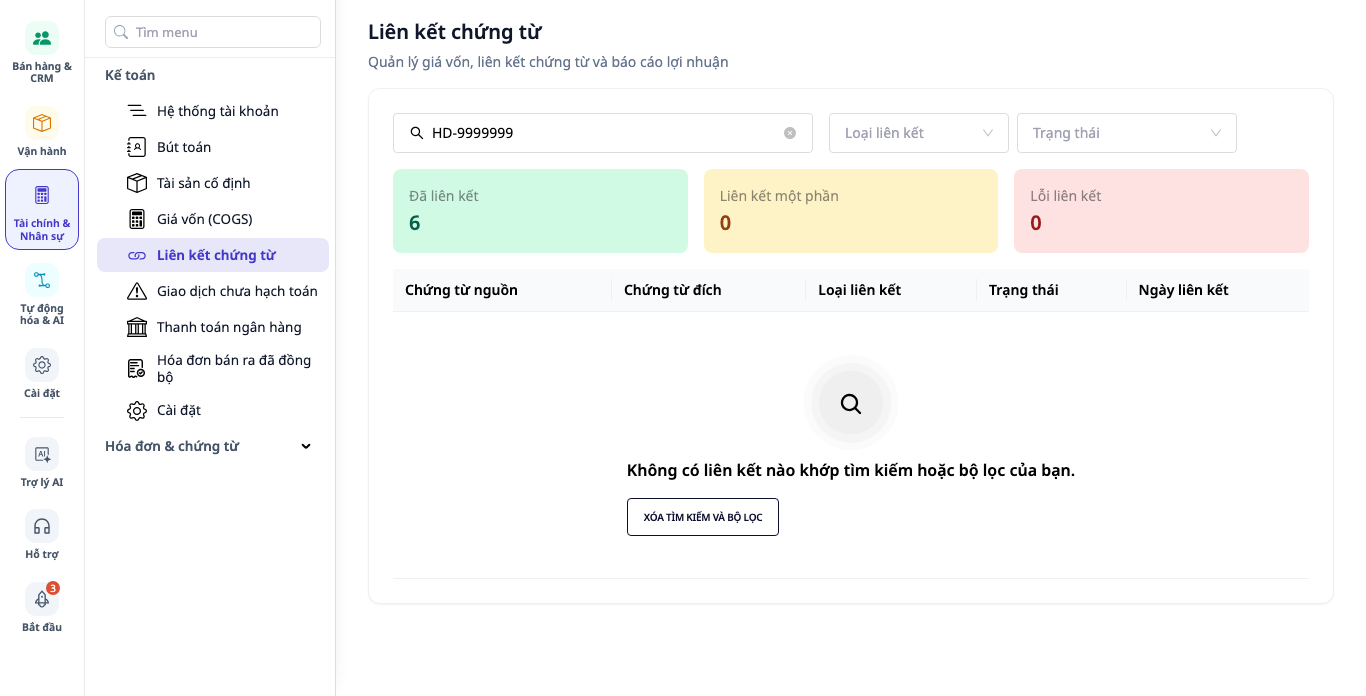
- Try typing a document number that does not exist.
✅ Expected result: you see No links match your search or filters. with a Clear search and filters button. The search box, the two filter boxes, and the three counters stay in place so you can adjust your search. The four-question panel is hidden when there are no rows to show and reappears when the list has rows. The button is shown in all caps. Clicking it brings the list back. A filter that returns no rows always shows this message, never a loading error.
Step 5: When the screen fails to load or you lack permission
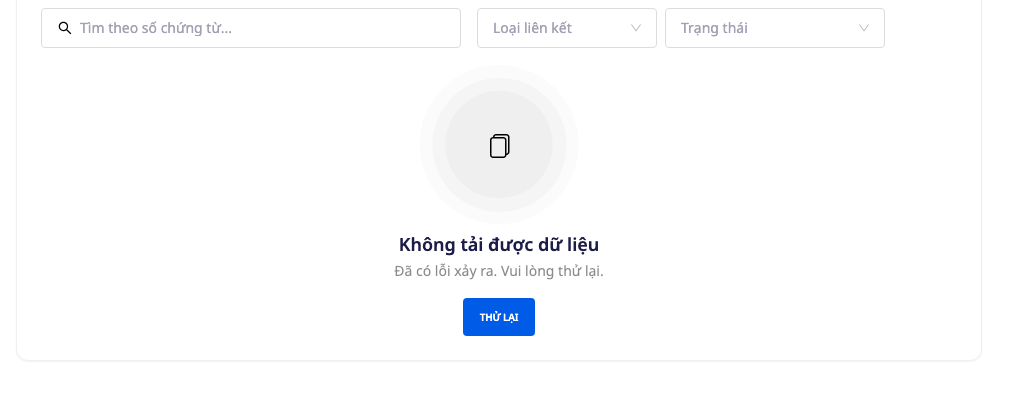
- Load failure: you see Unable to load data, the message An error occurred. Please try again., and a Retry button (shown in all caps). The three counters do not show 0, and the message No documents have been linked yet does not appear, because a loading error does not mean the list is empty. Click Retry. The image below shows the screen during a load failure.
- No permission: you see You cannot access this page and Ask the workspace owner to grant you access. There is no Retry button, because retrying cannot change your permissions.
✅ Expected result: each situation shows its own distinct message, and none of them looks like the empty screen from step 1.
Related areas
Linking a bank transaction from an invoice: amount exceeds the outstanding balance, and prepaid invoices
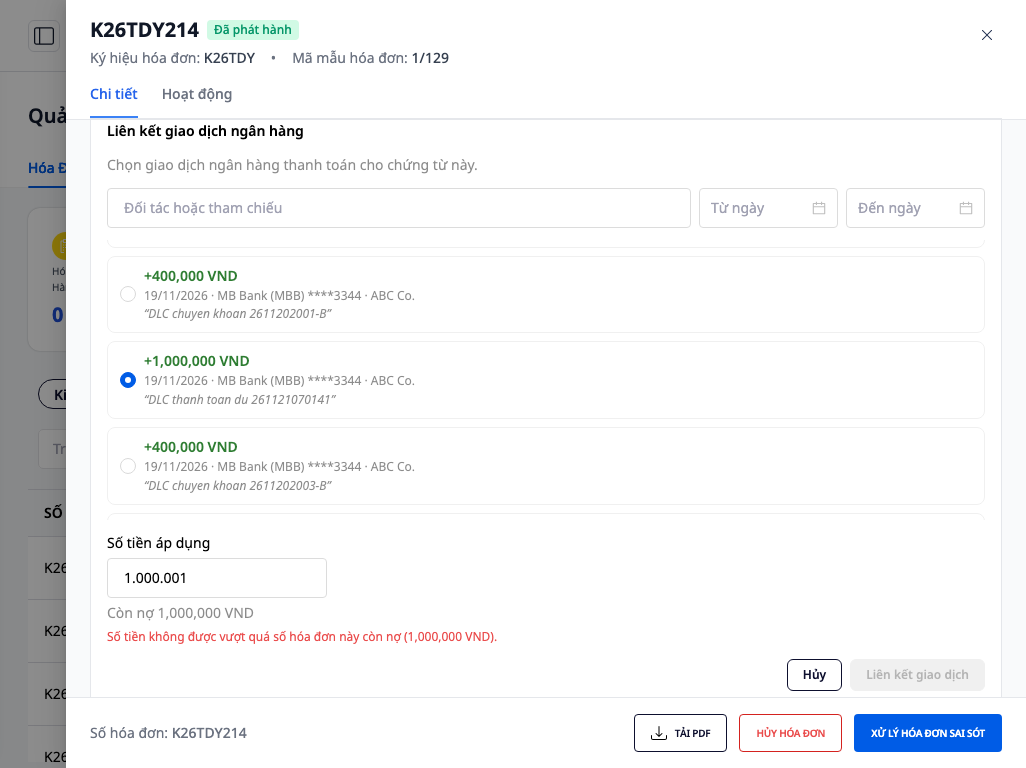
In the Amount received section of an invoice with an outstanding balance, click Link bank transaction, select an incoming money transaction, then click Link transaction. The Amount to apply field cannot exceed the outstanding balance. If you enter a larger amount, a red line appears right below the field: The amount cannot exceed the outstanding balance of this invoice (1,000,000 VND). The number in parentheses is the invoice's outstanding balance shown in the image. The Link transaction button is also disabled.
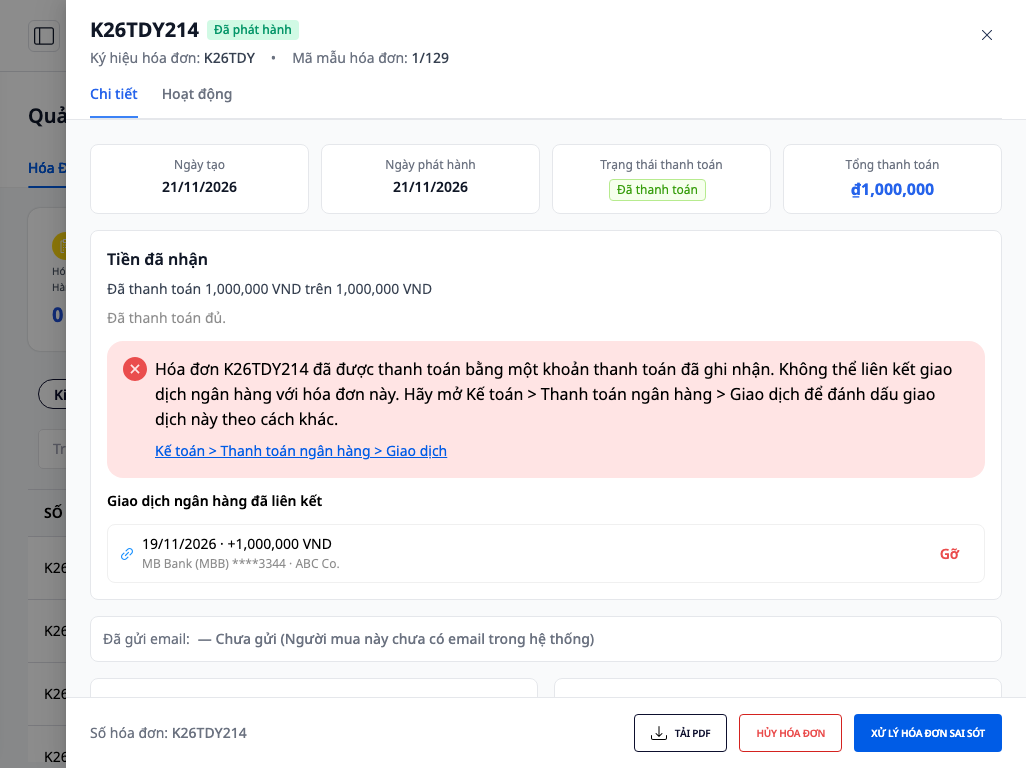
If in the meantime someone else fully paid the invoice in another tab, a red notice immediately appears in the section you're viewing: Invoice … has been paid in full by a recorded payment. The bank transaction cannot be linked to this invoice. Open Accounting > Bank Payments > Transactions to mark this transaction differently. Below that is the link Accounting > Bank Payments > Transactions, which opens the Transactions tab. The selection list closes automatically, and the transaction the other person just linked appears right below, with a Remove button. The steps for linking from the invoice side are in the E-Invoice Guide.
When the transaction selection list shows No unmatched incoming VND transactions. Check Accounting > Document Matching., the link at the end of the sentence opens the Document Matching screen described in this guide, so you can review the matched transactions. For how to match transactions from the bank side, see the Bank Reconciliation Guide.
From journal entry to the source screen
Go to Accounting → Journal Entries and open a posted journal entry. If you have the Create journal entry permission, you'll see the following in the footer of the detail panel (users with only the View journal entry permission won't see this footer):
- Journal entry from a bank transaction: the sentence This journal entry belongs to a bank transaction. Please unmatch that transaction. and the link Go to bank transaction. If your account uses the Bank Payments screen, the link opens the Transactions tab of that screen.
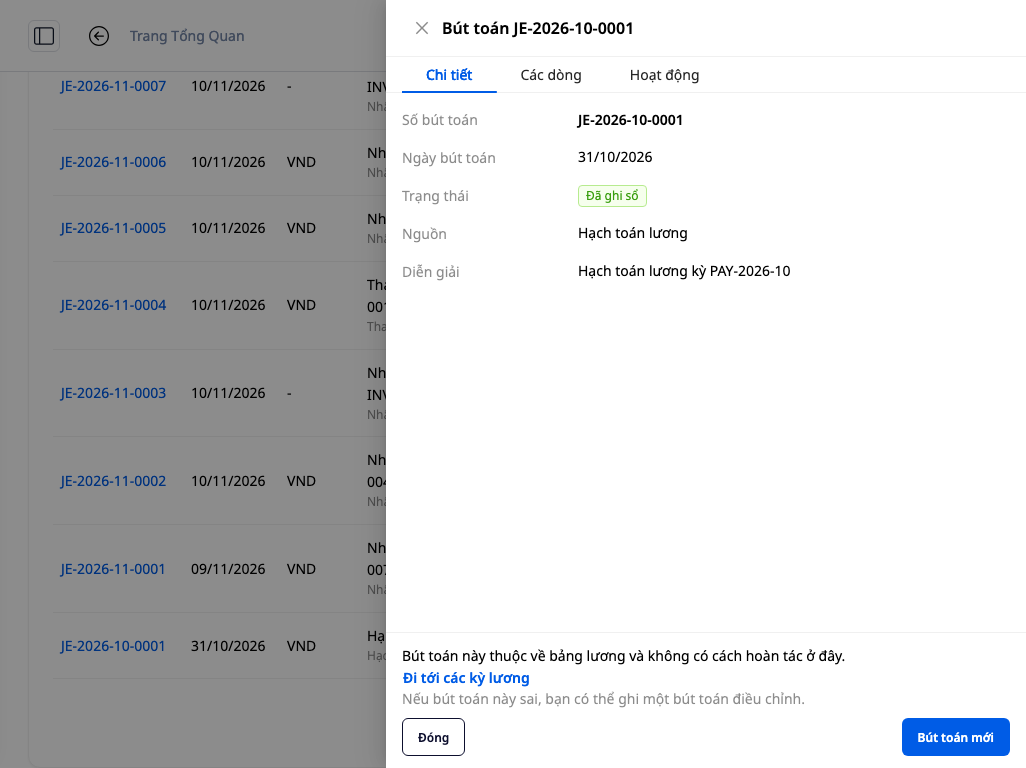
- Payroll journal entry: the explanatory text, a suggestion to create an adjusting entry, and a New journal entry button. The Go to payroll periods link only appears to users with the View payroll permission, and it opens the list of payroll periods, not a specific period.
The image below shows the detail panel of a payroll journal entry, opened by a user with the View payroll permission: the footer has the explanatory text, the Go to payroll periods link, a suggestion to create an adjusting entry, and a New journal entry button.
Quick reference for expected results
| Action | What you will see |
|---|---|
| Open Document Links when there are no links yet | The heading No documents linked yet, one explanatory sentence, and one button for the suggested first step. No search box, filter fields, or counters |
| Default Accounting group user | One button: Bank Payment |
| No permissions in the table in step 2 | Only the explanatory sentence, no buttons |
| Links already exist | The four-question panel (desktop only), a search box, two filter fields, three counters, and a Total: N line at the bottom of the table |
| Search or filter returns no rows | No links match… and a Clear search and filters button |
| Loading error | Data could not be loaded and a Retry button, with no zero counts |
| No permission to view the list | You do not have access to this page, with no Retry button |
| Enter an Amount to apply greater than the outstanding balance | A red line appears below the field, and the Link Transaction button is disabled |
| The invoice is paid before you click Link Transaction | A red notice in view, a link to Accounting > Bank Payment > Transactions, and the row linked by the other person has a Unlink button |
| Payroll journal entry footer | A Go to Payroll Periods link, visible only to users with the View Payroll Table permission |
Notes
- This list is for reference only: the columns have no edit or unlink buttons. To remove a transaction that has been matched to an invoice, click Unlink in the Payments Received section of the invoice, or click Unlink next to that transaction on the Transactions tab of Bank Payment.
- On mobile, the list appears as cards, with text wrapping fully and no horizontal scrolling. The four-question panel is only shown on desktop.
Next step: to link a bank transaction directly from an invoice, see E-Invoice Guide.