What you'll be able to do after this guide
Goods arrive at the warehouse: one carton is printed with a best-before date in March, another in September. If the goods receipt only records the product name, quantity, and price, then a few weeks later, standing in front of the shelf, nobody remembers which batch arrived first or which one is about to reach its expiry date. This guide shows you how to record the production date and expiry date when receiving goods in GTG CRM, so each date sits right on its product line instead of in someone's memory or on a sticky note. After you confirm the goods receipt, you only need to open one screen, Batches & expiry dates, to see which batches are Expiring soon and should be sold first. You won't have to dig through every carton or ask whoever received the goods that day.
You'll work with three places that have date fields: Purchase Orders, Goods Receipt Notes on the computer, and the Receive Goods screen in the Warehouse app (entered right at the warehouse).
Good to know
- The Production date and Expiry date fields are both optional, and neither requires the other. For goods without printed dates, leave the fields blank.
- On purchase orders and in the Warehouse app, dates are displayed in day/month/year format.
- Each place has its own date fields on its product line. On goods receipt notes and in the Warehouse app, enter the dates printed on the packaging when the goods arrive.
Don't have products in the system yet? See Product Hub: manage products and inventory. Want to know how goods receipt notes and supplier invoices are recorded in the ledger? See User Guide to the Accounting & E-Invoice Suite.
Before you start
| # | Requirement | Why it's needed |
|---|---|---|
| 1 | Your workspace has at least one supplier and one warehouse. | Purchase orders must select a supplier and receiving warehouse; goods receipt notes must select a destination warehouse. |
| 2 | Products already exist in the Product Hub. | Each product line is selected from your product list. |
| 3 | Your account has permission for the tasks you need to do (see the "Who can do what" section below). | Users without permission won't see the button, or will see it greyed out. |
| 4 | The goods or packaging are in sight when you record the dates. | Production and expiry dates are recorded according to the dates printed on the packaging. |
Step 1 — Create a purchase order and record dates for each line
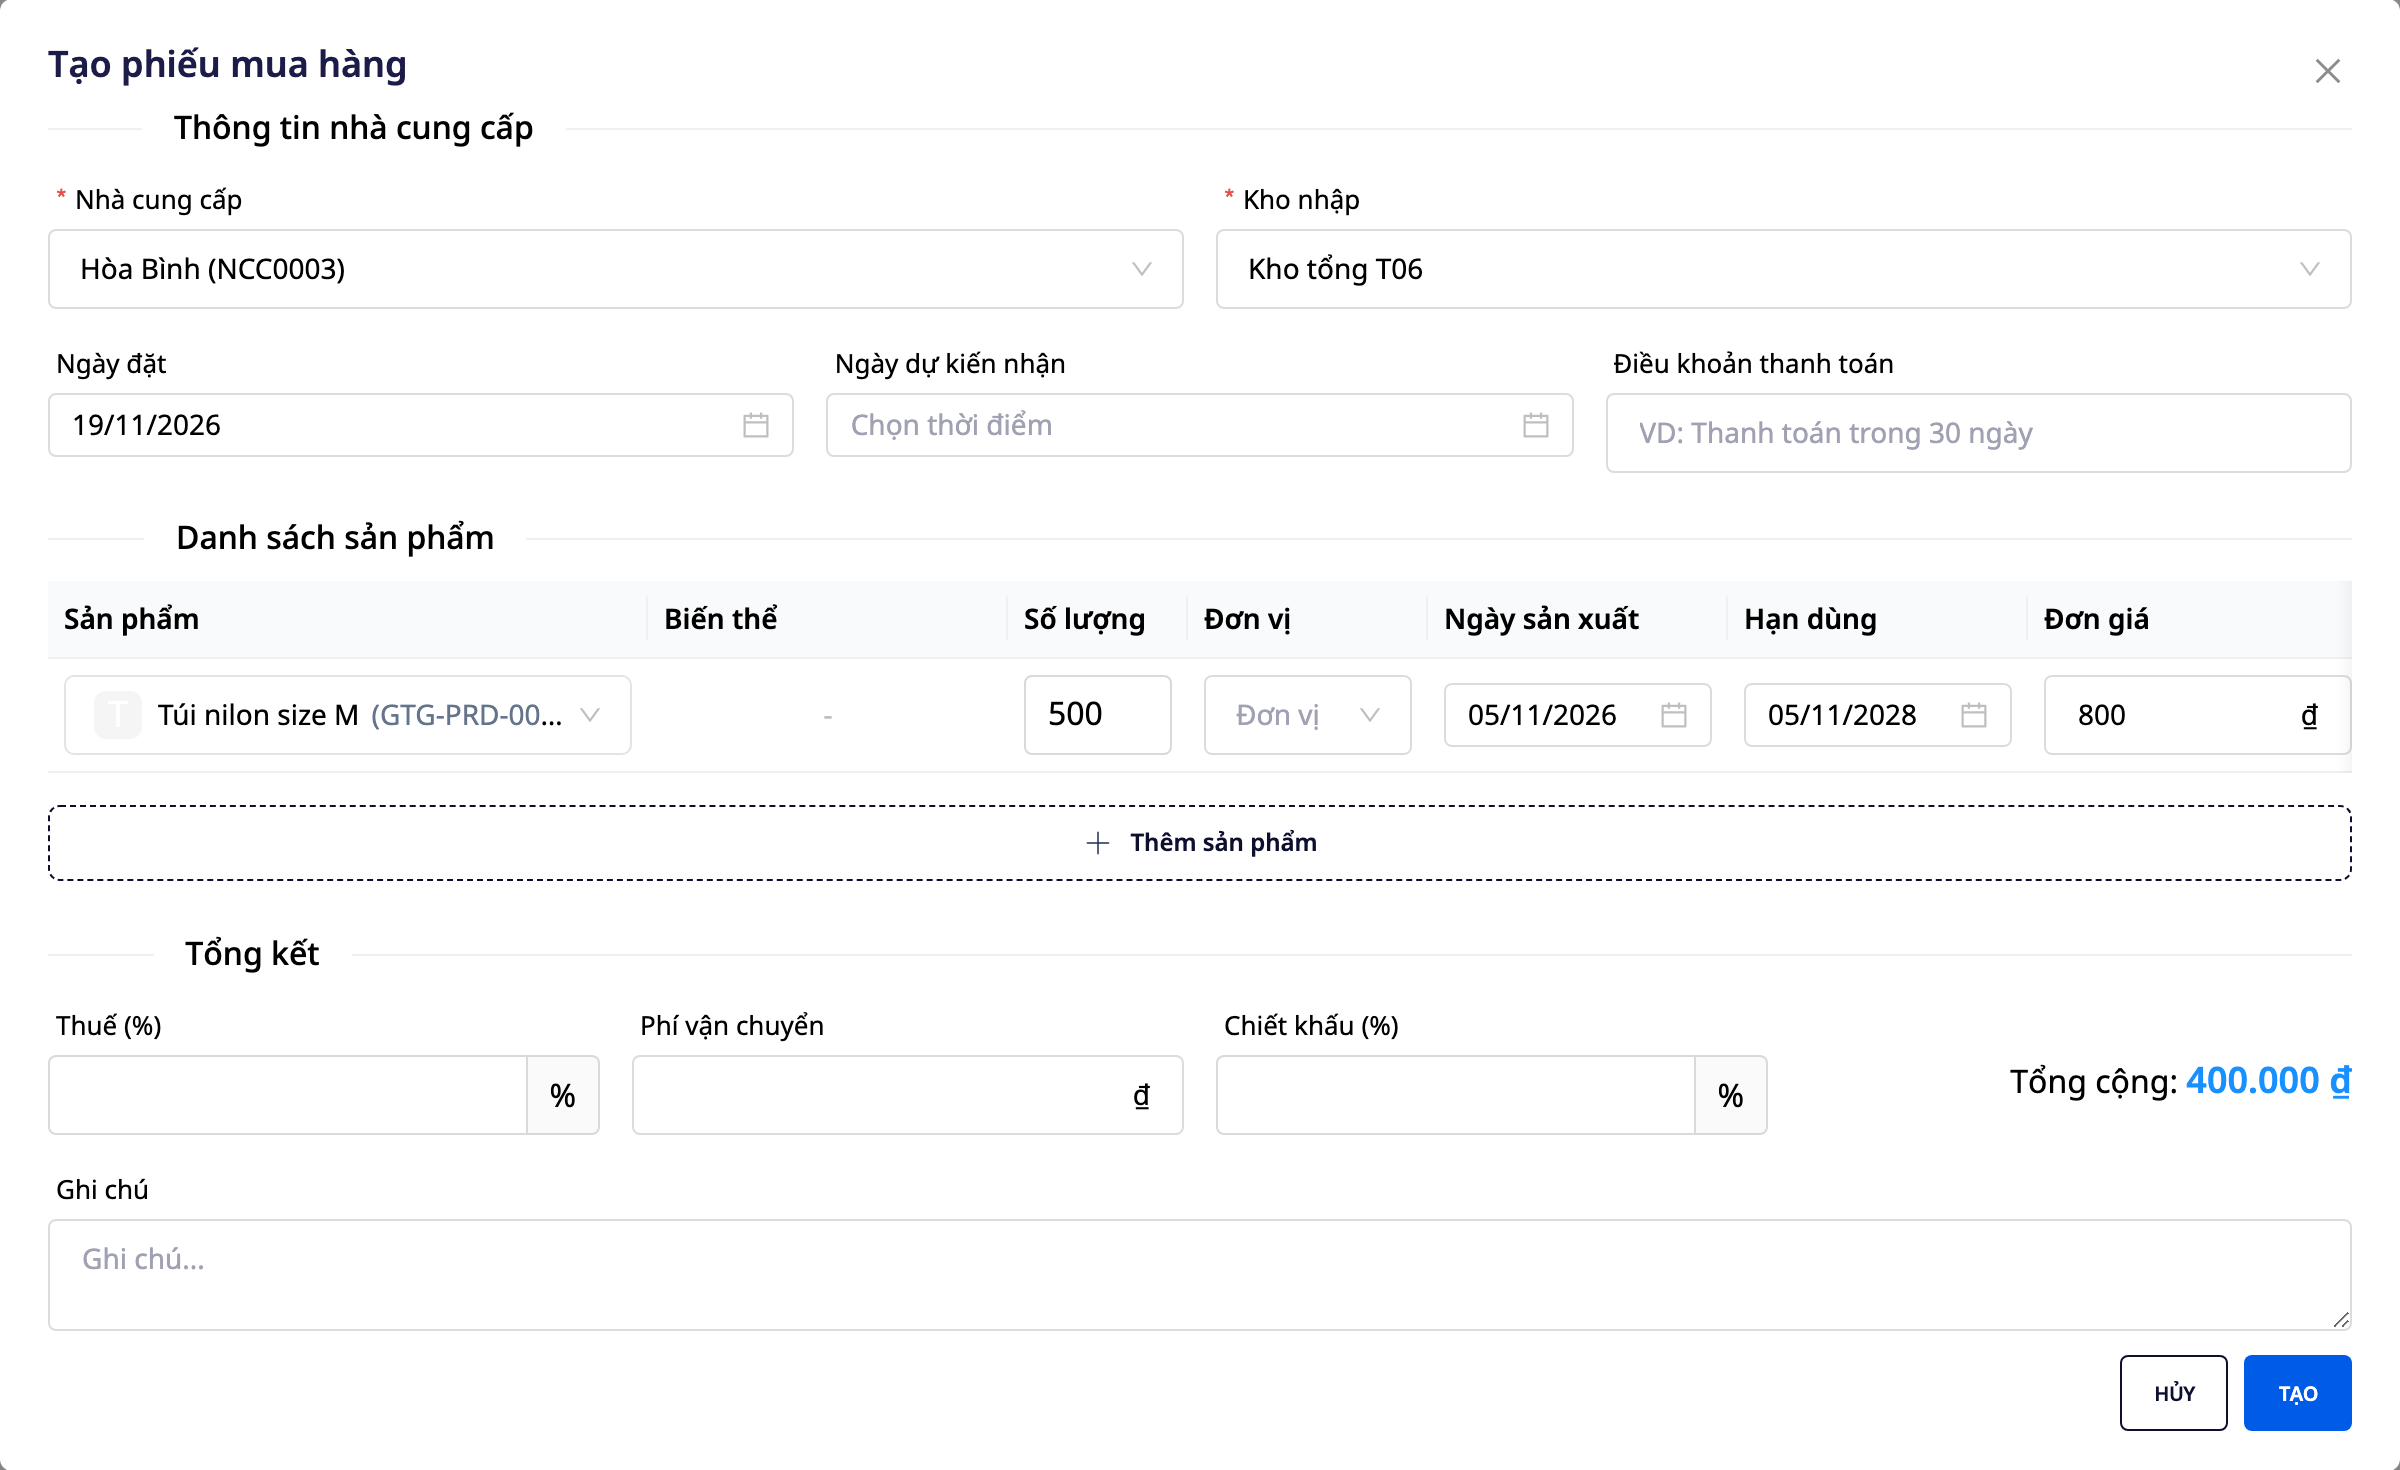
- Go to Operations → Warehouse Management → Purchase Orders and click Create Purchase Order.
- Select the Supplier and the Receiving Warehouse.
- In the Product List section, click Add Product. Each line has these fields: Product, Variant, Quantity, Unit, Production Date, Expiry Date, and Unit Price.
- Open the Unit field and select the unit for that line. The list contains the units set up in your workspace, for example Piece, Box, Dozen, Pair, Set, Meter. If the list fails to load, the field will say Unable to load the unit list. Close the list and reopen it to try again. Close the list and reopen it. The lines you've already entered will still be there.
- If you know the dates for that line, select the Production Date and/or Expiry Date. If you don't know them yet, leave them blank.
- Enter the Unit Price (if it's blank or 0, the order won't be created), then click Create.
✅ Expected result: The new order appears in the Pending tab of the Purchase Orders list.
Step 2 — Review the dates for each line in the purchase order
- In the Purchase Orders list, click the order to open the Purchase Order Details panel.
- Under Product List, check the Production Date and Expiry Date columns for each line.
- When the lines are correct, click Confirm at the bottom of the panel and answer Yes. The order moves to Confirmed, and the Create Goods Receipt button appears at the bottom of the panel.
✅ Expected result: each line shows its date in DD/MM/YYYY format. Lines without a date show "-". The Unit Price and Total columns are only visible to users who are allowed to view prices.
💡 Tip: the Edit button only appears while the order is still Pending. If a date is wrong, fix it before confirming.

Step 3 — Create the goods receipt and record the printed dates on the actual goods
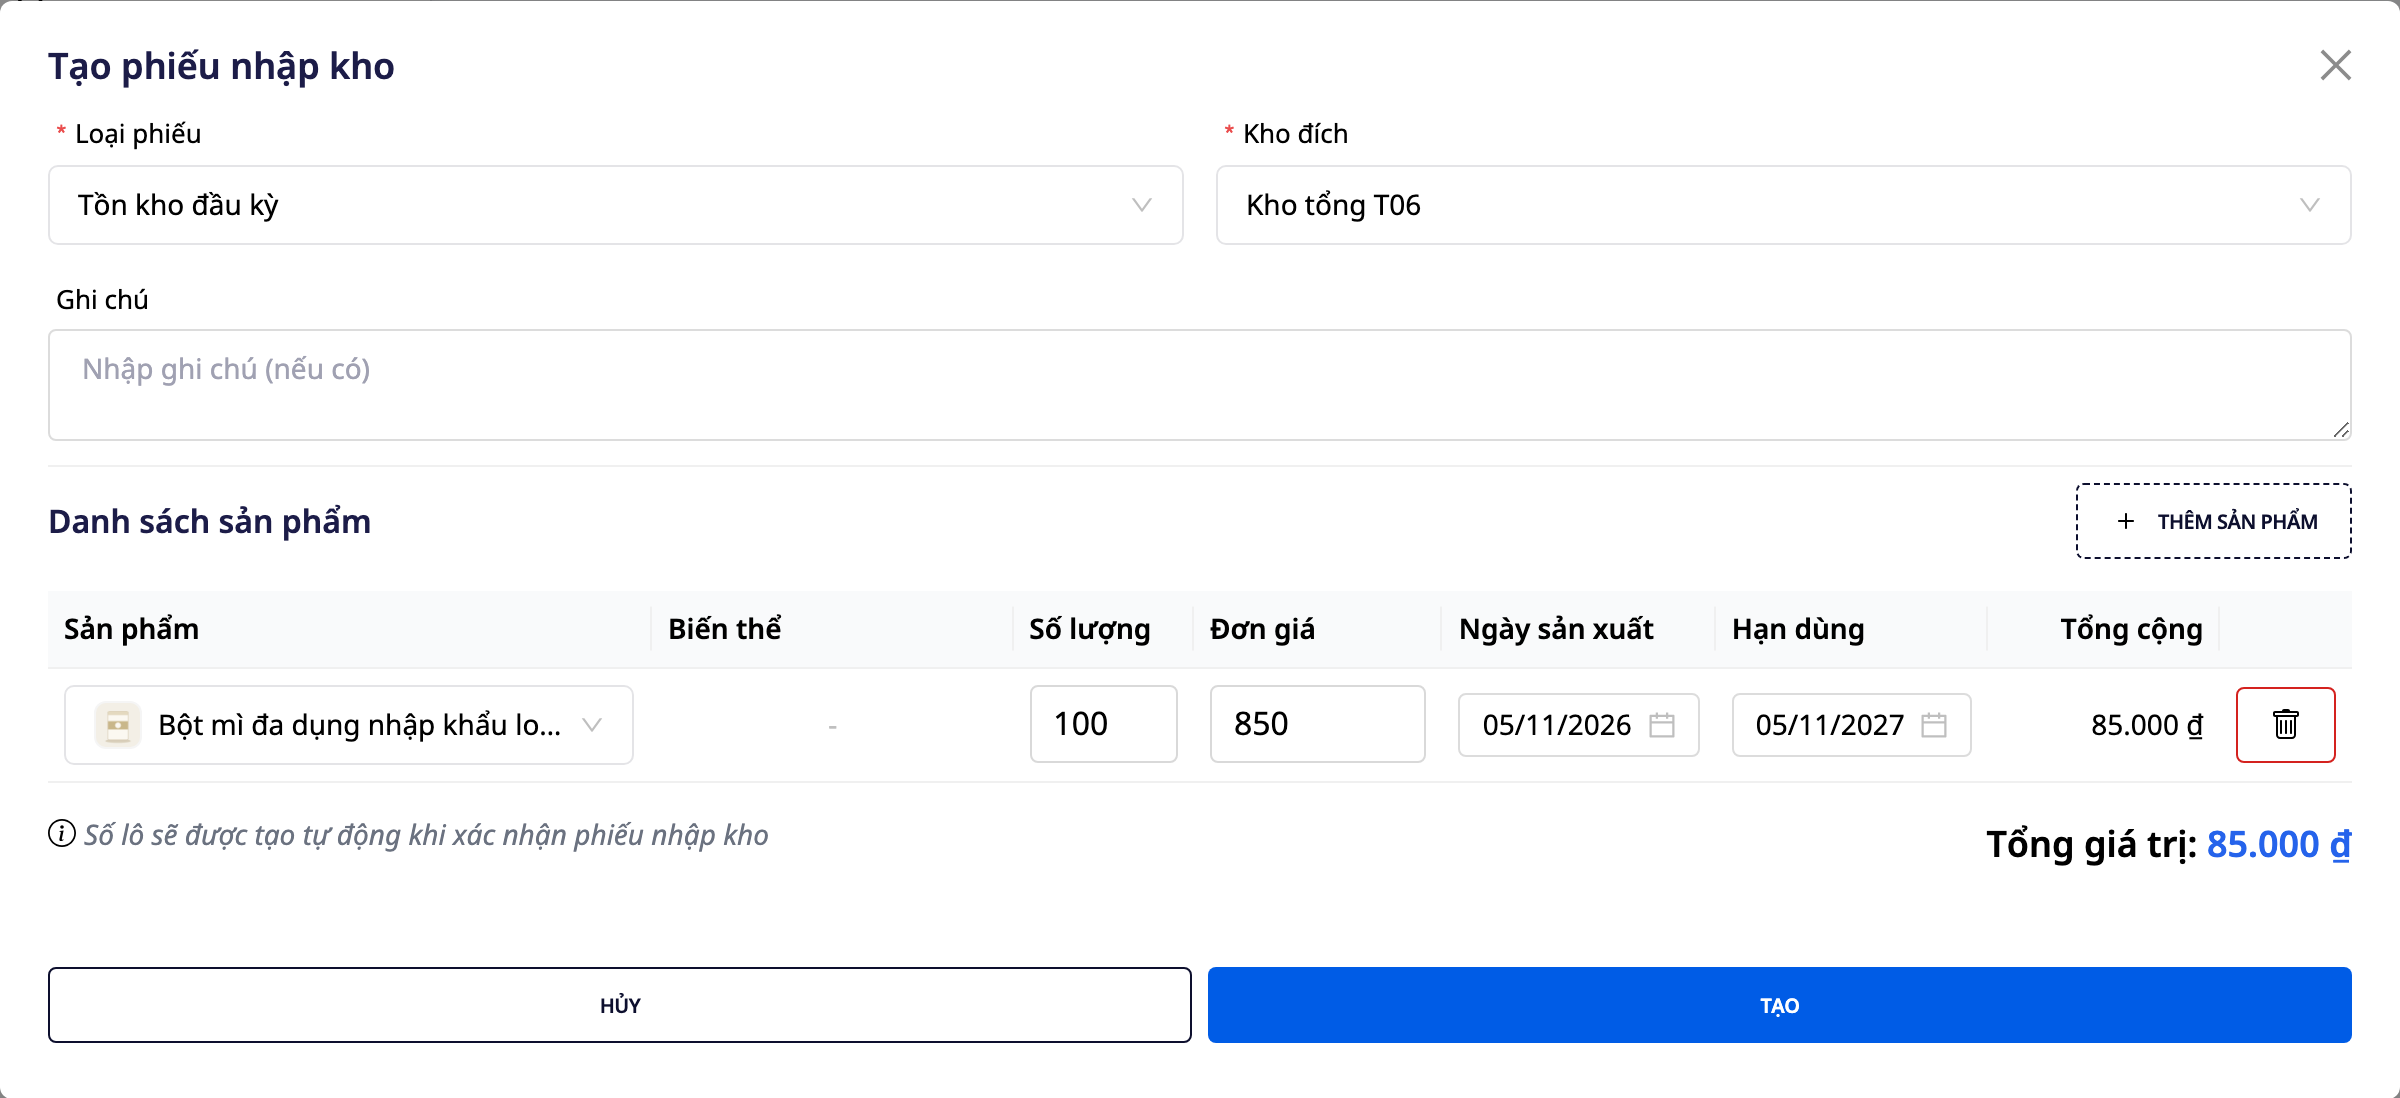
- Go to Operations → Warehouse Management → Goods Receipts and click Create Goods Receipt. You can also open a confirmed purchase order and click Create Goods Receipt at the bottom of the details panel. The goods receipt opens with that purchase order already selected.
- Keep Receipt Type as Purchase, select Purchase Order (the field reads Select an order to automatically load products), and check the Destination Warehouse field. The products from the purchase order are automatically loaded into the Product List table.
- In the table, each line shows the product name and its gray SKU code beside it. Long names are truncated with "…"; hover over the name to read the full text. The Product column has a fixed width, so Quantity, Unit Price, Production Date, Expiry Date and Total stay on the same row. On narrow screens, the table scrolls horizontally within its container.
- Adjust the Quantity to match the goods actually received. The production and expiry dates you recorded on the purchase order are pre-filled on each line (lines with no dates on the purchase order are left blank). For each line, select the Production Date and Expiry Date again based on the dates printed on the packaging of the actual batch received. The Production Date calendar grays out future dates, so you can only select today or earlier.
- Click Create, open the new receipt, and click Confirm. A note below the table reads: Batch numbers will be generated automatically when the goods receipt is confirmed.
✅ Expected result: the receipt moves from Pending to Confirmed, and the received quantity is added to the stock of the destination warehouse.
💡 Check which batches expire first: go to Operations → Warehouse Management → Inventory → Batches & Expiry. Each batch shows its Batch No., Production Date, Expiry Date and Status (Valid, Expiring Soon, Expired), so you can see at a glance which batches to sell first. This screen requires permission to view batches or view warehouse.
Step 4 — Receive goods right at the warehouse using the Warehouse app
- Open the Warehouse app at wms.gtgcrm.com, log in, and select Warehouse in the top bar.
- Click Receive goods. Under Voucher type, select From purchase order, then choose the Purchase order you want to receive.
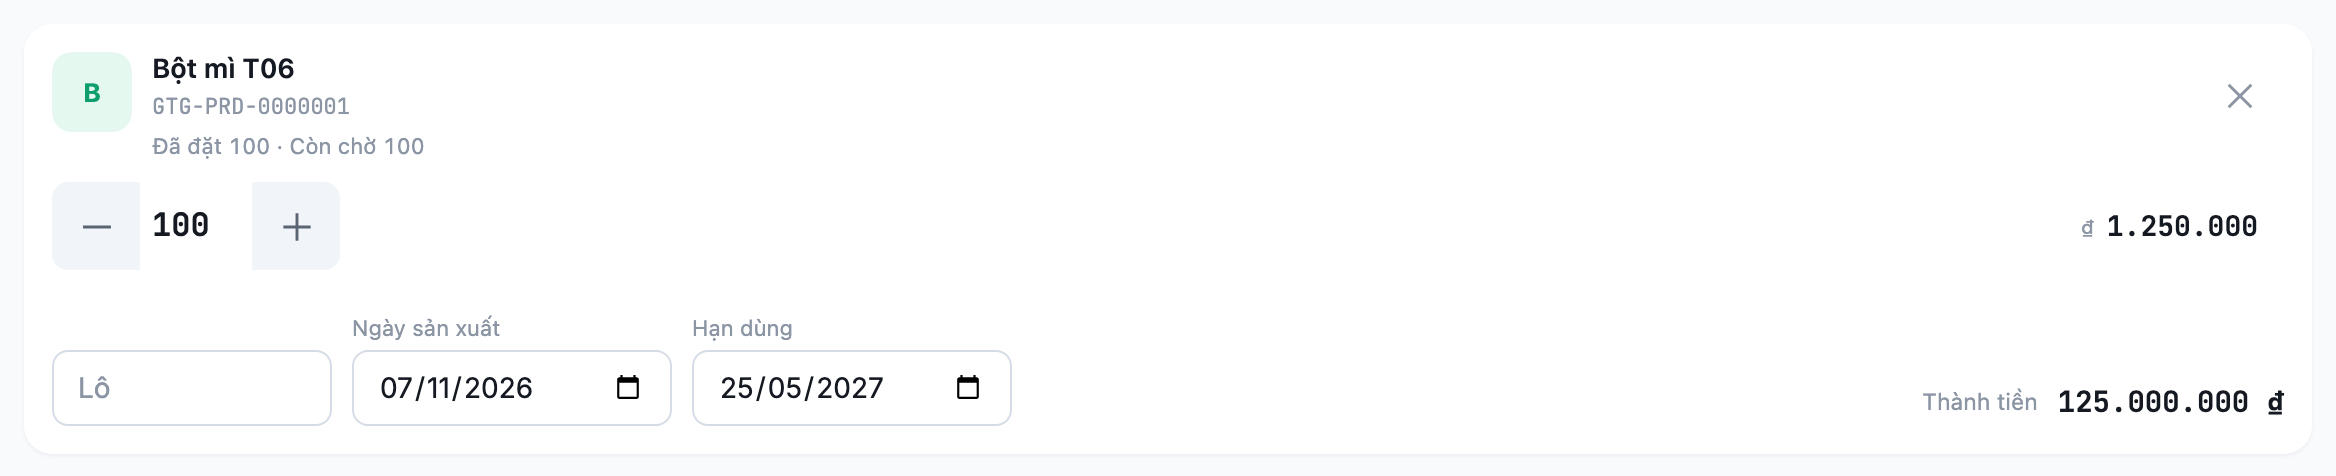
- Each row has a Lot field and two date fields, Manufacturing date and Expiry date. Each date field has a label written directly above it (format dd/mm/yyyy). Each row also shows Line total. On wide screens, the fields sit in a single row; on narrower screens, they stack on top of each other.
- Enter the lot number if the item has one, enter both dates as printed on the packaging (if printed), then click Confirm receipt.
✅ Expected result: you can tell which field is Manufacturing date and which is Expiry date from the labels.
Who can do what
| Task | Required permission | Good to know |
|---|---|---|
| View a purchase order and the date of each line | View purchase orders | The Unit price and Line total columns only appear with the View purchase cost permission. |
| Create a purchase order and select a Unit for each line | Create purchase orders | The Unit field shows the list for anyone who can create or edit a purchase order, including purchasing staff. |
| Edit, confirm, or cancel a purchase order | Edit purchase orders | The Edit button only appears for users who can view prices. Users who can edit the order but cannot view prices will see the line To edit this order, ask someone who can view its prices. |
| Create a goods receipt voucher | Create goods receipt vouchers | Warehouse staff who cannot view prices can still receive goods against a purchase order: the Unit price field shows Taken from purchase order, and the Total field shows “—” until saved. |
| Receive goods in the Warehouse app | A warehouse role in the workspace | If the app shows No warehouse access, the account has no role in the selected workspace. A greyed-out voucher type means the account lacks permission for that type. In both cases, ask a workspace administrator to grant access. |
Quick reference for expected results
| Action | What you will see |
|---|---|
| Add a product in Create purchase order | Each row has Product, Variant, Quantity, Unit, Manufacturing date, Expiry date, Unit price |
| Open the Unit field | The workspace's unit list (Piece, Box, Dozen, Pair, Set, Meter...); if it fails to load, a message tells you to close and reopen it |
| Open a purchase order | The Manufacturing date and Expiry date columns show the date as DD/MM/YYYY or “-” |
| Product list of a goods receipt voucher | Name and SKU are grey; long names are truncated with “…” and shown in full on hover; Quantity through Total stay on one line |
| Receive goods → From purchase order in the Warehouse app | Each row has a Lot field, two labeled date fields, and Line total |
Notes
- Both date fields are optional: if a line item doesn't show a date, leave it blank.
- The dates you enter on the goods receipt note and in the Warehouse app reflect the actual goods. Before clicking Create (goods receipt note) or Confirm receipt (Warehouse app), check the two date fields on each line and correct any that don't match the packaging.
- Don't see the unit you need in the list? You can't add new units yourself at the moment. Please contact support to have it added to your workspace.
- When a supplier invoice is recorded as goods from a purchase order, the goods are posted to the ledger only once, whether the goods receipt note or the invoice comes first. For instructions, see the User Guide for the Accounting & E-Invoicing Suite.
Free trial — no credit card required.